A three-dimensional New Year's panel will complement ikebana much better than a banal poster
Both adults and children take more than one master class to create a truly incredible New Year's composition. And you can welcome 2018 with a homemade wall decoration. This could be a craft on canvas, where things that are not the most common in creativity are used as the main material. You can hang elegant collages, panels made of plasticine, panels depicting the Snow Maiden or Santa Claus, or perhaps the symbol of 2018, on the wall.
It all depends on your imagination, what materials are used for crafts - cereals, buttons, sparkles, old puzzles, etc.
New Year's panel for kindergarten
Often parents have to work hard and do something with their own hands for their children. These are the same decorative works for kindergarten; as for panels, every third master class is dedicated to them.
Or maybe you yourself work in a kindergarten, and you are faced with the task of making beautiful wall compositions? Then shake your head!
New Year's pasta panel
Why from pasta - yes, because pasta is wonderfully aged into shapes, beautifully painted, glued, and from pasta, like from a construction set, you can make anything you want.
A panel for the New Year made of pasta could look like this:
- Panel Snow Maiden . It is not necessary that the entire Snow Maiden should be made of pasta; you can decorate the fur coat with pasta, or the hat. Snowdrifts can be made of pasta, or a sleigh in which the Snow Maiden rides. Or the Snow Maiden will have two braids made of pasta.
- DIY Christmas panel . The Christmas panel is dedicated to the theme of the bright holiday of Christmas - it is a spruce, the star of Bethlehem and, of course, angels. If the panel is for children, then everything that is depicted should be understandable to children. Volumetric paper angels, a star made of shiny textured paper, snowdrifts made of cotton pads. Children themselves can make panels for Christmas from pasta - simple figures of angels are made from different types of pasta.
Pasta can be used as a central element or for auxiliary decoration (for example, a frame).
Of course, this is not all, but the simplest place where pasta can be used is snowflakes. For the youngest children, this is a feasible task - to make a simple panel with your own hands, where large snowflakes made of painted pasta adorn a plain canvas.
New Year's panel made of pine cones
A panel of pine cones is a more difficult job, since pine cones are not very easy to work with. By the way, you can make snow-white ones from simple pine cones, and all this with the help of simple whiteness. Well, already such white cones - you can use them wherever.
Cones for panels require certain processing before use. To prevent the panel from deforming when the temperature changes, the cones must be dipped in a warm adhesive solution for 30 seconds before starting work.
Floral panels and collages for the New Year made from pine cones:
- Herringbone . The composition can be large - Santa Claus, his granddaughter, animals. It is not necessary to make everything out of cones; it will be enough to just arrange the tops of the cones painted green in a herringbone pattern.
- Fantasy composition . To do this, you need to watch a master class where many natural materials are used at once, where only the center of the composition, the dominant, is made of pine cones.
- Minimalism. And this is the so-called empty panel of cones. Considering that such minimalism in decor is relevant today, it is worth taking note of the topic. Moreover, it is so simple: you hang or fix ribbons with cones in a painted hollow frame at the top. It turns out that you have the cones inside the frame, right on the wall.
You can also make the same monkey, the symbol of 2018, out of cones.
New Year's panel made from disposable forks
This is a good way to make a large patterned snowflake.
When making a New Year's panel from forks with younger preschoolers, follow safety precautions and do not leave your child unattended at work.
The master class will be simple:
- In the center of the composition there is a dense circle where rays from disposable forks will be attached;
- This circle is decorated, wrapped in tinsel, and the ends of disposable forks are fixed to it with hot glue;
- The wide part of the forks is also covered with tinsel in a circle.
It turns out that the forks are the edges of a snowflake. On the other hand, if you decorate this composition more, you will get a New Year’s wreath made from disposable forks. In the center of such a circle can be depicted Santa Claus, or the number 2022.
How to do it?
Making a Christmas panel is not difficult, but very painstaking. First you need to measure a piece of lace ribbon. Its length depends on individual preferences. It is by this lace that the finished product will be hung. The next step is to tie both ends of the lace to the ends of the base branch. To make the design more reliable, additionally the knots can be fixed using hot glue.
Next you need to make a vertical - tie a small piece of lace to the middle of the base branch, and then attach the hanging decorative element. For example, this could be New Year's decorations with stars on ribbons. The prepared spruce branch needs to be divided into several small ones.
It’s better not to glue the branches right away. If you are sure that the composition is folded perfectly, then you can fix the branches with a glue gun. At this stage, you should be careful, since the glue tends to stretch. The composition can simply be ruined.
You need to attach holly or rowan berries (beads) to the branches. The procedure is the same - first you need to try it on, and only then glue it on. When everything is fixed, you can glue the decor.
Your handmade Christmas panel is ready. You can give it an original name, for example, “A Christmas Tale” or simply “Christmas.” You can make children's compositions by adding toys and figurines of angels to the panel. Children will be interested in playing with the theme of the birth of Jesus Christ in the composition. But to make such a panel you will need appropriate figurines, which can be purchased at craft stores or use suitable Christmas tree decorations.
To make such a panel, you need to prepare all the same tools: scissors and a glue gun. As for accessories, you need to purchase figurines of Jesus, the Virgin Mary and angels. The manufacturing process is very similar to that used in the first version.
- Tie lace to the base branch.
- Make it vertical. Decorate the composition with the prepared decoration.
- Next you need to glue the spruce branches. You need to place the figures harmoniously on them. It is better if they are made of plastic rather than glass. Because the latter are quite fragile and can burst not only from awkward movements, but also from hot glue.
You need to wait until the glue completely dries. The panel is ready.
New Year's panel made of cotton pads
Children love to make various things from cotton pads. You can start with a simple applique and end with a beautiful panel.
An evening village made from disks or just cotton wool looks great. It turns out that only two colors are used: the white color of the cotton wool and the dark color of the background
Moreover, you can make shapes with round outlines from cotton pads, or you can use the cotton wool itself. For example, it’s clear how to make a snowman or a hare from disks, the same snowdrifts. Well, the background can be made from cotton wool itself.
Branches
Festive decorations for the New Year and Christmas can also be made from twigs of various sizes, decorating them with dried leaves, chestnuts, dry moss, dried fruits, twine, silk ribbon, and paper.
So, we prepare pruners (scissors), glue, thread with a needle and a wide brush and get down to creative work.
Wicker panel
Let's start by decorating the front door. The lattice is made of branches, cut 40 centimeters each.
The rods are connected with yarn or bast. The structure is randomly wrapped with wire, thereby achieving the visual effect of a “wicker plane”.
Branches of juniper or cypress are placed inside, berries, ribbon bows, sweets in bright wrappers, etc. are glued onto them.
Wreath
The hallway will greet long-awaited guests with a wicker Christmas wreath. It is made from flexible twigs of birch or grapevine, decorated with dry moss and decorative paper, carefully attached to the wall, after which Christmas tree branches are attached to it with wire.
The craft is decorated with bright satin bows, balls, figures of angels, and spray-painted with gold and silver paint.
Light, airy mobiles over the New Year's table
Making them is not difficult. To do this, several thin birch branches are connected with a satin ribbon, gilded cord or beads. Animal figures, fairy-tale birds, multi-colored feathers, and openwork glass garlands are attached to the structure.
Such an airy craft can be given an external resemblance to a bell, a bird's nest, a cloud, or a chandelier.
New Year's panel made of plasticine
A plasticine panel can be a real work of art. And for 2022 this material is relevant.
Plasticine panels can be made using various techniques: drawing, sculpting, embossing
From plasticine you can make:
- DIY Santa Claus panel . Santa Claus is the center of the composition, but he can be surrounded by a spruce wreath made of plasticine, or snowflakes made of plasticine. The Christmas tree and Santa Claus are a familiar plot, but Santa Claus and the monkey are already something interesting. You can also make a three-dimensional panel from plasticine, where numbers can be three-dimensional (2018), or some details of the panel - the same Santa Claus or individual elements of his outfit. Or maybe use real candies in his bag?
- DIY panels for children. Make your own master class, where a whole New Year's fairy tale will be sculpted from plasticine. Ask the children to add something to the plot of this fairy tale, perhaps a little star or a bird, but let the child, with your help, do it himself.
You can also make interesting panels on the window.
Star
One of the key decorations for the Christmas tree is the DIY Christmas star craft. Made by yourself or with your family, it will be especially valuable to you.
To make a product, it is enough to prepare the materials:
- you will need glue, enamel intended for wood;
- the main material is wooden planks 2.5 * 15 cm. 10 such elements are needed;
- to simplify the procedure, you should take a drawing in the form of your star;
- you will need white tape.
A rag and gloves may also be useful during the work process.
Making this kind of Christmas crafts with your own hands for 2019 is quite simple, just follow the short instructions.
- Step 1. It is worth painting, then drying the wooden planks. Place each element on the drawing, gradually gluing the edges of the product.
- Step 2. It is necessary to allow the elements to glue securely to each other, 1 hour is enough.
- Step 3. The next step is to cut out the wishes from white tape. Think about what you would like to wish for your loved ones, including yourself. Make sure there are nice words on each bar.
Such a star will delight the whole family, decorating New Year's holidays for many years.
New Year's panel on the window
Usually, such words usually mean plot compositions on the window, where a whole New Year's fairy tale is played out. Here is Santa Claus riding in a sleigh, here are the cheerful snowmen frolicking, and the Christmas tree is all covered in snow.
You can decorate the window with snowflakes, hand-cut from paper or an entire New Year's composition.
How to glue such a panel onto a window:
- Arm yourself with an ordinary brush and liquid soap; you can simply smear the parts on the back with soap and glue them to the window;
- There is another interesting method where milk is used instead of glue;
- As an option - starch paste;
- If all else fails, you will have to use narrow tape.
And the snowflakes themselves and other New Year’s figures can be printed on a printer by downloading a sample from the Internet, and then cut out with a stationery knife.
Decorative composition
Do-it-yourself panel from wood cuts.
You can also make an unusual New Year’s composition from the twigs. Slices of citrus fruits (orange, lemons, tangerines) are placed at the bottom of a transparent vessel. Larch or willow branches are placed in it, multi-colored grains, shells, dry moss balls, small pieces of bark, cinnamon trimmings, etc. are attached to them with glue. The vase can be replaced with an ordinary clay pot, the bottom of which is covered with floral foam.
New Year's composition - fruit ekibana.
Watch this video on YouTube
Craft “Boat”
A bunch of thin branches are aligned along the length and tied with a “boat”. Christmas tree cuttings, wax candles on a stand, beautiful balls, chestnuts, walnuts, etc. are placed in the middle.
The delicious aroma of the craft is given by orange, lemon or cedar oil, which is applied on top of the shell.
The best New Year's ideas Decor of bonsai and branches new year
Watch this video on YouTube
DIY panel for the New Year 2022
Panels with retro pictures are rightfully considered interesting and one of the most popular. Again, you can download them on the Internet, and then cut out the necessary fragments. You can also get backgrounds there, which are called “backgrounds for decoupage.”
You can make panel collages where symbols and stories of past times are intertwined, combining plots, characters, and patterns. Even beginners can make such collages using the decoupage technique, the main thing here is accuracy and varnishing to the same final thickness of the panel.
Decoupage using napkins on the theme of the New Year and Christmas holidays is both simple and extremely beautiful
Christmas crafts for Sunday School children - the most interesting ideas
Another common symbol of Christmas is the festive wreath. And such a craft can also be made with children. It is best to make a wreath collectively: making it separately for each child will be difficult. But the result will be an overall wonderful decoration for the classroom interior.
Necessary materials:
Subsequence:
To get the base, you can buy an inexpensive wreath and remove the tinsel from it. Or cut it out of thick cardboard. The author of this instruction took the first route.
We glue the base for our future wreath with spruce branches.
Glue a cardboard in the center and a candle on it. Decorate the wreath with pine cones and artificial snow.
In order to disguise the base of the candle, we wrap it with beads.
The wreath is ready. This is such a wonderful Christmas decor we got.
Look how many more Christmas themed things you can come up with!
The angels alone are worth it.
Very interesting works are obtained using the appliqué technique.
Let's not forget about waste materials. Look what amazing shell angels you can make!
Panel "New Year's Fantasies"
New Year's fantasy is a composition in which there is more creativity than technology. It's just a combination of techniques.
Examples of such work:
- Batik + decor with beads and rhinestones;
- Decoupage + embroidery (embroidery can frame the work);
- Applique + patchwork;
- Applique + quilling;
- Decoupage + painting with acrylic paints.
Well, the heroes of such works can be Santa Claus, New Year fairies, angels, and children from pre-revolutionary postcards. Mix, match, decorate - creativity also comes with eating.
Recommendations
Before you start making a decorative panel that will decorate your New Year's interior, you need to decide on some nuances.
- First of all, you need to understand in what place, on the wall or on the door, the future product will be placed. The volume of the future composition and the use of certain materials entirely depend on this.
- It is necessary to make accurate measurements of the future composition. If suddenly the panel turns out to be larger, it will not fit into the space allocated for the craft. This means you will have to look for an alternative option for placing the decoration.
- Before you start decorating the panel, you need to select the appropriate materials. And we are talking not only about texture, but also about color scheme. For example, felt will look quite laconic in combination with pine cones.
- In the process of creating a masterpiece, you should never rush.
New Year's panel (photo idea)
Peculiarities
A decorative panel is a painting that allows you to decorate the interior of any room. Its sizes can be very different, ranging from mini to large dimensions. The panel as a decorative design is relevant in any season. However, special interest in it is shown in winter, when it is necessary to create a festive interior for the New Year.
To create panels you can use a variety of materials and tools. There is no need to run to the art store, just look around. It’s another matter if the work is done by a highly qualified craftsman for personal income
It is extremely important for him to use specialized high-quality materials
The New Year theme for the panel involves using a variety of images as a sketch, ranging from an ordinary snowflake to a complex composition of a fairy-tale setting. This decor can be used to decorate walls, ceilings, windows, doors and any other part of the house. The main thing is to take measurements first and decide on the material of the painting.
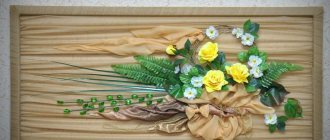
Butterfly and dragonfly
To create a panel we need:
- frame;
- base (cardboard);
- fabric or canvas;
- tweezers;
- glue;
- brush;
- coriander or buckwheat;
- white and brown rice;
- dye;
- dried flowers and herbs for decoration.
Let's start making:
- Wrap the base in canvas and secure on the wrong side;
- Apply the outline of the design to the fabric;
- Using a thin brush, apply a layer of glue to the outline of the design and, using tweezers, lay out coriander or buckwheat;
- Using the same principle, lay out the outline of insect wings, fill in the space of the wings and veins;
- Next, let's decorate the painting. Glue dried flowers and herbs in a chaotic manner.
- To make the picture sparkle with colors, paint the butterfly in bright colors. Apply paint to the cereal with a thin brush and let dry.
To make paintings from cereals, you do not need intricate and expensive materials. Be patient, use your imagination, and all the materials for creativity will be in the kitchen!
All colors and sizes
When you carefully look at photos of paintings and panels of cereals, you are amazed at the variety of textures. In the gastronomic departments there is a wide selection of cereals of all colors, sizes, shades. For example, the pattern can be round, medium length and long.
The color also varies. It can be white, golden (steamed), brown and red (unpolished), dark brown and even black (wild rice).
Buckwheat comes in different sizes: larger and smaller. Varies in color: from greenish to dark brown. Millet, this millet cereal, depending on the variety, also has different shades: from pale to bright yellow. Barley grain, pearl barley, is found in whole and crushed form.
These grains create shades of gray colors of different textures.
Wheat also comes in different forms. There are ordinary whole and crushed grains with a slightly yellowish tint. Bulgur and aranovka are made from grains of varying degrees of ripening, this expands the range of colors and shades.
Winter applications for kindergarten
An applique made from colored paper is the simplest and most popular winter craft for kindergarten.
Most often they depict a New Year tree or a winter landscape. Application “New Year tree” for the little ones.
You need to prepare:
- colored paper;
- a sheet of white cardboard;
- a simple pencil;
- scissors;
- glue.
To begin with, you should draw a Christmas tree of the desired size on green paper, and a tree trunk on brown paper. Cut out the details of the Christmas tree and glue it onto a sheet of cardboard.
Then cut out small circles from different colors of paper - New Year's balls for the Christmas tree and glue them in a fairly orderly manner around the perimeter of the green beauty. Cut out a small star from red paper and glue it to the top of the tree.
Decorating the kitchen
Making a panel for the kitchen with your own hands means reviving and decorating the homemaker’s workplace, as well as a place for family gatherings and conversations.
Small panels made from natural materials will look original on the kitchen wall. There may be several of them, and not necessarily similar in topic.
Just don’t place them near the stove, where they will quickly lose their elegant appearance from high temperature and steam.
For example, in the interior of a kitchen, a panel made of bean grains of different colors glued to stretched canvas or cardboard will look good. Of course, you will need a lot of beans. The grains can be laid out in the form of an ornament or a simple composition. It is better to insert such a panel into a glazed wooden frame.
Also in the kitchen you can place a medium-sized panel depicting tea drinking: fashion a samovar, cups, bagels from salt dough; After baking the figures, paint them and create a composition from them.
It is advisable to varnish the painted figures. Additionally, you can use fabric (tulle, lace, embroidered napkin) to create a tablecloth.
Small panels are good because they are easier to update, replace, and redo.
Plastic bottles
You can also make a penguin or Santa Claus from plastic bottles. The scheme is quite simple and similar to the previous one. For this craft, you need to take two empty plastic bottles of the same size and shape. From one you need to cut off only the bottom, and cut the second in half and use tape or glue to glue the top and bottom of the first bottle to it. This will create a block.
Now it needs to be painted white and allowed to dry. In exactly the same way as with the light bulb, you need to draw the contours of the front part for the penguin. If you are making Santa Claus, then you need to draw a face. These parts remain white, and the rest is painted black for the penguin or red for Santa Claus. After this, you need to paint the face and draw other necessary details. A scarf and cap are put on top; if you made Santa Claus, then you need to glue on a beard from felt or cotton wool.
It turns out to be quite an interesting craft that can be easily made with your child from unnecessary things.
Burnt out light bulbs
It is very good if you have a large light bulb. You can make a real New Year's penguin out of it. To make such a craft you will need the following tools:
- An unnecessary burnt out light bulb, preferably a large one.
- Gouache or acrylic paints.
- Paint brushes.
- A small piece of felt or fabric in red, black and white.
- Glue, it is advisable to use a heat gun if possible.
- Ribbon.
Step-by-step instruction
- First of all, the light bulb must be painted white, and then allowed to dry thoroughly.
- Using a pencil, draw the front part of the light bulb: the belly and the face, which will be white, the rest must be painted black, excluding only the place where the light bulb was screwed into the socket. This place must be painted with red paint and allowed to dry thoroughly.
- Draw the beak, eyes, dry again.
- From black felt or thick black fabric, you need to cut out oval wings and glue them on both sides of the light bulb.
- For scarves, cut out a red rectangle from felt and cut the ends, tie the scarf on a light bulb.
- Attach a ribbon to the top of the head, and cover it with a strip of white felt or thick fabric on top. You can also attach a pompom to the top of your head.