- February 27, 2019
- Weapons and ammunition
- Michael
Almost every knife lover's collection includes at least a few tools with birch bark handles. Which is not surprising - this is a really beautiful, practical and easy-to-use material. Moreover, such a handle can be made at home, unlike analogues made of plastic, craton or elastron. That is why some knife lovers eventually have the question: “How to make a handle from birch bark yourself?” Let's look at this interesting question, and at the same time evaluate the main advantages and disadvantages of the material.
The main advantages of birch bark
One of the important advantages has already been mentioned earlier - it is external beauty and elegance. Yes, many knife lovers highly value this factor. After all, not every knife is a working tool - some simply lie on the shelf, add to the collection and perform rather an aesthetic function, allowing the owner to admire a beautiful, high-quality item.
Another important plus is grip. This is already a factor of interest for people who actively use knives. The knife handle, made of birch bark, is soft and smooth, fits perfectly in the hand, and the risk of fingers slipping is minimized both during normal work and during stabbing blows. Moreover, the grip remains high even if the hand is dry, clean, and in a wet or even bloody palm. The conversation here is not at all about murder or self-defense - after all, knives, especially hunting knives, are often used when cutting up the carcasses of killed animals.
Many knife lovers simply like the feeling that occurs when you take such a tool in your hand. Birch bark is pleasant to the touch, even in winter, at temperatures of -30 degrees Celsius and below, it retains the illusion of warmth. She always seems to be warm. In addition, it practically does not cool the hand due to its very low thermal conductivity. This is very important if you have to do some work around the camp while hiking or hunting in winter. It is inconvenient to work with a knife while wearing gloves or mittens. And the handle made of plastic and rubber, not to mention metal, bone and horn, is quite cold on the hand, causing a feeling of discomfort.
Finally, there is no doubt that with proper care, a birch bark handle will last for many decades. This material does not dry out, is not afraid of direct sunlight, and does not crack from strong impacts. Therefore, having made the handle with your own hands, you can rest assured that you will definitely not have to regret a damaged knife.
What is birch bark and its properties
Everyone knows very well that birch bark is the bark of a birch tree. What next? Few will answer. Birch bark consists of fibers; the natural material is distinguished by a snow-white layer, with longitudinal lines - lentils. It is easy to determine the age of a tree by the number of layers.
Due to its natural qualities, it is used by many artisans as crafts. They are well applicable in everyday life, and some unique products can be called highly artistic works of art. The material has the following properties:
- Along the fibers, birch bark is amazingly strong. This property resists wear and stretching. But as soon as you make a crosswise movement, the birch bark will immediately break.
- It is often used as packaging material. Porosity and elasticity absorb shock. And poor thermal conductivity will allow a slower effect on the temperature of the crust.
- Absorption of bending is an important useful property. When the shape changes, it tends to return to its original position.
- The aesthetic component is an important factor in its use as crafts and handles for knives. The fresh birch bark handle looks attractive. But it’s quite easy to ruin the appearance.
- Throughout Russia, this type of wood is very common. The availability of material is colossal.
Birch bark is an undeniable material for the construction of log houses. Tar is extracted from it on an industrial scale; it is needed for medical purposes. Souvenir production and handicrafts often resort to using this material.
Advantages and disadvantages
The inherent properties of this material are its positive qualities. But the site is not of a forestry nature. Let's try to highlight the advantages of making a knife handle from birch bark:
- the aesthetic appeal has already been noted. For collectors, blades occupy a significant place on the shelf. They perform the function of admiring them;
- People who actively use the product note a good grip and reliability of holding the handle in their hand. Despite the weather conditions. For hunters who cut up a carcass - a valuable quality;
- the velvety texture gives the hand a pleasant feeling;
- the birch bark handle has poor thermal conductivity, in winter it does not lose heat, and in summer it feels pleasantly cool;
- due to the high content of tar - a natural antioxidant, rotting processes and the development of harmful microorganisms are unlikely;
- Having dropped a small blade into the water, it will remain on the surface like a float, due to the porosity of the material.
Birch bark blank for making a knife handle.
The handle is made from birch bark. There is no other option. It is cut crosswise and mounted onto the shank. She has a minus. Birch bark quickly absorbs moisture or other liquids. Which subsequently leads to unpleasant odors from it. But by impregnating the product with special solutions, this can be avoided.
Durability of the material
People have long noticed the durability of birch bark. Sometimes there is a rotten tree in the forest, but the bark is like new. Bast shoes were woven from it, they took on waterproof characteristics. Used as writing paper. Thanks to its properties, multiple writings of our ancestors have reached us. Sometimes it is called Old Russian papyrus.
The birch bark handle of the blade, made using the inlaid method, is tightly tied with a pommel. And during manufacturing, each piece is coated with a glue solution. The material is flammable, an open fire is required for combustion; it can actually be heated to high temperatures, without consequences for the product. It’s easy to burn your hand; the handle will not lose its shape or change color.
According to the stories of experienced users, birch bark handles last for decades. Its durability will be the envy of any modern polyester.
Disadvantages of the material
Unfortunately, any material that has important advantages is never without its disadvantages. And the handle made of birch bark is no exception.
In fact, there is only one drawback, but it is very important. According to some knife lovers, it completely negates all the advantages, sharply reducing the attractiveness of birch bark and forcing them to look for a more suitable material.
This disadvantage is water permeability. Yes, yes, birch bark absorbs moisture perfectly. Even in the case of water, this is not very good. If you fail to dry the wet handle in time, it will begin to rot. But even if you dry the birch bark efficiently, several such sessions can lead to a decrease in the quality of the handle.
The situation is much worse if the handle becomes soaked with sweat. Still, sometimes you have to work with a knife for a long time in the heat. The hand will involuntarily sweat, and the sweat, absorbed into the handle, will become a source of an unpleasant odor, which will be very difficult to get rid of. It also causes the light brown material to darken. Moreover, the darkening is uneven and therefore not very attractive.
But the worst thing is for hunters and fishermen. After all, they often work with a knife when cleaning fish, sanding prey and cutting. In this case, the birch bark handle may become saturated with blood or fish mucus. And this will definitely happen if even a drop of biological fluid gets on the birch bark, which the owner does not eliminate immediately. Not only will the attractiveness of the handle be reduced due to the dark heel, it will also smell disgusting. But it is simply impossible to clean birch bark from such a peculiar “impregnation”.
In general, there are several ways to get rid of this shortcoming. But we'll talk about them a little later.
Minuses
The disadvantages include such difficulties that the case will require constant care, although any material requires care. Controversial minus. Some argue that it is difficult to work with, and some, on the contrary, make the sheath literally “on the knee”. Again quite controversial.
And the fact that the case turns out to be soft is yes, true, but to give rigidity to the product, you first need to choose a stronger material. And the second important point is that to give it the necessary qualities, as a rule, a wooden insert is used. This is at the request of the owner of the homemade product.
Read also: How to make an inductor with your own hands.
Materials and tools
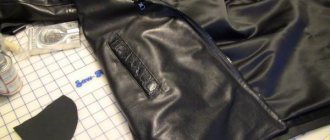
In fact, as mentioned above about leather tanning and drawing, this manufacturing process is for professionals. The same applies to the wooden insert. The article is intended to help the common man, not a leather specialist.
The list will include various tools, and where to use them will become clear to you further:
- You will definitely need leather, preferably naturally tanned and thick,
- shoe thread or nylon thread, reliable and not rotten,
- to process the ends you will need wax or paraffin,
- for the role of a fastener, if there is one, use a holster screw, otherwise you can take a rivet from a jacket or from anything,
- glue, preferably “PVA”, “Moment” for gluing various materials or special for leather,
- pencil, ballpoint pen, sheet of paper, ruler,
- awl, needle, sharp scissors,
- a stationery knife or better a shoemaker,
- sandpaper of different grits,
- brush, stationery clips,
- fork, marking wheel, drill with drill bit 1 mm in diameter,
- tape, cling film or insulating tape,
- stain or leather cream.
Some items may or may not be needed, or may replace each other; the list is compiled with reserve. Having prepared everything you need, you can start working.
Manufacturing process for a hunting knife
Take care of the cleanliness of your workplace. Table lighting should be organized from different sides.
- The first step is to wrap the blade in many layers of tape or cling film. This will protect your hands from cuts, as well as the blade from getting glue or moisture on it. Grab a little and the handle. Don’t be afraid, if the blade has become a little larger in size, a supply will not hurt.
- More “advanced” masters do not use templates. But in our case, mock-up development will save you from cutting errors, and beginners absolutely need this process. To do this, you need to trace the blade on paper with a pencil. Roll it up like a real sheath and place the blade there. Check how it sits in the layout, whether its movement is free.
- After making sure that the knife fits well in the mock-up, you need to transfer the mock-up cutting to the leather. Do this carefully and carefully. It is better to trace with a ballpoint pen from the wrong side.
- After marking, you need to carefully cut the workpiece out of the leather with scissors. Don’t be afraid, cut with a margin of a couple of millimeters. Anything unnecessary can be removed later.
- You definitely need such a part as a “spacer”; it follows the main contour and is glued to a smaller part of the workpiece; try on the blade while doing this. To eliminate errors.
- At this stage, you can glue most of the workpiece with a small amount of pre-prepared glue. Don't worry if the edges are uneven - this will all be corrected a little later.
- We wait for the glue to dry, which may take 24 hours, and cut off large irregularities with a stationery knife or something sharp. Then we sand the entire side surface with coarse-grain sandpaper and bring it to perfection with fine-grain sandpaper.
- After sanding, you can begin marking the seam. Carefully trace the outline with a pencil and use the marking wheel to apply marks. This can also be done with a fork. Choose a pitch of approximately 5 mm, as you like.
- If your skin is thick, then you need to use a drill with a drill of the smallest diameter and make holes. If you see that a “prick” with an awl is enough, then make holes with it. But keep in mind that in this case it is better to perform the operation on both sides. Immediately mark the holes for sewing on the fastener.
- You can stitch across the entire surface of the sheath, and after marking the clasp, cut it out of the leather and sew it on. It’s better not to “rack your brains” with the seam; a line on one side goes in one direction, and when returning, do it on the other.
- Don't forget to sew on a holster screw or rivet. Having completed all minor operations, rub the sheath with stain or cream. It will look like new ones from the store.
There are quite a lot of layout options on thematic resources, it’s not forbidden to peek there too, but use your imagination, and your sheath will be unique.
The model can also be made with a reserve for attaching to a belt. This will simply increase the large workpiece by a few more centimeters. There are also quite a lot of sewing methods; the simplest and most banal one has been described here. But if you want, you can really learn different types.
The process of making a holster for a camp knife
In this case, we mean the blade of, so to speak, an everyday knife for vacation, fishing, or even hunting. No, not the knife you'll use to skin your game or slaughter a wild boar. A simple small blade, more like a folding blade, which you always have with you for household work.
The manufacturing principle is practically no different . Only for the folding case the case will be small rectangular in shape. There is no need to lie; there are a lot of ways to make it yourself.
What materials and tools will you need?
If you want to make a knife handle from birch bark with your own hands, you will need the appropriate materials and tools. With their help, work will go quickly and easily even for the least experienced craftsman. Despite the fact that making a handle seems complicated, the process is quite simple and easy, requiring not so much skill as slowness, accuracy and perseverance.
So, for work you need to prepare in advance:
- Birch bark in quantities sufficient to make a handle.
- The blade of a knife without a handle, for which the handle is made.
- Several small (matchbox-sized) wooden blocks.
- Grinder equipped with a medium-grit grinding wheel.
- Drill – electric or manual.
- Clamping vices with wings and pins - two pieces.
As you can see, the set is not too large. Many DIYers have everything they need. And when all the tools and materials are at hand, you can start working.
Weaving a scabbard from birch bark
The scabbard serves as a case for bladed weapons. They prevent sudden injury to their owner or others. They will also prevent the blade from becoming dull. The sheath should be light and practical. Making the right case requires special art.
There are quite a few techniques for making sheaths. They are made from various materials: wood, leather, light metal alloys.
Birch bark can also be used for a small knife. The properties of bark are perfect for such a product. You will need two ribbons, just like for a bookmark.
The process will look the same as weaving a bookmark. It will only be necessary to put two birch bark plates inside so that the blade fits smoothly into the sheath and does not touch the edges of the tapes. These strips will be well fixed during the weaving process.
The most difficult part will be creating the hole in the sheath. At the moment of completion, you should change the sides of the birch bark and completely braid the product with the front layer. One tape will fix the other.
Creating a blank
When making a birch bark handle with your own hands, first of all you need to take birch bark and cut it into small squares. Then make a small hole in each of them, allowing you to attach it to the shank of the future knife. It is not necessary to worry about the perfect evenness of the holes - they will not be visible anyway, and they will not affect the ease of working with the handle. The prepared squares need to be soaked in boiling water. The birch bark should become soft, pliable and slightly sticky. The size of the squares should be slightly larger than the dimensions of the planned handle.
While the birch bark is soaking, you need to work on the wooden blocks. Small holes are drilled into them, which are then enlarged and adjusted to fit the blade for which the handle is made. The first will be its beginning, and the second will be its end. It is not necessary to process the bars and give them a beautiful shape - this will be done later.
Let's move on to the next step. We put the first bar on the shank of the knife, take out the steamed birch bark from the slightly cooled water and quickly put it on the future handle, take the next piece of birch bark, and so on until the material runs out. It is very important to press the records as tightly as possible to each other. We complete the handle with a second block, after which we fix the bars with a vice - on both sides. Tighten the stiletto heels extremely tightly so that the steamed birch bark practically turns into a monolith.
Now you need to leave the workpiece in a warm, dry and ventilated place (but not in direct sunlight) for several days so that the birch bark is completely dry.
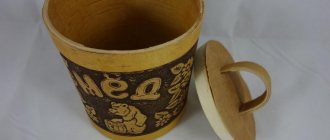
Household use of birch bark
Birch bark can be used to make many items for household needs. Let's try to make a bookmark out of it. You will need two strips of birch bark. Let them be 1 cm wide and 30 cm long. It is recommended that the dyne be three to four times larger than the future product.
- The strips should be folded in half.
- We intertwine them with each other until a right angle is formed.
- The top tape is bent ninety degrees, and then the bottom is bent in the same way.
- Each pair of ribbons should form a mat and an edge immediately during the weaving process.
- On the other side of the workpiece, you need to do the same.
- The end result is a straight diagonal weave edge.
Subsequent actions will be similar. Try to press the strips tightly when weaving. You won't be able to adjust or tighten the tape later. Finally, one end of the tape is cut off at the exit. And the remaining end of the tape is folded over the cut end in the opposite direction.
Making the handle
Now the work on creating a birch bark handle is entering its most important phase. If everything was done correctly, then after drying the individual compressed squares turned into a single monolith. All that remains is to securely fix the second block on the handle with a nut (or some other method) - and you can remove the vice.
The result is a massive block, which is very difficult to grasp with one hand, not to mention working with it.
This is where you will need a grinder with a sanding disc. It is advisable to hold the knife blade in a vice in order to be able to carefully process the birch bark block, giving it the desired shape. You need to work very carefully. First you need to round the corners - this is a fairly simple and rough job. Then you will have to act more carefully, removing a millimeter or two at a time, regularly testing how the handle lies in the palm of your hand.
Sometimes even experienced craftsmen take several hours to “cut” a handle from a block. But as a result, you get a high-quality birch bark handle made with your own hands.
Plywood scabbard
To make such a sheath for a hunting knife, you will need:
- laminated plywood 1.5 mm thick;
- a piece of felt;
- epoxy resin and hardener for it;
- leather belt;
- lavsan thread;
- file;
- sandpaper.
From plywood you need to cut two blanks in the form of a knife. They should be slightly larger than the blade itself. You also need to cut two pieces of felt to the shape and size of the plywood sheets. They need to be glued to the plywood with epoxy resin.
Both blanks need to be folded together with felt inside, and a leather belt needs to be glued on top of them to make a loop. It will serve to attach the knife to the belt.
Then the parts need to be coated on the outside with epoxy resin and wrapped with lavsan threads. After the epoxy resin has dried, repeat the procedure. Therefore, it is best to apply at least 4 layers of thread to ensure that the sheath is strong and durable.
When the epoxy has dried under the last layer of thread, the sheath should be processed with a file and sandpaper. You can sand their corners or apply various grooves and embossing to their surface. To give the product a more presentable look, it would not be amiss to perform other types of finishing. To do this, the sheath can be painted or wrapped with braid.
Product refinement
Some craftsmen prefer to coat the handle with beeswax or special impregnations after completing the work. This has pros and cons. On the one hand, it no longer absorbs moisture so intensely, and the blood becomes easier to wipe off. On the other hand, those advantages for which birch bark handles are highly valued by experts suffer. It becomes no longer so warm, more slippery.
Therefore, think seriously before taking such a step - it is quite possible to ruin a good handle, on the manufacture of which a lot of time and effort was spent.
Is it necessary to impregnate a birch bark knife handle?
You should think about what the future purpose of the blade is. This is a purely personal matter. If a decision is made to coat the handle with varnish or impregnation, then it should be taken into account that the material will lose all its useful properties and characteristics.
To carry out impregnation, natural-based liquids are mainly used.
Flaxseed oil or beeswax are good options. To apply varnish, you will need to dilute it with a solvent so that it is absorbed into the handle. But don’t forget that it will become slippery and lose its velvety feel.
Benefits of DIY
Some people are seriously surprised: why spend so much time if you can buy a ready-made knife in a store, and not buy a shank separately, and then work on creating a handle.
But when you make it by hand, you have a great opportunity to adjust the knife handle to your hand and make it perfectly ergonomic. In addition, the very fact of owning a knife with a handle made by yourself warms the soul of every knife lover. However, this is a matter of taste and personal preference.
What is Kydex
The material, invented in the second half of the 20th century, has unique characteristics. It contains rigidity, strength and resistance to external irritants, such as chemical and mechanical influences. It looks like soft plastic, but it is a completely different material and it is called kydex, in Russian it sounds like “Kydex”.
At first glance, you may not understand that it has such unique properties. In Russia it is not so easy to find him. Mostly it is ordered online. But there are interior items that use this material. Its technical properties are:
- impact resistance,
- good elasticity when heated,
- fire resistance,
- resistance to abrasive influences,
- resistance to chemicals,
- moisture resistance,
- volume stability,
- has no pores.
Step-by-step manufacturing instructions
The manufacturing process is completely simple and can be done by anyone who shows a little patience and diligence. If this is the first such experience, it is better not to rush and consistently follow the step-by-step instructions, then the final product will pleasantly please its owner.
- The first step is to take the knife for which you plan to make a sheath, and make a paper sketch on its base, wrapping the entire blade and drawing an outline.
- Then a spacer is cut out of the board along the curve of the blade; its thickness should not exceed 1 cm.
- The next stage is transferring the template onto birch bark and cutting it out; initially, you can leave a few millimeters of margin.
- It was previously mentioned that birch bark does not require processing, but to make it softer and more pliable to processing, it is boiled in ordinary water for at least 2 hours. After boiling, it changes in appearance, acquiring a softer and more attractive color.
- While the birch bark is being prepared, we connect the wooden spacer to the knife using electrical tape on the tip side. We wrap the resulting structure with cling film or a bag so as not to stain the blade or handle.
- After the bark has boiled, it is carefully removed and placed on a knife with an insert and secured with clamps. The future sheath should be left in this state for about an hour. Afterwards you need to remove the clamps to apply a second layer of bark for greater strength. To do this, both surfaces are generously lubricated with glue and pressed tightly against each other, respectively. The resulting structure is well compressed with clamps and a vice and is left to dry for 2 weeks.
- After a two-week period, all clamps are removed. Readiness will be indicated by a characteristic ringing sound when the birch bark is tapped on the table.
- Next, you need to remove the knife with the insert, separate them, and make a cut with a hacksaw along the sheath to align the inlet hole. Along the contour of the knife with a slight deviation, markings are made on top of the resulting cover for stitching: the blade should easily enter and exit. Then holes are drilled along the finished contour in increments of 0.5-0.7 cm.
- Using a shoe hook, a leather cord is used to stitch the scabbard. All excess is cut off. A stain is taken, which can first be used to cover the handle of a knife so that the entire product is made in the same style, and is applied in several layers to the birch bark.
- To make it convenient to attach the sheath to the belt, a braid is made from the same leather cord and attached to the hole in the sheath near the butt. All kinds of designs can be applied to birch bark products using a burner.
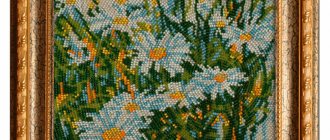
DIY birch bark sheath.
The process, of course, is labor-intensive, but the result exceeds all expectations; no one else will have such a sheath, and besides, it will serve its owner for a very long time.
Previous KnivesObsidian knife Next Knife makingWhat is micarta for knives
How to carry knives
The question is quite sensitive and multifaceted. It all depends on where and when you are going to wear the blade. Quite often, people are interested in how to properly carry folding knives in the city. After all, in our society, a knife has begun to be perceived as a threat to society. In Rus', it was difficult to imagine a man without a knife. It was everyday wear for household needs.
There are quite a few ways to carry knives, from simply on a belt to more sophisticated options. Essentially, they are divided into four main types:
- traditional, belt civilian,
- combat, when you need the speed of drawing the blade,
- special, professional and unusual ways,
- image, traditions of peoples, ceremonial options, etc.
The simplest and most common option is simple civilian. If you are right-handed, then the sheath is placed on the left side of the belt and vice versa. It’s easy enough to remove it when needed and it’s unlikely to get lost or caught on anything. Stores almost always have such options in stock.
Combat options are based on its size. It can be placed: in the armpit area, on the thigh, in the chest area, and the “boot” option is also not bad, the main thing is the speed of retrieving the blade. Sometimes it is placed on the back in the lumbar region, and if the blade is small, it is hung around the neck with a cord.
For some time now I have been interested in studying knives. I bring the accumulated knowledge to the masses. I don't consider myself an expert. I do knife making at an amateur level. I adequately accept constructive criticism. And I will be grateful for professional corrections of my work.
DIY knife handle at home
The handle of a knife is often made at home from wood. More precisely, these are the linings, and the metal frame (shank) is connected to the blade into a single whole.
Two wooden parts are cut to match the dimensions of the steel one. They need to be shaped as in the sketch. Grooves are cut on the inner sides, equal in thickness to the shank. Be sure to make holes in the top and bottom of each element for fasteners (pins or bolts). Wooden parts should be coated with linseed oil. When the tool is assembled, the handle is polished.
Making even a simple knife without experience is not so easy, but it is possible. To do this, you need to own at least hand tools, and it is better to do everything using machines. But you can get a unique product that fully meets the wishes of the owner.
Swedish folding knives
- Swedish knives Fallkniven F1. They were put into production in 1995 and are distinguished by excellent functionality and balance, and a high-quality cut. The products have received numerous awards and high test scores, making them one of the best in the world. Some varieties of these knives are produced that have an increased blade hardening and models with limited production, equipped with exclusive sheaths and handles.
- Fallkniven H1. They are distinguished by a smooth cutting edge and a wide bend near the tip. Excellent for cutting carcasses and fish of any size. These knives are also convenient for carrying out small work with wood.
- EKA Swede T9. These Swedish knives have a unique locking mechanism and a lightweight handle. The assembly uses bolts, allowing owners to tighten and loosen them themselves. After unscrewing them, cleaning the knives is much easier.
- EKA Swede 8. This model is very popular and compact, designed for multidisciplinary use. Equipped with a safe folding mechanism and an ergonomic handle with a soft grip.
- scissors;
- adjustable wrench;
- opener;
- can-opener;
- pliers, screwdriver;
- saw;
- corkscrew.
Handle mounting type
The methods for attaching a knife handle to a blade are not very diverse. There are only two of them: mounted and overhead. However, no matter what method is chosen, the production of the handle will in any case be carried out according to a template so that the finished product fully complies with the wishes of the future owner.
Since mounted and overhead handles differ from each other in many respects and have their own design features, we will look at the characteristics of each method in more detail.
Horseback
The mounted handle is also called a "rat tail". This name very accurately explains the technology of attaching the handle to the blade of the blade (Figure 2).
A narrow shank is made on the knife, onto which, like a rod, a handle is placed and secured in any available way.
If you decide to make a hunting knife with a wooden mounted handle, you should familiarize yourself with the advantages and disadvantages of such a design in advance.
The advantages include:
- Aesthetics:
mounted handles look more attractive in appearance, and they are often made from several types of wood at once to increase decorativeness. - Practicality:
this type of fastening allows you to create and attach a handle of any shape and size to the blade. - Ease of use:
Mounted handles are generally light in weight, which is an obvious advantage for hunters who have to move around a lot. In addition, such handles have low thermal and electrical conductivity, which is also an obvious advantage of their use.
It should also be noted that handles with a similar form of fastening are much easier to repair. Mounted handles have only one drawback - the method of attaching them is less reliable compared to overhead models.
Invoice
Knives with overhead handles have a slightly different design. They have a wide shank that completely follows the shape of the handle. Plates (linings) are attached to it on both sides and secured with rivets or screws. As a rule, this method is used for the manufacture of all-metal or folding knives with two handles (Figure 3).
Among the advantages of the overhead handle are ease of manufacture and high strength of connection of structural elements. However, it should be borne in mind that this mounting option also has disadvantages. Firstly, there are certain restrictions on the shape and size of the handle. Secondly, the finished product weighs much more than a model with a mounted handle. In addition, knives with applied handles have high heat and electrical conductivity. This means that you are unlikely to be able to operate such a tool for a long time in the cold without gloves.
At the same time, the reliability and durability of such knives completely outweighs their shortcomings, which is why many hunters and fishermen prefer to use edged weapons with applied handles.