When it's drizzling or windy, but warm enough for a coat, most girls prefer to wear windbreakers. Even for older women, these are practical and comfortable clothes. Jeans, short or long skirts and dresses go perfectly with it. In stores it is not always possible to choose your size, height, favorite color or desired style, which is why it is so valuable to cut out and sew a women's windbreaker with your own hands. This item will become versatile and stylish in any wardrobe.
The truth about tailoring jackets
Sewing outerwear is likely to interest almost every woman who loves to sew. Naturally, if you are taking on this matter for the first time, it will seem to you that it is very difficult. But believe me, this is only the first impression. So feel free to take on this task - you will succeed.
Think about the fact that with this product you won’t have to worry too much about gluing small parts, and if suddenly there are any minor flaws, they can easily be hidden under the lining.
Every modern woman can find all sorts of different jackets, raincoats and fur coats in her wardrobe. And every fashionista does not miss the chance to pamper herself with something new. But why not stop spending extra money on expensive purchases, and just ask yourself how to sew a jacket.
Moreover, it is worth noting that you do not need to have any special knowledge or extensive experience in sewing things. Actually the secret is simple. The most important thing in sewing a jacket is to follow the rules and make the pattern clearly and correctly, taking into account your size.
You will also need to decide on the main material from which you want to sew your jacket, as well as prepare other fabrics and accessories, such as padding polyester, lining, various zippers and fasteners, suitable for sewing needles and threads.
After this, all that remains is to decide on the style of your future jacket. After you have finally decided and weighed everything, following the recommendations, you can start sewing your new thing, and then you will definitely succeed.
What should a baby's jacket be like?
For a walk to be enjoyable for a child, he must be able to move actively. Therefore, it is important to take care of comfortable clothes. Especially about the outerwear, which includes jackets.
Clothing requirements for children
- Things should provide freedom of movement, not constrain, and be comfortable.
- The best fabric is water-repellent and provides wind protection.
- Kids need to be offered beautiful wardrobe items to shape their aesthetic taste from a very early age.
- In addition to meeting the parameters of children, it is important to know for sure that the fabrics used in the product are environmentally friendly and safe for the baby.
Hand made is fashionable
Today trade offers various types of these products. But every mother knows that their price is considerable, but their useful life is short, because babies quickly outgrow their clothes.
However, it is not necessary to purchase a new thing! Mom can sew a comfortable jacket herself. At the same time, she will be able to replenish the children's wardrobe with things for a wide variety of temperature conditions.
We will tell you how to make a pattern to sew a jacket that both the baby and his mother will like.
Sewing technology and secrets
Believe me, there is nothing to be afraid of here. The first thing that scares any person is the simple and banal unknown, but once you see the detailed step-by-step instructions for the entire work process, you will understand: in fact, nothing is simpler.
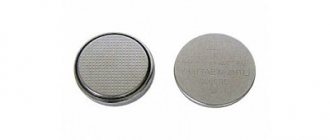
It is also important to decide what kind of fittings you need. If you are planning to sew a sports-style jacket, then a zipper closure is best suited for you. If suddenly it is not possible to get lightning, replace it with buttons. And if you don’t have access to them, then take buttons.
Construction of the hood and collar
The pattern for a women's windbreaker with a hood differs only in that, in addition to the shelves and sleeves, a template for the hood should be developed. It's quite simple to do. You should measure the circumference of the head and measure the length from the forehead to the back of the head through the crown and the height of the hood (from the shoulder to the crown). The construction is made in a rectangle, where the sides are equal to the height of the hood and the half-circumference of the head.
The measurement taken from the forehead to the back of the head should be laid through one of the upper corners of the rectangle, while the sharp edge should be rounded, and the straight line should be lowered to the forehead area by 1-2 cm. In the area of the occipital section, the line should be shifted 3-4 cm inward rectangle. The base line of the hood, along which it will connect to the windbreaker, should be made curved. At the back of the head - raised by 3 cm, and towards the face, on the contrary, lowered. This will ensure the hood fits correctly and will eliminate unnecessary folds at the back of the head.
The collar is much easier to make. It will require a strip of fabric equal to twice the height and width corresponding to the cut of the neckline.
Light jackets
Now let's look at an example of how to sew a light jacket.
You will need the following materials: - Raincoat fabric. - Non-woven fabric. — Lightning 60 cm. — Buttons. - Threads. - Sewing machine.
How to sew a jacket? We start the process by sewing the lining. To begin, we sew the shelves with the edges. Then we sew the side parts to the center of the shelves. Afterwards you need to sew up the darts. Sew the side sections and shoulders. Carefully sew on the sleeves.
Top of the jacket: sew the center of the front and side parts. We sew up the darts. Why do we sew the shoulder parts, the sides of the front and the back. Then we sew in the sleeves.
Jacket collar: you need to measure the neck size. The size of the finished collar should be 6 cm. Depending on the size of the neck, you need to cut a strip of fabric of such a size that the finished part is 6 cm. But do not forget to add 1 cm to the seams.
In order to sew a zipper, use a gel pen or chalk to mark the place on the right and left sides of the jacket. And carefully sew it on.
Jacket pocket: cut out a pocket for our jacket in the shape you want. We cut out the lining in the same shape. We connect both parts. Sew a finishing seam of about 1 cm along the top of the pocket. Carefully mark with chalk on the shelf the place where you will sew it. Then we carefully adjust it.
Belt: cut out a strip of fabric 9 cm wide. Place interlining on the upper part of the belt, bend it lengthwise and iron it. We bend the edges inward and sew with a finishing seam.
Assembling the jacket: you need to sew on the lining, starting from the sleeves. Bottom to bottom. And so on, carefully and evenly every detail.
Sew the collar to the neck. Spreading the finishing seam along the collar and front. We do the same at the bottom of the sleeves. We fold the bottom of the jacket and also carefully hem it.
Our jacket is ready. Now you know everything about how to sew a jacket.
Drawing selection
The windbreaker pattern is designed on the basis of the basic drawing. It can be obtained in several ways.
- Retake parts from an old jacket or sweater, the cut of which you like and suits. You need to rip the product apart at the seams, transfer the outlines of the parts onto paper, and then onto fabric for sewing a new windbreaker.
- Use ready-made layouts that can be adjusted to individual sizes, printed on standard A4 paper and combined into a single diagram.
- Build an individual model, starting from the basic pattern of the base of a sweater, jacket or jacket. Craftsmen who sew a lot design universal drawings to fit their sizes and modify them if necessary.
If you are new to this business, first practice on inexpensive fabric (calico, chintz). The time spent is compensated by savings on high-quality material that you would not want to spoil. It is also worth making a layout on tracing paper or graph paper before cutting the fabric. It will help you find out whether ready-made patterns are suitable for you and will give you the opportunity to correct mistakes in time.
The classic pattern of a women's windbreaker consists of several parts. They are all duplicated and made of lining material.
Construction details
- 2 paired parts for a shelf with chest darts.
- 1 back element - up to waist level.
- Details for the sleeve depending on the design (for example, two-seam).
- Variable details - hood, collar, pockets.
Jackets for children
It’s also easy to make a jacket for your child. So, let's figure out how to sew a jacket for a boy with your own hands.
For this you will need: - Fabric for the jacket. - Lining. - Lightning. — Rubber cuffs. - Threads. — Paper for patterns.
When cutting out the parts, do not forget to leave 1 cm for the seams. Transfer the pattern onto paper.
From the fabric for the jacket and from the lining we cut out the following details:
- Back - 1 pc.
- Front - 2 pcs.
- Sleeve - 2 pcs.
- Hood - 2 pcs.
Sewing a jacket
We connect the back and sleeves. Using the main jacket fabric, we sew together the sides and sleeves. We do the same actions with the lining.
On the back of the jacket we mark the middle. We connect the seam of the hood to the middle back. We put a lining inside the hood. On the front parts there will need to be an allowance of 1 cm wide for sewing in a zipper. Carefully fold the remaining edges at the bottom of the zipper.
We fold the rubber cuffs in half and sew them in the same way as the hood.
After this, we carefully attach the zipper, while retreating 3 cm from the bottom of the jacket. All that remains is to carefully hem the bottom of our jacket. The product is ready.
Materials and tools
A very important point when sewing a product is the selection of material. For the outer part, it is recommended to use a water-repellent fabric from the group of raincoat fabrics (polyester, polyester with cotton). This will extend the operation and wear resistance of the product, as well as retain heat in cool weather. To sew a winter down jacket with your own hands, you should use 2-4 meters of fabric with a width of 1.5 m. Consumption depends on size and height.
For the lining material, fabric based on viscose fibers is used. Its quantity will be approximately 1 meter less than the main one. The lining is matched to the color of the down jacket or made contrasting.
Various natural or synthetic materials are used as insulation. The choice depends on the customer’s preferences; the assortment of stores includes the following fillers:
- natural – camel or sheep wool, cotton. It has high heat-resistant qualities, but can come out through the fabric (especially around the seams) after prolonged wear;
- substitute - swan's down, bamboo;
- artificial – padding polyester, holofiber. It warms perfectly, but may roll down while wearing.
To sew a down jacket with your own hands using patterns, you also need to purchase flexible braid, a zipper (the size depends on the length of the product) and threads that match the color.
The tools you will need are:
- needles;
- scissors;
- tape measure;
- tracing paper, paper for patterns;
- tailor's marker (a simple piece of soap will do).
Leather jackets
Let's learn how to sew a leather jacket.
Many people think that a leather jacket is a terribly difficult task. But if you set a goal and approach this issue as correctly as possible, then there are really no difficulties in this.
If you have basic sewing skills and know how to work with patterns, then perhaps it's time to try something new. Working with leather has its own characteristics:
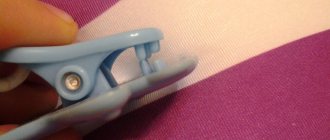
— Under no circumstances should you baste leather fabric with a needle, because the puncture sites with the needle will remain forever.
— In order to fasten two parts together, you can use superglue or different clamps.
— When working with patterns, you need to take into account the density of the leather. If it is too soft, then you need to leave more space for the seams.
Material selection
To sew the jacket, I decided to choose quilted fabric with impregnation, on padding polyester. This fabric does not need to be pre-quilted, which saves a lot of time. In the store, the yellow fabric immediately caught my eye, and I decided: “I’ll take it!”
Moreover, it suited my complexion perfectly. But the main advantage of quilted fabric is that against the backdrop of a gloomy, gray autumn, a yellow jacket will add cheerful notes to the atmosphere.
For the lining, I chose a twill fabric in a contrasting color with an enticing print. When purchased at the store, there was only one piece left, which was enough for the shelf and back.
Therefore, for the sleeves I had to buy plain fabric in the color of the jacket.
Disadvantages of fabric
With all the advantages of the quilted fabric I chose, it has one huge drawback. As I mentioned earlier, the fabric turned out to be polyurethane impregnated. This impregnation protects against wind and precipitation. But sewing it is a nightmare! Of course, when sewing coated jacket fabrics, you can use a Teflon foot. Fortunately, in my case, I did without it.
The main difficulty was in the impregnation itself. Either it has expired, or is it not an impregnation at all, but an adhesive connecting the fabric to the padding polyester? In general, during sewing, this same impregnation terribly crumbled from the cuts. It stuck to my hands, to the typewriter, table and floor. My hands were sticky, so was the machine, including the needle. Each time I had to degrease the needle with an alcohol-containing solution.
Then I decided to wash a piece of fabric and experiment. It turned out that this so-called impregnation is washed out or dissolved in water. I don’t know what it really was, but despite everything I’m very pleased with the jacket!
How to sew a jacket with your own hands
When all the patterns have been transferred to paper, all the nuances have been taken into account and finalized, you can try to start sewing. Try to lay out the patterns on the fabric as economically as possible. Use chalk to outline all the details. This can be done both from the wrong side and from the front side. Since our material is very soft and easy to stretch, all details must be duplicated with a special fabric - dublerin. It can be bought at any specialized store. To give the leather additional volume, glue the leather with foam rubber in the places you need and carefully sew.
As carefully as possible, connect all the parts of the jacket. Sew on the sleeves and collar. We cut out the same parts from the lining fabric as from the main one. We connect all the lining parts. Then very carefully sew the lining fabric to the main product. It's better to start with the sleeves. Then along the bottom of the jacket, then the front and neck. This is how easy it is to sew a jacket with your own hands.
Advantages of handmade products
There are many advantages to a self-sewn product. These include:
- efficiency. The cost of a product made from independently selected materials is much cheaper than the price of a finished product;
- originality. Materials are selected according to your own taste and discretion; repetition of a model of a similar color and style is excluded;
- practicality. You can sew a down jacket with your own hands from an old product that has already lost its presentation. To do this, it is enough to decorate the model with new elements or change the style;
- individuality. The product will be tailored to individual measurements, taking into account the specific size and characteristics of the figure;
- great time. Sewing calms the nervous system;
- new hobby. If the first attempt is successful, there is a chance to thoroughly master this craft and begin sewing more complex models. Perhaps this activity will become not just a hobby, but also a future profession.
Winter jackets
If you want a jacket made of padding polyester, the question you need to decide is: what material to choose for sewing? Basically, such products are made from artificial leather or raincoat fabric. There is, of course, a difference in price, so first decide how much you are willing to spend on fabric.
Once you have chosen your fabric, you can get to work. So, how to sew a jacket using padding polyester with your own hands?
For such a jacket you will need: - artificial leather - 2.5 m. - lining fabric - 2.2 m. - padding polyester 200 - 2.5 m. - raincoat fabric - 1 m. - zipper 80 cm long. - standard zippers for pockets - 2 pcs.
Taking measurements
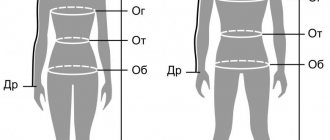
You can use an old sweatshirt, jacket, sweater or other clothing as a basis . But in order for the windbreaker to fit perfectly, it is better to take measurements and draw a pattern. They are especially important if you want to sew an elongated fitted model.
The measurements are always the same: waist, hips, chest circumference , shoulder width is needed as well as sleeve length and necessarily the length of your product.
Windbreakers do not have darts , which are required for a dress or blouse (on the chest or waist) . This is their main feature, which will facilitate the creation of patterns.
Attention! The length of the sleeve is measured from the top of the shoulder through the elbow (the arm should be half bent) and 5-6 cm below the wrist. Otherwise, the arm will be short in the finished product!
How to sew a jacket on padding polyester
We transfer the sample pattern onto paper. Then we cut out the details of our product from insulation and main fabric. All parts are connected to each other with pins, taking into account the places for the seams.
You quilt each detail along the marking lines, marking them in advance on the front side of the fabric. For this, of course, artificial leather is better suited, since by making marks on the front side, they can be easily washed off later. If you are working with another fabric and cannot make marks on the face, then do it from the wrong side of the fabric, then baste, and only then stitch together with the padding polyester.
To make the side pockets of the jacket you will need: - 2 pocket pieces each from the main fabric, lining and insulation (and you need to take only half of the insulation layer, i.e. carefully divide the padding polyester layer into 2 equal thicknesses by hand). - 2 pieces of strip (to add volume) from the main fabric and from the lining fabric.
For each piece, do not forget to leave room for an allowance of 1.5 cm.
We quilt and then sew the strip parts to the insulation pockets. We do the same actions with the details of the stripes and pockets made of lining fabric. We connect the pocket parts from the lining and the main fabric with the right sides and sew them together. Turn out the finished pockets through the cut.
We sew the finished pockets to our jacket, bending the edges in order to hide the lining.
We carefully connect and sew together all the prepared and pre-quilted parts of our product.
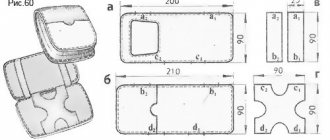
How to make a paper pattern for a children's jacket
Let's look at the finished pattern of a jacket with a hood .
We offer a drawing that allows you to sew a product for a baby whose age is 1 year and height 92 cm . Please note that the paper blank we are studying is made on checkered paper. The size of each cell is 1 cm . Thus, you will be able to independently calculate the parameters you need by enlarging or reducing the drawing.
Algorithm for working on a pattern
- Print the paper blank in full size or enlarge it yourself on graph paper, observing the proportions.
- Taking into account the measurements taken from the child, check whether the workpiece is suitable for the width of the product, the length of the jacket and sleeves.
- If necessary, make changes to the drawing, adjusting it to children's sizes.
- Cut out a shelf blank from paper. In the drawing it is shown in pink.
- Cut out the base for the back. You will find it on the same drawing as the shelf. Only now work with a blue pattern.
- Cut out the remaining parts: sleeve, side and center of the hood.
You now have all the paper parts needed to create a baby jacket.
Sewing a hood
We cut out the details of the hood from black raincoat fabric and sew them together. For the inside of the hood, we cut in the same parts from a different fabric and carefully sew them into the middle of the hood, then turn them inside out. We attach both lower parts of our hood to the middle of the neck of the jacket.
We cut out the parts for the bottom of our jacket and facing. We connect them right sides to the bottom of the jacket and sew them on.
For a hanger loop, you need to cut a piece of fabric in the form of a 1x8 cm strip. Of course, you can buy a finished piece, for example, in the form of a chain.
We sew it in the middle while connecting the facing and edging parts.
In order to sew a zipper into the product, we apply our zipper to the left and right parts of our jacket face to face and carefully stitch them. Before applying the zipper, step back 1 cm from the bottom of the jacket. This is done so that the finished product does not stick out at the bottom due to the fastener.
In the same way, carefully sew together the lining parts of our jacket. Sew on the lining, starting from the bottom of the jacket. Then we sew the sleeves from the main fabric and lining and connect them to the jacket.
Now the jacket is ready.
Stylish models and materials of women's windbreakers
You can find a wide range of products in stores; we will focus only on popular models:
- Classic - a light jacket with a fitted or straight silhouette with a zipper or buttons. More often these models are sewn from raincoat fabric.
- The shortened model is most often worn by girls under jeans or fluffy light skirts and miniskirts. These products are best made from eco-leather or denim.
- Biker jacket is a stylish youth jacket, a leader on world catwalks. The zipper in them is located diagonally. Looks great in business or sporty style.
- A quilted windbreaker is the warmest option among other products. Goes well with any things. Any materials are suitable: from knitwear to leather.
- Windbreakers made from lightweight fabrics can complement an evening dress or maxi skirt. This is a great solution for cool summer evenings. A clutch bag can become a bright accent.
- Model parks are new models for any age. The style of jackets has now switched to windbreakers. Fabrics need to be dense and without shine.
When you sew yourself, you can choose any model, or even create two fashionable items for the price of one.
Demi-season jackets
It would also be useful to learn how to sew a jacket for spring with your own hands.
With the onset of warm days, you want to take off your heavy fur coats and jackets and put on light, spring ones. If you are tired of your old things, you can try to make such a jacket yourself.
To work you will need:
- synthetic leather;
- padding polyester;
- lining fabric;
- zip fastener;
- short zippers for pockets.
We transfer the pattern samples onto paper. Then carefully draw it onto the fabric and cut it out.
Parts List:
— back — 2 children. middle part, 2 children. sides, 1 child. cut with a fold;
— shelves — 2 children. sides, 2 children. middle part, 2 children. central part, 2 children. planks;
- collar.
We connect the parts of the back of the jacket with pins, then carefully stitch and iron.
In the same way, we baste or connect with pins the parts of the middle part of the shelves with the side ones and also stitch them.
Baste the parts of the shelf strip together and sew them together. Then process the darts and iron towards the center.
Then alternately connect the parts from the lining and the main fabric. We prepare the collar pattern and cut it out of the fabric. We connect and sew the parts of the stand, sewing a collar between them.
Then we sew together the parts of the finished product from the lining and from the main fabric. We do the same with the sleeve parts and carefully sew them into the middle of the jacket.
The patterns will tell you in more detail how to sew a jacket with your own hands.
Everyone knows that all good things come to an end. And no matter how much we love warm summer days, they will definitely be followed by cold autumn and winter evenings. With the onset of cold weather, we have to spend money on warm jackets and raincoats. But why not try to make such products yourself? Moreover, it is not as difficult as some people think. All you need for this is to have at least the slightest knowledge of the features of the cut.
Features of fabric selection
Before sewing a windbreaker, you need to take a responsible approach to the selection of fabric. Whatever the style, clothing should fulfill its main purpose - to provide comfort in cool and humid weather. Therefore, the material must be moisture-resistant and at the same time hygroscopic so that it does not feel stuffy. Today, manufacturers produce many technological materials - for example, Nylon Ottoman, which does not allow water to pass through and promotes the effective removal of water from the body. A classic raincoat fabric would also be a good choice.
If you plan to wear the item in dry, cold weather, you can use natural dense fabrics - corduroy, fleece, knitted fabric. It is worth providing an insulated lining or an additional inner layer of fabric so that it is suitable for the late off-season. The hood is traditionally made of the same material or soft cotton. The cuffs and elastic band are made of elastic knitwear.
tell4all.ru
Materials and tools:
- main fabric (about 2 m);
- lining fabric (about 2 m);
- zipper for the entire length of the product;
- buttons, buttons for placket, pockets;
- dress elastic, laces;
- adhesive material;
- threads, pins, needles and sewing supplies.
It is also necessary to take into account the type of fabric when cutting parts. Corduroy is cut in one direction so that the pile moves from bottom to top. If you do not follow this rule, individual parts may shimmer and play with different shades in the light. When sewing knitwear or other materials with fraying edges, you should first process them on an overlocker or sew seams with closed edges - for example, linen or “locked” seams. Having chosen the fabric, you can start modeling the pattern.
Examples of patterns
Let's look at the most common patterns for autumn and winter jackets. Here's an example of how to sew a jacket using photo patterns.
You don't have to waste money on expensive fashion magazines. All you need to do is start your own collection of patterns and pamper yourself with new things whenever you want.
When you think about sewing outerwear with your own hands, the main criterion for you is the quality and style of the product. You won’t be able to sew such a thing yourself (“out of your head”). So you will first have to stock up on patterns. If you spend your time and effort on the work, you will succeed in everything. And you can proudly boast to your friends that this is your job.
LiveInternetLiveInternet
So I’m posting the long-awaited tutorial on sewing a winter jacket. This is my first time sewing a jacket with insulation.
Be patient, the MK will be large and detailed.
Pattern - Selected 1/2006 mod 20 r 92. Our height is 80 cm, weight 9 kg, according to the magazine's measurements we correspond to size 62-68, yes, we are very thin.
Insulation: holofiber 250 in the jacket, holofiber 100 in the hood
1. correct it and mark the location of the pockets
2. Cut out the parts from raincoat fabric. For now we are only working on the main part. These are the back, shelves and sleeves
3. Transfer the pockets from the pattern to the raincoat fabric 4. At this stage, I changed the runners to locks for future pockets 5. We sweep away the details of the raincoat fabric and insulation and cut them out. Here you can see the basting on the pocket, I marked it like this 6. As a result, we get these parts together with insulation 7. We work on the pockets, apply a facing for the pockets to the marked basting. It can be like my regular rectangle, since I am making a pocket with reflective edgings. If a regular pocket is zipped, then the part will be in the form of burlap pocket 8. We sew a line along our frame, strictly along the line
9. Cut in the middle and turn it inside out. In the end we get it. Along the frame we cut the insulation close to the stitching. The photo shows a view from the front and back sides
10. We apply reflective edging on all sides (I have it this way on all sides), and baste it. The photo shows the view from the front and back
11. Cut out the burlap (mine is made from lining fabric, someone else makes it from fleece) and baste it to the lock. We baste the lock to our frame and put a stitch along the frame close to the edge.
12.In the end it turns out like this. View from the face
13. From the wrong side, we apply the second burlap on top from the main fabric to the burlap. Basted and stitched
14. After the stitching has been done, cut off all the excess 15. Let’s see what the finished pocket looks like
16. Let’s also look at what the finished pocket looks like, you should do better than me 17. We connect the back and the shelves and sew along the shoulder seams. Cut the insulation close to the seam
18. Sew on the sleeves, cut off the insulation close to the stitching
19. Sew the sleeves and sides of the jacket with a single stitch. Cut the insulation close to the line
20. As a result we get
21. Cut out a collar and a placket for the hood from raincoat fabric.
22. We connect the collar with insulation. We reinforce the bar under the hood with interlining 23. We sew up the sides of the bar
24. Turn the bar onto the face. Here she is actually ready
25. Sew the collar and placket to the neck of the jacket, aligning all the marks 26. Sew the end of the placket to the collar
27. Our raincoat jacket is all ready. Let's put it aside, take a break and get to work on the lining of the jacket
28. We cut out the details of our lining. I have: shelves (without edges), back and collar made of fleece. The collar is made of raincoat fabric (mine is the same color as the overalls). The sleeve is made of lining fabric (someone can make it from fleece) and the hem of the sleeve is made of the main fabric. I have two more details in the photo that are extra, I wanted to do this with a detachable vest, but I changed my mind
29. Sew the lining to the shelves, sew it over the raincoat fabric 30. Sew moisture protection or whatever they call it on the back along the face
31. Sew on a hanger and a tag, label or whatever you want
32. Sew the back and fronts along the shoulder seams
33. Sew the collar to the neck
34. Sew on the sleeves and connect the sleeves and sides with one line, don’t forget to put a flag or an elastic loop in the sides, all this will serve as a cord holder (this is of course not necessary, you can do without it) 35. Look at the photo, I have the lining is 2.5 cm smaller than the jacket itself made from the main fabric, I then trimmed it by 0.5 cm
36. Let’s sew up the rest of the raincoat sleeves (this is our hem for the jacket)
37. Making a sandwich: a sleeve from the lining, then a cuff, then that part of the sleeve from the main fabric. We fold it face to face and lay line 38. Here we can see our sandwich better; cuff 39 is inserted between the parts of the sleeve. Let's see how it looks on the front side 40. We begin to connect the jacket itself with the lining. We sew the low sleeves of the lining and jacket from the main fabric with insulation face to face. We cut the insulation close to the line
41. As a result, we get a sleeve like this 42. We get this kind of bend, it didn’t turn out big for me, somehow I miscalculated 43. We sew the jacket and lining along the collar face to face, cut the insulation close to the line
44. We look at the face to see how it turns out. My fleece collar is one centimeter smaller than the collar made from raincoat fabric, this is done so that the edges of the fleece and raincoat fabric are not level, and the raincoat fabric is slightly placed on the lining
45. Connect the bottom of the jacket and the lining. We should leave a hole in the sleeve for turning inside out, I forgot to leave it then, at this stage I ripped open the section in the sleeve. We cut off the insulation close to line 46. We attach a piping and a windproof strip to the zipper on each side, if you have one on the inside. I put a layer of fleece and quilting inside the strip. the end of the strap is at an angle, we wrap the corner with a zipper 47. I ran an elastic band along the bottom of the jacket, and pinned the entire bottom with needles so that our elastic would not run away anywhere
48. Sew on a zipper. They swept it over the face and turned it away, putting a stitch on the car. The lining was folded and a new line was laid strictly along the already sewn line. Then whoever does what, someone makes marks on the zipper where all the lines coincide. Without unfastening the zipper from the zipper, I baste it to the other side and see if everything matches, and only then do I lay a line and separate the zipper, attaching the lining along the already laid line. After sewing on the lock, I connected the collar area from the inside along the allowances so that our jacket could be hung on a hanger
49. After sewing on the lock, the jacket already looks like a jacket
50. Let’s look at how the jacket looks inside, everything should be even
51. Here is our windproof bar covering our lock
52. Let's delay our lock, delay the low sleeves, put a stitch along the bottom (forming a drawstring, the one that was pinned with needles, make sure that the elastic does not get under the foot) I forgot to write that when we sewed the lock, we stitched the elastic along the bottom to the allowances of the lock. When I was stitching along the bottom I had to interrupt the stitching twice because the elastic band threaded through the flags got in the way
53. Cut out the details of the hood. My lining is also made of raincoat fabric, while others make part of it from fleece and the edging only from raincoat fabric. Whoever likes it. We connected the main part of the hood with insulation 54. We connect the parts. The main part has a reflective edging
55. We connect the hood along the top and sides, cut off the insulation close to the line, cut at the curves
56. We mark the elastic drawstring along the face, mark the places for the blocks and mark the places for the fur edging, if you have it on the buttons like I do. If the child is not small, it is better to make sure that the fur is fastened with a lock. I do this deliberately on the buttons and on top of the hood so that the fur does not get into the eyes
57. My edge will be held on by 5 buttons. Anorak buttons. We nail the top row in the drawstring of the hood, we will punch the bottom row at the edge with fur 58. In the end it should look like this
59. In the pattern, the bottom of the hood is straight, but we are not robots, we’ll make a slight rounding so that it goes smoothly over the shoulders
60. We thread the elastic all the way through and delay the drawstring, thereby securing the elastic at the ends. Connect the bottom of the hood, leaving an opening for turning. Let's delay the whole hood
61. We make the edge, cut out the strip (I have it from watches, since the fabric is all gone), connect and attach the edge and the strip face to face, make sure that the fur does not fall under the stitching, punch out the buttons before sewing. We turned it out through the unstitched hole and sewed it up across the face, or by hand, but I was too lazy, so I did it on machine 62. Our hood is ready. punched 3 buttons on the bottom of the hood and on the bar on the collar of the jacket 63. Our jacket is all ready. We are glad that we saved a lot on the winter set by deciding to sew it at home. 64. The whole set, together with the bib overalls, looks like this
65. We try it on and pat ourselves on the head. A new suit like this in our city costs from 3,500 rubles. Thus, our savings amounted to more than 2,500 rubles. Thank you all for having the patience to read to the end. I hope my MKs will at least somehow help you sew a kit.
Let's all clap our hands.
Working with the lining
If you sew a windbreaker without a lining, then this will be an excellent option for cool summer evenings, but if you need a warmer model, then it is better to have a lining, or you can even use a quilted jacket with a small layer of synthetic padding.
To cut out the lining fabric, you will need the same windbreaker pattern for the female model. First, all the elements of the top of the product are assembled, then the lining is completely sewn together, and then they are connected.
The assembly sequence is as follows: first along the neckline and front cut; further along the bottom, and then in the sleeves.
To ensure that all joints are beautifully decorated, they are sewn through a hole in one of the sleeves. Lastly, the sleeve is sewn up.
How to work with finished stitch
Buying a ready-made stitch is an excellent solution for those who want to save their time.
Among the assortment of our store there is an original Moncler raincoat, quilted with Isosoft insulation 250 g/m2. How to work with finished stitch? Here are some tips.
- During transportation, the material may become wrinkled and look completely different than in the store. To revive it, you need to remove it from the packaging, shake it and spread it on a flat surface, preferably overnight. The insulation needs to be “saturated” with air, then it will become lush again.
- If you don’t have time, you can start cutting. During operation, the material will also begin to return to its normal form and gradually straighten out. If there are creases in the material, the stitch may be ironed before cutting. But you need to be very careful: the material can accidentally melt or burn.
- It is better to cut quilted material facing sideways.
- The parts need to be laid out in one direction. Raincoat materials often have different shades, so we recommend arranging the parts so that the top always faces the same direction.
- The direction of laying out the parts can be chosen either longitudinally or transversely - this is not important in raincoat materials. Focus on the stitch pattern and in which direction you want it to appear in the product.
- Pay attention to stitch alignment. It is better when the pattern matches along the side seams, along the edge cut, as well as in other elements that are present in your product.
- After cutting, it is worth laying a line around the perimeter of the parts close to the cuts. This is necessary so that the stitch does not unravel during work.
- There is no need to wash the stitch before sewing - otherwise it will unravel. But the finished product can be washed, taking into account the recommendations. For example, we recommend washing quilted items from the GRASSER store on a delicate cycle without spinning at a temperature not exceeding 30 degrees.
Coat and jacket according to the GRASSER pattern№713