A sense of beauty is inherent in every person, so many try to decorate their home and garden in the best possible way. Still, how to make a ladybug with your own hands quickly and cheaply remains a mystery. Creative gardeners who know a lot about decorative crafts from scrap materials come to the rescue. Understanding some of the subtleties of the creative process significantly saves time, money and effort. However, the resulting result will exceed all expectations, because funny figurines of insects will flaunt in the company of original and rare plants.
Volumetric paper ladybug applique: step by step photos how to make
Applications with children are relevant, interesting and educational at any age. These are the ladybug applications offered to be made in many kindergartens with children. This application can be done in both the middle and senior groups. The only difference will be that in the younger group all the details for the appliqué will be prepared in advance, and in the older group all the details will have to be done independently.
A paper applique “ladybug” based on templates is perfect for spring, when all nature wakes up and plants begin to bloom. However, this does not mean at all that you cannot do it together with your child at any time of the year, because creating an applique with your baby is always exciting, fun and interesting. Such works can be used to decorate a room in a kindergarten or to attach them at home.
It is with the help of such an application that the child’s involvement in creative work is demonstrated. The “ladybug” applique will help your child develop creative abilities and also teach him how to work with visual materials. We must not forget about the development of fine motor skills.
How to make a ladybug applique
Absolutely every child can make a “ladybug” applique.
It is noteworthy that such work will be of interest to children, as it looks quite interesting due to its volume.
Volume applique
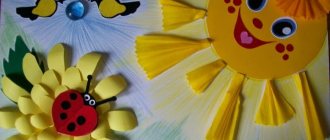
One example of a “ladybug” craft is a three-dimensional appliqué. To create such an applique you will need white, red, black and green paper, glue, and scissors. You will also need a template in the form of a leaf; the remaining parts are created without using a template.
First of all, a sheet is cut out using a template from green paper, the outline of a leaf is created on it, and in the end we get this detail:
The second step is to make a small black circle and glue it to the base.
The next step is to glue a small semicircle - this will be the head. Also, white circles are glued to this part, which will serve as eyes.
Next, two large circles are cut out of red paper; they should be 2 times larger than the body itself. The circles are folded in half and glued to the entire applique, as shown in the photo.
You can understand that these two semicircles will be wings. At the gluing stage, it is important to remember that only one side of the semicircle needs to be attached to the body. It is due to this gluing that the volume of the application appears.
The final step will be gluing black circles on the wings, as well as finishing the whiskers on the ladybug. The end result is something like this:
From stripes
The second example is an applique of stripes.
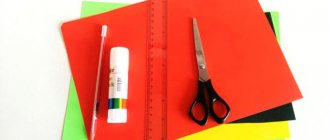
For such a craft you will need colored paper in black, red and white, scissors, glue, pencil, and a ruler.
A circle is drawn on red paper. A circle can be made using a glass by circling its bottom. Identical strips about 1 cm wide are cut.
The first of the strips is glued at the end to the base as shown in the photo.
The next strip is glued at an angle of 90 degrees relative to the first. Next, all the strips are glued in such a way that they cover the voids. Depending on the size of the application itself, a completely different number of strips may be required. For this reason, it is necessary to ensure that the body is more dense, for example, as shown in the photo.
The next step is to create the head, eyes and whiskers. Black small circles are cut out. A semicircle for the head is also created as shown in the photo; do not forget about the mustache. For the eyes, small white ovals are made and the pupils are drawn out with a marker.
- Secrets of builders: working with couplings
DIY New Year's crafts - 9 best options
DIY craft from CDs
Black circles are glued to the back of the ladybug, and the muzzle and whiskers are glued to the front of the lower part of the entire body.
The ladybug craft is ready, now together with your child you can come up with an interesting story about it.
Hanging ladybug
If neither the parents nor the child like ordinary appliqués, then you can make a hanging ladybug.
To create such an application, you must complete all the steps described in the volumetric craft.
Thus, at the preparatory stage we get the same voluminous craft as before. However, after the last stage, when attaching the circles and finishing drawing the antennae, one more step must be completed. It is due to the last point that the ladybug can be hung anywhere, and it will become a wonderful decoration in the interior.
The two wings that remain unglued are connected to each other; they can be glued together, or they can be fastened with a stapler. A thread is threaded through the extreme point of the fastened parts, from which the resulting figurine can be hung.
From colored paper for children
If the child does not want to do something voluminous, then you can make a regular applique from colored paper “ladybugs in a clearing.”
- DIY crafts for the year of the monkey 2016
- DIY paper tulip craft
- DIY snowman craft
For this craft you will need colored paper, glue, scissors, a pencil, and a marker.
You can use green colored cardboard as a base; it can become a lawn.
Next, several small circles are cut out of red paper, which will become both the body and wings.
This circle is glued to the cardboard, and a black semicircle is glued to the edge.
Circles smaller than the wings are cut out of black paper and glued in a chaotic manner onto the wings.
The final moment will be finishing the drawing of the antennae, legs, as well as the line demarcating the wings.
If the child wishes, you can add eyes.
Thus, the application will look something like this:
- Autumn paper crafts
- Crafts from stones for the little ones - learning colors
- DIY helicopter craft
When are plastic bottles used?
There are many options for creating ladybugs from plastic bottles with your own hands. The simplest is to use bottoms. They are cut from plastic containers of various sizes (0.5-2 l). The blanks are painted both inside and outside. Several layers are applied to create a smooth surface. The head is made from a regular foam ball. A third part is cut off from it, and then a recess is formed in order to glue the base to it. The antennae are made from disposable forks, the edges of which are heated by candle fire and then slightly bent. After this procedure, they are cut off with tweezers and inserted into the holes on the head. Finally, store eyes are glued on and dots are drawn on the protrusions and sides.
Before making a ladybug with your own hands, the number of required exhibits for the garden is determined. The design of the exhibition, as well as the color scheme of the front garden/rock garden, is carefully thought out.
A more painstaking task would be to create a ladybug with open wings. In this case, a 2-liter bottle is used. The neck and bottom are cut off, and a slit is made along it. From the resulting canvas, 4 identical ovals of a slightly elliptical shape are cut out.
Coloring is done as follows:
- Donyshko. Black paint is applied in several layers both inside and outside.
- The first pair of wings. It is painted in the form of a web, but remains transparent.
- Second pair. Dots are drawn on the outside, and the inside is completely covered with red paint.
Next comes the assembly. 4 wings are attached to the inverted bottom using superglue. The cover is glued to the front and painted black. Eyes, eyelashes and a smile are applied to the face. Holes are cut at the base into which the wire is threaded as a fastening element.
Step-by-step instruction
Each application contains step-by-step instructions that must be followed. In some cases, you can change the order in which certain points are performed if this does not affect the final result. So, for example, small circles can be glued to the wings while they are being formed.
In order not to get confused, parents can make a short note on the topic of the craft before the lesson.
Required Tools
Among the tools and materials that can be useful in all crafts, you will need: colored paper, colored cardboard, glue, scissors, pencils, felt-tip pens and in some cases a ruler.
Handling each of the tools does not present any difficulty. The only important point is the fact that it is worth instructing the child if he has not previously worked with dangerous tools, for example, scissors.
Along with this, parents should remember that they need to monitor the entire process of work not only so that the applique turns out beautiful, but so that the child does not manage to harm himself: he does not accidentally stain himself with glue or does not cut his clothes.
Templates
To create a more accurate silhouette of a ladybug, so that you have a general idea of the resulting application, you can use the following templates:
Algorithm of actions and gluing
The entire algorithm of actions is also described above. We can only add a note that it will be much more convenient for a child to use glue with a pencil than with PVA glue.
All stages of creating an application should be done with extreme caution and accuracy. Depending on the age of the child, it is necessary to monitor his actions and control the entire process of creating crafts.
User tips
Those who have already made such cows can give some advice to parents who are just starting to engage in such activities.
Some people say that you can talk to your child about a specific topic in order to diversify the activity and identify the child’s interest. The craft can be done not only in kindergarten, but also in primary school.
Some even suggest letting the child do everything on his own, so that he not only develops his creative abilities, but can also dream up a little.
Some parents give advice regarding the ladybug's eyes. Paper blanks can be replaced with ready-made plastic eyes. Such eyes will diversify the craft and make it more lively and interesting.
In a word, creating such a fake will definitely give both the child and the children a lot of positive impressions. Everything depends only on imagination and desire.
DIY ladybug made from a hard hat, natural materials and plastic bottles
You can decorate gardens and private areas in different ways. The simplest is to use ready-made decor, which is sold in specialized stores. But it has disadvantages - limited selection, high price. If you understand that you are ready to create yourself, have imagination and enough free time, master a simple master class and create garden decor with your own hands. Next, we will tell you how to make a colorful ladybug - from natural materials like stone, clay or affordable plastic. Sometimes decor is knitted or sewn, but these are not very durable or reliable solutions.
How to make a ladybug for your dacha garden with your own hands
Artificial and natural materials can be used to decorate the garden. All of them are accessible and easy to use. Making these crafts is a great family activity for the whole family. Read how to make a cellar in a private house here.
Ladybugs are made from paper or plasticine, but such options will not be stable or durable.
Drawings on a construction helmet
Although not the most luxurious, it is the simplest and cheapest option. Usually no one buys new helmets - they use the ones lying around in the barn.
The optimal color for creating a garden ladybug is black; such a base will be as rich, versatile, and durable as possible. It is enough to draw wings, eyes, paws, and the figure for the garden is ready. Use paints that are durable and non-toxic. If they are not there, arm yourself with a regular marker. Find out how to make beautiful wooden signs for your home here.
You can place garden figurines outdoors only if you are sure that they will withstand exposure to sunlight, rain and other precipitation.
From natural material: descriptions and how to make
Eco-friendly natural materials are readily available and inexpensive, so they will be the best choice in many situations. The main solutions used for garden decoration are pebbles, stone, and clay.
From stone and pebbles
Ordinary round stones are ideal blanks for creating garden decor; they can also be used to make beautiful decorative covers for a well. You will only need to apply red paint (body) to them, draw dots, wings, head, mustache. Each layer will need to be allowed to dry before applying the next one.
Place ready-made ladybugs on grass, stones, stumps, near ponds and playgrounds, swings, and residential buildings. They can be simply unfolded, installed or secured to prevent movement.
If there is only one large block of stone on the site, insects can be drawn on it.
From clay
When there are no suitable large stones, and there is neither patience nor time to create an intricate mosaic, you can mold the body of an insect from clay. Any variety will do, you just need to knead the mass before work and ensure the optimal density.
Taking into account air humidity, drying takes from several hours to a day or more. Find out how to make a barn for 10 heads for your summer cottage in this material.
To speed up the hardening of the clay mass, it can be fired in an oven.
Crafts from plastic bottles
Plastic bottles are not the most environmentally friendly material, but they are cheap and versatile in terms of use. It can be used for many things in garden landscaping, including a greenhouse made from plastic bottles.
- Cut off the bottoms of the bottles. 1.5 liters are best; if you use plastic barrels for watering, the ladybug will turn out to be out of proportion.
- We paint it red on the inside so that the paint does not wash off when it rains.
- We make a circle from plasticine for the future insect's head. And we attach it to the bottom. You can also use plasticine.
- For the antennae, you can use wire, which will need to be “wrapped” in plasticine, or the painted teeth of a plastic fork.
- For the eyes, you can take blisters from used tablets.
The result is small ladybugs that can be carefully placed throughout the garden. And if you try a little, you can make a stork from plastic bottles.
From plastic spoons
Plastic spoons are the next option after bottles in terms of practicality. The shape of the spoons is ideal for creating insects with outward wings. Take 3 spoons for one cow - no more is needed. Paint two of them red, then add dots. Make one black - it will serve as the body or base.
The head is usually constructed from clay, buttons or other suitable small items. This article will tell you how to make a beehive with your own hands at the dacha.
A large-scale craft will not come out of plastic spoons, but it will be quite voluminous.
Made from concrete
Concrete is a good alternative to solid blocks of stone and pebbles. Here you need to use a stone base and multi-colored tiles. The method is labor-intensive, but interesting and gives beautiful results.
Laying out a mosaic or curb requires more than one hour of time - please be patient.
Now take cement - any cement will do, the brand doesn’t matter. You will knead it in a bowl or basin - choose the shape of the container so that you immediately get the desired product. The tiles are red and black; in addition, polyethylene is needed for work. Don't forget to lubricate the molds for paving slabs.
Place a bag in a basin or bowl so that the cement does not stick to the sides (it will be difficult to tear it off, especially without damaging the container). Next, attach the mosaic pieces on top of the pieces of black and red tiles. That’s it – the cement ladybug is ready, all you have to do is place it in a visible place in the garden.
Other options
If the options mentioned above do not suit you for some reason, you can try others. They are not so durable, but they also have the right to life:
- Beads - from small beads you can make miniature cute figures and use them to decorate gazebos, playgrounds, and trees. Weaving is not easy, it is best to work according to a pattern - you can find it on the Internet.
- Textiles - the main task in this case is to sew a dense, voluminous pillow from red and black scraps of fabric. To obtain a fluffy product, fur is used. You can use buttons, beads and other elements as decoration.
- Threads for knitting - you can also simply knit a ladybug. Sizes – any to your taste, shapes – standard round or original. Hang products on fences, fireplaces, shelves, trees in the garden.
- Paper is a short-lived option, but it will make beautiful crafts. The simplest option is to simply fold red sheets of paper into shapes or create complex origami-style compositions. You can glue an insect from several parts, use a couple of sheets of paper or a whole package.
The best way to make paper crafts with children is by watching a video. You can also try quilling - the technique involves the use of thin strips of paper. From them come flat or small round-shaped ladybugs. The task is not difficult, but quite troublesome and requires a lot of time and perseverance. Find out how to make vertical beds for vegetables at this link.
Beaded pillows will be an excellent country interior decor. If you make them strong enough, you get durable textiles and a functional accessory.
conclusions
- Do-it-yourself garden decor, such as crafts made from stones or plastic bottles, is not difficult to make; the method is quite economical.
- To construct ladybugs, different materials are used - from plastic bottles to stones and clay.
- Homemade decorative figures are not durable, but they are cute, beautiful, and can be made with children as crafts.
- The best natural materials for work are clay, stone, concrete. Concrete is a cement mortar from which a figure is made and then covered with mosaic tiles.
- Short-lived, but very interesting crafts are made from fabric, beads, and paper. The paper used is regular colored paper or for the quilling technique. You can make frames from cardboard and fill them with multilayer structures from ordinary thin sheets.
- Usually ladybugs are arranged, hung, that is, placed in a free order. But if desired, the finished figures can be securely fixed (for example, concreted).
- The simplest materials to work with are plastic spoons and bottles; such decor will be enough for one season. For more durable structures, use stones or clay (this can be single products or, for example, a large block with a painted bunch of small insects with red bodies with black dots).
Types of molds for making tracks
How to make a peacock from plastic bottles with your own hands: step-by-step instructions
DIY crafts for the playground from scrap materials
What can be made from plastic bottle caps at the dacha
Savvy
Halloween is coming soon and a ladybug costume can be a completely original idea for a dress-up party.
We will need:
Cut two large circles from a cardboard box and cut them about 2/3 in the middle. After this, cut 12 small cardboard circles and 4 small circles for the rim. Cover large circles with red paint.
Paint the small circles black.
Cut two strips of red ribbon or fabric to hold the costume on your shoulders. For the side ties we used thin tape, but you could also use red tape or fabric. Cut short strips and secure them to the shoulders and sides with hot glue.
We glue the black circles onto red cardboard. 6 black circles for each red circle.
To create a headband-horns on your head, take a strip of black fabric or paper and make a headband according to the diameter of the child’s head. The horns themselves are made from two wire brushes, to which two small black circles are glued on both sides. We attach the horns to the headband with glue and the costume is ready.
The costume is held on the child by two shoulder ribbons and two more ribbons on the sides. Put on over the head like a poncho.
How to make a ladybug with your own hands
The first method of making a ladybug using the origami technique is considered the simplest.
To do this, you need to take a square sheet of red paper and bend it diagonally to form a triangle, diagram 1.
Then the corners of the resulting triangle must be folded towards the middle according to diagram 2. It is better if the corners are not folded completely. The beetle's wings look more realistic this way.
Next you need to make the head. To do this, the workpiece should be turned over to the other side, and the corner should be bent upward, as shown in diagram 3. The next step is to bend the same part again in the opposite direction.
The base for the ladybug is ready, it should look as shown in the picture.
All that remains is to draw spots and eyes on the paper bug with a black marker.
From colored paper
DIY ladybug made from colored paper - this option is a little more complex than the first.
For the craft you will need:
- Colored and corrugated paper.
- Glue.
- Scissors.
- Double-sided tape.
- Paints or colored pencils.
You should start making a bug from the body.
- A circle and legs are cut out of colored paper. It should be taken into account that the size of the circle will correspond to the size of the future craft.
- Then the square sheet of corrugated paper should be folded in half, and then diagonally.
- The leaf unfolds. According to the resulting contours, the workpiece is folded again, but inward. This is how a triangle turned out.
- A circle is drawn on it so that in some places it extends beyond the paper triangle.
- Then the circle is carefully cut out with scissors. At the same time, places where the circle goes beyond the limits are left untouched.
- The body is ready.
- The legs, head of the bug and spots are cut out from a black sheet of paper. Eyes are cut out of white.
- All parts are glued together.
The funny bug is ready. This craft can decorate a child’s room or “refresh” the interior of the kitchen.
Made from velvet cardboard
This option for creating a bug is very simple. This craft can be done together with your child.
To create it you will need:
- Velvet cardboard.
- Glue.
- Scissors.
- Pencil.
Let's start making:
- From a sheet of velvet cardboard you need to cut out two large circles and one small one. Then fold two large circles in half.
- “Specks” are cut out of black paper and pasted onto two large circles.
- The two halves of the red circles are glued together. A muzzle is formed from a small circle.
- The craft is combined into a single whole.
You can attach a funny bug to a window or decorate a flower pot with it.
DIY paper bug garland
To make this decoration you will need:
- Velvet cardboard.
- Colored paper.
- Scissors.
- Stapler.
- Ribbon.
Blanks for the bug are cut out of velvet cardboard according to the stencil.
Small specks are cut out of black paper and glued onto the future wings of the bug.
All parts are glued together.
You can make as many of these bugs as you like, but the more there are, the more beautiful the garland will be.
All the resulting bugs are secured to the ribbon using a stapler.
If everything is done correctly, you will get the same garland as in the photo below.
Volumetric paper ladybug craft: master class
To make a voluminous bug, you don’t need to spend a lot of time and effort. It will be enough to arm yourself with: colored paper, cardboard, scissors, glue and a little imagination.
- A circle is cut out of cardboard. This will be the body of the beetle.
- Then strips are cut out of red colored paper to serve as the back.
- Then the edges of the strip are carefully bent and secured with glue to a cardboard circle, as shown in diagram 2.3.
- Then the next strip is fixed across the first.
- The same stripes must be used to fill the free space. But you need to remember that the number of strips needed for the craft depends on the size of the body.
- The result is a “dome”, as in Figure 4. The back should be dense.
- The head, legs and spots are cut out of black paper.
- All blanks are held together with glue into a single whole.
Ladybug is ready!
Such a paper craft can even serve as a talisman. For example, many people are sure that if such a toy is stuck on a window, it will definitely attract true love and good luck into the life of its owners.
Moreover, it is better to make such crafts together with the child, turning this activity into an exciting game.
Originally posted 2018-03-19 05:42:18.
From plastic spoons
To make one insect, take three plastic spoons, one flat button, acrylic paints, glue and scissors.
First, let's decorate the spoons and the button. It is better to cut the handles after decorating, as it will be very convenient to hold the objects during the process and secure them for drying. We paint one spoon black and two red. After drying, apply black spots to the wings.
Using glue we fasten the entire structure.
And at the end a muzzle.
You can attach a wire to the bottom, this will make it easier to place the winged ones anywhere in your garden or flower bed.
Through creativity - to life mission
How to make a ladybug with your own hands from different materials for garden decor
A sense of beauty is inherent in every person, so many try to decorate their home and garden in the best possible way. Still, how to make a ladybug with your own hands quickly and cheaply remains a mystery. Creative gardeners who know a lot about decorative crafts from scrap materials come to the rescue. Understanding some of the subtleties of the creative process significantly saves time, money and effort. However, the resulting result will exceed all expectations, because funny figurines of insects will flaunt in the company of original and rare plants.
First, we decide what to make a ladybug from for the garden so that it is aesthetically pleasing. Properly selected material will allow you to create a luxurious exhibit that can compete with store samples. High-quality paint, glue and decorative elements determine the service life of the product. In addition, diligent execution of the work will help minimize possible defects.
Thus, the most suitable materials for crafts are:
- helmets;
- plastic bottles;
- stones;
- plastic spoons.
The next step in how to make a ladybug with your own hands is design. The insect is made with either open or closed wings. The first option is more labor-intensive, requiring a painstaking and creative approach. However, figures of this type look much more luxurious than all the others. The ladybug's facial expression stands out as a separate item. Of course, smiling faces always evoke a response from garden visitors.
The final touch of such mastery will be the location in the garden. In this case, the fact that paint usually fades in the sun or cracks is taken into account. For this reason, exhibits are located in shaded areas, under trees, bushes or tall plants.
In most cases, decorative garden elements are attached to surfaces or soil. Thanks to this fixation, the area looks neat. Moreover, neither natural phenomena nor evil people will be able to disturb this heavenly idyll.
How to make a ladybug with your own hands from helmets
The best option would be red or orange helmets, because they do not have to be painted. These can be not only construction or mining models, but also children's or bicycle models. For better decorativeness, surfaces are given a glossy shine using a varnish coating. A ladybug made from a helmet is painted/varnished with your own hands in the evening hours, because under the influence of ultraviolet radiation all the properties of the paints are lost. The sequence of actions in this process plays an important role.
Before painting work, a plastic blank:
- washed thoroughly;
- dries naturally;
- coated with a primer for plastic.
It is noteworthy, but red is not the main shade of the amazing insect. In nature, there are species with black, yellow or orange shells, which significantly expands the gardener’s horizons for creativity.
Due to this, the coloring composition lies as smoothly as possible and will not peel off over time. Acrylic paints are often used, which shine and shimmer in the sun. For reliability, the helmet is covered in two layers. If possible, use a special gun or compositions in cans.
After this, the antennae are made:
- take two identical tubes from a spray/spray bottle;
- wires are inserted inside;
- the outer edges are curled or balls are placed on them.
Two holes are drilled above the visor. The antennae made are inserted into them and tightly fixed. Rods with threads and nuts are often used as legs. The material is cut into equal pieces by a grinder. The outer edges are carefully polished, and the fastening side is screwed. Then comes the design process.
Botany will help you understand how to decorate a ladybug. Depending on the variety, insects have a different number of points: from 1 to 10 on each wing. They can be the same or different sizes. Creating such patterns by hand or with a marker will not be successful. For this reason, masking tape is used.
The algorithm for creating decorative circles comes down to the following:
- on any surface (wall or table) they are glued in strips 10-15 cm wide and 20-30 cm long;
- circles are drawn on the resulting areas - inverted cups of different diameters are outlined with a marker;
- circles are cut out and removed;
- The edges of each workpiece are fixed with masking tape to create a square with a hole inside.
Two strips of tape are glued to the center of the helmet to create a border for the wings. Towards the back it may become narrower. The resulting blanks, 2-3 pieces, are placed on each side. The front part with the visor is also separated in the shape of a semicircle or triangle, because it will become the muzzle of a craft for a ladybug’s garden. Next, black paint is applied using a brush or a piece of foam rubber. The bases with antennae are carefully painted. If a gun is used, be sure to cover all necessary areas on the back with masking tape. After drying, the tapes are removed.
The eyes are painted with white acrylic paint or ready-made decor for toys is purchased. To give the exhibit a cartoonish look, eyelashes are added, as well as a smile.
Stones - an opportunity to perpetuate your art
The easiest way is to create ladybugs from stones. Pebbles are most often chosen as the starting material. It is washed thoroughly with water, and after drying, it is covered with a solution of PVA glue and water. This composition helps to level the surface and smooth out roughness. Next, white acrylic paint is applied to give the top layer a bright, richer shade. The resulting base is painted over with two layers of red paint.
After which the painstaking drawing begins:
- muzzles;
- central strip;
- points;
- antennae;
- eyes, eyelashes;
- smiles (can be spot-on).
Sometimes you come across interesting twin stones. Ladybugs are very easy to create from them, since their backs already have a relief division.
To make the edges as smooth as possible, the design is first drawn with a marker or gel pen. If possible, a V-shaped neckline is drawn from the beginning of the head on the back. White wings with small veins are depicted along it. In another design, the same cutout is made in the central part of the back with an extension at the bottom. At the end, the stone is given a glossy shine, which secures the painting, using acrylic varnish.
When are plastic bottles used?
There are many options for creating ladybugs from plastic bottles with your own hands. The simplest is to use bottoms. They are cut from plastic containers of various sizes (0.5-2 l). The blanks are painted both inside and outside. Several layers are applied to create a smooth surface. The head is made from a regular foam ball. A third part is cut off from it, and then a recess is formed in order to glue the base to it. The antennae are made from disposable forks, the edges of which are heated by candle fire and then slightly bent. After this procedure, they are cut off with tweezers and inserted into the holes on the head. Finally, store eyes are glued on and dots are drawn on the protrusions and sides.
Before making a ladybug with your own hands, the number of required exhibits for the garden is determined. The design of the exhibition, as well as the color scheme of the front garden/rock garden, is carefully thought out.
A more painstaking task would be to create a ladybug with open wings. In this case, a 2-liter bottle is used. The neck and bottom are cut off, and a slit is made along it. From the resulting canvas, 4 identical ovals of a slightly elliptical shape are cut out.
Coloring is done as follows:
Donyshko. Black paint is applied in several layers both inside and outside.
The first pair of wings. It is painted in the form of a web, but remains transparent.
Second pair. Dots are drawn on the outside, and the inside is completely covered with red paint.
Next comes the assembly. 4 wings are attached to the inverted bottom using superglue. The cover is glued to the front and painted black. Eyes, eyelashes and a smile are applied to the face. Holes are cut at the base into which the wire is threaded as a fastening element.
Using regular spoons
A ladybug is made from plastic spoons according to the same principle as from a bottle. Only here you don’t need to cut out the wings, because they are already ready. Take three spoons, two of them are painted red on both sides, and one is painted black. Dots are applied to a bright background. After drying, the handles are cut off.
The craft is folded so that the red wings do not completely cover the black belly. In this case, the angle of inclination or the degree of expansion of the wings is selected depending on the design. A black button or a cover painted in a dark shade is glued as a head. With such funny ladybugs, the garden will be filled with a special atmosphere.
How to make ladybugs with your own hands from CDs, Kinder Joy and plastic spoons - video
Material selection
First, we decide what to make a ladybug from for the garden so that it is aesthetically pleasing. Properly selected material will allow you to create a luxurious exhibit that can compete with store samples. High-quality paint, glue and decorative elements determine the service life of the product. In addition, diligent execution of the work will help minimize possible defects.
Thus, the most suitable materials for crafts are:
- helmets;
- plastic bottles;
- stones;
- plastic spoons.
The next step in how to make a ladybug with your own hands is design. The insect is made with either open or closed wings. The first option is more labor-intensive, requiring a painstaking and creative approach. However, figures of this type look much more luxurious than all the others. The ladybug's facial expression stands out as a separate item. Of course, smiling faces always evoke a response from garden visitors.
The final touch of such mastery will be the location in the garden. In this case, the fact that paint usually fades in the sun or cracks is taken into account. For this reason, exhibits are located in shaded areas, under trees, bushes or tall plants.
In most cases, decorative garden elements are attached to surfaces or soil. Thanks to this fixation, the area looks neat. Moreover, neither natural phenomena nor evil people will be able to disturb this heavenly idyll.
DIY ladybugs for the garden: master classes with photos and videos in photos
DIY ladybugs for the garden are a real decoration for any homestead. Every experienced gardener strives to make his garden especially cozy and beautiful. To diversify your summer cottage, you need to decorate it with original crafts, which with their brightness will lift your spirits every time. One of the simplest and cutest crafts is a ladybug. It’s not for nothing that these insects are called “God’s”; according to legend, they bring happiness and great joy to the house. In addition, this wonderful creation can be made from almost any material. Ladybugs can be made from ribbons, plastic spoons, felt, and even salt dough!
These wonderful master classes for beginners will tell you how to make ladybugs for the garden.
From paper
The simplest craft option is a cow made of paper or cardboard. To do this, you just need to fold red paper using the origami technique and draw eyes with spots. You can also glue a ladybug from several parts of different colors.
You can decorate trees and bushes in your dacha with these crafts:
Country tomato sandwiches
You can have a delicious and original snack in the garden thanks to sandwiches made from cherry tomatoes and olives. Tomatoes will do for the body; heads, points and antennae can be made from black olives. The sandwich can have any filling.
From beads
These cute ladybugs made from beads, which can be made in this master class, will not leave avid lovers of needlework indifferent. You won’t get a large figure, but even these very small cows can decorate your garden by gluing them to tree leaves. The weaving pattern looks like this:
Photos of finished beaded cows:
From plastic spoons
This wonderful craft from plastic spoons can be made with children. For each such cow you will need three spoons. Paint two red and draw black dots on them; they will be wings. And paint one spoon, which will become the body, black. Glue all three spoons together. All that remains is to add a head - made of buttons, clay or a button.
The finished craft looks like this:
From a construction helmet
Ladybugs made from helmets can be used to decorate a flower alley in the garden or courtyard. A helmet is the main material when working on a product. A black marker is useful for drawing dots and faces. Draw spots, eyes and wings on the helmet - that’s it, the figurine is ready for the garden!
Master class on making ladybugs for decorating a summer area
Natalia Chernikova
Master class on making ladybugs for decorating a summer area
You can make ladybugs . They are perfect for decorating a kindergarten area in the summer , as well as for organizing games for the development of speech breathing.
To work you need:
• Red and black gouache, brush
For work we need 3 disposable spoons.
Using scissors, cut off the handles of the spoons, leaving about 1-2 cm. You can break them off. They are fragile and break easily.
Use scissors to trim the edges.
Using Moment glue, smear the body on the top left and apply the wing, pressing.
We also spread the body on the top right and apply the second wing.
From a ball of thread we cut a thread approximately 20-25 cm long. The color of the thread can be any.
Using Moment glue, glue the end of the thread at the top of the wings in the middle.
Let's take a decorative stone. And with the help of a glue gun we will glue it in the place where we glued the thread.
This will be the ladybug's .
Paint both wings red using gouache.
Let's color the head black.
Let's color the body that looks out from under the wings also black.
Apply black dots to the right wing. There can be any number of them. Our ladybug has 3 of them .
We apply black dots symmetrically on the left wing.
Turn the ladybug over and paint its body black.
Paint the inside of the wings red.
The decorative stone turned out to be heavy. He outweighs the torso. To avoid this defect, the idea came to make the ladybug's from a lighter material.
To do this, you need to take a bottle of detergent.
We cut off the moving part from the cork that allows you to open the detergent.
Just as in the case of a decorative pebble, use a glue gun to glue the part to the body of the ladybug .
Color the head and body black.
Wings in red.
Apply black dots to the wings.
We coat the finished ladybug with varnish .
To decorate a site or to develop speech breathing, we need several of these ladybugs . Their wings can be folded in different ways. The number of points on the wings can also be different. When designing the wings, do not forget about the rule of symmetry.
Ladybugs can be hung from a flower by strings.
They will hang freely. You can blow on them to make the ladybugs spin , thereby creating the effect of flight.
"Santa Claus on a reindeer sleigh." Master class on making decorations for a music hall for New Year's events Did you know that Santa Claus rides around on a sleigh and deftly controls a team of reindeer? And in his sleigh there are gifts for cute girls and...
Notes of a lesson on artistic and aesthetic development “Let's plant ladybugs on leaves” Notes of an open lesson. Educational field “Artistic and aesthetic development”. Section: “Development of productive activities:.
Master class “Garland of disks” for decorating a site I bring to your attention a master class on making a garland for decorating a site. This garland looks spectacular in winter. Master class “Hook for decorating stands” It is convenient to use needles and buttons in the design of stands, but they are prohibited for use in kindergartens. So I came up with a device. Master class on making a penguin to decorate a group for the New Year. For the New Year's decoration of a group, I made a penguin. The height of the toy is 1m 20 cm. 1. From a box and a plastic bottle using tape. A master class on making a goat to decorate the fairy tale “Silver Hoof” in our kindergarten group is a tradition. For the New Year, each group draws up a fragment of a fairy tale with a winter plot. This year I'm working in high school. Master class on making a vase to decorate a group for the holiday of March 8. A wonderful spring holiday is approaching. To decorate the interior and create a festive, spring mood, I want to offer it to yours. Master class “Zoo” for group design In order to constantly maintain the interest of preschoolers and diversify their games, it is necessary to regularly update thematic corners.
Source