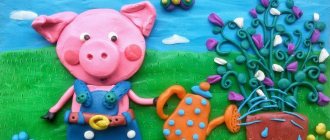
Stylized images of the sun always evoke a positive reaction from children and adults. The image of the luminary is associated with warmth, the spring awakening of nature and a pleasant summer vacation.
Crafts in the form of a cheerful, bright sun at the end of winter, after the boring cold, when since ancient times people celebrated Maslenitsa and prepared for the arrival of spring, are especially uplifting.
At this time, many kindergartens and schools hold competitions on the theme of national holidays and children are asked to make homemade sun crafts with their own hands, which the little ones learn to do together with older family members.
Various craft options
In children's creativity there cannot be two identical works, but making a sun still requires a certain set of elements that can be made from any materials. The main detail of the craft is always the central disk of the celestial body.
Then you need to make and attach to it many stylized rays diverging in different directions from the center of the circle. At the same time, it is important to decide how the product will be attached - glued to paper or cardboard, hung on a string or placed on a stick for festive events.
If desired, on the disc itself you can depict a human face with a playful smile and freckles.
Preparatory stage
When you decide on the model and size of the pillow, you can go to the store to select suitable materials. But it is not necessary to buy fabric at specialized retail outlets. It is quite possible that you will even have a suitable piece of material at home. In addition, this will allow you to save money. For example, if you decide to make soft pillows from fleece fabric, the material can cost you a pretty penny. What's the point of doing things yourself if it doesn't save any money? Try looking for items made from the fabric you need at a thrift store or hardware store. Sometimes you can find things of very good quality there. Besides, if you don’t succeed, you won’t be so sorry for the spoiled material.
Fleece blankets work well for making pillows in the shape of the sun and stars. It's good if they are yellow or orange, but you can try other colors.
Craft for the little ones
The simplest and most understandable craft for preschool children may be a paper sun craft.
To work you will need the most common set of materials:
- colored or corrugated paper in yellow, orange or red;
- glue in convenient packaging so that it is safe for the child to use it;
- special scissors for child labor;
- cardboard or a piece of thick paper to give a rigid shape to a craft or a base for applique.
To create a solar disk, you need to draw it on colored paper using any round object of the required size, which can be a saucer or plate. To draw the border of the rays, you will need to draw a circle of larger diameter.
The rays can be made from bent strips of paper, braid, fingers circled on paper of a different color and pasted in a circle, or bright corrugated paper.
Sun made of colored paper
A fun craft can be made from plain paper. Prepare:
- colored paper 2-4 colors (yellow, pink, cream, orange);
- felt-tip pen;
- glue and scissors;
- sticks.
Detailed instructions on how to make a sun with your own hands:
- We fold colored A4 sheets into a small accordion.
- Fold the accordions in half, cut at an angle to create cloves with the point up.
- We glue the “accordions” folded in half with other colors (yellow, pink, etc.). You should get a circle with sharp rays.
- Now, approximately 2 times smaller in diameter, cut out 2 circles, for example, pink. Cut out slightly larger circles of a different color (yellow) with waves, as in the picture.
- Glue the pink even circles onto the wavy yellow ones. You will get 2 funny faces. Let them dry.
- Glue the finished 2-color circles onto the accordions on both sides.
- The craft can be attached to a thin stick (juice tube) so that it is convenient to hold in your hands or placed in a small vase.
A mischievous little thing (or several) will look beautiful in a children's room. It can be placed in the ground next to a house plant and fixed on a shelf. Can be glued to the window.
Volumetric work on a stick
To make a craft for a 5-6 year old child in kindergarten, for events dedicated to Maslenitsa, you can use cardboard and colored paper. Two disks of different diameters are cut out of cardboard, gluing one of them onto the other.
On a smaller circle you can draw the eyes, mouth and nose, which will be in the center of the product. The rays are made from multi-colored paper, which can be yellow, red, orange, or golden. Fragments of paper are folded like an accordion, the assembled edge of which is attached to the outer diameter of the circle blank.
Depending on the size of the Maslenitsa sun craft, it can be made on a stick or skewer to decorate a festive dish.
Sew the front part
Children's pillows in the shape of the sun and stars can be decorated with funny faces. They may have big eyes, a small smiling mouth and large rosy cheeks. Small pieces of fleece are ideal for such applications. You can also purchase the corresponding parts at a sewing accessories store. Small elements, such as a smile, can be created by applying appropriate stitches on the front side of the product. However, be prepared for the fact that curved lines are very difficult to make with one thread. You can also use embroidery to depict closed eyes on fabric.
Smooth and fresh skin: dermaplaning, or why a woman needs to shave her face
If there is little snow, there will be no harvest: December 16 is Ivan the Silent Day
A student at the Vietnam Police Academy shared how she takes care of her facial skin.
Handy household items for crafts
As a basis for making sun crafts, you can use ready-made round plastic products, such as lids from various containers or disposable plates. To paint such products in the desired colors, you can use acrylic paints and a type of glue suitable for plastic, one of which is silicone.
The face of the luminary can be drawn using paints and markers, both on the inside of the plate and on the outside. Rays in the form of palms drawn and cut out of cardboard are attached along the edge of the plate with a strip of glue.
When gluing the application to a wall or cardboard, you can use rubber gloves of appropriate bright colors instead of cardboard palms. It can be interesting to work with the use of multi-colored cocktail tubes.
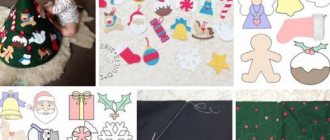
Celebrating the spring holiday with felt toys
Such crafts are in demand among those who love creative works and handicrafts, because felt is unpretentious, it does not crumble and is easy to work with. Make a sun out of a pompom and one piece of felt.
Or you can cut out the pancakes and pierce them with an awl. By the way, you can write the designation of each Maslenitsa day of the week.
Using these pictures, you can easily sew such a craft yourself in the form of a yellow-orange sun.
Don't forget to bring a needle and thread with you.
Embroider the eyes and mouth.
Or there is a more complicated option, which is done using a glue gun.
Or this one, reminiscent of a flower and a cheerful laugh.
Well, the simplest thing is to sew pancakes.
But of course you can bake them, what do you think about that? You can find recipes for openwork and lace with holes here or here
You can sew a naughty girl.
CD - discs for making the sun
Used computer disks are suitable for making sun crafts for kindergarten or junior school. It is advisable to choose two discs with a yellow tint, which are placed together with the sides with the inscriptions, so that the iridescent coatings are on the outside.
Thanks to the holes in the center, two discs can be tied together with a beautiful thick thread or braid. From the same threads you can continue the rays, braiding them into tight braids. At the end of the work, the center of the disk is sealed with a circle of colored paper with a face drawn on it with felt-tip pens.
Putting both sides together
Once you have decorated the front of the piece, you can begin securing both sides of the pillow together. To do this, you need to fix the front sides of the product to each other using tailor's pins. After this, they are sewn together, leaving a small hole a few inches wide. Then you will have to turn the pillow out through it and stuff it with cotton wool or padding polyester. The most difficult part to sew will be the sun, since it has many individual rays. Stuffing each of these elements is also not easy, but if you get used to it, you can do it without any problems. You can also use a fluffy soft cloth. Yes, it will be more difficult to work with, but the fibers will hide all the unevenness of the seams.
Soft toy “sun”
From multi-colored felt or other soft and thick material, you can cut out two circles of different diameters, the edges of which can be beautifully decorated in the form of stylized rays so that they are not too thin and long.
You can place a round piece of foam rubber or synthetic padding in the middle, which will provide volume to the product. The smaller part can be glued to the larger one along the edge of the filler. From material of other colors, eyes and smiling lips are sewn or glued onto it.
Charming Owls made of fabric. Pattern and Master class
To diversify the interior and make the atmosphere in the house cozy, many people spend money on exquisite figurines, paintings, and various accessories. We'll show you how to transform your room with just pieces of fabric and sewing supplies. At the same time, you will be in trend, because we will sew an owl, the image of which is now incredibly popular.
There are many options on how to use this wise bird in your home. These can be pillows in the shape of an owl, a soft toy, or various household appliances.
To begin with, let’s consider a version of a soft toy that even a novice needlewoman can make.
To sew such a toy owl, it is better to use stiffer fabrics that retain their shape well. Felt and jeans are perfect.
We prepare for work:
- Cardboard or any dense material;
- several large scraps of fabric;
- filler;
- materials for marking the eyes and decorating the bird;
- scissors;
- needle and thread.
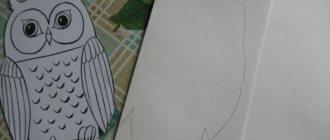
First we make a pattern:
We transfer it to the fabric and sew the parts together, as shown in the following photos.
So that the toy owl can stand, we build it a dense bottom.
Here's another similar pattern:
Cut out two triangles from a sheet of paper. Angles and dimensions are shown in the picture. We round the bottom side of the triangles to the same radius. After transferring it to the fabric, sew the scraps together as in the photo.
Separate about a quarter of the upper body.
We stuff the lower part quite tightly with filler and sew it up.
To get the beak and head, we bend the upper part of the body and sew it on. We connect the base to the body - and now our toy can stand. We make the eyes.
Our beautiful owl is ready.
We looked at the easiest way to create an owl with your own hands.
With a little practice, you can start creating real masterpieces. The main thing is not to be afraid to give free rein to your imagination and use all kinds of decorative means, the choice of which is now huge: rhinestones, beads, sparkles, buttons, ribbons, etc.
There are many interesting examples:
Pillows in the shape of owls look very interesting and will appeal not only to children, but also to adults:
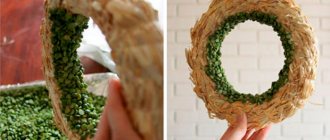
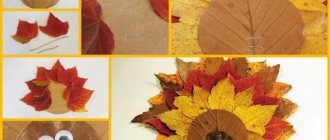
Application made from natural materials
On a sheet of sky-colored office paper you can make an applique from ready-made elements collected during an autumn walk in the park.
Beautiful, bright dried yellow leaves from maples, birches or reddish ones from park shrubs and fruit trees can be successfully used for an applique in the form of a sun, where the center is made of rounded crimson leaves, and the rays are made of yellow and even greenish leaves with carved edges.
DIY sun craft - photo ideas for products made from different materials
Handmade crafts will help develop imagination, creativity, and teach a child to work. Making it together will strengthen the bonds of friendship between family members.
It will diversify leisure time, decorate the room, and add positive emotions. Together with your child, you can quickly and easily make a simple craft - a sun.
Crafts for a country house
An image of the sun made from plastic bottles, wheels from an old children's bicycle, or a picture of the sun cut out of plywood can be used to decorate your home area. A sun craft for a dacha looks original, woven from wicker and installed in the middle of a flower bed or decorating the wall of a veranda.
You can knit an original rug in the shape of a smiling sun to decorate your home or bathhouse. In the kitchen you can place a panel in the form of a stylized celestial body made from salted dough or pasta of various shapes.
In this case, the spaghetti will perfectly represent the rays, and the middle will be round pasta. Natural products are treated with a primer and coated with paint. You can finally seal the work with water-based varnish.
Stuffing the product
After the two halves of the product are fastened together, you can proceed to the next stage of work - stuffing. First check that the sides of the product are well fixed, there are no holes or gaps anywhere except the main one. If everything is in order, then you can start filling the product. It is important that the pillow is filled evenly. This is especially difficult to do when stuffing the sun, since it is more difficult to stuff material into the rays than into the main space of the product. As auxiliary tools, you can use small wooden sticks or non-sharp knitting needles, as I did.
Why French children behave well: eight ways to raise them
"Dad is offended." Agata Muceniece about her relationship with Priluchny after the divorce
“We are still friends”: Derevianko commented on the breakup with his wife
During the filling process, you may notice various defects in the product. For example, the shape may be far from ideal, and the eyes or cheeks may be different in size. But these are homemade children's pillows, so such minor defects are quite acceptable. You could even say that they add a special charm to these products. Besides, you definitely won’t find a second pillow like this anywhere. Remember, your child will definitely not care if there is an uneven seam somewhere on his pillow.
Tools
Before you start making crafts, prepare the following tools:
- Material (felt).
- Sintepon (if you are creating a toy).
- Threads (floss, iris).
- Needle (according to the thickness of the thread).
- Pencil, scissors (simple and curly).
- Safety pins, hot glue gun.
- Decorative details (beads, rhinestones, eyes, ribbons, etc.).
Festive atmosphere with felt
Felt Easter eggs are easy to make and last a long time.
- With the proper level of design skill, they look original and just beg to be picked up. You can attach a satin ribbon on top for hanging.
- Bags for gifts for the New Year can be easily replaced with felt ones. A child, especially a girl, will be pleased to receive a surprise in a soft package that is pleasant to touch.
- New Year's felt snowflakes, cut out according to patterns or randomly, can be hung on threads right in the middle of the room, like a mobile. They will hold their shape and turn with every slight breeze.
For the Autumn or Spring holiday, a good idea is to make wreaths from felt leaves of appropriate colors (green in spring, yellow and orange in autumn).