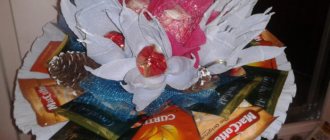
How to prepare bones for a massage track
Greetings to all who stopped by! Somehow, imperceptibly, a bunch of familiar children celebrated their one-year anniversary and began to run briskly, including my princess. This means that to prevent flat feet, we need to sew massage paths for everyone. Today I will show you how to prepare bones for massage tracks. Bones prepared in this way can also be used for games with children instead of or after beans, and can also be used in educational books. There are 13 photos in this MK.
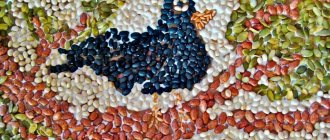
You will need: 1. Bones; 2. Enameled dishes;3. Potassium permanganate; 4. Laundry soap;5. Vinegar;6. Colander;7. Frying pan or baking sheet;8. Foil or baking paper (optional);9. Sandpaper. After a couple of months of cooking dried fruit compote, I formed this small pile of apricot seeds, plums and cherries (Photo above). In our family, we somehow don’t eat dried fruits in compote. Therefore, after preparing the compote, the delicious liquid is poured into a jug and refrigerator, and the dried fruits are chewed by the mother for seeds and thrown away. I wash the bones under waste water and put them in a metal jar until better times. Today, better times have come. I am very sensitive to the safety of children, so I carefully process the bones. To begin with, I plan out laundry soap into a basin and sprinkle a little potassium permanganate. I pour boiling water. The result is a soap-potassium permanganate solution. I immerse the bones in the solution. This is the color the solution appeared in literally the minutes that I wiped my hands, picked up and turned on the camera. Leave the seeds in the solution. I left it for about 40 minutes while I bathed my daughter. This is the color the solution acquired. I put the seeds in a colander and rinse under running water. Pour hot water and 1 tablespoon of vinegar into a bowl. I lay out the seeds and boil for about 30 minutes. It’s cool, but the kitchen doesn’t smell like vinegar. After boiling the seeds with vinegar, I put them in a colander and rinse them under running water. I put foil and bones on a frying pan (or baking sheet). I put it in the oven to dry and bake for 30-40 minutes on low heat. I periodically look into the oven and, when the bones are dry, I take them out of the oven. I put a piece of sandpaper on the table and use it to grind off the sharp corners of the apricot kernels. Plum pits and cherry/cherry pits for the most part do not need this. This work is tedious and uninteresting. And it would be better for dad to do this, but as always, he is on a business trip with us. And this NEEDS to be done! Look at the following photos on the left of the bone without processing, on the right after sanding.
From pumpkin seeds
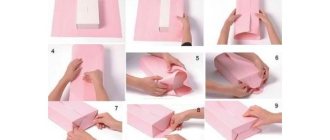
This is another version of a cute Christmas tree with a long, downward curved tip, like a gnome's hat. To create it you will need:
- wire;
- pumpkin seeds;
- masking tape or adhesive tape on a roll;
- paper or plastic cup;
- skewers;
- glitter;
- PVA glue;
- hot glue;
- gypsum;
- braid;
- beads;
- small Christmas tree toy or ball.
To make a Christmas tree from pumpkin seeds, you need:
- Cut the wire into 5 pieces of 30 cm each.
- Place a lump of crumpled paper on the table and vertically attach a wire to it with an adhesive plaster at an equal distance.
- Gather the ends about 10 cm long together. Wrap the craft with adhesive tape, including the bottom and thin tail, bend it and leave the loop sticking out.
- Cover the shape with seeds, starting from the bottom row, making it hang slightly down. Place the grains flat. Fasten the second and subsequent rows with an overlap on the first row, in a checkerboard pattern.
- Bend the long end of the tree to the ground and also cover it with seeds - 3 per row.
- Mix PVA glue with water in a 1:1 ratio. Add glitter and cover the craft with this mixture.
- Assemble the trunk. To do this, cut the glass by a third and fill it with diluted plaster. Connect 3 skewers and insert into the center, let set.
- Decorate the pot and trunk with braid and beads, and at the foot of the future Christmas tree, place sunflower seeds and secure them with glue.
- Connect the pot to the tree.
- Hang a toy or ball on the tip.
Cool crafts from unnecessary junk: 7 top ideas
General characteristics of the plant
Plum is a fruit tree belonging to the Rosaceae family. It can often be seen in summer cottages and garden plots. Plums are planted to produce tasty and healthy fruits - drupes with juicy or dry pulp, covered with skin, and a small pit. The skin can have different colors - blue, purple, burgundy, reddish, yellow, pink. Depending on the type and variety, plums can be sweet, sweet-sour, sour, or tart.
Did you know? Knowing about the unique benefits of plums for the human body, Queen Elizabeth II of England begins her day by eating 2 fruits of the Brompcon variety, which is grown specifically for this purpose in the royal garden.
Transplantation into the ground
Experienced gardeners recommend replanting the plum seed into the soil in which the seedling will subsequently grow. A small amount of such soil is placed in a flower pot and mixed with a small amount of humus, in a ratio of ten to one, respectively.
You can also use the growth stimulants mentioned earlier. It is not recommended to use them in their pure form. It is advisable to dilute a certain amount in warm water and use it as a liquid for watering the seed.
The soil should be kept moist regularly. Otherwise, the seed will dry out without having time to sprout. When the first sprout appears, you need to care for the plum in the same way as any other indoor plant: water it on time and periodically loosen the soil.
When and where can I plant?
The plum tree is usually placed on a small flat area. Thus, the soil under the seedling will be better warmed up, and the plant will receive a large amount of heat. The tree can also be planted near the fence. But this must be the side where more sunlight falls.
Popular articles Martha the Goat
If the tree is planted in a low area, then it is recommended to give preference to a small mound, the height of which will be at least 40-50 cm and the width from 180 to 200 cm. The optimal time for planting a plum is the early months of spring.
What will you need?
In order to provide the seedling with all the necessary minerals and nutrients that will ensure its healthy and active growth, you will need to stock up on some types of fertilizers. For planting plums, you need granulated superphosphate, wood ash, high-quality compost and peat.
In the process of mulching (that is, protecting and improving the properties of the soil), manure, hay or dried grass may be required. Over time, you will definitely need a wooden peg. With the rapid growth of a seedling, it is necessary to take care of its correct direction of growth. For stability and balance, the seedling is carefully tied to a wooden stake.
Soil preparation
The close occurrence of groundwater at the bottom of the planting hole can complicate the good and healthy growth of a plum seedling. Therefore, it is recommended to get rid of this problem by making your own drainage. To do this, broken bricks, expanded clay and any available fabrics are laid in an even layer at the bottom of the pit.
Nutrient soil is laid on top of the homemade drainage from one to two buckets of rotted plant debris, one kilogram of ash and two buckets of warm water. It is worth mentioning that the presence of a high acid content in the soil can complicate the adaptation of plum seedlings to a new location. To prevent this, it is recommended to treat the acidic soil with dolomite flour before planting. Then add 5 buckets of warm water.
Requirements for the landing pit
Preparation of a planting hole for a plum seedling planted in the spring should begin in the autumn. If the tree is planted in the fall, then preparation begins 15-20 days before the intended planting. The shape of the pit can be any, but its size has strict recommendations. So, for example, the height, width and depth should be no less and no more than 70 cm. When digging, the upper surface of the soil is discarded, and the bottom of the hole is thoroughly loosened.
Description of the transplant process
After all the preparatory work with the soil has been carried out, you can begin planting. So that a seedling sprouted in a pot can successfully adapt to new conditions, and at the same time prepare for the cold before the onset of autumn, it is advisable to transplant it at the end of April:
- The pit for planting should be filled with humus and high-quality compost. It is recommended to sprinkle a small amount of sand on the top surface.
- A plum seedling is planted along with soil from the pot in which it sprouted. No fertilizer is required on the top surface of the soil.
- The soil is compacted before planting. This way, air will not be able to reach the root system. By ignoring this step, you can allow the roots to dry out.
- If necessary, tie the seedling to a wooden stake.
- The plant is watered abundantly.
Is it possible to eat plum pits?
Plum pits are actively used in cooking and folk medicine . They do not use the whole seed, but the grain, which is located under the hard shell.
These nucleoli, when fresh, are harmful to the body, especially in large quantities, since they contain the toxic substance amygdalin. When it enters the human stomach, it is converted into hydrocyanic acid, which can cause severe poisoning. But after heat treatment they can be consumed.
We advise you to read whether you can eat plums while breastfeeding.
How to grow a plum in a pot
When growing plums from seeds at home, you need to work harder, but the success of the event is higher.
Preparing the seeds
In order for the seeds to germinate reliably in home conditions that differ from natural conditions, they must first be prepared. Of course, only full-fledged seeds are planted (if they do not sink in water, then they are unsuitable for planting).
- The seeds extracted from ripe plums are washed and wrapped individually in pieces of damp cloth, after which they are placed in the refrigerator on a shelf with the lowest possible positive temperature. Staying in the cold for several months gives a “signal” to the seeds to germinate.
- During storage in the refrigerator, make sure that the fabric is damp at all times. During storage (until the end of winter), the seeds are monitored: if mold appears, they are washed well.
- Shortly before planting, you can stimulate the seeds to germinate by using solutions of Epin or Zircon instead of water for wetting, diluting them according to the instructions.
Popular articles Stained glass on a mirror
Planting seeds
By the end of winter, the seeds should swell and their hard shell should crack. For planting, ordinary flower pots with a capacity of about 2 liters are suitable.
Latest posts 7 flowers that are planted in September to admire the primroses in early springWe begin to prepare indoor plants for winter: a work plan for September4 simple ways to determine the quality of the soil without purchasing tests
Landing is done like this:
- Soil consisting of turf soil and river sand (1:1) is poured into the pot, but first drainage made of small pebbles or expanded clay is placed at the bottom.
- The seeds are planted to a depth of 3–4 cm, watered well and the pots are placed in a bright place at room temperature. If the pot is wide, you can plant 2-3 seeds in it (then excess shoots are carefully removed using scissors).
- Until the emergence of seedlings, the soil is kept moist, preventing it from souring.
After 2–4 weeks, shoots appear with cotyledon leaves, similar to those of vegetable seedlings, and only then elliptical true leaves.
Seedling care
To prevent the seedlings from stretching, they are kept in bright light, but without being exposed to direct rays that can burn the leaves. For the first 7–10 days you need to maintain a temperature of 10–12°C, then you need room temperature. If the window sill is north-facing, it is necessary to provide illumination with fluorescent lamps. Water moderately, not allowing the soil to dry out, with settled water at room temperature. If the room is too dry, periodically spray the air around the pot.
A month later, the plum is fed with complex mineral fertilizer (for example, azofoska). After another month, fertilizing is repeated. The soil is systematically loosened. By the end of spring, the tree can grow up to 0.5 m.
Already at the end of May, the seedling can be carefully planted in the garden if it is removed from the pot with a lump of earth without disturbing the root system. In warm regions, replanting can be organized in the fall, but in the middle zone they try not to plant plums before winter.
Planting in the garden is carried out according to general rules and has no special features, but shortly before this the plum must be hardened. Already established seedlings are grafted into the garden.
Use of plum pits
It is known that plum kernels are a common ingredient in oriental medicine . They are part of remedies that cure bronchitis, cough, high fever, and purulent wounds. They are also used for the prevention of cancer. Most often, an alcohol tincture made from plum grains is used for treatment.
In cooking, the kernels are used in jams - compotes and jam . It is believed that if you put them in a jar, the syrup and jam will be transparent and have an appetizing color. Fruits are also often rolled whole, without removing the seeds.
Oil is also made from plum seeds . It is used for cosmetic purposes to soften and nourish the skin.
What you need to know to start making seed jewelry
All necessary elements must first be washed and dried thoroughly. If, for example, a wine glass is needed for future decoration, it must be degreased. To make it, you will need some materials: a base for making jewelry; natural material (seeds); glue or glue gun; spray paint or glossy varnishes; decorative elements.
The benefits and harms of plum seeds
Plum seeds can cause harm only when eaten uncontrolled and consumed fresh. When seamed, they do not pose a danger, since after heat treatment, harmful substances evaporate. Although seaming can also be harmful, but only after it has stood for more than a year. After preparation, they must be consumed within 12 months, so it is important to mark the exact date of sealing on the jar.
Important! If symptoms of poisoning are observed, a person urgently needs medical attention.
How to grow young seedlings?
After successful stratification, the next stage begins - growing young seedlings. Where to plant young seedlings: in open ground or in a pot? Everything here depends on the climate. If it’s already warm outside and the soil has warmed up well, then you can go to the dacha and plant the seedling immediately in its usual place. But it is worth considering that such a sudden climate change can be detrimental to the seedling. Therefore, it is better to plant the seed in a pot and germinate it at home, and when the tree gets stronger, it can be transplanted into open ground.
Growing seeds in a pot
To germinate plum pits at home, you need to select a container. The diameter of the pot should be at least 20 centimeters so that the sprout is not cramped in it. You also need to make sure that there are drainage holes at the bottom that will remove excess moisture. The container must be disinfected with a weak solution of manganese, and a layer of expanded clay should be placed on the bottom. Now we need to prepare the substrate. Plum pits love light soil that allows moisture and air to pass through well. You can mix humus, leaf soil and vermiculite in equal proportions. It also doesn’t hurt to add perlite (0.5 part of the total mass of the substrate) - a natural volcanic rock that promotes rapid seed germination.
Fill the pot with the prepared mixture. The substrate should be well moistened. The seed is planted in the center of the container and buried 5 centimeters into the ground. Now you need to cover the pot with transparent polyethylene or glass to create a greenhouse effect. The container is placed on the windowsill, where there is enough sunlight. Now all that remains is to wait for the sprout to appear. Usually the seed germinates in 30-40 days. Throughout this period, it is necessary to ventilate the greenhouse daily, as condensation should not be allowed to form. In addition, regular air baths will help the plant get used to the environment.
Creating optimal conditions will help achieve good results. Try to control:
- Watering. The plant should be watered abundantly, but infrequently. 1-2 times a week is enough. You cannot water the seed in the usual way; it is better to use a spray bottle or syringe. The water should be warm and settled.
- Lighting and temperature. There should be enough light. If the room where the seedlings are located is dark, then you need to use special fluorescent lamps. For a seedling to germinate, a temperature of +25 degrees is needed.
- Fertilizer. The first feeding can be done only after the sprouts appear. While the seedling is growing, it is necessary to apply two more fertilizings with nitrogen fertilizers. One seedling requires 100 milliliters of solution.
When the first two leaves appear, you should pinch the plant by 1/3. This procedure activates the growth of the root system. If several seeds were planted in one container, then after the leaves appear, picking should be done. The seedlings are planted in separate containers, watered abundantly and placed in a dark place for several days.
To avoid getting a wild tree whose fruits will be dry and tasteless, seedlings must be planted in new soil every three months
At the same time, it is important to change the container itself, increasing its size each time. A young tree can be planted in open ground no sooner than after one year.
Transplanting a seedling into open ground
To transplant a seedling into open ground, you need to prepare the soil. If you plan to plant seedlings in the spring, then the soil must be dug up in the fall. Over the winter, the soil will rest, settle and become saturated with melt water. If there is an autumn planting, the soil must be prepared at the beginning of summer. Fertilizers must be added to the soil:
- compost (6 kilograms per 1 meter);
- superphosphate (60 grams per 1 meter);
- potassium salt (30 grams per 1 meter).
Popular articles Garden planter in the form of a stump
Now you need to dig a hole, the depth of which should be 60 centimeters and the width - 100 centimeters. Since the young seedling is still weak and may not withstand strong wind or rain, a stick should be placed at a distance of 30 centimeters from the center of the recess, to which the young tree should then be tied.
To fill the hole, you will need two buckets of manure, 2 buckets of sand, 30 grams of superphosphate and 20 grams of potassium sulfate. All components are mixed and poured onto the prepared area. From the earth mixture you need to form a hill on which the seedling should be placed. The roots of a young tree must be leveled over the entire surface. When adjusting the planting height, you should try to ensure that the root collar is 5 centimeters above the soil level
When filling a hole, it is important to avoid voids, since the plum does not like them. The soil around the tree must be compacted, watered, and the tree itself must be tied to a stick.
The tree trunk circle should be sprinkled with sawdust.
LiveInternetLiveInternet
Quote from Tiana_R
Read in full In your quotation book or community!
Crafts made from seeds.
It's summer, time for fresh berries and fruits. Not only is it delicious, but it also gives you a lot of ideas for creativity. Once again, when we bought a watermelon, I decided to wash and dry the seeds - preparations for crafts for the fall and winter. Later I looked for what kind of crafts I could make with children using seeds. Here's what I found. Maybe it will be useful to someone else.
Autumn is the time for vegetables and fruits to ripen. We make jam, squeeze juices, preserve vegetables, and simply eat fresh autumn fruits. And they make us the owners of not only wonderful taste sensations and vitamins, but also... seeds. Seeds and seeds should be treated with care, do not throw them away, but wash, dry thoroughly, sort and place in open containers, for example, yogurt cups. The shape, texture, color, size of various seeds - everything can become a subject of play and research for a child. Seeds can be counted by moving one finger. When moving the seeds, change fingers (thumb, index, middle, ring, little finger), change hands (left, right). You can line up seeds and seeds in a row, according to size, color, shape, and try to find a round and pointed end of a seed (for example, a watermelon one). Arrange a competition to see who can move the seeds from left to right the fastest. Such games and exercises contribute to the development of the baby’s fine motor skills, develop coordination of movements of both hands and enrich sensory experience. Finally, seeds of plums, cherries, apricots, peaches, seeds of pumpkin, sunflower, melon, watermelon, zucchini, cucumbers, peppers, apples, pears, grapes, peas, lentils, etc. - This is an excellent material for crafts. To attach the seeds, take plasticine and thick PVA glue. Thick PVA glue can be obtained by leaving it for 30-40 minutes. in the air, pouring it into a small container. It is better to coat finished works made from seeds with clear varnish; this will improve their appearance and make them durable.
CRAFTS OPTIONS
Chamomile
Roll up a ball of plasticine and flatten it between your thumb and forefinger into a thick cake. Insert watermelon seeds into the end of the flatbread with the pointed side. We insert the seeds closely or at a distance from each other - depending on the age of the child and the complexity of the task assigned to him. For strength, the seeds can be pre-dipped in glue. It is more difficult to make a multi-layered flower. For example, the seeds are arranged in two rows. To do this, dip a small ball of plasticine in thick glue and place it in the middle of the “daisy”. We insert the seeds between the ball and the middle of the chamomile, into the adhesive layer. In the flower we use seeds of different fruits (for example, watermelon and melon), of different colors and sizes. To make the flower “listen” to us, we press the ball like a button, exclaiming: “Beep!” The multi-layer flower is ready. Finished flowers can be attached to branches or glued to a piece of colored or box cardboard. The cardboard box is first covered with wallpaper, colored paper or paper painted with watercolors. In the latter case, the “wet” technique is used. You can draw lines and dots with wax crayons, and then cover the background wet-on-wet with a watercolor tone. Another way to depict flower stems is to draw them with glue, and then sprinkle the glued “path” with small seeds. To depict stems, it is good to use small seeds - poppy seeds, meadow grass seeds or spoiled cereals, such as semolina. Shake off excess seeds into a box with low sides, placing the work vertically. Here are some options for projects that you can do with children.
Butterfly
Where there are flowers, there are butterflies. Our butterfly has upper wings made of large plasticine cakes onto which a multi-layered flower is glued. The lower wings are flat cakes, in the center of which there is a pea seed, and along the edge there are millet and rapeseeds. (We place the seeds on PVA glue.) The middle of the butterfly and the edge of the large wings are flagella. Having completed the finished elements of the wings and the back of the butterfly, glue them onto colored cardboard. We draw antennae with glue and cover them with small seeds or cereals.
Cat
Let's draw a cat or transfer the drawing onto thick colored cardboard from a book. (Thin colored paper will create wrinkles when working.) Apply glue along the contour of the image and cover it with cilantro seeds. To make the inner part of the contour we use small grass seeds and semolina. The eyes are cut from watermelon seeds.
ORNAMENTS
From flowers of different types, you can make an ornament in a stripe, rectangle, square, circle, and thereby introduce children to geometric shapes and solve the compositions of these spaces. The ornament in the circle is made by children of the older group. For the background we use a cardboard plate. Glue a multi-layer flower in the middle, distribute and glue three daisies around it. Place a plasticine ball in between the daisies. We finish the work with a game moment: we imagine that we are building a circular garage and putting cars in it. (This is so that the boys will also become interested in decorative work.) The middle of the garage is our ball, the melon seeds are the partitions between the boxes, and the viburnum seeds are the cars. Apply glue around the ball and move the seeds into the glue with your finger, imagining that we are building a garage for each car.
STORY COMPOSITIONS
From seeds and plasticine we will make planar and semi-volume plot compositions: “Kolobok”, “Fish in an Aquarium”, “Vase with Flowers”, “Hedgehog in a Clearing” (with children of the middle and older groups). The background for the work is cardboard, plastic lids, and disposable plates. If there is a frame in the panel, then work should start with it.
Kolobok
To frame this composition, you need to roll up many thin colored flagella and glue them in the form of rays, then strengthen a row of watermelon seeds. To make the craft more expressive, we make prints with a stack, a stick, or a used pen.
Vase with Flowers
Smear plasticine of three colors on a plastic lid from a jar of sour cream or cottage cheese. This is the background. For the vase, flatten a large ball of plasticine. For the neck and base of the vase, roll up wide and thin short flagella and apply them. Let's draw the lines of the ornament, coat them with glue and place the seeds on them. The stems and leaves are made of thin plasticine flagella. For chamomile petals, zucchini seeds are taken.
Fish in an aquarium
Apply PVA glue to the bottom of the cardboard, place green plasticine flagella, small shells, “corals” (dip the branches in liquid PVA glue, then in semolina). We fill the rest of the space with a mixture of different seeds, shaking off the excess into a box. We make the fish like this: roll the ball into a thick cake and give it an oval shape. Let's push through the lines of the mouth and head, insert watermelon seeds at the top and bottom - these are fins, place the seeds on an oval in the form of scales. Insert a black pepper seed to represent an eye. To make the tail, roll up the flagellum, bend it and flatten it. For expressiveness, let’s push the line on the tail.
Hedgehog in the clearing
For this composition you need to make a plasticine background. Pinch off small pieces of plasticine and press them onto the cardboard in the form of a clearing, sky, cloud. We roll a ball and flagella for the sun from plasticine. We sculpt a hedgehog by rolling a large ball of plasticine and stretching out its muzzle. This is the body of an animal. The hedgehog must be attached to the background, so one side must be flattened. To do this, tap the plasticine blank on a working board: you will get a flat surface. Using a small seed or plasticine ball, we draw an eye. We will make hedgehog needles from sunflower seeds. We insert the seeds into the body with the blunt side, to ensure secure attachment, we pull them out, dip them in glue and insert them again. Flowers in the composition are made in two ways: melon seeds are inserted into a ball of plasticine, and viburnum seeds are glued around a lentil seed. To make mushrooms, crimp a plasticine cake and turn it into a short thick column. Give the fly agaric cap a pointed shape and glue millet seeds onto it.
COMPLEX COMPOSITIONS AND PANELS
For more complex compositions, you need to have a wide range of different seeds - large and small, dark and light, of different shapes and textures. They will wonderfully decorate the interior of a room or group.
Scenery
This is a composition depicting trees, bushes, and flowers. The background is made with watercolors “on wet”. The paper is wiped with a wet sponge, then we work with a brush from top to bottom. To depict the crown, cut out a piece of cardboard of the desired shape (circle, oval). On this blank, starting from the edge, we place seeds (for example, watermelon seeds) on very thick PVA glue. Each next row of seeds overlaps the previous one a little. We make the tree trunk using the technique of “filling small seeds with glue.”
House in the village
The frame of the composition is made of fir cone scales. They are glued in two rows onto a cardboard box covered with colored paper. The house is made using the “drawing” method on a ready-made template made of thin cardboard (graphic drawing): we apply glue step by step, fill in some seeds, then draw with glue again and fill it with other seeds again. The logs are made from acorn cups. To depict dragonflies and butterflies, insert 4 seeds of different sizes into a plasticine flagellum. Having completed the finished elements (house, crown of trees and bushes, sun, flowers, dragonflies, butterflies), we build the composition on the finished background. We glue the blanks with PVA glue and dry them under a press (the press can be well-dried sand poured into plastic bags). At the next stage, we draw the trunk and branches of the trees with PVA glue and cover them with small seeds or cereals. Shake the excess into the box. We determine the horizon line of the work, apply glue in the form of lines and dots to the lower part. We fill the glue with a mixture of seeds and small alder cones. Shake off everything that doesn't stick.
The Bird of Happiness
The frame of the composition is done in the same way as in the previous work. The tail, wings and crest of the bird, multi-layered flowers of different types and sizes are flowers from grape seeds. We cut out the body template along with the head from cardboard, coat it with plasticine (layer 3-5 mm), press in pistachio shells, melon seeds, lentils, poppy seeds, and millet. We make a composition from the finished elements, glue it to the background with thick glue, dry it under a press (the thin part of the feathers, maple seeds). We draw stems of fairy-tale flowers and fill the glue with millet. Sprinkle the path with a mixture of seeds.
Nadezhda MALYSHEVA
Source https://dob.1september.ru/2001/17/14_15.htm
Preparing to work with seeds
Before you start making crafts from seeds, you need to do some preparatory steps:
- Prepare seeds (rinse, dry and distribute by type for subsequent storage).
- Prepare materials (glue, cardboard or a small plywood sheet, plasticine, brush, tape, bulk pieces, such as a foam ball).
- Prepare things for decoration (for example, a vase, photo frame).
- Color the seeds in the desired colors.
To do this, you need to put the seeds in a bag, pour paint into it, close it tightly and mix well so that the dye evenly colors the seeds. They should remain in the bag for about another hour. Then the material is laid out in a thin layer to dry.
We recommend reading:
Crafts made from twine are original and interesting uses for twine. 125 photos and video descriptions of ideasCrafts from foamiran: master class, diagrams, examples and step-by-step guide from experts on how to make crafts from foamiran
Crafts made from colored paper - examples and step-by-step master class for children and adults (95 photos and videos)
Coloring of a finished product is also often used.
Planting in a pot
The process of transplanting a plum seed into a flower pot is almost identical to sowing any other plant. Not too coarse drainage is placed in an even layer at the bottom of the pot. Next, the pre-prepared substrate is poured. It needs to be watered well. The water should be warm and the soil should be well moistened.
The plum seed is planted in the middle of the pot to a depth of no more than 5-6 cm. Upon completion of planting, the flower pot is hermetically wrapped in a plastic bag and placed in a warm place. If there is good sunny weather, the pot can be placed on the window.
“Greenhouse” conditions allow the sprout to germinate already 3-6 days after planting. All these days, it is recommended, if necessary, to moisten the soil and remove condensation drops from the surface of the plastic bag.
A variety of crafts made from seeds
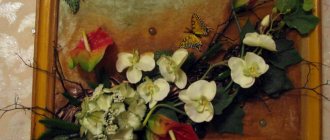
Photo frame
Seeds of various shapes, colors and sizes make it easy to decorate a photo frame. Bright flowers, curls or geometric shapes will transform it and make it unique.
Topiary
For this craft, a foam blank in the shape of a ball is used. When decorating it, coffee beans and watermelon seeds will look impressive. You can use a tree branch fixed in a beautiful pot as a stand.
Pictures from seeds
A sketch of the intended picture is made on a piece of plywood. Then, element by element, the image begins to be filled with cereals and seeds of different shades and sizes.
Unusual tree seeds
Not everyone knows that in nature there are specially shaped seeds in the form of ears and wings. These are the seeds of ash, maple and elm trees.
Ash seeds are perfect for creating chrysanthemums, maple seeds can be used to create amazing New Year's crafts for Christmas trees and snowflakes, and lush elm seeds are convenient to use for making flower arrangements.
We recommend reading:
Wood crafts - step-by-step instructions on how to make wooden crafts with your own hands (200 photos + video master class)Mushroom craft - a review of interesting crafts and a master class on making a simple mushroom (100 photos and videos)
- Crafts from disposable tableware - a detailed description of the main methods of making disposable crafts (125 photos)
Seeds of vegetables, fruits, trees and legumes can be excellent helpers when constructing appliqués, paintings, topiaries and other unique crafts.
Both adults and children love to work with these natural materials. All you have to do is use your imagination to create a unique handicraft.
Traditional date recipes
Folk recipes from dates are widely used both in medicine and in cosmetology. Below are some common date recipes.
Date decoctions
Date decoctions are indicated for infectious diseases and influenza conditions. Everything is determined by the maturity of the fruits that are used to prepare the solution. The more ripe the fruit, the better the final result. Date decoctions are very useful in the prevention and treatment of cancer.
On the water
A decoction of dates in water is indicated when it is necessary to treat the flu or the consequences of an infectious disease. When preparing the decoction, use 60 grams of dates per glass of pre-boiled water. Due to the large amount of iron in dates, they are recommended for use in the treatment of anemia.
Malignant tumors can also be effectively treated by drinking a decoction of dates in water. This is explained by the high concentration of magnesium in these fruits, the lack of which causes the development of cancerous tumors.
With milk
A decoction of their dates in milk helps to enhance sexual arousal and its severity. In addition, a decoction of dates in milk is a good remedy for coughs. Dates with milk will help eliminate a dry, lingering cough. To prepare the decoction, the following ingredients are required: seven pieces of fresh dates and 250 grams of milk. The sequence of preparing the decoction is as follows. The washed dates are placed in a saucepan, after which they must be poured with cold milk and kept on the fire for up to ten minutes. After this, the broth is cooled to an acceptable temperature for consumption. After this, the broth is drunk and the dates are eaten. It is best to use this technique before going to bed.