Cutting, cleaning and grinding are the three main functions of an angle grinder. The technology involves performing work while holding the tool in your hands. To reduce the load, stationary devices for various purposes are made on the basis of the grinder. They are obtained through design refinement and modernization, which significantly expands the functionality of the tool. Special devices for grinders and attachments are sold in retail chains, but most craftsmen perform them themselves. They allow the tool, which is in demand in production and at home, to be used to perform diverse operations on materials for various purposes during installation and construction work. The modified design can work as a cutting, trimming, milling, sharpening, grinding machine, wall chaser, pendulum saw, miter box, etc. To manufacture the device, you need to purchase the necessary attachments, components and fasteners from the retail chain. You can make a device with your own hands if you set such a goal and understand the intricacies of the design that you plan to create. This will expand the capabilities of the grinder, make it easier to work with the tool, reducing the load on your hands, and make the process of performing many operations more productive. On the Internet you can find a large number of drawings, photographs and videos that will help you realize your plans. It all depends on the capabilities that a person has, his thinking and flight of fancy. Let's consider the nuances of converting an angle grinder into the machines, devices and devices presented below.
Cutting machine
A cutting machine is used for cutting and cutting metal and profiles, obtaining blanks of the same size, cutting to a certain depth, cutting ceramic tiles, etc. You can purchase a ready-made design in a retail chain, which costs a lot of money. You can make a device that will perform the same functions at home and small workshops from an angle grinder with a power of 0.9 kW or more.
The figure shows that to manufacture such a device, you only need to think through the design and reliable fixation of the angle grinder. To do this, you must first determine the dimensions and secure them at 2-3 points so that the tool does not move during the cutting process. And this is very important.
The grinder can also be located at the bottom of the table top. In this case, it will not only cut different materials into pieces, but also work as a circular saw.
How to make it yourself, homemade cases
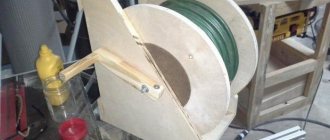
You can make a convenient and reliable case for an angle grinder with your own hands from scrap materials . There are many options and it’s worth using your imagination. One of the simplest ways can be suggested.
The body is assembled from two plywood boxes connected by hinges. The height of the lower box is selected based on the height of the angle grinder. The second half acts as a lid. The outer side of the plywood is carefully sanded and coated with varnish or paint.
Inside it is necessary to form cells for the machine itself, disks and components. To do this, you can use foam from the packaging of any household appliances . It is easy to process, and cells of the desired size can be easily cut into it. Next, the foam blank is glued to the bottom box . This material is prone to crumbling, and therefore it should be covered with thick, dark-colored fabric. The inner cavity of the lid should be covered with the same cloth.
a steel wire hook as a lock . in a convenient place . It is better to purchase it ready-made or use a handle from an old case (suitcase).
Video
The following video shows how to make tool compartments in an existing drawer.
Pendulum saw
The accuracy of high-speed cutting of various materials and at the required angle is ensured by a special device called a pendulum saw. At home, it can be made from an angle grinder with a power of 0.9 to 2.5 kW, having thought through the design, which directly depends on the angle grinder model. All that needs to be done is to make a metal platform with a slot, an angle, a pendulum and securely attach the tool itself to it. To do this, you need to use the holes for installing the handle on the grinder itself. To suit their size, it is necessary to make a bracket, strips, pins and bearings, with the help of which to secure the angle grinder in the working position. The angle grinder device is ready.
Review of possible options for manufacturing stands for an angle grinder
An angle grinder stand, as mentioned above, is a simple mechanism, but this statement applies only to the simplest designs. Having considered the variety of factory-made and homemade devices, we can distinguish three main types of devices:
- the simplest pendulum type frame;
- pendulum mechanism with a rotating unit for cutting with a grinder at different angles;
- bed for an angle grinder with a so-called broach.
The most common and easy-to-manufacture homemade machine for an angle grinder is built on the basis of a pendulum console. Using such equipment, you can easily saw various pipes of both round and profile sections, as well as rods, fittings and metal parts, the thickness of which does not exceed the thickness of the working part of the disk, and the length of the cut can be adjusted by moving the workpiece along the frame. Features of the device for angle grinders:
- ease of manufacture and operation;
- high reliability, since only one moving unit is used here;
- With such equipment it will not be possible to cut at an angle;
- It is difficult to saw sheet material: low accuracy and risk of injury.
The design of the bed with a rotating mechanism for an angle grinder allows you to carry out all the above-described metal cutting operations, but at the same time the function of sawing with a grinder at different angles is added. There is also a pendulum assembly here, and, in addition to it, the pendulum support itself can rotate, or the stop-clamp that holds the workpiece rotates. Features of the device:
- expanded metal processing capabilities of angle grinders;
- relative simplicity of design;
- here it is more difficult to obtain an accurate perpendicular and angular cut due to the rotating mechanism and the need for angle calibration.
The broaching mechanism is the most difficult to perform. In addition to the pendulum unit, it uses a unit for pulling the angle grinder in the horizontal direction.
Milling machine
In a milling machine, the main movement is made by the cutter, which is used to process shaped and flat surfaces on workpieces made of different materials. A machine using a grinder can be made in the following options:
- with a movable angle grinder. In this case, the tool is securely attached in a vertical plane to a special frame, which allows you to move the grinder relative to the milled workpiece, which is fixed motionless;
- with a rigidly fixed angle grinder. With this design, the workpiece moves in the desired direction, and the grinder is motionless.
In both cases, you need to think through the design, purchase everything necessary for its assembly, and also buy a collet-type cutter holder or make it yourself from a hexagon. The picture shows a simple, quickly manufactured design of a milling cutter made from an angle grinder.
The simplest device for an angle grinder stand
Actually, this device cannot be called a stand, but the work with it can be done almost the same as that provided by the most technologically advanced stand. The principle of its operation is clear from the short video:
But if instead of a strip you use a corresponding corner with a sawn-off part of one of the shelves, as one of the authors of a similar design did, then there will be no need to drill a blind hole in the head of the angle grinder.
In this case, the tool will be fastened with two screws into the threaded holes for the handle existing on the head of the angle grinder. But the principle of operation of the sole will not change - only its rigidity will increase.
The method of using an angle grinder as a kind of circular saw using the same sole, shown in another video by the same author, will also not change:
We recommend other articles on the topic
Screw mechanical jack and more - we choose for your tasks
Renovator - a multifunctional tool
Leveling, what does it mean? How to use the level
Mounting gun for dowels, nailer
Machine for porcelain tiles
Cutting porcelain tiles with a grinder requires skills and knowledge of the structural features of the material, since it is difficult to draw an even line while holding the tool in your hands. The work requires a special approach: it is necessary to ensure movement without deviations and control the depth of the cut during the operation. Any violation leads to damage to the material, the appearance of chips and unevenness. This leads to additional costs, and porcelain tiles are not cheap. In order for the grinder to move without deviations, you can make a special device with guides. The figure shows a manufacturing option for such a device, where the main material is plywood and fasteners.
What can be done with an angle grinder without a gearbox
A grinder without a gearbox is a fairly powerful electric drive with a value rarely less than 0.5 kW. Such a device can be used in home-made machines for performing various types of mechanical processing (cleaning, cutting, grinding and others).
Important: do not throw away the emergency gearbox, but modify it by removing all unnecessary parts, for example, on a lathe, leaving only part of the housing with the bearing assembly. This design of the drive shaft will maintain its rigidity when transmitting load. Next, instead of the drive gear of the angle grinder, a drive pulley of a suitable diameter is fixed and, using a belt drive, torque is transmitted to another driven pulley sitting on the working shaft. The working tool is installed according to the nature of the work performed.
The option of using high speed electric drives for an angle grinder is effective when performing engraving work . Here, no intermediate mechanisms are required to set the working speed, but you only need to solve the problem of how to connect the flexible shaft used in engraving technology with the electric drive shaft. Preserving part of the gearbox housing with the bearing installed in it (the replacement process for which is presented in a separate article) is an important condition for the operability of the design.
Bench Grinder
The stationary grinding machine can be made from an angle grinder in two versions.
In the first case, the grinder is fixed motionless on a special device. And another manufacturing option is shown in the figure. In the second case, it is a belt-type grinding machine. It is shown in the picture. Here it is necessary to consider the tensioning mechanisms (on 2 or 3 rollers) and fastening to the tabletop.
Tips for choosing a box and bag
Before choosing a case for an angle grinder, it is worth considering that this type of tool is usually transported together with consumables - diamond blades for cutting. The purchase of a special storage box in this case must be justified by its convenience and adaptability to the size of specific equipment. Accordingly, you need to pay attention to:
- dimensions of the model - they must correspond to the dimensions of the angle grinder;
- number of sections – good if a module for storing disks is provided;
- Purpose – a wooden box is suitable for stationary storage; for transportation it is better to choose a polymer case;
- the presence of a handle - it matters if the angle grinder often has to be moved from place to place;
- Internal fastenings – latches help hold the case in place, preventing accidental damage.
In addition to hard cases, there are also soft, portable options in the form of bags that allow you to protect instruments that are used especially often when carrying, transporting, and storing.
Miter box from a grinder
A miter box is a device used to cut tiles, metal blanks, baguettes, plinths and other linear materials at a given angle. If you install a disk with holes in a rotatable design with locks under the grinder in the workbench or table top on a metal axis, you will get a device for high-quality cutting of workpieces at the desired angle. The rotating part is a guide for the grinder's cutting disc. The material is clamped motionlessly, and the angle at which cutting must be performed is recorded using marks.
Let's get started
It should be noted right away that for trimming it is best to use a small grinder (angle grinder) with a Ø 125 mm disc. Of course, as an option, angle grinders with Ø 115 mm and Ø 150 mm are also suitable here. Here you will already choose from the tool that you have and which you are ready to repurpose.
Source bigl.ua
What you need
First of all, you need to collect all the necessary materials and tools that will be needed to assemble this structure:
- steel corner with shelves 50×50 mm;
- steel sheet 350x350x3 mm;
- selection of bolts and nuts;
- a good compression spring (tool steel is best;
- non-removable door hinge (canopy) of good quality;
- fitter's square;
- welding (gas or electric);
- metric tape measure, scriber.
Assembly work
Prepare two corners 350 mm long and with shelves 50x50 mm. On the top shelf, along the two edges of each of them, cut the scarves at an angle of 45°. This angle can be easily calculated with a plumber's square if you attach it to the profile so that the outer edges coincide with the edges of the profile. Then use a scriber to make a mark in the inner one. The top angle created by the profile flanges and the mark will point to the 45° line. Weld a square from the resulting blanks, but so that its diagonals are equal (check them with a tape measure).
Now cut a square of sheet iron 350x350x3 mm and through it drill holes in the frame at the corners for bolting the frame to the frame. There is no need to weld the sheet to the frame, since in this case the miter saw from the grinder can be used not only as a stand, but also as a hand-held circular saw to cut sheet lumber (chipboard, OSB, MDF, plywood).
Make a channel from two pieces of angle 50 mm long, and then weld it to the frame so that the part is in the middle of the edge with a distance of 2-3 mm from the edge. This will serve as a support for the angle grinder lever. Weld the door hinge to it a little later.
Source o-trubah.com
Now cut two blanks 150 mm and 200 mm long, and then cut one shelf of a 150 mm corner to 30 mm. From these two parts, weld a hollow profile as shown in the top photo.
Cut another piece 120 mm long, and reduce one of the shelves to 20 mm. Make another blank 50 mm long and also trim one shelf to 20 mm. Then weld them into the letter “L” at 90°, but with a short profile with the edge outward. Then weld the resulting part to the homemade profile so that at the end of the lever on the open side a flattened letter “P” is formed perpendicular to the profile. Sand the edges and welds of the lever you made to avoid cutting your hands with burrs in the future.
Advice! When working, a plumber's square should always be at your fingertips. Check with it all angles that must correspond to 90°.
Source youtu.be
While the lever is not welded to the stand, you need to make fastenings on it along the head (gearbox) of the angle grinder. Please note: there are two holes on the gearbox for screwing in the handle, so the letter “P” should fit around the head like a clamp, and on the letter stands, drill holes according to the diameter of the threaded mounting holes. The thickness of the Einhel angle grinder gearbox for a disc Ø 125 mm is 70.6 mm. Therefore, my U-shaped clamp on the inside turned out to be 50x70.6x50 mm. Measure your model with a caliper and adjust the clamp to fit it.
One bolt for attaching the angle grinder to the lever is screwed through the upper hole, which is in the gearbox housing for the handle, and the other through the lower one. Try to ensure that the holes on the "P" line up exactly with the lever. After fastening, the body of the angle grinder must stand strictly parallel to the lever and strictly perpendicular to the welded channel support post.
Source oknaidveri.info
Weld the non-separable door hinge with one side to the support post and the other to the lever, but make sure that the assembled structure strictly corresponds to the edges of the frame perpendicularly and parallelly. Now screw the frame to the frame, fix the grinder there with a metal cutting disc and cut a strip in the sheet. For now, remove the angle grinder so that it does not interfere and strictly parallel to the slot, place a mark in front of the support post and make a cut there 1-2 mm deep (we left 2-3 mm of the free edge when we welded the support channel). This cutout will be needed to guide the circular.
At the bottom of the clamp, screw a spring made of tool steel that works in compression, with one end to the crossbar “P”, and the other to the frame. Select the length depending on the spring itself and the size of the grinder.
Source youtu.be
Now all you have to do is widen the slot made earlier with the cutting disc by 2 mm in one direction and the other so that the circular saw can fit there with a gap. That's it, now with the bed mounted on the frame, you will get a miter saw made from a grinder, and if you remove the frame, it will be a manual circular saw for cutting sheet lumber.
Wall chaser from an angle grinder
Using an angle grinder with a power of 1.2 kW or more, it is not difficult to make a device for making grooves (grooves) in the surfaces of walls, floors and ceilings. The main task is to install two disks on the shaft. After all, they are the ones who cut a groove of the same width and depth for laying cables, wires, and pipes of small diameter. The size of the original angle grinder shaft does not always allow them to be installed there, and even at a certain distance. In this case, you have to make bushings in order to secure the discs to them to the required size using spacers of different widths. Since the protective casing of the angle grinder is designed for one disc, there is a need to manufacture a new protective casing that would protect the worker during the operation. It often becomes necessary to equip such a protective casing with a pipe for removing dust and small waste to the vacuum cleaner. More advanced craftsmen install angle grinders on special rollers (from 2 to 4) in order to reduce the load on their hands while moving and move it effortlessly across the surface. It would not be superfluous to have a unit for adjusting the immersion of disks into the surface, the design of which also needs to be thought through.
When working with tools based on an angle grinder, it is necessary to observe safety precautions. Under certain circumstances, they can harm human health, cause injury and even death. Before starting work you must:
- wear protective clothing and personal protective equipment (mittens, safety glasses, dust mask, earplugs);
- check the reliability of fastening of all components of the device;
- check the integrity of the electrical cord and plug;
- make sure that the disk of the required diameter is installed, without flaws and suitable for the work being performed;
- Check the operation of the device at idle speed.
During the operation, you must adhere to the following rules:
- make sure that the electrical cord is not twisted or pulled;
- do not remove waste while the grinder is working with your hands;
- the material to be processed must be securely fixed if this is provided for by the technology for performing the work;
- do not work with the device if there are signs of its malfunction;
- Replace the disk with a new one or a failed one only after its rotation has stopped.
Upon completion of work, the device must be disconnected from the electrical network.
In the video you can clearly see devices where the angle grinder is a mandatory element of the design. They will help home craftsmen facilitate the performance of many operations, increase the quality and productivity of labor, and expand the capabilities of the grinder.
Anyone who has changed the functionality of an angle grinder or made accessories for it, please share your experience in the comments to the text.
Homemade designs
We offer you two options for a machine made at home
on
an angle
grinder.
- The first design is more common, perfect for doing work at home. The model is not distinguished by high processing accuracy, but, alas, it has its undeniable advantages;
- Option 2 is suitable for those who want to make
a high-precision machine. The design is more difficult to complete and will require proper drawings, plus a video tutorial on assembly would be nice for a nice example. However, you won’t need to waste extra time creating it.