On one of the sites I read about making concrete decorations for the site. This gave me the idea to make dumbbells for my grandson. After all, playing sports strengthens the body, which is important for a child.
I used four empty tin cans, d 84 mm, 57 mm high, and two pieces of water pipe (for handles) d 21 mm, 160 mm long.
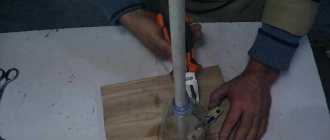
I processed the sides of the cans with a file. To place the handle strictly in the center in both jars filled with solution, I threaded the lids from these jars onto it. I pre-drilled a hole of the required diameter in each cover.
I placed three pieces of wire d 5 mm and length 200 mm inside the handle pipe. bent the ends protruding from both sides at an angle of 90 degrees. This is necessary to securely fix the handle in the solution. Prepared the second handle in the same way.
I made a clamp-stop for the tube from a wooden block (see photo below). so that you can fix it in the solution at the required level (for me it is 16 mm from the top of the jar).
I prepared a solution (2:1) from dry river sand and cement, filled one container with it and installed a pipe with a lid in it using a clamp. When the solution hardened, the container at the other end of the handle was similarly concreted. I also made a second dumbbell. The weight of the finished structure is 1.5 kg - a little heavy for a grandson, so I decided to make dumbbells in plastic containers (sour cream cups) using the same system. Their weight is 1 kg.
Note: The length of the pen tube should be selected based on the size of the palm (plus immersion in the solution).
Many people want to keep themselves in good physical shape. To perform basic physical exercises, sports equipment is required. A poor financial situation, as well as a lack of free time to visit the gym, does not allow me to take care of myself. However, you can train using home sports equipment, for example, homemade dumbbells.
DIY sports equipment: basic rules
You can make almost any sports equipment yourself, from simple weights to sports complexes.
The most common strength exercises can be performed at home with dumbbells.
The best, of course, are metal dumbbells, but they are much more difficult to manufacture than other designs. It is necessary not only to make the disks, but to choose the correct width of the pancakes, and to make the locking locks in a quality manner according to the calculations. You can make several heavy and several small pancakes.
The diameter of the bar (handle) must be within 3 cm; this condition must be taken into account when manufacturing dumbbells and barbells. Weights allow you to perform exercises of varying loads.
Before you start practicing at home, carefully check your equipment for the integrity of both collapsible and permanent products.
What you might need
You can make dumbbells yourself at home from almost any object or material. The most common substitutes are plastic bottles, concrete or metal parts. Projectiles made from the latest material are recognized as the best in terms of efficiency, but they, compared to other designs, are difficult to manufacture. So, for example, to make homemade weight plates for dumbbells, you need to accurately select the width of the disks, as well as make high-quality locking locks in accordance with the calculations. To weight plastic containers, you can use various fillers:
- water;
- crushed stone;
- sand;
- cement;
- small metal elements.
When making dumbbells, you cannot do without auxiliary tools. To get a sports device made of cement, you will need a mold for casting pancakes, a bar in the form of a metal pipe, bolts and screws. For plastic models, you should prepare glue, tape, scissors or a knife, a wooden stick or a steel rod. To make dumbbells from metal, it will take more time, effort and money. They will consist of a neck, a thin-walled pipe, a steel sheet and locking locks, so their production can only be done in a locksmith workshop.
Concrete mix
Metal tubes
Pancake molds
Making dumbbells with your own hands
At home, you can make both small and large dumbbells.
The first step in manufacturing is to decide what they will be made of.
From plastic bottles
To make plastic dumbbells from plastic bottles, you will need the following materials:
- bottles (2 pcs. of the same volume);
- handle 30-40 cm long (wooden stick or metal rod);
- scotch tape (insulating tape);
- filler (sand, crushed stone, small metal parts).
After all the material has been prepared, you must:
- take bottles and fill them with filler;
- wrap the handle with electrical tape in the middle (10-15 cm);
- insert one end of the handle into the neck of the first bottle until there is no movement;
- to prevent the filler from seeping through, coat the joint of the handle with silicone or glue;
- connect the second bottle to the handle, then process the joint;
- wrap the assembled structure around the handle, strengthening the connection.
From cement
Heavier dumbbells are made using a cement base. The disadvantage of concrete dumbbells is that it is difficult to evenly adjust the weight of the weighted plates, and this design is not dismountable. If a different weight is required for sports, a new apparatus will need to be made.
In order to make dumbbells at home, you will need the following materials:
- metal pipe (neck);
- cement mortar;
- bolts, screws;
- form for casting pancakes.
Then you need to:
- At the ends of the neck, make four holes evenly for 4 bolts around the perimeter.
- Install bolts into the holes, which are holding elements for the pancakes.
- Place the bar in a vertical position in the casting mold. Pour in cement mortar and leave in this position until the mortar is completely dry.
- For the second side, repeat the previous step.
You can eliminate the flowability of cement dumbbells by adding PVA glue or paint to the solution, and to increase the weight - crushed stone, gravel or small metal products.
Metal
Shells made of metal are considered the most reliable and practical.
To make dumbbells you need:
- Prepare a metal rod with a diameter of 3 cm (bar).
- Take a thin-walled pipe 15 cm long. The internal diameter should be slightly larger than the diameter of the neck.
- Place the pipe on the bar, then fix it in the middle.
- Make the required number of weight discs. This will require sheet steel.
- Use rings or a 2-3 cm long pipe as locking locks. Drill a hole in them and cut a thread for screwing in a screw. As a result, the screw that is screwed in will hold the plates by pressing them against the bar.
Pay special attention to high-quality pressing of the screw to avoid play. Collapsible metal dumbbells allow you to adjust the weight. It is also possible to make non-separable dumbbells, for this purpose welding is used as locking locks.
Stages of manufacturing from various materials
When starting to manufacture dumbbells and select materials, the first thing you should take into account is the gender, age, physical training of the athlete and the tasks that correspond to the specific nature of the training. Don’t forget about ease of use and proper storage of equipment. To successfully manufacture a product, you cannot do without a detailed diagram, especially for metal options.
From plastic bottles
Homemade dumbbells made from bottles are simple and easy to make, as they do not require special technical knowledge or a large amount of additional materials. There are several ways to create them. In this case, the weight of future equipment will depend on the displacement of the containers. Bottles of 0.5 liters will yield a dumbbell of 400–500 g. Accordingly, a larger container of 2 liters can reach 3 kg; The weight will depend on the type of filler.
Methods for making equipment from plastic bottles at home:
- Dumbbells are assembled from two bottles with caps, tape, glue, sand, and a tube. The latter should be sized for a comfortable hand grip. Both caps are screwed to the ends of the tube. To secure them, a self-tapping screw is used. The covers must be threaded outward. A hole is cut in the middle of the bottles. Then only the bottom and neck are used. The bottom should be placed at the top of the bottle, so you get a kind of flask. Similar actions are performed with the second container. The cut of the flask is treated with glue and secured with tape to prevent the filler from seeping through. At the end, sand is poured in, and the necks are screwed to the lids on both sides.
- You need to take an empty bottle of a certain size and close the lid. Then the container in the middle should be slowly rotated over the flame. Be sure to ensure that the plastic does not overheat. Periodically remove the container from the heat and open the lid. Due to the high temperature, the middle of the bottle will decrease in diameter. This place will become a kind of handle for the future projectile. Once the bottle has cooled, it can be filled evenly with water, sand, sawdust, crushed stone or metal shavings.
To make the dumbbell more aesthetically pleasing, you can tint the water with potassium permanganate, brilliant green or food coloring. Colored electrical tape will also help make the product bright.
Made from concrete
To make dumbbells with your own hands from concrete you will need cement, sand, crushed stone, and water. In an iron basin or any other container intended for these purposes, the specified dry ingredients are mixed in equal proportions with the gradual addition of liquid until smooth. The mixture should be thick enough so that you can fix the handles in it later. Plastic bottles or a regular ball made of thick rubber are used as a form for dumbbells. In the second case, it is necessary to make holes in the product so that there is a place where you can pour the prepared solution and fix the fasteners for the handle.
To increase the weight of dumbbells, not only crushed stone is used. It can be replaced with gravel or small metal items can be added.
The bar can be made from dense plastic water pipes of the required diameter and sufficient stiffness class. A shortened shovel handle or other similar wooden object will also work. In order for the neck to be removable, you should prepare a pipe in advance from which a handle of the required length is cut.
Be sure to make two sections of pipe with a large diameter in advance into which the bar itself will be inserted. There should be a through hole at each end of these two fasteners to allow a metal pin to be inserted into for a secure fit. When all the elements are ready, you can start pouring the mold. When filling the container, there must be room left for attaching the bar. Then the clamps for the handle are installed and the form is carefully filled to the end with the solution. When the concrete has completely hardened, it will be possible to tighten the fasteners and insert a bar, that is, a pipe of smaller diameter, into them.
Metal dumbbells
Such devices differ from other homemade projectiles in their strength and durability. The main parts are the bar and dumbbell plates, which can be made according to weight for any workout. Procedure:
- preparing a metal rod with a diameter of 3 cm (neck);
- selection of a thin-walled pipe 15 cm long, the internal diameter of which should be slightly larger than the diameter of the neck;
- connection of the pipe and the neck with reliable fixation in the middle of the pipe;
- manufacturing the required number of burdening disks, which will require sheet steel;
- blank rings or pipes 2–3 cm long as locking locks, having a hole and thread for screwing in a screw.
Particular attention must be paid to securely pressing the screw to eliminate play . Do-it-yourself dismountable metal dumbbells provide weight adjustment. Moreover, it is possible to make non-separable projectiles, in which case welding acts as locking locks.
How to make a barbell from improvised materials
You can make a barbell using available materials. Its design is practically no different in complexity from a dumbbell.
The main element is the bar; without it it is impossible to make a barbell. There are many options to make a barbell at home.
Plastic bottles
The design of a homemade barbell is identical to a dumbbell, and you can use bottles of water or other material for weighting. But for more serious weight loads, pancakes are made not from two bottles, but from 8 (4 on each side). The bottles are filled with filler, then 4 pieces are tightly fastened together, forming a square. After which the bar is installed in the space between the bottles and secured.
Wheels
Another easy way to make a barbell is to use car wheels as weights. As a rule, assembled wheels are used. This type of sports equipment allows you to throw the barbell onto the floor after performing an exercise, without fear of damaging both the barbell itself and the floor.
For such a rod, a plate with bolts is installed at the end in accordance with the bolt pattern of the disk.
Concrete pancakes
To make pancakes from concrete, you must first make a mold for pouring the solution. Place a cylindrical object in the center of the mold. The diameter of the cylinder should be slightly larger than the diameter of the neck. Then the cement mortar is diluted, which is poured into the mold until completely dry.
In order to make the rod more stable, it is necessary to install metal sheets (inserts) when pouring. All concrete weights for barbells must be made in pairs and have the same weight.
The bar must have a locking element that will prevent the plates from moving to the center. Additionally, locking locks must be made.
Making dumbbells and barbells using concrete
To make heavier and more durable equipment, concrete should be used. But it can only be used with an all-metal neck, which should be prepared in advance.
Pieces of metal pins need to be welded to the ends of the neck. The result is reinforced concrete, which is much stronger than regular concrete. Another way to make the projectile more reliable is to add PVA glue to the solution.
The form for concrete weights can be plastic buckets
. By selecting a bucket of the required volume, you can obtain the desired weight of the finished rod. Containers for mayonnaise and other food products are suitable for dumbbells. The disadvantage of such equipment is that such a dumbbell is non-separable, that is, you will not be able to adjust the weight.
In order to make a barbell, you need to mix the solution and pour it into the mold. Set the bar strictly in the center; this is very important for balancing the projectile. Four days later, when the solution dries, the procedure should be repeated on the other side. If the concrete cannot be removed from the mold, it can be easily broken. If the bucket remains intact, it can be reused.
When calculating the weight of the finished rod, it is worth considering that 1 liter of poured concrete weighs about 2.5 kg. You can make a concrete weight in the same way.
Instructions for assembling a homemade rod
The bar is the most important part, thanks to which the barbell is able to withstand heavy weight loads. The safety of performing exercises depends on the quality of the bar.
When making the neck, it is necessary to use durable materials. In order to make a fingerboard, you will need steel reinforcement, an iron pipe or a crowbar. When choosing a material, pay attention to the thickness, as it should be comfortable for a clenched palm.
The entire process of making a barbell at home can be seen in the video
Self-made sports equipment is the most optimal and economical option for playing sports without going to the gym.
You can make almost any equipment with your own hands - from a homemade weights to a full-fledged sports complex.
Before performing exercises, it is necessary to inspect the equipment for structural integrity. And follow basic safety rules.
Conditions are good dumbbells...
In my last “homemade project” - “” I told you how you can make dumbbells using bottles and sand... But these are quite primitive dumbbells, although they are very easy to make, but if you still set a goal for yourself more or less seriously to go in for sports, then you need to make good dumbbells... If, of course, you have the opportunity and means to exercise in a gym with professional equipment, then this article is not suitable for you, but if you are still “self-taught” and decided, like me, to make your own small gym - then this article is perfect for you!!!
So, let's begin…
To make dumbbells we will need:
— 2 bottles of 2 l; - cement; - sand; - water; - pipe or fittings; - drill; - drill; - screws or nails.
We start by cutting the bottles as shown in the photo...
The cut bottles need to be washed, cleaned and dried well...
Also, you need to clean the pipe (or fittings) and use a drill to make 5-7 holes on each side of the pipe as shown in the photo...
After this, you need to insert screws or nails into the holes in the pipe (this is done so that the pipe in the finished dumbbell does not rotate)... Well, all the components are ready!!! Now let’s prepare the cement mortar... I diluted cement with sand in a ratio of 1:2... Instead of sand, you can also use granular screenings... After the mortar is ready, we put a pipe in the center of the bottle with pre-made holes and screws or nails inserted there, and pour solution... That's all... One side is ready, now you need to leave it until the solution dries completely and hardens... After one side has hardened, proceed to the other side... We do the same operation, wait for it to completely dry and harden... That's it!!! The dumbbell is ready... Now you can use it... Good luck!
Everyone wants to have a beautiful and pumped up body. To achieve the desired effect, you need to train long and hard and go to the gym. Often, a person living a modern life simply does not have enough time to go to the gym at least several times a week. A person who really wants to achieve a goal can study at home. The first question that immediately arises is: where can I get the sports equipment needed for sports?
Where can I get sports equipment?
If the decision has already been made that you need to study at home, then the first step is to purchase all the equipment. Let's start with the simplest thing - dumbbells. It’s strange, but in all sports stores these pieces of ordinary iron are so expensive that not every athlete can afford to spend that amount. It will cost you a pretty penny to buy dismountable dumbbells with a set of discs. Such luxury is certainly not available to everyone. What to do? Shouldn't you give up all training? You can make dumbbells with your own hands - this is a way out of this situation. This simple homemade inventory will help you save money.
DIY dumbbells from plastic bottles
Oddly enough, most often homemade dumbbells are made from ordinary plastic bottles. There is more than enough material to create them. There are several two-liter bottles in each apartment.
Before making dumbbells with your own hands, you need to decide on the filler. For the laziest, there is a simple way - just pour water. These DIY dumbbells are made from bottles very quickly and easily. Pouring water into bottles is very simple, but ineffective. The dumbbells will be too light. Sand is another matter. One liter of sand weighs two kilograms - still more than water. If you need heavier dumbbells, then you can safely send all sorts of nails, small fittings, nuts, bearing balls and any other metal rubbish inside.
Concrete shells
In order to create heavier projectiles than from plastic bottles, you will need cement and a mold to pour it. The disadvantage is that it will not be possible to change the weight of the finished structure.
Materials for making the rod:
- Cement mortar
- 10 self-tapping screws
- Thick stick, 3-3.5 cm . Length must be at least 125 cm.
- Two empty five-liter plastic bottles for making a mold
- Polyethylene.
Manufacturing process:
- You should start by pouring the pancakes. To do this, you need to cut out the part for the ebb. Measure 35 cm and cut at this point.
- Mix the solution. Mix water with cement powder. It is better to make a thick solution so that the element does not begin to crumble in the future.
- Place polyethylene moistened with water at the bottom of the resulting form. This is necessary in order to easily remove the frozen element.
- Screw screws to the neck along the diameter, on both sides, in those places where the pancakes will be put on.
- Pour in the mixture.
- Place the reinforcement in the center.
- Wait until the concrete hardens.
- Take out the frozen pancake.
- Let it sit for 2-3 days . Water periodically.
- Fill the second form with concrete, turn the resulting structure over, and insert the second end of the neck into the middle. In order for the bar to stand up straight, place the entire structure, for example, on a table leg and tie it with a rope.
- After hardening, remove from the mold and also let the finished sports equipment stand. Don't forget to water the concrete parts.
In a few days the rod will be ready for use.
The same principle can be used to make dumbbells. For the form, use smaller containers.
How to make dumbbells from eggplants
The manufacturing technology is very simple. Just to do this you need to stock up on adhesive tape or insulating tape. Let's start production. To do this, you will need two plastic two-liter bottles, a stationery knife, wire, tape and filler (sand, cement or something similar).
First, use a utility knife to cut off the top and bottom of the bottle. It is important to cut carefully so that the edges are even. This removes the middle part. The bottom and top are glued back together using a large number of turns of tape. It should be noted that the smaller the middle part is cut, the heavier the dumbbell will be. The same must be done with the second bottle.
After this, pre-prepared filler is poured into each half of the dumbbell through the neck hole. Then the lid is screwed on. Once the two halves are ready, they can be joined. Having placed the neck against the neck, you need to wrap these parts with tape so that they are connected. After several fixing turns, we begin to make a handle. To make the handle strong, it needs to be well wrapped with wire, which will also add weight. You need to make something like a wire winding. Thus, these two parts will be firmly connected. After adding a couple more layers of tape and insulating tape, you can start training.
Sweet golden dumbbell
To make such a delicious product, you will need the following materials:
- cardboard, boxes of candies and marshmallows will do;
- cardboard tube (foil tube for baking);
- Double-sided tape;
- satin ribbon (2 and 2.5 cm wide);
- sharp scissors;
- lighter;
- candies in gold packaging.
First you need to make blanks from cardboard for the so-called pancakes on the bar. You need to cut out 8 circles of different diameters. Half will be 18 cm in diameter, and the other half of the circles will be 14 centimeters. In the middle of the circles, cut a hole the same size as the cardboard tube so that the circles can thread through freely.
All actions to connect and strengthen the dumbbell will be performed using double-sided tape.
Next, wrap the circles with satin ribbon. But before that, connect them to each other. To do this, you need to cover the circles on one side with double-sided tape. Take one small circle and one large one, glue the paper folded into a tube onto the tape on the circles. This is done in order to give volume to the pancakes. The resulting parts can already be wrapped with tape.
The ribbon can be black or white. To prevent the ribbon from moving while wrapping it around the pancakes, the end can be sealed with tape and the edge treated with fire. Wrap the piece with tape, gradually securing it to the cardboard with tape. Once all the circles are wrapped, you can begin wrapping the cardboard tube-rod. First, mask the side holes of the tube with tape, and then cover the entire length.
Related article: Crocheting a pillow from square motifs
Now you can assemble the dumbbell. Carefully place the circles on the barbell. You should get a beautiful and original dumbbell that can be decorated with candies. To do this, glue a piece of tape to the candy and attach it to the circles. The dumbbell is ready!
How to make dumbbells from concrete
The first step is to drill four holes in each pipe on both sides at the ends with a drill from all sides. Nails or screws are inserted into these holes. They should stick out like a cross. Nails perform the same function as when creating reinforced concrete. They will hold the concrete weight so that it does not move during training. When all the manipulations have been done on both sides, you can start making a dumbbell.
You need to make a dumbbell in parts - first one side, and then the other. After the cement or concrete has been mixed, it must be poured into a bucket. After this, simply insert the iron pipe with nails at one end into the solution. The load must dry for several days, only then can it be removed.
The next step is more difficult: you need to do the same with the second side. But what if there is a load hanging there? To do this, you need to tie a load to something so that the stick stands vertically. After this side has dried, you need to keep the concrete in water for a couple of days. This is done to make it durable. After all this, the dumbbell can be considered ready. The larger the bucket, the heavier the dumbbell itself will be.
How to make dumbbells yourself
Then I mixed the cement mortar: 1.5 parts of fine river sand, sifted through a sieve and 1 part of cement, with which I carefully filled the cuff with a pipe placed in it with a tee at the end. By the way, I lubricated the inside of the rubber “mold” with silicone grease so that the cement would not stick to it too much, since I planned to use it again. The poured workpiece was left for a day for the solution to set. After a day, when the solution had hardened well, I removed the workpiece from the tripod and cut the collar to remove it from the cement.
Making the second half of the weighting material
I coated the edges of the cut cuff with instant glue and joined them together. After the glue had set, I put clamps on the ends of the cuff so that it would not unravel when pouring cement. Since the previous tripod would not support the weight of the dumbbell, to fill the second part I hung it between two handles laid on cinder blocks. Then I repeated the process: I adjusted the restored form for the weighting agent on the foam backing at a height so that the tee did not reach the base by about 1 cm, mixed the solution and carefully filled the cuff. After 24 hours, I removed the rubber cuff, and one dumbbell was completely ready.
In the following days, I made the second dumbbell in the same way.
When the dumbbells were ready, the thought occurred to me that if I had 4 cuffs, then I wouldn’t have to remove them - I would get dumbbells with rubberized weighting. Therefore, if you decide to repeat, consider my experience.
How to make a homemade barbell
A good addition to dumbbells would be a homemade barbell. Making a barbell with your own hands is also very simple. As a rule, a barbell involves heavy weight, so you need a lot of eggplants to create it.
To create a homemade rod, you will need a piece of reinforcement or iron pipe, adhesive tape and the plastic container itself. You should immediately choose for yourself what weight you need to exercise with. The structure will consist of two blocks placed at different ends of the reinforcement. Each of them consists of four eggplants tightly connected to each other. If you choose two-liter bottles, then the weight of the entire barbell (without the bar) will be only eighteen kilograms. For a heavy barbell, it is best to take five-liter bottles. Then the weight of the barbell will be at least forty kilograms, and this is already a normal weight.
To make such a block, you just need to pour water into the bottles and secure them all with a good roll of tape. After the two blocks are ready, you can place them on a bar made of reinforcement or pipe. You can place pieces of reinforcement between the bottles, gradually adding weight to the bar.
Making a barbell or dumbbells with your own hands is very simple. You just need to apply a little perseverance and imagination when creating this sports equipment.
Many people want to keep fit and exercise, but not everyone has the opportunity to visit professional fitness centers for a number of reasons. Don't be upset, because this problem can be easily resolved. In one of our articles we described, taking into account all the technical nuances. But to start classes, you need to have at least a minimum set of sports equipment.
Modern sporting goods stores offer a wide variety of exercise equipment, but their prices are very high. Therefore, many began to be interested in how to make equipment for a home gym with their own hands without spending a lot of money. This is exactly what this article will discuss.
Homemade punching bag for the home gym
A punching bag is one of the most necessary equipment that will help you practice your punching power and technique. Making it yourself is quite simple:
- To do this, you need to take an old fire hose and rip it apart along one of the folds;
- You should end up with a strip of tarpaulin, which must be washed and boiled so that the fabric is not too hard and does not hurt your hands;
- We measure the required length from the workpiece and sew a cylindrical bag with a diameter of up to half a meter. Inside we place another thick bag, well filled with sawdust, grain or plastic granules. It is not recommended to fill the product with sand, because it will be too hard at the bottom and soft at the top. This will create inconvenience;
- It is best to attach the finished projectile to the ceiling using a chain or rope. You can also mount the equipment on a bracket, crossbar or wall bars. When exercising outdoors, the bag is hung on a strong tree.
There is another option on how to make a punching bag at home with your own hands. You will get a so-called “pugnacious bag”, which will help train your reaction and learn to dodge a blow.
- Fill a small piece of a fire hose with unnecessary things or rags and secure it well on both sides;
- Hang the product on a thick elastic band or fasten the stretcher on two ropes. When hit, the bag will spring back.
You can also make such sports equipment with your own hands from a tarpaulin from a car cover, but it will have to be sewn together in several layers so that it does not tear.
Homemade kettlebell for the home gym
The simplest version of this equipment is a plastic canister with a comfortable handle. It can be filled with sand, gravel or small coins. You can cast the product yourself, making a metal body and lead “insides”. But you should not create a projectile entirely from lead, since this metal can cause harm to the skin if it comes into contact.
There are a couple more simple ways to make a kettlebell with your own hands:
- We put three strong bags inside each other, fill them with filler, and give the product the desired shape using tape. How it will look, look at the photo below;
- We roll up a small diameter tube into a handle shape. Make a cut in a ball with a dense shell (a basketball would be best), put large bolts and metal scraps inside, and pour in the concrete mixture. We fix the handle in it, connecting its ends to each other. Then we close the incision tightly. The disadvantage of such a weight is that it will be difficult to calculate its exact weight.
DIY dumbbells and barbell made from plastic bottles
Dumbbells are one of the most common sports equipment that can be used in a variety of exercises. They can be easily made from scrap materials. The easiest option is to use plastic bottles.
Instructions on how to make dumbbells with your own hands:
- To assemble one pair of shells you will need 4 bottles. Their middle part is cut out, and the top and bottom are fastened together with electrical tape;
- Filler, for example, a mixture of cement and sand, is loaded into the resulting containers. To increase the weight, you need to place metal elements (bearings, nails, small scrap metal) in the filler;
- Next, the two parts of the bottles are connected to each other by a tube or a strong wooden stick, which must be inserted into the necks;
- The joints and the resulting handle are wrapped with tape or tape.
Before starting training, check all joints again to ensure that the filling material does not “leak” out.
Plastic bottles can also be used to create a barbell. Since the design involves more weight than dumbbells, more material will be needed.
A simple diagram of how to make a barbell with your own hands:
- We take at least 8 whole plastic bottles and fill them with filler. The weight of each element should be the same so that there is no skewing to the sides during exercises;
- As a neck we use reinforcement (wrapped with tape) or a pipe that fits comfortably in our hands;
- We place the finished weights evenly at each end of the bar and tighten them tightly with electrical tape. There should be 4 filled bottles on each side. Be sure to check the tightness of the connection and do not spare the electrical tape if the neck moves out;
- To increase the weight of the projectile, additional weights can be placed on top of the bottles, for example, from wooden blocks, also taped to the main weights.
You can increase the weight on such a barbell up to 100 kg. To make it easier to calculate how much homemade equipment will weigh, use the following data:
Weight of a 2 liter plastic bottle (in kg):
- With water – 1.997;
- With crushed stone (sandstone) – 2,600;
- With compacted sand – 3.360;
- With wet sand – 3.840;
- With lead – 22,800.
How can you replace dumbbells at home?
If you don't want to make dumbbells yourself or don't have the necessary tools, you can use heavy things that you have on hand to train.
The most common items that usually replace dumbbells are ordinary plastic bottles or bricks. The latter can be used immediately without additional modifications. A standard red brick weighs about 3.5 kg.
Bottles should only be used as a weighting agent with filler : water, crushed stone or sand. The weight of the equipment directly depends on the type of filler. 1 liter of water weighs approximately 1 kg. This is a small mass, so if you are using water, it is better to take a 2 liter bottle. By filling it with crushed stone, you can get a weight of 2.6 kg, and with sand - 3.4 kg, and if you fill it with additional water, it will be about 4 kg.
Such weights are suitable for training only for girls. Men should use larger plastic bottles . Today you can easily find plastic containers of 5, 6 and 10 liters. By filling them with various fillers you can get sports equipment weighing up to 40 kg. This load will be sufficient even for experienced athletes. But there is one problem: holding such a bottle is not very convenient, and its fastening is not designed for heavy weights. Therefore, it is better to make your own dumbbells with a comfortable handle.
DIY barbell bench
Almost all sports equipment can be used as separate units without additional equipment. And to work with a barbell, you definitely need a special bench for bench press. To make it, you need to have skills in working with metal.
To create a metal base you will need:
- Drill;
- Bulgarian;
- Profile pipe with a cross section of 40x40 mm;
- Roulette;
- Vise;
- Steel strip (length 140 mm, width 40 mm);
- Welding machine.
Making a bench for a barbell:
- We cut 2 pieces of pipe, each 830 mm long. They will be used to support the barbell, so they need to be as strong as possible. From the bottom of each product, 340 mm is measured and a mark is made with a simple pencil;
- We install two pipes at a distance of 520 mm from each other and at a height of 340 mm (this is how much you need to retreat from the weld to the base). The weld must be made taking into account the fact that it will be subject to a load of over 100 kg;
- The bench support element will have a length of 970 mm. It will combine the structure with the rear and front supports (it is placed on top of the rear one, and attached to the side by welding at the front);
- A 340 mm leg is embedded on the reverse side;
- To evenly distribute the load on the floor plane, an extension of 220 mm is made under the front legs, and 300 mm under the rear legs. The joints are well welded;
- From a steel strip in a vice, 2 supports are bent in the form of the letter “J” of the same length. Their rear protrusion should be high (7-8 cm), and the front, on the contrary, should be small.
The structure must also have holes with a diameter of 1 cm. They are used for the entry of rods and are located at a distance of 160 mm from the center of the beam that connects the front legs (see drawing).
- Roulette;
- Bulgarian;
- Door hinges;
- Sheet steel 2 mm;
- Welding machine;
- Reinforcing rod without ribs;
- Foam rubber;
- Rubberized fabric;
- Edged board.
Stages of work:
- We cut out steel sheets measuring 350x160 and 350x940 mm. The first one is secured with a welded seam in the leg area with a protrusion of 1 cm beyond the pipe;
- We fix the second one using a steel loop by welding one side of it to the pipe and the other to a steel plate;
- On the reverse side, 100 mm is retreated and two ribless reinforcement bars, each 300 mm long, are fixed. This will allow you to install the backrest at an angle;
- At the final stage, we lay chipboard or edged board on top so that it protrudes half a centimeter in each direction. Only at the junction of two plates, on the contrary, it is necessary to cut 1 cm.
All joints between metal and wood are carefully secured with self-tapping screws so as not to pierce the wooden surface. The structure is wrapped in foam rubber on top and wrapped in rubberized fabric with maximum density.
DIY ab roller
The ab roller is the simplest, most effective exercise tool that many people use. It's quite simple to make.
Effective ab roller exercises for beginners, men and women.
The main part for such a device is a wheel with a diameter of about 10-20 cm. This spare part from a stroller, children's bicycle or large toy is quite suitable. The second necessary part is a metal tube (you can also use a plastic pipe or a piece of wooden cutting). The length of this element is at least 30 cm, and the diameter is at least 3 cm (it should be as close as possible to the hole).
The simplest assembly method is when the tube is threaded into the hole in the wheel and secured on both sides with electrical tape. You can come up with other fastenings, for example, by putting a plastic bottle cap on each side.
There is another option on how to make an abdominal exercise machine with your own hands. This will make the design more reliable. To do this, take a metal rod with a threaded thread, thread it through the hole in the wheel and secure it with nuts. For convenience, we put two pieces of irrigation hose on it on each side.
As you can see, you can make home exercise equipment yourself, and you don’t have to buy expensive equipment that many stores offer. You just need to stock up on the necessary materials, spend a little time and effort, then you can fully equip your sports corner for comfortable and effective training.
DIY candy bouquets
More tender than tender. Master class with step-by-step photos. Master class for children, both primary and secondary schools. Dumbbell from. This bouquet of candy flowers can be given to both men and women.
for a birthday Step-by-step manufacturing instructions are shown in the video. How to make the New Year's Eve magical for young children. A bouquet of sweets is not only beautiful and original, but also...
To do this, cut large branches into smaller elements, attach each such segment to a toothpick using hot glue and place it organically inside the bouquet. The master class on creating roses from candies and corrugated paper is coming to an end. The finishing touches are to glue decorative beads onto individual elements of the composition, and decorate the box with an elegant bow made of beautiful ribbons.
Master class with step-by-step photos. Sweet candy compositions have been very popular lately. How to make a bouquet of roses from candies and corrugated paper.
Then we proceed to decorating the sepals and stem of the flower. To do this, we cut off the excess paper at the base of the bud so that the transition from flower to stem is smoother. We wrap the calyx of the bud with tape, slightly capturing the beginning of the stem. On one side we cut out long thin triangles with scissors.
With such a composition the bride will be extraordinary and unique. A bouquet made with satin ribbons will not dry out, will not wither, and will delight you with its appearance for many years. The following step-by-step instructions will help you create a unique composition.
Falling bouquets in the shape of a drop are festive, solemn, and look great with lush, silhouette dresses. Such compositions can be strict, classic, emphasizing the bride’s playfulness with their slightly disheveled appearance.
The form itself originated in England and has become very popular among modern brides. The presented video clearly demonstrates the process of creating this version of the bouquet.
It has a slightly loose structure, which makes it look graceful and airy.
The basis of the floral arrangement can be a variety of flowers made using corrugated paper. This material allows you to create a variety of shapes. They look very cute and relevant, suitable for a celebration of any style or trend. A wide selection of corrugated paper in different shades allows you to bring your wildest creative ideas to life.
Their production and design takes a lot of work and time, but the result will certainly please you. Such flowers look very festive, bright, impressive and, most importantly, unique.
This is a colored film or mesh rolled into a bundle; it is attached to the rod in the same way as a flower with candy (the master class will tell you more about this later). Pounds are needed to thicken the bouquet so that the flowers do not look lonely.
For this you will need: candy; corrugated paper of the same color for the petals of the bud and green for the sepals; artificial rose leaves; wire; tape; scissors; glue gun Let's look at how to make a rose with candy inside step by step: Cut out a rectangle from corrugated paper, fold it in half and round the edges on one side.
We wrap this element around the candy chosen to fill the bouquet. To do this beautifully, you need to slightly stretch the paper in the center, then it will not bulge and fit evenly around the sweetness. We secure one edge with an elastic band and trim it so that it is as even as possible. For the stem, you need to glue the wire to the base of the flower using a silicone gun.
Do everything as carefully as possible.
To make it beautiful, use your imagination, place flowers on toothpicks in front, and tall ones behind, or combine them. Watch the video for another option on how to make a charming candy bouquet: How to make a rose from corrugated paper for a candy bouquet.
The rose is the favorite flower of many girls; it attracts with its grace and majestic beauty, so they are often used in unique flower arrangements, combining the charm of the plant and the pleasant taste of chocolate candy.
The girl will be delighted with such a gift, receiving both aesthetic and taste pleasure. Roses look beautiful in sweet floral arrangements, which can be arranged on a frame, in a basket, or often diluted with other flowers.
By learning how to make roses from corrugated paper with candy in the middle, you can create a gorgeous bouquet.
Watch the video with another example of a beautiful rose with candy inside: Check out the master classes on how to make it.
To create you will need: candies; corrugated paper - green for the petals and bright colors for the flower; scissors - ordinary and curly, for edge decoration; foil; skewers for stems; scotch; organza, decorative mesh for decoration.
Instructions for creating a sweet bouquet with tulips: Making flower blanks: cutting long strips of bright colored corrugated paper. We trim one edge with curly scissors and cut the other evenly.
Perhaps this method will seem easier to someone. Watch a video with a detailed description of this version of a sweet flower arrangement: Video lessons for beginners on creating bouquets of candy. Their prices are inflated, and the sweets inside turn out to be the cheapest and most tasteless.
To make a perfect, beautiful bouquet with a delicious treat, you need to do the work yourself. This is not as difficult as it might seem at first glance, and video lessons with detailed descriptions of the actions can help. Lesson on making a base for a candy bouquet.
Just flowers and a box of chocolate will be both beautiful and tasty, but a bouquet of chocolates will be an original and unexpected gift.
Here it is worth noting that this is also economical, but you need to put your whole soul into such a thing, show imagination, which means truly love, do not spare your free time and think about the one for whom the sweet flowers are intended. And making a unique thing yourself is always interesting and pleasant.
It’s a good idea to lightly sprinkle the bouquet with the girl’s favorite perfume or place a couple of drops of aromatic oil on the cardboard stem of the bouquet - be careful not to overdo it, otherwise the recipient will have to eat perfume-flavored candies.
We wrap the resulting part with a satin ribbon or variegated braid. If the tube is made of ordinary gray cardboard, then it must be wrapped in corrugated paper. Now the circle of cardboard is glued to the foam head - it should sit tightly, since the entire structure will rest on it.
All girls, young and old, love flowers and cannot live without sweets. When going to a birthday, date, wedding celebration, or just wanting to pamper a friend, daughter, girlfriend or spouse, and cheer her up on a weekday, you should definitely give bouquets and sweets.
Creating unusual holiday accessories is a whole science. Brides are working on inventing new decorative elements, trying to do everything to make their celebration unforgettable.
As a rule, preparations are already in full swing several months before the holiday: representatives of the fair sex meticulously select the ideal outfit and jewelry, and plan the ceremony. Not a single detail should be missed.
And when it comes to a symbol of bloom and happiness, collected from flowers, newlyweds show real miracles of ingenuity.
Sweet samples have gained particular popularity, which become a pleasant and tasty surprise, reminiscent of the childish spontaneity of the chosen one and seem to hint: life together will be a gourmet treat with a luxurious chocolate or caramel filling.
Girls who never want to part with a sweet bouquet are perplexed: how to preserve this delicious surprise, bypassing the well-known ritual designed to make one of the girlfriends of the hero of the occasion happy.
A beautiful delicacy will remain with you and will remind you of pleasant moments until it is empty.