Optics
Adapters from bayonet to M42 thread are sold for all SLR cameras.
Using such an adapter, you can easily adapt an inexpensive manual lens for macro photography needs, however, to do this you will have to buy a couple more sets of extension rings for it.
This solution is suitable even for a Nikon camera, which has a longer flange length than 42mm optics.
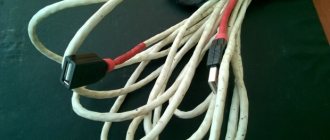
The picture shows one of the sets of rings that can be bought on the used photographic equipment market. You just need to keep in mind that a similar set of rings for lenses with a 39mm thread was previously produced.
There are special devices for macro photography such as PZF, but they are heavy and completely inconvenient for use in field conditions.
At low magnification, part of the adapter sticks out in front of the lens, which can prevent you from bringing the lens closer to the subject at the required distance.
Large weight and dimensions make such devices inconvenient for macro photography in the field.
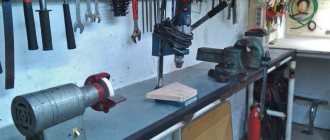
The picture shows a device for macro photography PZF with a screwed-on lens and an adapter from the mount to the M42 thread.
A lens with screwed-on rings and a bayonet mount can be successfully folded into a case along with other lenses, which distinguishes this design from the PZF attachment.
FLASH DIAGRAM
FLASH DIAGRAM
Many, if not all, have a digital camera. For nature and relaxation, this is just the thing, but when shooting is done indoors, and even in a darkened room, the quality of the images deteriorates significantly. The power of the built-in flash, about 20 - 30 Joules, is clearly not enough.
Having searched the forums on the Internet, I managed to find a wonderful, and most importantly, stable working circuit for a powerful 3 x 100 Joule photoflash. If you add a light synchronizer circuit to it, you will not need to run wires from the digital point-and-shoot sync contact to the flash itself. In other words, we place this flash where needed, and move freely with a digital camera in our hand. When the flash of a digital camera goes off, this one goes off at the same time.
Flash charging is very fast - less than 1 second. If the flash power of one channel on the IFK-120 is not enough, you can add two more via switches. You will get stepwise power adjustment. A 5 Ohm resistor has a power of 20 Watts, but even this may not be enough, it will heat up - set it to 30 Watts. If such high-speed charging is not needed, change the resistor to 24 Ohm 15 W - the charging time will increase to 8 seconds. The igniting trance in the flash circuit is from any Soviet flash on the IFK-120.
Of course, you can use more powerful lamps, for example, imported 500 J ring lamps, but they cost from $20 versus $1 per lamp.
The boards for the photoflash circuit can be cut out with a cutter rather than etched - they will adhere to the tracks more reliably when resoldering.
The flash can be controlled via a sync contact, or wirelessly.
Here is the complete circuit of the flash + light synchronizer.
In the case of prolonged and intensive operation, powerful resistors can heat up. To cool the flash circuit we use a cooler from a computer. We power it from a simple transformerless rectifier. Here is a view of the entire structure with three channels:
Source
Light.
When photographing all kinds of spider bugs, it is very difficult to use a tripod due to the restlessness of the insects. When shooting handheld, for short shutter speeds, there may simply not be enough light. Even on the sunniest day there is not enough light, and the only light source may not allow you to work out details in the shadows.
If you are not professionally involved in macro photography, you can use this design, the construction of which will take at most half an hour.
Everything is assembled from ready-made parts, except for two slats, which can be made from getinax, textolite or fiberglass.
I did not list aluminum-based alloys among the materials, since without galvanic coating they get dirty, and they are not very pleasant to use in winter.
The next picture shows the slats with screws and light synchronizers. It is better to use light synchronizers whose fastening threads are cut into metal rather than plastic.
Drawing of the slats. All linear dimensions in the drawing are in millimeters. The thickness can be 5-6 millimeters, depending on what material can be obtained.
To expand the capabilities, you can drill a few additional holes in the slats.
If you have a 1/4" inch tap, you can cut threads into the slats to prevent the fasteners from falling out. However, you don't have to do this. This will not affect the performance of the structure in any way.
Master class for parents on making a keychain from reflective material
Tatyana Matveeva
Master class for parents on making a keychain from reflective material
In November, our group held a parent meeting dedicated to the safety of children at home, in kindergarten and on the street.
In late autumn in Karelia it gets dark early, parents bring their children early too, and it dawns late . That is, the path from home and home is in the dark.
In an average city with heavy traffic, it is important to provide children with reflective elements .
In order for parents to ensure the safety of their children, we decided to teach them a simple way to make a funny keychain . This item of clothing will help you become more visible on the road and save the life of a child.
We prepared blanks from reflective material , double-sided tape and stickers.
For the master class you will need another hole punch.
You need to remove the adhesive layer from the tape and fold the tape in half.
Now all that remains is to make a hole using a hole punch for the cord, which will attach the keychain to the jacket or handbag.
You can decorate your keychain and then your child will be doubly pleased to wear it on outerwear.
Parents were interested in the master class . At first we made one at a time, then we got carried away and asked, “Can I have more?” material for everyone !
They are happy to demonstrate the results.
Here are some of our keychains .
And here's what we've completed:
This is how, in cooperation between kindergarten teachers and parents , work is being done to ensure the safety of our children.
Master class for teachers on making a “Vulcan” model from waste material Good afternoon, dear friends! I would like to present to your attention the “Vulcan” model, which I made with my own hands from scrap materials. Master class on making a boat from natural and waste materials I made a boat and launched it on the water. You sail, my little boat, and then return home! Rodionov I. Summer holiday on the sea coast.
Rotating platform from a kitchen timer
Time lapse shooting has gained particular popularity since even inexpensive compact cameras and action cameras began to be equipped with the function of interval shooting and video gluing. To shoot such a video in motion, you will need guide rails or a platform on wheels, and to evenly rotate the camera around its axis and capture the panorama, you can use a simple mechanical kitchen timer. For example, at IKEA a timer in a metal case can be purchased for only 200 rubles. It is more profitable to choose a timer with a flat top for convenient placement of the camera. Of course, a bulky DSLR cannot be placed on such a platform, but a lightweight action camera will fit perfectly.
Figured bokeh
This is perhaps the most impressive homemade effect of the entire collection. Bokeh is a pattern that forms in the out-of-focus area. Simply put, light points outside the sharpness zone are blurred and turn into round spots. The diaphragm opening gives them their round shape. A homemade lens attachment seems to add another aperture, but with an arbitrary hole. It could be a star, heart, triangle, or any other pattern. This method works best with high-aperture optics when the lens aperture is maximally open and its diameter exceeds the size of the cut out pattern. Using a compass, draw a circle on cardboard with a diameter equal to the diameter of the lens. In the very center of the circle (this is where the mark from the compass needle comes in handy) a pattern is cut out.
Nozzle with curved cutout
Bokeh in the form of hearts
The cardboard attachment is attached to the lens and the bokeh takes on the intended shape. For lenses with different apertures, the size of the cut out pattern may be different, and the optimal value is selected experimentally.
Flash diffuser
A classic of the genre - a homemade flash diffuser made from improvised means. The diffuser gives softer light, eliminates the unhealthy shine of faces in the frame and too harsh shadows. Building a diffuser is very simple, and there are many ways to make such a flash attachment. Even a piece of paper attached to a flash with an elastic band or tape can already be called a diffuser. A coffee or yogurt cup, instant noodle tray, plastic shampoo bottle, table tennis ball, white cloth or any other translucent white material are ideal. The mounting method depends on the flash and the manufacturability of the entire structure. The diffuser can be disposable, or you can try and design a durable accessory with a durable frame and reliable fastening to the flash head.
The simplest table tennis ball diffuser
Instant noodle container as a diffuser
A cigarette pack easily turns into a diffuser
Here it is worth talking about the so-called honeycombs. An excellent result can be obtained using ordinary cocktail straws, preferably black. The light pulse of the flash, passing through such cells, acquires a clear direction and is ideal for shooting portraits in a dark room. In this case, the light turns out to be softer, and the resulting spot has a small diameter, just sufficient to illuminate the face in the frame.
Honeycomb made from cocktail tubes
Constructing a honeycomb is not difficult - a rectangular box is made from cardboard, which is tightly filled with cocktail straws. Long tubes should be trimmed, but cuttings that are too short will not work. The optimal length of the tubes is 5 cm. The shorter the tubes, the brighter and larger the light spot will be and the larger the area of illumination of the subject will be.