The question of how to make a cabinet in the toilet behind the toilet arises at the first glance at this cramped room.
Here you need to place detergents and hygiene products, and other small items, but there is not enough free space.
A cabinet placed in an unused space helps solve this problem and also gives the toilet a certain appeal.
You can easily make such furniture with your own hands, but to do this you should take into account the specifics of the bathroom.
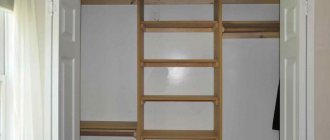
Three options for a closet in the toilet behind the toilet
If there is a sink in the toilet, then the shelves will be very convenient for placing various containers with household chemicals.
Girls will definitely find use for the shelves that are located near the sink and mirror. If the shelves are equipped with special holes, you can place some hair care equipment in such places: hair dryer, curling iron, tongs. If the interior of your apartment is made in a classic style, then the design of the toilet with shelves should be made using classic decorative elements. You can place old books or figurines on the shelves. The main thing is to make sure that the shelves are always in order.
If there is a lot of space in the toilet, then you can make a whole system of shelves located along three walls. Pots with flowers will enliven the boring interior of the toilet. In this case, the toilet must have a window. The shelves in the toilet can be decorated with climbing plants.
When planning bathroom storage, you have a choice between wall and built-in cabinets. Both options fit beautifully into the interior, but are manufactured and installed differently.
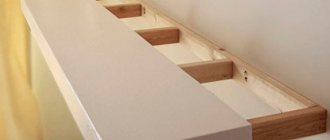
The wall-mounted one is made completely with all walls. The cabinet box is hung on the wall behind the toilet with loops on hooks. Metal lugs are attached to the vertical walls on the rear side of the housing. Special dowels with curved ends are installed as hooks. The best option is to secure the locker to the tire with hook brackets.
The design of a built-in wardrobe differs favorably from wall-mounted furniture in that the walls and ceiling of the toilet act as the top plate and sides. A facade frame with doors and a bottom (if necessary) are attached to them. In addition to hinged curtains, you can install roller shutters.
An example of a built-in closet behind a full-wall toilet
If you have no experience at all in this matter, and the desire to make a cabinet yourself overwhelms you, ask for help from neighbors and friends who already have practice in making and assembling furniture.
We offer you three options for arranging furniture in a plumbing cabin. We will present each option in the form of step-by-step instructions. Of course, to bring any project to life, you need to know how to use tools.
1. Prepare the necessary tools:
- desktop or workbench;
- perforator;
- jigsaw or circular saw;
- drill;
- screwdriver;
- confirmat drill with a crank;
- end mill for installing overhead hinges;
- rubber hammer;
- construction knife;
- iron;
- various utility tools: screwdrivers, a set of bits, chisels, etc.
2. Prepare the following materials:
- MDF sheet;
- end tape;
- LDVP sheet;
- metal tire and hook brackets;
- screws;
- dowels (wooden dowels);
- shelf supports (metal bushings);
- PVA glue;
- jigsaw files;
- dowels;
- confirmations (euroscrews);
- plastic plugs for euroscrews;
- furniture overhead hinges;
- door handles.
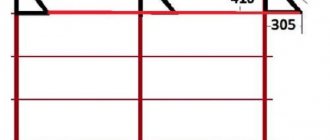
3. On a piece of paper, draw a sketch of the future cabinet. Separately draw the top and bottom plates, sides, shelves and door panels with dimensions.
| Name | Size, mm | Material | Quantity, pcs. |
| Top plate | 628 x 330 | MDF | 1 |
| Base | 628 x 330 | — « — | 1 |
| Sidewalls | 1210 x 330 | — « — | 2 |
| Back wall | 1210 x 660 | LDVP | 1 |
| Shelves | 628 x 330 | MDF | 2 |
| Doors | 1210 x 330 | — « — | 2 |
| Dowels | 20 | Tree | 8 |
| Confirmations | 50 x 6.4 | Metal | 8 |
| Overhead hinges | — « — | 4 | |
| Self-tapping screws | 4 x 16 | — « — | 16 |
| Shelf bushings | Ø 5 | — « — | 8 |
| Metal tire | 600 x 60 | — « — | 1 |
| Hook brackets | 70 x 50 x 25 | Combined | 2 |
| Door handles | Plastic or metal | 2 |
5. The plan is ready, go to the hardware store for materials and accessories.
6. It is better to cut out parts from MDF on a desktop.
7. Cover the ends of the finished parts with plastic tape using an iron. Iron the end tape applied to the cut sides of the panels through the paper.
8. Mark the installation of shelf holder bushings on the side walls. Drill holes with a diameter and depth of 5 mm.
9. Insert the shelf supports by tapping lightly with a rubber hammer until the bushings engage the panel.
10. Drill holes for dowels at the bottom and top of the sidewalls. Drill the same depressions in the top and bottom plates.
11. Place the walls and slabs end-to-end on the floor or workbench.
12. Insert the wooden dowels into the seats, having first filled the holes with PVA glue.
13. Connect the panels into a single box.
14. Use a confirmation drill to make holes, drilling through the walls and ends of the slabs at an equal distance from the edges of the sidewalls (60 - 70 mm).
15. Tighten all the housing parts by tightening the Euroscrews with a wrench.
16. Screw the hook brackets on the back side in the upper corners.
17. Place the box with the back side up. After checking the equality of the diagonals of the outer corners of the case, screw the back wall with screws.
Be sure to install the back panel with the laminated side facing the inside of the cabinet. First you need to make slots for the brackets.
18. Use an end mill to cut out recesses in the door panels for the hinge bowls. It is better to do this in advance - before assembling the case. Insert the canopies into them and secure them with screws through the mounting holes. Screw the overhead parts of the hinges onto the sides. Connect the parts, adjusting the gaps with the set screws.
READ MORE: Standard ceiling height in an apartment 60 photos size standards how to visually increase the height in Stalinist houses
19. Install furniture handles from below.
20. Using a level, mark the dowels for the tire. Use a hammer drill to drill two holes. Nail the tire with dowels.
21. Hang the cabinet on the wall so that the teeth of the bracket hook onto the rod.
22. Use the adjusting screws of the hooks to secure the cabinet.
23. Insert the shelves, resting them on the bushings. The cabinet is ready to be filled.
Expert opinion
Dmitry Laptev
Carpenter with 20 years of experience.
In a construction supermarket, they can cut you an MDF sheet according to the drawing and glue plastic tape to the ends. This will eliminate annoying mistakes when cutting the material yourself.
Let's set the initial data:
- Let's take the width of the toilet to be 1.2 m, therefore, this will be the length of the shelves and the bottom of the cabinet.
- We will assume the height of the bathroom to be 2.5 m. The distance from the cistern lid to the floor will be 730 mm. This means the height of the cabinet will be 2.5 – 0.7 = 1.8 m. It will be possible to install 4 shelves inside.
- The distance from the tank to the wall will be 400 mm.
Based on these data, we will proceed to the manufacture and installation of built-in furniture in the toilet behind the toilet.
1. On the side walls, make markings for fastening shelves based on the distance between shelves of 350 mm.
2. Nail the supporting corners or sections of timber with dowels. Stack the shelves. They can be cut from MDF, laminated chipboard or an old countertop.
If the sewer riser passes through the interior of the cabinet, then use a jigsaw to make cutouts in the shelves and base for the sewer pipe.
3. Build a frame from 50 x 50 mm timber, connecting the frame with self-tapping screws. The height of the racks is 2.1 m. The width of the crossbars is 1.1 m.
4. Screw the mounting metal corners to the side posts and the top bar with screws.
5. Install the frame by nailing the corners to the walls and ceiling with dowels.
6. Secure the bottom of the cabinet (it can be made of the same material as the shelves) to the horizontal crossbar with screws, and nail the corners that were screwed in advance to the wall with dowels.
7. Hang the doors on single or piano hinges to the vertical beam of the frame. First, use a chisel to cut out the seats for the furniture hinges on the frame and doors. Screw the hinges with self-tapping screws using a screwdriver or screwdriver.
8. Screw the door handles. The built-in wardrobe is ready.
In some cases, a built-in plumbing cabinet is installed to the full height of the bathroom. A blank panel is placed behind the tank. The bottom shelf is not mounted, creating a lower cabinet compartment for storing various long items.
Instead of hinged doors, you can install roller shutters to the entire height of the room. It will be more expensive, but building such a cabinet is much easier:
- After installing the shelves, secure the shutter guides behind the toilet to the side walls with dowels and screws;
- attach a drum with a folded fabric to the ceiling;
- Pull the side edges of the roller shutters into the longitudinal grooves of the vertical posts.
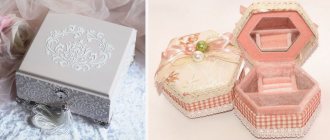
The cabinet for the toilet room can be a separate piece of furniture. It has a distinctive design that cannot be confused with anything else. At the bottom of the toilet cabinet there are two narrow and high cabinets, which stand at a distance of 50-60 cm from each other. Above them there are one or two sections with or without doors. These are already solid sections with hinged doors.
Various designs: the same idea - maximum use of all available space
The parameters of these cabinets depend on the dimensions of the room. You will not see such products in stores, only individual orders. The same laminated chipboard will not be too expensive, and there is plenty of space for storing chemicals.
There are models that are more economical in terms of space use: in the lower part there are only racks, open and closed shelves are located above the toilet cistern.
If the shelves are only on top
The option presented above is good when the load-bearing capacity of the walls is insufficient to support conventional wall shelves. If you have a partition made of plasterboard, porous or lightweight concrete, you can look in this direction.
Before you start work, you need to make a plan, take measurements and draw a plan of the plumbing cabinet in its actual dimensions on a piece of paper. A plan is needed from the facade and the side. It is necessary to take into account the number and size of shelves, as well as select the option and mounting locations. You need to think about how to make a closet for the toilet with your own hands step by step, write a short instruction plan so that you do not subsequently redo the already formed material.
Before you begin the actual assembly, you should decide on the materials that will be used to assemble the cabinet.
We use serious fasteners for the wall.
Design of a small toilet with a cabinet
A small toilet room is equipped with narrow shelves that take up space above the toilet barrel, or a side wall or mini-models, with open or closed shelves that look very harmonious and neat.
Quite often they use products with mirrored facades, which make it possible to visually increase the dimensions of the room. Such cabinets do not contribute to cluttering the space, give the atmosphere a special lightness and allow you to radically change the design of the room.
Design of a toilet in an apartment - 7 rules
It would seem where you can mess up in a room as small as a toilet. But in such an area everything is visible, every detail matters. Let's figure it out.
We recommend: How to seal a stainless steel chimney: use thermal tape, sealant or
Toilet - wall-hung only
This is the first most important and ironclad rule - only a wall-hung toilet with installation. Without it, you don’t even have to think about toilet design. Even the most expensive and sophisticated floor-standing toilet is inferior to a wall-hung one in all respects. Differences:
- Only the wall-hung toilet has a modern appearance.
- There is no ugly silicone joint with the floor or a gap between them.
- Because visually the area of the room is estimated by the floor, but the suspended floor does not occupy it, the area seems larger.
- Convenient to clean. Dirt does not accumulate behind the toilet and at the joint.
- Effectively takes up less space.
A modern toilet design without a wall-hung toilet is impossible. This is the thing on which saving is unacceptable.
Some photos will show regular floor-standing toilets - this is a mistake. These photos are here to illustrate other ideas, I will not return to this.
Hatch in the toilet
This is the second point, without which the toilet design will be of a very low level. The worst thing you can do is use a ready-made white metal hatch. This is a purely rough technical solution, which is unacceptable in the design of a toilet in an apartment.
Correct ways to hide pipes and meters:
- Hidden hatch under the tiles.
- Furniture doors.
- If inexpensive - a painting or a printed photo, a panel, a roller blind.
The latter can be done very inexpensively. And this is already better than a white hatch. Be sure to hide the pipes properly. It is on such nuances that the design of the toilet is built.
Please note that the hidden hatch under the tiles will have dark gaps around the perimeter. To prevent this from being noticeable, the grout of the rest of the tiles should also be dark.
No more than 2 colors
The toilet is white. Those. There is always 1 color already. There should be no more than two colors that strongly contrast with white. Otherwise there are too many details for a small toilet without a bathroom. The exception is patchwork and other non-aggressive mixtures, where colors do not dominate and do not attract attention.
I love dark and black colors in the interior, but not in the bathroom, toilet and kitchen. On average, the design of a small toilet looks advantageous in light colors. Everything else is an unjustified risk.
White, beige, gray, wood shades are the best colors. I wrote in detail in an article about the design of small bathrooms.
Small sink
There are very small sinks specifically for toilets. Being able to wash your hands is very important for a toilet without a bathtub. Otherwise, we come into contact with the door handles of two rooms at once just to get to the sink.
They are so miniature in size that in width they occupy little more than part of the wall with the platband. This is not a design issue, but for practicality I recommend it.
Decorative lighting
There is no need for a bright overhead light in the toilet. We do not need to look at ourselves in the mirror or perform any hygiene procedures. This means you can make decorative lighting and use it as the main one.
One of the modern ideas for renovating bathrooms in 2022 and for the toilet too is to place light sources at the bottom and middle of the room, making them hidden. With this arrangement, they provide a lot of shadows and the interior looks not boring, but at the same time strict. The more textured the tile, the more voluminous and interesting it will look. There are a million ways to embed LED strips, special profiles with a diffuser screen, etc. You can find a place for them even on an area of 2 sq.m.
Brush holder on the wall
Yes, such a small thing. There are very few objects in the toilet and each of them affects the overall perception of the interior. And such things as a brush are usually left for the last minute and bought “temporary”. Which then, of course, last for years. Just buy a normal one right away and hang it on the wall.
Toilet larger than 2 sq.m.
2 meters is more than enough space for a toilet and is exactly the size in most apartments. That's why all the rules and photos are about them. If your toilet is larger, then it makes sense to place additional items there, otherwise the space will be used irrationally.
Candidates for entry: bidet and pseudo-bidet, washing and drying machines, boiler. If the toilet is still small, here’s how to place a washing machine in the bathroom.
Open shelves
Stylish storage in the toilet.
Open shelves can transform and complement any interior. They are especially relevant in tight spaces. Such storage systems do not clutter up the space, give a feeling of lightness, and can visually change the interior for the better. For example, in a cramped room they should be installed on a narrow wall, this way you can visually stretch it out, thereby expanding the space.
Homemade storage system in the toilet.
Neat open shelves in the toilet.
Open shelves in the toilet.
Storage in the toilet on open shelves.
Storage in a small closet.
Stylish design of a small toilet.
Features of the space
The main problem that you will have to face when equipping and renovating a bathroom in a Khrushchev building is its small area. Most often, the standard dimensions of the room do not allow for placement of three-dimensional models of plumbing fixtures and a lot of furniture. This can only be a small bathroom or a compact shower.
The layout of most “Khrushchev” apartments involves a combined bathroom, and then these square meters are quite enough to accommodate all the necessary plumbing, and the length of the walls allows everything to be arranged so as to accommodate a washing machine and a small bedside table. 2 sq. m is a small space, but a well-thought-out project will allow you to fill it with the right things and choose the right design option.
In that part of the Khrushchev buildings where the toilet and bathroom are separate rooms, the situation is even worse. Bathrooms in such apartments are usually very narrow. It is very difficult to place anything in them. Usually there is only room for a small bathtub and washbasin. To accommodate, for example, a washing machine, you will have to install a very small bathtub, where an adult can only fit sitting, or look for low models of washing machines. Then these necessary household appliances can be placed under the washbasin.
But the best option in such cases would be to combine two rooms. This, of course, will take time and effort and will require registration of all permitting documents for redevelopment, but with such a solution there is a real opportunity to carve out space for additional items or placement of more spacious plumbing options.
Purchased shelf option
The stores offer a large assortment of corner and classic shelves of all sizes and colors. The most inexpensive option is a shelf system made of plastic. Such shelves are quite practical, but their appearance leaves much to be desired. Over time, the plastic loses its appearance and becomes stained, which is very difficult to clean. Scratches and abrasions make plastic shelves on the wall in the toilet unusable quickly enough.
READ MORE: Outdoor Jacuzzis, heated outdoor hot tubs for use in winter, DIY pool products for the garden from China
Metal chrome shelves are a good option for a toilet. They do not look bulky and give the interior of the toilet some zest. The remaining parts of the room can also be decorated with the addition of chrome elements. The price of such shelves is a little higher, but it is quite affordable for the average resident of Russia.
Store-bought glass shelves are very difficult to find. If your toilet does not have any pipes that come from neighboring apartments, and the wall space is empty and flat, then you can use purchased glass shelves.
What color for the toilet to choose
Everyone needs to choose a color scheme for a toilet in a Khrushchev-era building together, based not only on the practicality of the color, but also listening to themselves. So, white and its shades (pearl, milky) will make the room visually larger and cleaner. But you shouldn’t overdo it; it’s still better to make the floor a darker shade, since white will be too easily soiled. There are even toilet interiors in black. and very successful ones. Black, like white. visually pushes boundaries, helping them disappear. But the best solution would be to combine different colors - in this way the interior can be “broken” by removing clear boundaries of the corners and adding dynamics. We have selected for you photos of different toilet interiors in Khrushchev, decorated in different color schemes.
White shades
As we have already said, you should not make completely white walls, floors and ceilings; it is better to combine this pure color with other shades and materials. So, you can lay out the lower half with “hog” tiles in white or milky color, and paint the upper part (moreover, you can choose the paint of any shade). When you get tired of the paint color, you can easily replace it.
The combination of white and wood textures and shades looks impressive. This combination is reminiscent of Scandinavian minimalism. Moreover, it is not at all necessary to use natural wood - on the modern market you can find porcelain tiles, plastic panels, and laminated MDF panels with imitation wood.
Dark colors
Only the bravest can decorate a toilet in a Khrushchev-era building in dark colors. It has been noticed that this makes small rooms even smaller, but if you choose the right shades, materials and combine them with others, you can get an unusual result
For example, by covering the upper part of the toilet with non-woven or vinyl wallpaper with an unusual print, you can divert attention from the dimensions of the room
Another successful option for using dark tones is to combine it with a contrasting floor covering. This could be bright tiles or a self-leveling floor with an unusual pattern. The main thing is that when entering, it catches the eye, then the room will not seem so cramped.
In beige and brown shades
Even such a banal color as beige can look advantageous in a Khrushchev toilet. Especially if different materials with different textures and patterns are involved. The dark chocolate color will add contrast. Use brown and beige tones together, dilute them with other colors, choose an unusual print on the tile (or lay out the pattern yourself), buy the necessary accessories - all these tricks will help get rid of the feeling of boredom in a beige toilet.
Toilet in gray tones
Any of the gray shades will look fashionable and modern, since nowadays such tones are in trend
Whether it is a light neutral gray or a deep dark one does not matter. If you want to give the room an elegant brutality, choose porcelain tiles with imitation stone
An unusual combination would be a combination of gray with gold or cool beige colors.
Bright colors
It’s worth making a reservation right away - using bright colors in a cramped closet is not always appropriate. Firstly, combinations that are too contrasting will have a depressing effect and put pressure on the nervous system of unbalanced people. Secondly, any, even the most cheerful shades will become boring over time. Therefore, bright colors can only be chosen then. when they are easy to replace. For example, when painting: when you get tired of the color or don’t like it, the toilet is simply repainted.
Corner shelves
Ideal storage systems for a small toilet.
If the toilet area is very limited, then wide open shelves will simply be inappropriate. Here it is worth thinking about how to take advantage of unsightly corners. Several rows of open shelves of non-standard size - already ordinary ones - will fit well here. They are convenient for storing toilet paper, cotton pads in glass jars, detergents and cleaning products.
One step, two steps
By the way, it is not necessary to buy special furniture for the toilet in the store; you can use improvised materials. For example, place a stepladder or an extension ladder behind the toilet, which is rarely used (only during repairs or when changing light bulbs). The stepladder will accommodate baskets with towels, paper and other accessories, and the ladder can be used as a heated towel rail.
Stepladder as a storage system.
Plasterboard shelves
Drywall is a universal material that allows you to create entire niches with shelves. You can make rounded shapes or corner designs. To form a frame, which will then be sheathed with sheets of plasterboard, a metal profile is used. It will not be difficult to assemble such a structure with your own hands. In the photo, the shelves in the toilet are made of plasterboard and painted with white paint.
The first step is to draw up a detailed project for the future design of the shelves. Using a profile, we build a frame. The joints of the profiles are secured using special staples. We cut the drywall and attach it to the frame.
The next stage will be finishing the product. We level the surface of the niche itself and the shelves using putty. Use a silicone spatula to distribute the mixture. We are waiting for the putty to dry completely. Next, carefully sand the surface of the shelves with fine-grained sandpaper. You should get perfectly even shelves.
Drawing a diagram
Before you make a cabinet behind the toilet in the toilet with your own hands, you need to make a competent diagram.
Drawing up a diagram is a necessary step before starting work.
The main points to pay attention to when drawing are listed below.
- Draw the diagram in standard planes (top view, side view, profile view).
- Apply dimensions indicating allowances. An extra 2-3 mm will not make a difference when cutting MDF sheets. Not such a big expense. But when cutting, there is a gap at the cutting site, which is why the geometric parameters of the lined workpiece will differ. To eliminate this discrepancy, the allowance must correspond to the size of the gap from the cut.
- When installing a cabinet with closed doors, draw out the interior arrangement on a separate sheet. This way you can competently plan the internal space and cut workpieces according to pre-specified parameters.
- Separately, draw a diagram for cutting blanks and parts. This will save you money on buying extra material. Proper planning of expenses is the basis.
- Mark all necessary junctions of pipelines, electrical wiring, and sockets. On the cutting sheet, be sure to mark on which side you plan to cut the recess for the pipe. This will allow for better distribution of the material.
It is advisable to make the diagram as detailed as possible.
Draw a sketch separately. For a more effective presentation, use colored pencils, markers or paint. Organize your design at the highest level. Consider several options for the future decoration of the restroom. This will allow you to choose the optimal design.
Special racks
Complete toilet storage system.
So that owners of small apartments do not feel discomfort and do not rack their brains about how to organize storage in the toilet, modern furniture brands have developed many convenient multifunctional storage systems. Today you can find many original toilet sets in a variety of styles. For example, an elegant metal shelving unit would be suitable for a classic-style toilet, a laconic white set would easily fit into a Scandinavian setting, and stylized wooden models would be appropriate for a rustic style.
Stylish model of a toilet cabinet.
Just what you need for a small toilet.
Neat storage in the toilet.
Plastic doors for sanitary cabinets
Plastic doors for a toilet cabinet are the easiest to install and, importantly, will fit seamlessly into any interior. Another important advantage of plastic products is moisture resistance and resistance to other types of influence.
Plastic doors come in a wide variety of designs, which allows you to choose a model for any style solution
A wide color palette provides plastic products with enviable popularity
Such doors are easy to clean; a simple damp cloth is enough, and in case of heavy contamination, you can use various cleaning agents without fear of harming the material.
Wooden shelves
Wooden shelves are not at all difficult to make. The main thing is to use good, even and fresh material. The photo shows shelves in the toilet made of solid wood covered with stain. The boards must be free of stains, knots and deformations. Before starting construction, treat all lumber. You can go through it several times with an electric planer or sanding machine. Achieve a perfectly smooth surface.
Treat the boards with an antiseptic and coat them with several layers of varnish. If you do not want the surface to be glossy, you can use a special matte varnish. To give the wood an elite shade, we use stain. It will be absorbed into the wood, but will leave the texture and pattern of the cut visible.
To give the wood an aging effect, you can use a gas burner. The fire will highlight the cut rings in a dark color. After firing, the surface must be cleaned.
When the wood is prepared, you can begin installing the shelves. It is more convenient to attach them to furniture corners or wooden corners.
Laying tiles in the bathroom on drywall
Before laying bathroom tiles on drywall, you should prepare the surface. It is pre-primed in 2 layers. Next, all joints are puttied using reinforced tape, which will prevent the formation of cracks in the future. The finished surface is primed again in 2 layers.
When finishing a plasterboard structure with ceramic tiles, you should approach the choice of adhesive composition with particular responsibility. The best option is flexible tile adhesive. The material is available in the form of dry powder or ready-made mixture. It provides reliable adhesion of the surface to the tile, which will not fall off over time. The most convenient to use is the modern composition in the form of liquid nails, which is produced in plastic bottles. To work with it you will need a special gun.
The plasterboard partition is lined with tiles and complemented by wooden shelves
The tiles on the plasterboard in the bathtub are laid out according to the chosen pattern. You should start from the place that is most visible. Each tile is pre-wetted. The adhesive composition is applied to the plasterboard surface and the back side of the finishing material using a notched trowel. The correct position of the product is checked with a level. The next tile is laid in a similar way.
Helpful advice! Laying tiles begins from the edge of the structure if there is a gap at the end of the row measuring more than half the width of the tile, or from the center to the edges when the gap is less than half the width of the tile.
Crosses are placed between the elements in order to form a smooth and neat joint. The final stage of making a bathroom shelf from plasterboard and tiles is to grout the gaps between the finishing elements.
Mosaic tiling of plasterboard shelves in the bathroom
Plasterboard shelves finished with mosaics look beautiful and organic. This facing material consists of small rectangles or squares. There are also other shapes of fragments in the form of an oval, diamond, honeycomb or circle.
The shelf in the bathroom is lined with mosaics
Mosaics can be pieced or assembled on a paper, polymer or silicone base, which greatly simplifies the process of laying the material on the surface. The tiles are available in different designs. Ceramic options are the most popular. Products can have a glossy or matte surface, contain a pattern, and be in different colors.
Surfaces decorated with glass mosaics look impressive. Shelves decorated with mirror puzzles will become an elegant decoration of the room, contributing to the visual expansion of the space. Salt mosaic in the form of opaque glass has a special property of refracting light. Thanks to this finish, a tiled bathroom shelf can become an accent element of the room.
Due to the flexibility of the material substrate, the mosaic can be laid on a surface of any configuration. It will completely follow the contour and bend of the product, so this finishing option is ideal for curved structures. Interesting design solutions are shown in the photo of shelves in the bathroom made of plasterboard and mosaic.
Important! Before laying mosaic tiles on drywall in the bathroom, you should perfectly level the surface, otherwise all its defects and flaws will be visible.
Laying the modules is carried out according to the same principle as when using ceramic tiles. Products on a mesh base are attached with the mosaic on the outside, and the module on paper – with the mosaic on the inside. After laying, the paper is removed from the surface. The modules should be leveled using a rubber roller. Grouting of joints is carried out 1-2 days after laying the tiles.
The back wall of the niche in the bathroom is lined with mosaics
Wall cabinets
Wall cabinet in the toilet.
Most often in the interiors of small toilets you can find hanging drawers. This is due to several factors. First of all, the doors of the cabinet are closed, which allows you to hide all hygiene and care items from prying eyes. On the other hand, such a storage system looks neat and aesthetically pleasing.
An excellent option for a small toilet.
Above the toilet you can hang a regular wall cabinet of suitable width and height. This could be part of a kitchen unit or part of a hallway. You can find a suitable example in any modular collection. You will only have to cut holes in the back wall for sewer and water risers, but this modification is not difficult.
Wall cabinet above the toilet: heights and fronts are different...
If you are worried that the open cut may be damaged by moisture, you can take a self-adhesive melamine furniture edge and treat the cuts with it. A simpler option is painting or coating with a water-repellent sealant.
it shouldn't interfere. That is, there must be access to the flush button, and while sitting on the toilet you should not hit your head on the door. Based on these considerations, the dimensions of the wall cabinet in the toilet are selected. Since the parameters of the toilet bowl, cistern and installation of the entire structure are different, the depth of the cabinet can be from 35 to 60 cm.
Manufacturing process
The entire process of assembling a closet in a toilet comes down to five steps.
- Measurements of the restroom room.
- Drawing on paper.
- Drawing a design sketch.
- Cutting materials to size.
- Assembly and installation of parts at the installation site.
The closet in the toilet is installed in several stages.
In the list above, all points are clear except the third. What is the difference between a drawing and a sketch? Here's the thing. A drawing is the main document on which all technical parameters of the future product are indicated. Allowances, gaps, lengths and thicknesses are taken into account here.
The drawing shows all the parameters of the future cabinet.
Another thing is a sketch. This section refers to the sketch as it relates to the design definition. For a visual representation of the future cabinet design, its color palettes, patterns and other effects, a sketch on paper is the ideal solution. You can consider several options for the future design of the restroom at once, choosing the best one from them.
A sketch is a drawing of a design solution.
OSB shelves
OSB boards differ from chipboard boards in that their strength level is several tens of times higher. The OSB board is impregnated with a resin composition, which protects the surface from getting wet and absorbing moisture.
Cutting parts from this lumber is easy. You can use a jigsaw or circular saw. It will not be possible to cut out the carved elements; the material crumbles.
The surface of the OSB board has a peculiar pattern, which can not be masked under several layers of paint, but can be highlighted by covering it with stain or varnish. The design will be very strong and durable. The edges of the cuts can be treated with putty.
If you want to get a smooth, perfectly flat surface, then it is better to take a different material for making shelves. The surface of OSB boards is coated with a resin solution to preserve the moisture resistance of the material. The putty will quickly peel off from such a surface.
How to make it yourself?
Shelf above the toilet
Shelves above the toilet are very popular, hiding unsightly utility fixtures. The design is easy to make with your own hands. You should start working with a drawing; it can connect all the elements of the future structure.
Having made an accurate calculation on paper, it is necessary to transfer the measurements to the prepared walls. If wood, MDF, or chipboard is chosen as the material for the shelves, you can order ready-made cut parts of the product with a processed edge in workshops. This approach simplifies the work on the design. For those who like to do everything with their own hands, you will have to cut out the material for the shelves yourself.
The cut boards are sanded and treated with a special compound, paint, and varnish. The dried finished products are suitable for further work with them.
It is necessary to attach the corners according to the marks on the walls, checking with a level the ideal installation of each of them. The size of the fastenings depends on the weight they will have to withstand. For more massive structures, in addition to side fasteners, a support is also used on the central wall.
When the base is ready, boards are laid on it. You can order lightweight doors for the shelves above the toilet, or make them yourself from plywood, decorating them with adhesive film to match the color of the tiles.
Corner shelf
Fans of corner shelves can also create the design themselves. The easiest way to work is with plywood. A model consisting of straight or curly shelves is selected. Then a drawing is created on which the shapes of the product are drawn, and a clear calculation is made.
Next, the sketch at scale is transferred to a sheet of plywood. If the model has the same parts, it is better to make a template for them and use it to create a pattern on the canvas. Each workpiece is carefully cut out with a jigsaw, and the ends are sanded.
All parts should be covered with stain and varnish. For the ends, edge tape is used. It can be selected according to the color of shelves, tiles, and accent elements of the interior.
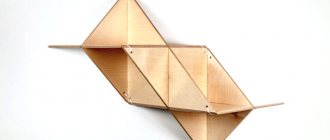
Unusually shaped shelves
Storage shelves in the toilet.
READ MORE: Bench vices 41 photos rotating and other types of steel and cast iron tools, their structure and dimensions Rating of manufacturers of vices for the home
The size of the room is not an obstacle to experimenting with design. Even the interior of a small room can be advantageously diluted with unusual objects. Install not just open shelves, but furniture of an unusual shape, for example, in the form of a honeycomb.
Honeycomb-shaped shelves in the toilet.
Fabric pockets
Fabric pockets on the wall are a democratic way to solve the issue of storage in the toilet, which you can implement with your own hands from scrap materials. If you have a sewing machine at home, then these pockets can be sewn in different sizes and shapes: single ones hanging on hooks, a series of pockets located one above the other or along a horizontal line.
Shelves made of metal and glass
Metal shelf holders in combination with glass shelves are suitable for decorating any room, including the toilet. Glass will give the effect of free space without the effect of clutter.
Metal processing will require you to have certain knowledge in this area and the availability of special equipment. The fastening points of metal parts are connected by a welding machine.
The glass thickness must be at least 6 mm. The edge is carefully processed and polished. If you do not have special equipment, then it is better to order all the glass from a glass workshop.
It is better to choose shelf mounts with suction cups. This way you won’t have to make holes in the glass, and the shelves will hold tightly. There should be a sufficient number of suction cups. The entire glass area must have uniform supports that distribute the total mass among themselves.
Assembly and installation
Begin installation by installing support bars, guides and internal horizontal partitions. Be sure to use a level to attach all cabinet pieces as level as possible.
You need to drill holes carefully.
When drilling holes in walls, floors and ceilings, try to do it more carefully
It is important that the diameter of the resulting holes is equal to the diameter of the purchased dowels
The shelves need to be attached as evenly as possible.
Also pre-drill holes in wooden blocks, chipboards, MDF with a thin wood or metal drill. This is necessary so that when screwing self-tapping screws into workpieces, the latter do not crack due to expansion and internal pressure. The diameter of the hole must be less than the diameter of the screw. If this condition is not met, the reliability of the connection will be at risk.
If you are installing a plumbing cabinet that hides the piping, heating boiler, water heater, floor heating pipe system or other plumbing fixtures from view, installation will be easier. Here, the need to install internal horizontal shelves is partially or completely eliminated.
It is much easier to make a cabinet that simply hides communications.
Built-in storage
The layout of some toilets allows for built-in storage systems. This method works well where there are niches and allows you to use them practically and wisely, turning the disadvantages of space into advantages.
Built-in storage system in a small toilet.
We have collected 20 more gorgeous examples of how to visually enlarge a small toilet. They are definitely worth a look!
Space saving hiding box
The wall completely covers the utility part of the room, but noticeably reduces the usable area. In order to save space, as well as to cover protruding risers, build a concealed box, hiding the sewer pipe. Making a frame for the box will be a little more difficult, since you will have to tinker with the corners. A strong corner can be easily obtained from two ud-profiles fastened together, with the shelves directed at right angles.
Depending on the location of the elements that need decoration, the protection system can be triangular or tetrahedral. When there are many protruding parts below, and only a riser is located at the top, you can build a multi-level box. This will create more space and create an additional shelf for storing small items.
One of the simplest designs. Drywall or plastic is useful for covering pipes. This method is quite simple: just purchase a sheet of drywall, preferably moisture-resistant. The cost of one sheet is about 4.5 dollars. In addition to the gypsum board, you will need a profile. It can be wooden or metal. It is better to choose a metal profile. It comes in two types:
- Guide. They form a contour and are attached at 4 corners, at a distance of at least 10 cm from the pipes.
- Wall. Serve to strengthen the structure.
Plasterboard box with inspection hatch
If the height of the box is less than a meter, then you can do without them. After installing the frame, a sheet of drywall is attached to it using self-tapping screws.
Such a box can be tiled and made invisible. The cost of creating a box from gypsum plasterboard will be slightly higher than covering it with plastic panels.
The principle of constructing a box from plastic panels is the same as from gypsum plasterboard. In short, covering the pipes in the toilet with plastic panels is very simple:
- It is necessary to install the frame around the perimeter at a distance of 5-10 cm from the pipes.
- If the height of the box is more than two meters, it is worth strengthening the structure with a transverse profile or wooden blocks.
- Cover with PVC panels. A square meter of such material will cost an average of about $5.
The method is quite simple and inexpensive, but due to lack of space it can be very difficult to install the box correctly.
Corner box
Box with inspection hatch in a small toilet with a water heater
Hidden inspection hatch, decorated with tiles
Plywood shelves
Plywood is compressed lumber. Thin layers of veneer are glued together until the required sheet thickness is formed. To make shelves, you can use sheets from 6-10 mm. If you decide to build a shelf for your phone in the toilet, then 4 mm thick plywood will do.
If you want to give your shelves an unusual curve, then plywood is the material you need. You can cut out not only various shapes from the sheet, but also make carvings and various patterns. The edges will remain even and smooth.
The sawn blanks can be coated with several layers of varnish or stain. If desired, you can use interior paint. It is also applied in several layers.
Shelves can be mounted on metal shelf holders; this is the most convenient option. Self-tapping screws of the required length are used as fasteners.
Materials
When choosing a ready-made wall cabinet for the toilet, you can look at products made from a wide variety of materials. The most common types are plastic, wood, wood panels, and less commonly metal and glass.
Plastic is the most practical material. It is not at all afraid of moisture, can serve for many years, does not oxidize, does not rot.
Low strength is compensated by stiffening ribs.
Plastic is cheap, but flexible enough to make the most intricate designs from it.
But you won’t be able to make shelves out of it in the toilet with your own hands, because the material is inconvenient to process.
People are also put off by the aesthetic unattractiveness of the material.
The tree looks much more solid and beautiful.
But high-quality material is not cheap; it requires a lot of knowledge for proper processing. The tree also does not tolerate moisture well, so it will have to be thoroughly protected from dampness.
Chipboards, in particular MDF, are less expensive and more convenient. They are easier to process, cheaper, and suffer less from moisture. For aesthetic appeal, you can cover the panels with decorative films.
But you should only take medium and high density slabs. Processing the material does not cause difficulties for people familiar with a jigsaw and hammer.
Metal is beautiful, reliable, durable. There is a wide selection of ready-made products; not everyone can assemble a cabinet made of steel or aluminum on their own.
Glass looks even more beautiful, but it is fragile and difficult to process, so it is not used often. If you look for ready-made solutions for installation behind the toilet, you can find various options at different prices.
| Variety | Price |
| Laminated MDF | 6000-14000 RUR |
| Plastic | 2000-5000 RUR |
| Metal 45x35x50 cm | 500-1000 |
| Wall glass shelf | 1700-3000 RUR |
Shelves above the toilet
The area of the wall, which is located at the edges of the toilet cistern, in most cases is not used in any way. To make this space useful, it is necessary to place a system of shelves there on which all kinds of toiletries and interior accessories will be stored. The shelf above the toilet in the toilet will not interfere if it is not made too deep.
The shelves above the toilet have another very significant function - masking water supply and sewerage pipes. The upper shelves can be left open, and small doors can be made on the lower ones. In apartment buildings, a wide sewer pipe runs directly to the toilet. In order to hide it, you can use any of the materials listed above.
The shelves above the toilet and along its edges will look more attractive if you lay out neatly folded towels in the right colors and place scented candles and figurines. The main thing is that the composition looks like a single whole.
Shape and dimensions
The most common cabinet shape is rectangular - a standard box with several compartments or shelves. However, manufacturers are not limited to just one option. Corner models in the form of a triangle and trapezoid are convenient for placement at the junction of walls. They are roomy and practical. The main disadvantage is that they can be very deep, so you have to reach for distant contents. The most unusual design of radius cabinets is that the side panels are united by a rounded facade. This design does not provide any practical function, but it looks visually more pleasing.
Since usually the bathroom in an apartment is not very large in size, the standard width of the cabinets is also small - about 20 cm. But the depth already varies - the standard indicators are in the range of 35–60 cm. The height of a cabinet with two or three shelves usually does not exceed 70 cm.
If you need to close pipes, choose rectangular or corner models, depending on where the communications run. The latter are also well suited for small spaces. But in spacious toilets you can place radius cabinets - they add coziness and a feeling of comfort. To prevent furniture from visually cluttering the room, it is convenient to hang it above the toilet or sink. If there are niches, you can arrange storage space in them - this is an interesting, and also functional, stylistic solution.
Shelf lighting
Spot lighting can be used as illumination. Small round lampshades are easily mounted in chipboard, OSB or plasterboard. A small border is made above the very top shelf. Behind it you can hide the wiring that will extend from the lamps.
An interesting lighting option is obtained by using LED strips. To connect them, you must use a special converter - a 12 or 24 W power supply. The choice of power supply depends on the type of tape. Nowadays there are LED strips that even connect to AC power from an outlet.
The tape pieces are attached with their sticky side to the bottom surface of the shelves and connected to each other by wires. The LED lighting switch can be placed in a location convenient for you. If you use a motion sensor, then the light in the toilet will turn on automatically when someone enters. All these interesting little things are impressive when they are arranged in a room such as a toilet.
Dimensions and design
When choosing a product, you must take into account its dimensions. Lockers should not take up much space. For small spaces, narrow shelves behind the toilet or on the side wall are suitable. If space allows, you can place a cabinet with legs or a pencil case under the ceiling. The design will provide maximum access to communications. A small hatch is located at the bottom; it will hide the water meters and lower wiring.
Having decided on the type and size of the structure, you can proceed to choosing a design. The following models are popular:
- With roller doors. Convenient blinds are suitable for small spaces. The lifting system makes shelves accessible from the lowest to the top in turn, so it is better to place frequently used items at the bottom;
- Pseudo-blinds. Movable slats are not used as doors. The opening is simply covered with a structure of longitudinal elements;
- Plumbing hatch. Covers the niche with pipes. The main purpose is to hide communications. If desired, you can place one or two shelves behind the door;
- With hinged doors. The most popular option, can be of different sizes, installation methods, designs;
- Closet. Usually the shelves are divided into two parts and have an internal partition. It will not be possible to open both sides at the same time.
The cabinet looks harmonious in any room if its shelves are not wider than 20 cm.