Making a shelf
If you do not have the opportunity to purchase a stand for images, or all the models that you have come across did not appeal to you or are not suitable (for example, a small number of tiers, limited space, etc.), then do-it-yourself homemade iconostasis, photos of which are presented in the article , you can make it yourself. For a standard three-tier iconostasis you will need wooden boards, a drill and screws. In order to assemble it, you need to create drawings of a home iconostasis. Using them, you can easily calculate the dimensions of the wooden panels, which will depend on the number of icons located on the iconostasis.
Decoration options
The choice of decor is determined in accordance with your tastes or interior. In order for your shelf to look beautiful and harmonious along with the icons, you can use different methods of decoration:
- wax coating;
- stain of various colors;
- artistic carving;
- patterned burning or engraving;
- varnishing;
- wood painting, etc.
It is not recommended to use a large amount of decor, as it can overshadow the icons.
Stand for holy images made of plywood
Shelf parameters and design may vary. It is important that the icons you need are placed there. This plywood shelf will be made with dimensions of 30x35x4 cm. What you will need for this:
- Pine board measuring 1.5-2.0 cm thick and 15 cm wide.
- Prepared glued board to form the bottom of the cabinet, 1.5 cm thick and 21 cm wide.
- Small pieces of fiberboard and birch plywood for sketching.
- Sandpaper.
- Self-tapping screws.
- A jigsaw is best if it is electric.
- Drill and drill bits.
- Milling table.
- Lathe.
- Pencil and meter ruler.
First, we draw and prepare future templates from fiberboard. This is done simply:
- We make a drawing on the fiberboard in natural volume and cut them out using a jigsaw.
- Next, we sand it with sandpaper to the parameters we need.
- We delimit the places for screws on the templates.
- We take the prepared blanks, transfer them to plywood and cut them out using a jigsaw and grind off the irregularities.
- The result should be: side, side and bottom.
- Now mark the holes with a pencil. There should be 2 of them on the bottom, 3 on the side, 4 on the side. We drill out the marked places and get holes for connecting the template to the workpiece.
The last step is to attach the template to the workpiece using self-tapping screws.
The sides and sides are cut down in the same way, and 6 holes are marked: 2 on the bottom, 2 for the side, 2 for the side.
Now using the machine we make 2 identical parts.
Decoration methods
Self-made shelves for icons need finishing and decoration. This will give them a fresh and solemn look that matches the purpose of the products.
There are the following decorative options for stands for images:
It is allowed to combine several finishing methods in one product. The main thing is that it does not look too colorful, overshadowing the image.
Wood carving
Each shelf should have a crucifix. It is made in a volumetric version by carving solid wood. In most cases, such work is entrusted to craftsmen and it is expensive. You can make an Orthodox cross yourself, using a set of well-sharpened cutters. In addition to the crucifix, relief images of domes, images of saints and martyrs, fish, birds, animals and fairy-tale characters are applied to the walls and sides. It is allowed to cut out patterns and bas-reliefs.
Execution of volumetric fragments is carried out in the following sequence:
The crucifix and overlays are glued to the back wall. To do this accurately and without distortions, you should make outlines with a pencil.
Simulation process
Natural wood and good quality metal are not always at hand. Often craftsmen have to improvise to give image shelves an attractive look.
The following methods are used for this:
History of the red corner
Every person has heard the phrase “red corner” or “God’s place”. However, not everyone knows why this place received such a name and how correctly it was located. You can often hear the answer that this is the right corner from the door. But it is not always the case.
Ethnographers claim that in past times, “God’s place” was located diagonally from the stove.
And this was done for a reason. The word red was associated with spring, summer and warmth, so they tried to place icons more on the south or east side.
The north and west for the ancient Slavs were comparable to death, evil spirits and severe winter. A little later, these stereotypes diverged, and people began to simply create cozy corners with numerous icons.
Design options
Orthodox canons suggest placing icons on the eastern wall. As an option, the place of the iconostasis is arranged in a corner directed to the east. Depending on the selected area, the shelf can be straight or angular. The small size of the corner shelf requires a multi-tier structure. The shelf can be equipped with a rear wall. Often it is decorated with carvings depicting birds, vegetation or the outlines of the holy apostles. The traditions of Orthodoxy do not provide for the placement of items not related to religion next to church paraphernalia. Having decided on the shape of the shelf, we move on to preparing the material and tools.
Where to place the iconostasis
A home deity is a temple that is always next to a believer. The foundations of the temple are transferred to a small home chapel, and the first church law is that icons should be located on the eastern side of the apartment.
How to determine where east is? There are three ways to get your bearings:
- In the morning, go out onto the balcony and see from which side the sun rises.
- In the evening, find the North Star in the sky - it always points to the north, which means the east will be on the right.
- On the compass, align the arrows with north and south, east will be on the right side.
4 interesting ways to use old laminate flooring in your dacha
After determining the east side, you need to choose a wall or corner near the window so that natural sunlight illuminates the images.
The icon rack can be placed in any room, except for the room close to the toilet and bathroom. The kitchen is suitable for icons of Christ the Savior: he sanctifies food and protects the household. And after eating, it is advisable to thank the intercessor every time for “...our daily bread...”.
Note to believers! The holy elders do not recommend placing the iconostasis in a room where guests gather and drink alcohol. There should be no posters of stars or large photographs on the walls. The place for prayer is chosen to be spacious, bright, secluded and, most importantly, free from objects reminiscent of human sins.
DIY home iconostasis drawings photo
Home iconostasis made of natural wood with carved patterns The tradition of arranging a home iconostasis has existed for more than one century. Although in modern homes icons are often placed on bookcase shelves or hung on the wall, it is best to set up a separate special place for them.
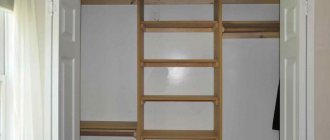
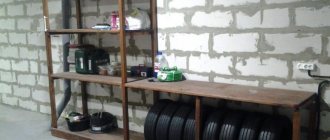
Single-tier straight rack - shelf for icons
A good option would be a hanging shelf, which according to the canon should be placed on the eastern wall of the house. Often such a shelf is made corner, two or three tiers high.
Beautiful wooden shelf for icons in the corner of the room in three tiers
Corner shelf for icons with candlestick
Varieties
Shelf for icons “Home mini-iconostasis corner”
In workshops you can order a stand for home icons of any size and configuration, but this is quite an expensive job.
Corner shelf made of fiberboard, made in three tiers
An easier option is to use a regular corner shelf from a hardware store, but this may cause sizing issues. In addition, you will have to look for a model that will “fit” better into the interior. All these difficulties can be avoided if you make a shelf for icons yourself - this is quite feasible even with little experience in carpentry.
Wall-mounted corner shelf for wooden icons
A do-it-yourself icon shelf can have any convenient design. Corner shelves are made single-level or in several tiers. To connect several levels, supports carved from wood are usually used. The finished shelf is often decorated with carvings, openwork overlays, and covered with special carpentry varnish and wax.
Small corner shelf for icons, two tiers
DIY home iconostasis
Homemade shelf for icons
By putting love, soul, and heart into the process of creating an iconostasis, you can create not only something useful to use, but also a real design masterpiece. There are many options for making such shelves. But there are certain requirements for them.
Using modern materials and wood, you can make a corner shelf to suit every taste.
Thus, the frames of the images should not overlap. No foreign objects can lie next to them, only things that directly belong to the shrine.
Creating shelves for icons
For work related to the creation of shelves for icons, you need special tools for woodworking: drill, lathe, milling cutter, jigsaw.
The materials needed to make shelves for icons include boards from any wood, pieces of slabs, wax or varnish, silver and black paints, and wood glue. Component materials and hardware require carved slats, a metal or wooden crucifix. Screws and original plugs are suitable as fastening elements. To secure the product to the wall, you need hinges and dowels.
Some of the carved elements can be made with your own hands. For example, start making carved elements and original shelf parts. The crucifix, which is the center of the icon, is made only in carved form.
In addition to such details, the corner shelf for icons should have a back wall in the form of a carved iconostasis. The carving is made with floral ornaments, outlines of saints, and fabulous birds.
To decorate the upper part of the shelf for icons, you can choose the outline of an Orthodox church.
You can cut out bas-reliefs yourself and choose interesting reliefs. To carve a crucifix, you must first select a high-quality sketch, and only after that begin to implement your plans.
The types of wood from which a crucifix can be carved include birch, aspen, spruce, pine, and juniper boards.
Where and how to make a home iconostasis
According to church traditions, the iconostasis is placed on the east side, so first in an apartment or house you need to find a corner exactly looking east. If it is not possible to use the desired angle, then you need to find one close to it.
Since not everyone manages to adhere to these conditions, they were made optional. Usually the iconostasis is placed in a large spacious room so that at least 2 people can fit there. You cannot have a TV or computer nearby.
Manufacturing of parts
You can make shelves for images with balusters under the crossbars. To do this, you need to buy or rent a portable lathe. It is advisable to use a pattern so that the side is made of identical symmetrical fragments.
Do-it-yourself home iconostasis is made in the following sequence:
Finally, the finished product is tried on the wall. Screws are screwed into it, and the shelf is hung on them.
Single tier straight shelving
Shelves of this type are chosen to accommodate a large number of images or if all the corners in the room are occupied. The shelves are hung on the east wall of the room. Even for such a relatively simple rack to manufacture, drawings are necessary. Preliminary planning will allow you to fit all the details with high accuracy and calculate the required amount of building materials.
For a single-tier structure, it is necessary to take boards with a thickness of at least 15 mm. The height of the back wall should be more than 30 cm so that the images do not protrude above it. The iconostasis should be placed at eye level, provided that there are no other bright or decorative interior items nearby. To install a candle or lamp, a non-flammable stand should be provided. In order not to clutter the product with the side, you can run a low threshold along the bottom crossbar to fix the frames.
Create your own red corner
What the home iconostasis will be like depends only on the owners of the house. However, remember to follow the following rules:
- Holy images must be installed far from technology (TV, computer, etc.) - the farther from everything worldly, the better.
- There should be enough space in front of the icons so that those praying do not feel crowded. And during prayer, it is better to place church books (prayer books, the Gospel) on a folding lectern (stand).
- You should not place icons individually on bookshelves, in cabinets, while crowding these images with other worldly objects: souvenirs, pictures, etc. This is strictly prohibited, since by doing so we show disrespect for God. After all, for some reason, many people put photographs of people we love and care about, especially those who have left this world, in the most prominent place, without cluttering them with unnecessary objects. The same should be done with icons, showing love and respect for holy images.
Manufacturing stages
Carved corner shelf for handmade icons with a drawing Before starting work, you should make a drawing of the project. The size and number of shelves depend on the type of icons that will be placed on the finished home iconostasis. To make a simple two-tier shelf, you will need two 1.5 cm thick pine boards, as well as four supports.
We cut out three parts using a jigsaw according to the template - sidewall, side and bottom
The workpiece is milled using a stencil using special equipment
To turn decorative parts you will need a lathe or take them ready-made
We assemble the shelf - the bottoms are screwed to the turned elements using self-tapping screws
When connecting the sidewalls to the bottoms, the screws should hit the middle of the ends of the bottoms
The sides are screwed on using cylinders - self-tapping screws are inserted into the holes from the bottom, the cylinders are put on, the hardware is screwed into the side
The final stage is coating the finished product with drying oil and attaching it to brackets in the corner
After completion of the work, the finished shelf is treated with stain and varnish. Both colorless varnishes and those that give the board the color of different types of wood are suitable. When choosing a quick-drying varnish, the product is ready for use in a few hours.
Small shelves for icons of different colors - pine, walnut, mahogany
Decoration
Depending on the complexity of the elements of decorating shelves for icons, you can make them yourself or purchase them ready-made
The most common way to decorate a home icon case is wood carving. You can do it yourself using a jigsaw. If you do not have the necessary experience, carved elements can be bought at a hardware store or ordered in a workshop. The finished carved plates are attached to the shelf with wood glue.
Soft wood is selected for carving: birch, spruce, pine, aspen or juniper
Another way to decorate is to burn out the ornament using a special device - for this, you first apply a drawing of the pattern to the wood with a pencil. The shelf can also be painted - special wood paints are sold in construction departments. An alternative to strict monochromatic painting is to apply a pattern to the enamel with paint of a different color.
You can burn out the ornament and then open individual fragments of the image on the shelf with enamel
To further strengthen and decorate the shelf, its back walls are covered with a wooden panel. It can also be decorated with carvings, painted with varnish and enamel.
Shelf for icons with a beautiful back wall
To decorate the upper part of the shelf for icons, you can choose the outline of an Orthodox church
When using a plywood board, these methods will not work - but painting with acrylic paint with the addition of gilding will look impressive on such a panel.
A small figured shelf for icons with candlesticks and a lamp
The difference between icons and paintings
It is important to note that if there are some picturesque paintings in the house that depict various biblical scenes, they should under no circumstances be installed near the home iconostasis. Since it is known that with the help of holy images and icons, Orthodox believers communicate with all the saints and the Almighty, but there is no connection between the icon and the picture.
In this case, it is important to know that the home iconostasis is a holy place, a kind of small temple in your apartment and it is intended to offer prayers and thank the Almighty for help. Therefore, installing reproductions of various paintings depicting biblical scenes is inappropriate.
In your own apartment, you cannot place the Sacred Face close to posters or paintings depicting certain famous people. Because, in this way, Orthodox Christian believers insult the shrine, placing them, in some way, on a par between worldly idols and the Almighty.
It is known that the eastern part of an apartment or house is of particular importance for the Orthodox religion, therefore it is necessary to place home iconostases or create a red corner on the eastern side.
The eastern part has a definite place in all historical religious information, which is why the Old Testament speaks of the creation of paradise in the eastern part of Eden. The Gospel Scriptures say that lightning came from the east, and the Almighty also comes from heaven to earth from there. Every Orthodox parishioner knows that in a church the church altar is located on the east side.
Modern location of the iconostasis
For a family, this relic is a unifying prayer factor that arises after the forgiveness of all everyday grievances and the achievement of mutual understanding.
- Today's realities of life insist that the church allows you to set up a home iconostasis in a free place. However, orthodox rules recommend placing it on the eastern side. The concept of “east” has an important feature for Orthodoxy. It is written about him in the Book of Genesis, in Bartholomew and Matthew.
- If doors are located in the east of the apartment, it is allowed to use other cardinal directions.
- When choosing a place for a family altar, you need to avoid the proximity of holy images with any household appliances, which are considered a vain product of modernization and do not contribute to spirituality. It is necessary to avoid close proximity of icons and decorative decorations, as well as with books of a non-religious nature.
- For an Orthodox family, the presence of images of the Savior Christ and the Virgin Mary in the home iconostasis is mandatory. The image of the Messiah should always remain central, and all others will be smaller in size. The main icons (Trinity, Christ and the Virgin Mary) are located above the rest, but the Crucifixion is allowed to be placed above them.
How to correctly arrange icons in an apartment
- Decoration for the family iconostasis - fresh flowers. Large icons installed nearby should be framed with towels according to the ancient Christian tradition. It is prohibited to place non-canonical paintings or their reproductions nearby.
- The home iconostasis should be crowned with a cross, and a lamp should be lit during prayerful praise. On holidays, according to the church calendar, candle flames can burn for a whole day.
Important: enough space should be left in front of the iconostasis so that believers do not feel crowded during a family prayer service.
Icons for home iconostasis
The Orthodox Church attaches great importance to a “beautiful corner.” She says that a person has the right to pray not only in the temple, but to honor the Lord at home. A properly constructed chapel should contain the following images:
Some lay believers place the face of the Guide in the “red corner”. The Vladimir and Kazan images of the Mother of God are also allowed. At the same time, you need to turn to shrines not only for help. We should not forget to express gratitude for their support.
How to arrange a home iconostasis
Publication date: August 23, 2016
The temple is a house of prayer and a place for performing the sacraments. A home is a family hearth, but in the home of a believer there should be prayer, because the home of an Orthodox Christian is a small Church. And we pray in front of icons, and there must be icons in the house. In sufficient quantity, but within reasonable limits.
An Orthodox Christian living in a modern home often has questions: what icons should be in the house and how to place them correctly?
Installation of an iconostasis in the house
The arrangement of icons in a home iconostasis can be arbitrary, but in the Christian tradition there are some rules.
In past times, every family had a shelf where holy images were displayed. These divine paintings were located in the brightest and most eye-catching place. The shelf for icons was installed in the far corner of the house, in the East. This place was the most illuminated, since the two walls forming it had windows, where a lot of sunlight passed through.
Home iconostasis
An icon is a sacred image, which is separated from everyday realities and never mixes with everyday life, but is intended exclusively for dialogue with the Lord. It is a window from the infinite world, as well as divine revelations in the tones and lines of the icon painter’s brush.
It is naive to assume that a large number of holy images makes the life of an Orthodox believer more pious than it actually is.
About icons:
An unsystematized collection of icons, various reproductions, and church calendars is similar to ordinary collecting, where prayer completely disappears as an end in itself. Here there is a complete distortion of the term “house”, which is a continuation of the monastery.
Required materials and tools
To make a corner shelf, wood of various decorative species is used - for example, oak or cherry. A less expensive material would be pine board. In addition to wood, you can also use plywood or chipboard. The thickness of the board can vary from 1.5cm to 2.5cm. You will also need boards of small width in order to carve the supports.
To work you will need the following tools:
- tape measure or ruler;
- hacksaw;
- sandpaper for wood;
- electric jigsaw;
- electric drill;
- self-tapping screws;
- wood glue;
- wood varnish.
Required Tools
To attach the finished shelf to the wall, you will also need masonry drills, metal corners or hinges, and self-tapping screws with dowels.
The procedure for making a shelf for icons
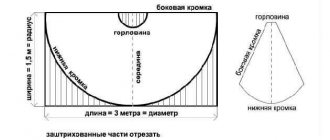
On a board, the thickness of which is fifteen millimeters, the outlines, as well as the main contours of the parts, are transferred from a paper sketch to the main board. Next, use an electric jigsaw to cut out the crucifix. Using cutters you need to make convex parts. The carving must be done in layers, carefully highlighting the internal parts with a thin cutter. Once the procedure for cutting the crucifix is completed, you can begin sanding the product, armed with fine sandpaper.
Advice! If you have to cut out bas-reliefs in segments, it is better to secure them with a sheet of plywood on the back side.
Then the decorative parts are glued together and attached to the sheet of the slab. To remove all excess, you can use a jigsaw or an electric cutter.
Using sandpaper, it is necessary to carry out high-quality sanding of the side of the finished product.
To make beautiful crossbars you will need certain professional skills, as well as certain equipment. After the balusters are made, it is important to carry out high-quality sanding of the product.
For a shelf for icons you will need several parts:
- side panels;
- vertical racks;
- sides;
- shelves
Shelf templates for icons can be made from pieces of wood board.
Attention! Professionals do not recommend using plywood for templates, since after cutting it needs to be significantly modified.
You will need two side panels for the shelf, and you also need to take care of purchasing high-quality fasteners.
Sequencing
First you need to attach the ready-made templates to the board. Next, the part is formed using an electric jigsaw. The edges are processed using a milling cutter; all irregularities and roughness present on the surface are sanded with abrasive paper. Before making holes, you need to mark them with a pencil. Next, the side panels are prepared using the same algorithm. After assembling the product, it is advisable to varnish the shelf.
Wall fixation
To attach a corner shelf under icons on the wall, you will need dowels. First you need to attach hanging loops to the finished product. Next, the shelf is applied to the wall, and the places where the dowels will be located are marked. The holes for them are made with an electric drill.
There are certain requirements that must be met in order for the finished shelf for icons to be beautifully mounted on the wall:
- the product should hang at the level of human eyes or higher;
- there should be no other decorative elements next to the icons;
- if there will be functional lamps on the shelf, it is important to ensure fire safety (there should be no flammable materials near the shelf)
Decoration features
Basically, natural wood is used in the manufacture of shelves for icons. If you can’t make carved strips and parts with your own hands, you can limit yourself to creating an imitation of it. To obtain a similar effect, you can first burn out the design, then cover the finished fragments with decorative enamel. To do this, the contour of the ornament is transferred to the top panel or side, and all contours are outlined using burning devices.
Attention! The finished pattern must be uniform over the entire surface of the product, otherwise the shelf will have an unaesthetic appearance.
As soon as the contour application is completed, enamel is applied to the surface with a thin brush, then the product is coated with colorless varnish.
What else was placed on the shelf for images?
It is worth recalling that iconostases in Ancient Russia contained not only holy water , various icons, but also prosphora. Also, residents of certain houses hid the Bible, Gospels and memorials in the red corner . The memorials were a kind of book in which the names of all family members were recorded, as well as all those who were living and those who had already died. Women of Ancient Rus' created some kind of doves from scrap materials as symbols of the Holy Spirit in order to later hang them near the home iconostasis. During the home service, lighted candles and lamps were placed in the red corner, which was an integral attribute during the Ascension of prayers.
Historians from around the world claim that home iconostases existed in every Orthodox home before the 1917 revolution. After the Bolsheviks came to power, Orthodox believers continued to pray, but they did this in secret from the government. Therefore, after a while, only a few icons remained from the huge, decorated home red corners, which believers hid from other people, fearing various persecutions, repressions and other gossip. If you turn to a modern Orthodox believer, you can find many different differences between the modern iconostasis and the red corner of antiquity. Since until now, historians have not established exactly what the iconostasis looked like, and what, in addition to holy images, books and lamps, was located in it.
How to make a home iconostasis with your own hands
Before making a home iconostasis in an apartment or house, it is recommended to first study the recommendations for its construction, then select the desired corner in the house. And only then consider all possible options for making an iconostasis with your own hands.
Of course, it cannot be mentioned that modern furniture stores, taking into account the needs of customers, also offer, albeit a small, but quite good selection of such corners. But most families want to make it individual and unique. By the way, special wall cabinets for icons do not have to be corner. It all depends on the location you choose.
The best article for you, go to: Easter is the holiday of the Holy Resurrection of Christ
There is also the option of making a special custom cabinet. In this case, all features and wishes will be taken into account. In this version, it can be folded from several colors or have a carving.
- To independently make a special corner for icons, you can use absolutely any materials.
- The main thing is to first make drawings of the cabinet that you want to place in your home for this purpose.
- And don’t forget about sufficient distance between the shelves. Since when candles are burning, they can heat up and ignite.
- As for the height of placement, there is no special technology or recommendations. Just remember that the horses should be at eye level, not higher or lower.
- If you have made shelves for icons, then it would be reasonable to place a table under it. It will be possible to light both candles and lamps on it.
- You can also place holy scriptures, holy water, etc. on it.
Nuances of fastening
The shelf under the icons is secured using dowels. Initially, the hinges are installed on the product, then the entire structure is applied to the wall and the locations of the holes are marked. After that, the recesses are prepared with a drill and the dowels are screwed in. Then brackets or brackets are hung. There are two ways to avoid excessive contamination when drilling holes for a shelf for icons. If you have helpers, it is enough to use a vacuum cleaner, placing the pipe near the work site with a drill, and all the debris will disappear into the bowels of the vacuum cleaner. Working with a shelf for icons alone forces you to use another trick. From four album sheets (according to the number of holes being prepared), cone-shaped figures (simply bags) are rolled up. Then, using tape, they are attached under the points marked for drilling. This simple device will prevent unnecessary clogging of the floor when attaching the shelf for icons.
Important! The shelf is fixed quite high, approximately 50-80 cm from the ceiling, since according to Orthodox canons, icons should be at or above the level of a person’s eyes and rise above other decorative items.
What else should be taken into account when installing a shelf for icons:
- absence of paintings or other decorative elements in the immediate vicinity;
- the use of candlesticks requires taking care of fire safety measures: there should be no combustible or flammable materials nearby (curtains, paper, etc.).
What icons are needed?
Worshipers claim
that every Christian should have a home iconostasis or Red Corner in his home. It should contain the following images:
- icon of Jesus Christ;
Holy Face of the Mother of God;
image of St. Nicholas the Wonderworker;
the icon of the Almighty, which is considered most suitable for the Ascension of various prayers at home. It is worth noting that in this case, the temple ministers recommend that parishioners purchase a waist-length image of the Almighty.
Often, Orthodox believers choose to create an iconostasis in their own home, the Holy image of the Mother of God, which is called Tenderness or Guide. Some parishioners in the Orthodox Church choose the Vladimir icon of the Mother of God. There is no doubt that one of the Kazan icons, that is, the Help of Sinners or the Quick to Hear, should exist in the home iconostasis. Having installed holy images in the house, a person can not only ask them for help, but also thank them with their help.
How to arrange icons
A standard iconostasis should consist of 5 rows and the icons should be arranged in a certain order:
- A cross must be placed at the head of all icons.
- In the center is an icon of Jesus Christ. The faces of the Holy Trinity are placed a little lower.
- To the right of the icon of Christ is the Mother of God. And only then can you place other saints at the request.
It’s best when the red corner consists of icons that are similar in style.
But this is difficult to do, because usually the icons are either donated or the required design was not found. But this does not play a big role; the most important thing is to create a holy place with faith and love in the heart.