Home » Building a house » Categories » Fence
Alexander Korovaev 10/16/2019
4584 Views 1 comment
Working with gas silicate (gas blocks) compares favorably with conventional brickwork. Silicate blocks are much larger in size than bricks, and therefore the installation process is significantly accelerated, where the formation of the adhesive layer takes more time and effort.
This can and should be fixed. Therefore, we are making a simple device for laying blocks that will save your time and effort.
Forming methods
Factory molds for preparing cinder blocks are made of reinforced concrete or steel.
Such parts can easily withstand the weight of a large volume of solution. As for do-it-yourself molds, they are most often made of wood or steel sheets. Such elements largely play the role of special formwork. To save on raw materials and free time, molds are mainly assembled without a bottom. You can put a simple film under them. Thanks to this method, the entire process of block formation can be significantly simplified. It must be remembered that the forms themselves must be made of perfectly smooth wood parts. The working surface will be a concrete base, a table with a flat and smooth tabletop, or a sheet of iron, which also does not have any defects.
Let's take a closer look at how to make a mold for slag blocks:
- you need to choose sanded boards 14 cm long (the width should be a multiple of this parameter);
- then, using a hacksaw, you need to separate the segments, which will then play the role of transverse partitions;
- then you will need to connect the segments with longitudinal elements to form a rectangular frame;
- Next, you need to cut a sheet of steel or any other material with a smooth surface into separate plates measuring 14x30 cm;
- in the inner part of the resulting structure, cuts are made that will act as grooves, the width of which is equal to the dimensions of the dividing strips;
- then the sections responsible for the separation are fixed in cuts, creating a mold for the production of 3 or more slag blocks.
In order for the resulting container for hardening the solution to serve as long as possible, at the final stage it is recommended to coat both metal and wood structures with oil-based paint. This form is suitable for preparing cinder blocks, the dimensions of which are 14x14x30 cm.
Equipment for sawing gas blocks
You can use special equipment, mechanical or hand tools, since the abundance of tools allows. But how effective are they? A hand saw or saw for wood requires additional refinement, setting the teeth using a grinder.
Unread message Natalya Sh. Exit Exit Registration. Foam concrete forums Skip. Foam block processing - cutting, sawing, drilling Load calculations, house, insulation, pouring roofs and floors.
And even in this case, such a homemade tool will not last long. A reciprocating hacksaw, electric saw or band saw should make precise and even cuts, and productivity will be greater.
But the high cost of such tools does not live up to expectations; it’s another matter if you need them for other purposes. Special tools for processing and laying gas blocks will simplify and significantly speed up the work process.
Such a tool will allow you to easily cut a block right on the construction site, while maintaining clear lines. Gas block is a durable material, but when using the right tools, it can be processed. It can be given any shape and angle of inclination, length and width of the block. Its main advantage is the completely Teflon coating of the canvas. This feature reduces mechanical friction, thereby increasing operating speed and reducing tooth wear.
Teflon protects against corrosion and preserves the tool for a long service life. Re: Construction from foam concrete. The fact is that I am installing smart home systems, and I needed to make a small recess in the foam concrete. Our hammer drill is powerful, I'm afraid it will break.
Tips for choosing
Or can you not be afraid and do it boldly? Re: Processing foam blocks - cutting, sawing, drilling Foam blocks can be drilled.
Experts advise choosing a hacksaw made of thick metal for cutting aerated concrete, the teeth of which have Victory tips. Wet material will resist cutting much more strongly and the hacksaw will get stuck
For a reciprocating saw, it is important to choose a special blade for aerated concrete
This method is fast and quite effective, but the chains quickly become dull, and sometimes even break and jam. In addition, when cutting with such a saw, a very large amount of harmful dust is generated.
There is a special tool that is specifically designed for cutting gas, foam and other lightweight blocks. It's called:.
Therefore, if you plan to saw in this way, be sure to protect your respiratory organs from dust. When choosing a tool for cutting aerated concrete, there is no need to chase cheapness. As a rule, cheap does not mean reliable. However, it is better not to rely on your intuition, especially if you have no experience in this matter, but to read reviews or talk with knowledgeable people.
Usually people without experience who want to build a small object for themselves opt for hand tools.
Planer for aerated concrete based on sandpaper
The basis of this version of the plane is moisture-resistant sandpaper 20 cm wide with an abrasiveness of about 40 (for rough work). In addition to this, you will need:
- a piece of flat multi-layer plywood;
- board for making a pen;
- screws, jigsaw, drill, stapler.
The handle can be cut with a jigsaw and then sanded. It is more convenient if it is higher on one side than on the other. The dimensions of the narrow side of the plywood base are determined by the width of the sandpaper strip, and its length can be made equal to the transverse size of the block or slightly larger.
The handle is screwed to the base with two screws. A countersink should be made for the screw heads, and it is advisable to drill holes in the handle so that it does not crack. Then a piece of sandpaper of the required length is cut and stapled to the ends of the base. The paper fastening may be different. The planer-grater for aerated concrete is ready.
How to use a stencil correctly
Having made it yourself or bought a ready-made stencil, it is used to decorate the walls. The templates are used as follows:
- Decorative plaster and one side of the stencil are covered with aerosol glue. The template is applied to the wall until it fully adheres to it.
- As soon as the stencil adheres to the wall, a layer of decorative plaster is applied with a spatula. The strokes are made strong to create a “bas-relief” and give the plaster density.
- The template is completely hidden under decorative plaster.
- Once the solution is completely dry, carefully remove the stencil.
- To create a three-dimensional effect, several layers of plaster are applied.
- If the picture is destroyed after removing the stencil, it is corrected with sandpaper.
To give the design shine or the desired shade, it is coated with a decorative color.
Important! When working with glue, it is important to hold your breath or use a mask to prevent sprayed chemicals from entering your respiratory tract.
We buy or make tools for bricklaying
The easiest way is to purchase a tool in a store. One of the professional devices is bricky. We can assume that this is a template for a novice mason; the result is a neat wall, but the speed of action does not suit a professional.
For different types of masonry and brick sizes, various modifications of the template are available. Currently it is made of plastic, but you can make it yourself from wooden or metal strips. A good option would be a brick consisting of sliding planks, which is suitable for various wall designs and brick blocks.
Bricky template drawingSource 100uslug.com
Conductor for obtaining smooth masonry
This bricklaying device includes a rectangular frame made of durable plastic, it has holes and projections for easy operation. We install the frame on the laid row, pour the solution inside, and remove drips from the sides. As a result, we get a layer of the same thickness, onto which we place the brick and lightly press it. We use the same smaller device to connect the end surfaces of the elements.
Set “Your own mason-2”
The device helps to lay a layer of masonry mixture of the same thickness in a brick row, with its help we obtain high-quality, neat masonry, save mortar, and increase the productivity of the mason. The set of templates is suitable for erecting a structure of half a brick or more, laying brick columns and columns, and performing facial finishing. Used to work with standard brick elements, sizes 250x120x65 and double 250x120x88 mm.
Set for bricklaying “Your own mason-2”Source plastsmart.ru
Set includes:
- horizontal template, 70 cm long for laying out the solution on a horizontal surface, equipped with two levels and graduations in mm;
- horizontal template of 40 cm, used in places of limited length;
- vertical template for ordinary bricks;
- vertical template for laying one-and-a-half bricks;
- supports for installing a horizontal template 70 cm in the amount of 8 pieces;
- strips required for laying pillars in the amount of 2 pieces.
All components are packed in a box and supplied with instructions.
Devices for dosing the binder mixture
Dispensing devices allow you to avoid excess consumption of masonry mortar when constructing brick structures. We use the following constructions:
- A cuvette helps to measure the required amount of solution in the selected area and get a beautiful seam of the desired shape. This is a simple container with walls without a bottom.
- Dispenser order. Container with a marking mechanism, adjustable length. Attached to the conductor frame using screw support clamps.
- Complex dispenser.
Order-dispenserSource nagdak.ru
Instruments
These are devices for monitoring: the thickness of the seam and such geometric indicators as the horizontal and vertical position of the wall.
- A plumb line is a weight weighing 200-300 grams, shaped like a cone, which is attached to a strong, non-stretchable thread. When lowered down, it shows the deviation of the brickwork from the vertical.
- A building level is required to ensure that each row of bricks is horizontal and vertical. This is a flat oblong strip with a capsule with an air bubble sealed in the middle of it. Based on the location of the bubble (it should be in the center of the capsule), the deviation of the surface from the specified position is determined. Professional builders use laser levels, which greatly simplifies their work.
- A mooring for laying bricks is a cord stretched along a row; it shows a line beyond which you cannot step, so as not to distort the surface of the wall being built.
Setting the orderSource yandex.net
In order to make horizontal seams of the same thickness and ensure the horizontality of the brick row, we use orders. Their role is played by rectangular corners installed in the corners of the masonry. They are installed strictly vertically and secured with staples. The order is indicated by divisions, between which the distance is 77 mm for a single brick and 100 mm for a thickened one. Orders are convenient to use together with moorings.
Jig for perfectly smooth brickwork
In connection with the development of industry and the production of various building materials, so-called panels or other, lighter or cheaper material have recently been preferred to brick.
It cannot be said that other materials are not able to outperform brick in terms of properties. This is probably where everything is heading. But the appearance of a brick or “stone” building is always appreciated. Especially if the hand of a real master mason is visible. There is no need to do this
But like any other type of construction work, builders without experience also undertake the construction of a brick wall, which is called “for themselves.” Indeed, if you do everything carefully, then the difference (with small errors) between your masonry and the mason’s masonry will be especially visible only in the speed of work. However, it will constantly move closer to the standard.
It’s not a problem to find out how to tighten a string, mix a mortar or how much reinforcement you need. But how much mortar should be thrown under the brick so that you don’t have to add, rake or hit with a mallet, deforming the previous work, is a more serious question. Of course, with experience this will happen automatically, but what should a beginner do? There are two options: learn like everyone else or use an amazingly working device created just to solve this problem.
The jig or template for distributing cement mortar is made of durable plastic. It consists of a rectangular frame with provided cutouts and protrusions. In the process of work, you should install it on a laid row of bricks, pour the mortar into the recess and, leaning the trowel closely against the upper part of the jig, clean off its excess.
The result is an inter-brick layer of the same thickness along its entire length. Simply lay the brick flat on it and press down lightly. A similar device, only smaller in size, is also provided for applying cement mortar to the end part of the brick. Using such a template also allows the outer edge of the seam to be positioned at the same distance from the outside of the wall, which looks very nice.
The price of such pleasure is on average 1,500 rubles. Plus or minus half a thousand depending on the company, quality and completeness of the set.
Construction specialties are different. The most difficult to implement, accordingly, are also the highest paid.
The mason profession is one of the most difficult. No one can just pick up and start laying brickwork. To do this, you need to learn, both theoretically and gain practical experience from real masters of their craft, working as their assistant and gradually performing simple operations at first, step by step moving on to more complex ones.
When you go through everything - from simple to complex, you will be entrusted with laying brickwork. Brickwork of a multi-storey building is the pinnacle of any mason's skill.
Smooth brick joints are perhaps the most difficult element of brickwork. Always wondered how they are made? How do master masons manage to apply the mortar in an even layer and then lay bricks on it one straight at a time?
He was building a brick garage on his property. I did the brickwork myself. Did this for the first time. It took a hundred sweats until I somehow got used to laying a more or less even wall. I’d rather not say anything at all about the brick joints on the walls of my garage, as you yourself understand, everything turned out crooked.
But don't be discouraged
Recently I found a special device for masons on the Internet. With its help, it is possible, even for the most inexperienced beginner, to make smooth brick-to-brick joints, both horizontal and vertical.
This miracle device is sold on a well-known foreign online store.
Costs 39.99 euros. To be honest, the price is very high!
Yes, we need it, it’s a device, and we don’t need to buy it. Make your own, completely free - from ordinary corners!
The operating principle is simple
Install the device on the brickwork, fill its frame with mortar, level the mortar over the frame, and remove the excess. Remove the frame. Place a brick on a flat strip of mortar.
Do the same with a vertical seam.
We build it ourselves - laying walls from cinder blocks with your own hands from A to Z, video
Cinder blocks are an excellent building material that has a number of advantages, which has gained popularity among summer residents and owners of country houses. Let’s start with the fact that it’s easy to make this lightweight stone with your own hands, which I’ll tell you about, and it’s no less easy to lay cinder blocks yourself. You don’t need a team of builders, and if you want to build a garage, a country house or a more serious building, you can do it yourself. Let's get started and figure out how to lay a cinder block and what tools we need for this.
So, the list of tools:
- hand-held circular saw or hacksaw (cinder block is easy to saw);
- respirator (required when sawing);
- building level;
- water (hydraulic level);
- hammer or mallet;
- trowel;
- plumb line (cord or fishing line);
- order.
Procedure for laying cinder block
As when starting work with brickwork, we adjust the corners, trying to achieve the correct rectangle. Of course, it is assumed that your foundation is already ready and you have carried out preparatory work, including waterproofing it. We place four cinder blocks at the tops of the corners, level them using a level and stretch the cord or fishing line along which the masonry will be made. Next, we apply the mortar to the foundation and lay the first rows of cinder blocks.
Important! The first and subsequent 2-3 rows of masonry are the most important, and it is recommended to check the correctness of the masonry more often with a level and plumb line in order to get even walls - redoing an already finished wall is much more difficult than checking your work on time. There are several ways to lay cinder blocks:
There are several ways to lay cinder blocks:
- half a stone (can be sawed off with a hacksaw or circular saw without any problems), or the spoon method;
- tychkovy - in one stone;
- one and a half stones;
- two stones.
During the laying process, the mortar is applied 1-1.5 cm thick. The fact is that a thicker layer of mortar will significantly worsen the thermal insulation properties of the finished wall, since the advantage of a cinder block is precisely that it has voids, the air cushion of which has excellent properties for heat preservation. For the same reason, you should not fill the voids in the blocks with mortar - in addition to the completely unnecessary additional consumption of cement, you will only worsen the thermal insulation properties of the wall.
How to lay cinder blocks - take the stone with your left hand by the middle and bring it to the wall at an angle of 45 degrees, then turn the block parallel to the wall, press it tightly against the previous stone and tap it with a hammer or the handle of a trowel - for the pros. Excess mortar must be removed with a trowel and used for laying the next blocks. After installation, the finished wall is covered with fine slag, followed by compaction.
Useful tips
Before starting work, think in advance about a platform or scaffolding from which it will be convenient to lay the top layers of blocks. A stepladder is not suitable for this - you will have nowhere to put a bucket of solution, it is unstable and you will have to constantly move it.
Colored chalk works great for marking blocks.
For better viscosity of the solution, you can add red clay to it in the following proportion - for 4 buckets of sand-cement mortar 1/3 bucket of clay. Another solution option is a mixture in a similar proportion, only ash is used instead of clay.
If you have any questions, watch the video:
https://sdelaysam-svoimirukami.ru/2478-master-klass-po-kladke-sten-iz-shlakobloka.html https://obetone.com/steny-i-peregorodki/shlakobeton-i-bloki/kladka-shlakobloka. htmlhttps://masterim.guru/stroitelstvo/kladka-shlakobloka/
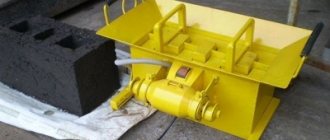
Instructions for use
Device for laying blocks
The procedure is elementary. To work you need an adhesive solution, the consistency is normal. The adhesive spreader is placed at the end of the wall row and work begins.
Step No. 1 - loading the device with adhesive solution
Loading the adhesive dispenser
Using a spatula, glue is loaded inside the box. There is no need to put a lot of solution - it will be difficult to work with.
Step No. 2 - forming an adhesive layer
Apply a layer
1 Pull the device away from the comb. If the glue spreader gets stuck, then you need to move it back and forth a little, and it will go easier.
Apply glue to the end of the block
2 Don’t forget about treating the end of the previous block in the row with glue. Apply glue.
Forming the layer thickness
3 Remove excess with a notched spatula.
Step No. 3 - install the block
Place a block along the cord
We install gas silicate locally. Align with the cord. The block installation cycle is completed.
Step #4 – repeat the cycle
We follow the cycle algorithm shown in the steps in the photo below.
Apply glue
We process the end
Removing excess
Installing a gas silicate block
If necessary, we knock
Step No. 5 – quality control of installation, elimination of defects
Level check
1 After laying several blocks (3-4), until the glue has set, we check the quality of installation.
2 Using a bubble level, we check the level of the laid out blocks in two planes.
We hit the block with a mallet
3 If necessary, we eliminate defects. We use a mallet.
Cinder block laying tool
To carry out cinder block laying work you will need the following tools:
Cord - mooring for marking.
It is desirable that the color of the marking cord be bright and conspicuous, for example red. Some people use graph paper to mark the line. But it is not particularly practical, since it is transparent and difficult to see during operation.
Building level and plumb line, tape measure.
It is advisable to also stock up on a hydraulic level (water level) and a metal building rule. A must-have tool for any repair and construction work. Using a level and plumb line you will control the evenness of the masonry, both vertically and horizontally.
- Construction pencil or chalk.
- Tool for preparing the solution.
These are containers and buckets for mixing and carrying mortar, a concrete mixer, and a construction trolley. The listed equipment is necessary for delivering sand, cement, water to the container for mixing the solution. If you have the opportunity to use a concrete mixer, this will make the process of preparing the solution easier. But a couple of metal buckets are definitely needed to transfer the solution to the masonry site. Plastic containers will suffice for water. It is advisable to use metal containers, since plastic buckets can be quickly damaged by a metal trowel and shovel. masonry tool - Construction trowel (trowel). Necessary for collecting and applying the solution to the cinder block. There are three forms of the metal part of the trowel. A trapezoid-shaped trowel is considered the most convenient for masonry.
- Hammer or pickaxe.
A cinder block is a heavy stone and it is not always possible to lay it perfectly straight in a row. Using a hammer, the stone can be leveled with a level and string. In addition, the geometry of an ordinary cinder block is not always perfectly smooth and may arise.
Grinder with a circle of at least 150 mm. A grinder is needed to cut a cinder block; otherwise, it is almost impossible to cut a cinder block. See the article below for how to cut a cinder block.
Perforator with mixer attachment. Necessary for mixing the solution if you do not have a concrete mixer.
Shovels: shovel or bayonet. Ideally, have both shovels. They are needed to load sand and cement into buckets, a mixture container or a concrete mixer. In the absence of a concrete mixer, shovels are needed to mix the solution.
Template for laying cinder block. It is not required, but its presence will greatly facilitate and speed up the laying if you plan to lay out a large area. The template can be easily made independently from lumber, metal corners, or purchased at hardware stores.
Overalls and construction gloves. Gloves are a must since your hands constantly work with mortar and cinder block
When laying or carrying blocks, you can inadvertently damage the skin of your hands, legs and abdomen. It is recommended to protect body parts with durable used clothing or construction clothing. blank for laying mortar
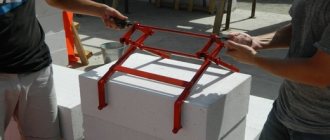
How to lay foam blocks using a device
Everything is very simple here. First you need to install the device on top of the first row of foam blocks, and then apply the solution to it. Then it will be necessary to stretch the device along the row, after which the next row of foam blocks can be laid.
Thus, there is no need to apply the solution to a notched trowel and then pull it across the surface, that is, to perform several operations. Just one movement, and in front of you is a solution already leveled in the required way, on which you can immediately lay foam blocks.
Of course, such a device for laying foam blocks will significantly increase the speed of work and eliminate a number of mistakes during laying.
Rate this article and share the link:
Masonry hooks
Hooks can be made from profile pipe. To connect the two handles, plates cut from corners are welded to the pipes. The two handles are connected with a bolt for free movement. The hinge needs to be moved towards the edge to increase grip strength.
The gap under the handle should not be too large, but sufficient for a two-handed grip. When folded, the width of the gripping part should be 5-7 mm larger than the block, so that there is no too much movement of the handles.
The gripping plates are cut from 5 mm thick channel. There is no need to make it thicker so that it is convenient to move the block directly to the glue. One plate has dimensions 75x85, the second 90x75. The second plate is longer because the pipes are fixed offset.
The handle must be made non-slip, and a cap must be placed on the end of the pipe to prevent the hand from slipping off.
The gripping force is very powerful; the device easily lifts 2 heavy concrete blocks. Nothing falls out. But safety precautions must be observed.
Materials used
The planer for aerated concrete is made on the basis of available materials:
- boards, 10-15 cm wide and length corresponding to the size of the product;
- thick plywood or board used to make the handle;
- screws, the dimensions of which allow you to securely fix the handle;
- carbide files, which are the cutting element of the device;
- glue that allows you to reliably glue metal to wood.
To make a plane, it is necessary to incorporate the maximum available materials into the design.
You will also need sandpaper, which is used to round the edges and sand the surface of the product.
Description of the design for carrying gas blocks
Since the weight of one cellular concrete block can reach a maximum of 30 kg, the question arises about the advisability of using special manual and mechanical devices that will help easily transport the blocks to the installation site. This type of device is considered to be a grip. It is designed in such a way that it is capable of grasping, with a specially created mechanism, a block of aerated concrete of any weight and size, and carrying it with the help of a handle (grip), like regular luggage.
The gripper has the form of a metal clamp and is a hinge-link mechanism that can facilitate labor during construction work on the construction of buildings made of aerated concrete blocks.
The advantages of using the tool are:
- the ability to raise gas blocks to different heights;
- significant acceleration of construction time;
- noticeable reduction in labor costs;
- ease of use and quick turnaround of products;
- careful operation in relation to the surface of the blocks;
- reliability of the clamp enclosing the product;
- assistance to ensure the accuracy of masonry installation;
- ensuring reliable coupling of the mechanism with the block;
- multifunctionality of the device (lifting, transporting, turning over, transferring, etc.);
- compliance with safety and technological standards.
The standard mechanical gripper device (pictured) includes:
- Rocker.
- Clamp (levers).
- Stand.
- Suspension.
- Traction 1.
- Traction 2.
The clamp is represented by 4 levers with a “scissor mechanism”, connected by a hinge element that allows the mobility of the parts. Some types of grips (multifunctional) have, in addition to levers, a ring for hanging from the forklift hook. The picture does not show the handle that comes from the pendant, by which you can use the tool manually. But the handle (grip) helps to use the device manually.
What to make a stencil for plaster from
Impressions on slightly dried plaster can be made using a special shaped roller. Thanks to the templates, three-dimensional pictures, protruding patterns, and unique layers are drawn on the walls.
A stencil for plaster can be made from paper, plastic or silicone.
The paper version is printed on a printer or drawn by hand, cut out according to ready-made patterns. Such templates are attached to the walls with tape and plaster is applied. They have a minimal cost, but are disposable.
Plastic stencils can be cut from bottles or other packaging. The selected picture is transferred to plastic and cut out with a stationery knife. Such templates are attached to the walls with special glue.
The simplest and most reliable stencil is the silicone version. The picture is poured onto a sheet of paper with silicone glue. After complete drying, the paper is removed, and the resulting reusable product is used to decorate the walls.
A mold for gypsum plaster will allow you to decorate in a short time
Advantages of the template
These include:
- the use of templates when laying blocks allows them to be installed on a layer of mortar of the same thickness without any excess, which makes the work easier and more productive. In addition, the solution consumption is noticeably reduced. It is possible to calculate the required quantity with sufficient accuracy;
- templates are used both for facing work and for laying the main frame of the building;
- Even for an inexperienced craftsman, such a design will help to obtain good quality masonry, with blocks laid at the same distance, strictly horizontally and vertically;
- the low cost of templates is available to anyone who wishes to purchase them.
Therefore, for novice craftsmen or people who decide to make masonry on their own, this design will be indispensable.
Classic mason's tool
The main tools of any master who lays blocks or bricks are hand-held and marking tools.
Hand tools are:
- a trowel, resembling a small spatula, with which the solution is applied and leveled, and its excess is removed. The gap between the blocks is filled and erased. Using the handle, tapping the block, it is leveled;
- a hammer that resembles a pickaxe. One of its strikers is pointed, the other resembles a rectangular block. The pointed part makes small chips on the block, the blunt part splits the block in half;
- jointing is used at the completion of work for decorative purposes and making the seam continuous;
Marking tools are:
- construction plumbs - they control walls vertically and horizontally;
- mooring cords - they control the horizontal when laying a row;
- squares - they check the accuracy of the angles;
- building levels - they exercise current control over the verticality and horizontality of the surface;
- rulers;
- aluminum slats up to 3 meters long, for measuring the overall verticality and horizontality;
- controllers in the form of water eyes.
Masonry hooks
Hooks can be made from profile pipe. To connect the two handles, plates cut from corners are welded to the pipes. The two handles are connected with a bolt for free movement. The hinge needs to be moved towards the edge to increase grip strength.
The gap under the handle should not be too large, but sufficient for a two-handed grip. When folded, the width of the gripping part should be 5-7 mm larger than the block, so that there is no too much movement of the handles.
The gripping plates are cut from 5 mm thick channel. There is no need to make it thicker so that it is convenient to move the block directly to the glue. One plate has dimensions 75x85, the second 90x75. The second plate is longer because the pipes are fixed offset.
The handle must be made non-slip, and a cap must be placed on the end of the pipe to prevent the hand from slipping off. The gripping force is very powerful; the device easily lifts 2 heavy concrete blocks. Nothing falls out. But safety precautions must be observed.
We assemble a machine for making cinder blocks with our own hands
Getting ready to assemble a machine for cinder blocks - preparing materials and tools
Home craftsmen usually have the required equipment and tools in their arsenal. Catalog of necessary equipment and materials:
- electric welding device;
- grinder with a disc for cutting metal;
- a set of metalwork tools;
- vice;
- three-millimeter metal sheets;
- steel pipe cuttings;
- electric motor or ready-made vibrator;
- bolts, washers, nuts for fastening parts.
The amount of metal for the manufacture of the device is determined in accordance with the drawing or sketch, which shows all dimensions.
First of all, blanks are cut from a 3 mm sheet of metal; you should work with a grinder carefully
How to make a mold for a block machine with your own hands - drawings and assembly
Make it according to the following algorithm:
- Mark the contours of the parts on a metal sheet, cut the blanks for making a molding box.
- Weld the shell of the future container, make sure that the angles are right.
- Use a grinder to cut pieces of pipes the length of which corresponds to the height of the cinder block.
- Make cuts along the axis on opposite sides of the pipes, giving the workpieces a conical configuration.
- Weld them to the base of the box and connect them with a crossbar to increase rigidity.
- Weld the base with conical inserts to the shell, fix the plugs at the end of the pipes.
- Make two handles for moving the molding box, fix them on both sides of the structure.
- Make a lid for the molding box and make holes in it that correspond to the dimensions of the technological inserts.
- Secure the stops inside the box at a level corresponding to the height of the block. They act as a limiter for the lid.
The use of a group molding box with increased dimensions will increase the productivity of the equipment, and the use of a collapsible mold will facilitate removal.
Drawing for making a machine with your own hands
How to make your own block making machine
As a material for manufacturing, use the metal profile available in the household.
Sequencing:
- Weld the sides of the frame and connect them with jumpers.
- Make a working platform and secure it between the posts.
- Attach the vibration motor mounting studs to the platform.
- Fix the eccentric balancer to the motor drive shaft.
- Prime the metal surface, then paint.
- Connect the power cable to the motor and perform a test run.
Having carefully studied the pre-developed project and drawings, it is not difficult to make a machine for making cinder blocks with your own hands.
Advantages of the template
These include:
- the use of templates when laying blocks allows them to be installed on a layer of mortar of the same thickness without any excess, which makes the work easier and more productive. In addition, the solution consumption is noticeably reduced. It is possible to calculate the required quantity with sufficient accuracy;
- templates are used both for facing work and for laying the main frame of the building;
- Even for an inexperienced craftsman, such a design will help to obtain good quality masonry, with blocks laid at the same distance, strictly horizontally and vertically;
- the low cost of templates is available to anyone who wishes to purchase them.
Therefore, for novice craftsmen or people who decide to make masonry on their own, this design will be indispensable.
How to make a matrix with your own hands
The mold for making a cinder block is the most important thing in the process and the most important thing in the configuration of the machine. Without the correct shape, the whole point of making a cinder block yourself becomes a useless circle of Skillful Hands. The more irregularities and voids there are in the cinder block, the longer the wall will take to build, and the poorer the quality of the masonry will be. During the manufacturing process on a vibrating table, slag concrete tends to shrink, and this is quite natural, since the whole point of the vibrating table is to compact the solution as much as possible, driving all the air out of it.
If the matrix does not take this into account, the cinder blocks will be of different sizes, and it will be very difficult to make normal masonry from them. Therefore, professional machines also use a press to quickly stabilize the mixture. The matrix drawings and the step-by-step process of its manufacture require no explanation. Everything is clearly visible in the photo, and by observing these dimensions, you will get the perfect cinder block.
How to make a cinder block machine
First, let's decide what goals we set for ourselves. If we need to build a small utility room, a barn, a summer kitchen or a temporary shed, this is one thing. In the same case, if we are going to sell cinder blocks, then the approach to its production should be completely different. Firstly, mass production of cinder blocks requires stability of the recipe, otherwise it will be simply impossible to produce high-quality cinder blocks. Secondly, the machine for making cinder blocks with your own hands, the drawings of which we have given right here, is not intended for large-scale production for obvious reasons.
The reliability and performance of a machine assembled from just about anything cannot be compared with a machine made in production conditions, where there is at least a hint of a quality guarantee. However, making a couple of hundred cinder blocks is not prohibited for anyone yet, so we present drawings with dimensions for a vibrating machine.
A super device for laying aerated concrete that will save you time and effort
Which is better: heated floors or radiators?
Warm floorBatteries
Working with gas silicate (gas blocks) compares favorably with conventional brickwork. Do-it-yourself gates, drawings, diagrams, sketches, design? Silicate blocks are much larger in size than bricks, and therefore the installation process is significantly accelerated, where the formation of the adhesive layer takes more time and effort.
This can and should be fixed. Therefore, we are making a simple device for laying blocks that will save your time and effort.