Craftsmen are drinking. Excuse me, they are having a intimate conversation. For one, instead of the sacramental “Vasya, do you respect me?” “Vasya, how many hands would you like for yourself?” comes out of your mouth? He thinks about it: “How much? But who knows... Well, how much work is needed there..."
Hands, of course, to hold, press, pick up, etc. Therefore, such an auxiliary tool as temporary removable clamps of various types - clamps - is always lacking for a craftsman. There wasn’t enough at a time when these same clamps cost a penny. Nowadays they can charge more than 1000 rubles for a good clamp. Despite the fact that now even in small piece production, power tools, electric and gas welding, pressure gluing and other technologies that require reliable holding of parts during the working process are widespread. The purpose of this article is to tell the reader how to make a clamp with your own hands at home. Preferably - from scrap materials with minimal need for welding and turning work.
Note : in English, a clamp is cramp (screw), bar clamp (spring-lever) or simply clamp, similar to how a screwdriver (screw driver) is often called simply screw. A person who knows spoken English well, but is unfamiliar with the technical features (these are very different languages), hearing something like “Give me screw driver,” most likely will not understand what they want from him. Moreover, poorly educated English-language articles are most often “swallowed.” If you happen to find yourself in a similar situation, listen: “the screw” means a tool, and “a screw” means some kind of threaded hardware (screw, screw) that is twisted with it.
Varieties
The purpose of this publication is not to build something like an encyclopedia of mounting clamps - there are many types of them, and there are even more patents for new, “super-super” ones. Our task is to show which clamps are most needed in a home workshop, and how best to make a clamp without wasting a lot of material and time.
The most common types of clamps in handicraft production are shown in Fig:
- G-shaped (G-cramp; G-clamp) is the most reliable, reliable and cheapest of the general-purpose clamps. Disadvantages: it takes a long time to tighten and can turn the parts being glued if the stop hinge is of poor quality or not maintained. The latter is quite important: an adhesive layer that has not set is a good lubricant, but it is undesirable to separate and recompress the surfaces being glued together, as the strength of the dried joint decreases sharply. In addition, a regular G-clamp does not hold round parts well, so a special pipe clamp is used to secure pipes or a round profile for welding or butt soldering (see next figure). Assembled from ordinary structural steel s=(2.5-4) mm, such a welded clamp provides reliable fixation of pipes up to d(120-150)x(1.5-4) mm.
Clamp for welding and butt soldering of pipes - F-shaped (F-cramp). Quick-clamping, operates on the principle of jamming the sliding stop in the dead center position. Pressure until it is firmly secured is most often provided by a screw clamp, as in a G-shaped clamp. An even “softer” and faster clamping, but less reliable, is provided by a trigger-eccentric clamping mechanism, see below. The most versatile and widespread of the clamps. The main disadvantage is that due to vibrations and shocks during operation, it can self-unclip and release. Or, on the contrary, it jams tightly, and when wedged with a hammer blow (see below), either the clamp or the part “shoots out”. It is not suitable for adaptation to butt welding of pipes: the jaws are driven by indirect heating and the pipe joint moves apart.
- C-shaped (C-clamp, fixing tongs). A fairly narrowly specialized tool. The main purpose is to compress the parts to be glued. Simple C-clamps are made with a spring clamp. The trigger-lever clamp allows you to precisely set the clamping force.
- Angle clamps for welding linear parts (pipes, profiles) at a given angle. There is no completely established special Anglo-American term. The most commonly used are welding clamp and dead-lock clamp.
- Joiner's bench - a carpentry clamp for joining panels from boards, slats and beams, assembling units from shaped parts (for example, railings with balusters). On the trail. rice. a rail clamp is shown; There are also rack and pipe ones, see below. Please note that pipe clamps are sold under the name “pipe clamp”, and clamps for end-to-end welding/soldering of round timber should be searched for under the query “welded clamp”.
- E-shaped (E-clamp). A highly specialized tool for edging carpentry with glue. If you need to carefully glue an edge on existing valuable furniture/interior design, it is difficult to do without an E-clamp.
- O-shaped or tape, or crimp grip (loop stay, loop brace). Band clamps are most often used by virtuoso carpenters and furniture makers-restorers. If you can fetch up to $1000 or more for a well-restored antique Viennese chair, then for a slightly skewed or wobbly chair they will fetch, at best, 15-20 of the same ones. Making a frame for a large painting or photograph without a tape clamp is also not so easy.
- Lever-plunger (precision clamp). When the trigger is pressed, the plunger (pusher) with the clamping stop moves smoothly forward. The trigger is released - the plunger is fixed by a spring-loaded slide, which becomes in the dead center position. Pressing again releases the slide and further advances the plunger. A good lever-plunger clamp can securely clamp a chicken egg without damaging its shell. In a home workshop, such precision clamping is unlikely to be needed, but suddenly a good precision clamp can be obtained from a mounting gun for tubes with silicone, etc. viscous compounds. A fixed jaw can be easily installed into the opening (window) for the neck of the tube, and a movable one is mounted on the rod instead of the standard pusher. If necessary, both can be removed and the tool can be used for its intended purpose.
Laying a tongue and groove floor on a concrete base
First of all, in order to lay the boards on concrete, it is necessary to carry out some preparatory work. There are two ways to level the base: using a self-leveling screed or using a metal spatula and a cement-sand composition.
It is not necessary to use insulation under a tongue and groove board. However, using this upgrade, you will get a warm floor.
Before laying tongue and groove boards, the floor should be leveled and thoroughly cleaned.
Next, you need to select insulation and waterproofing film. It is difficult to say which materials are better. One thing is clear: natural insulation and durable polyethylene film are considered the ideal option. You can also use waterproofing primer.
Assembling a heated floor on a concrete base with your own hands:
- Plywood or chipboard is attached to the concrete base. The distance at which the plywood edge should be from the walls is 1.5 cm. I also leave a gap between the plywood sheets. It should be equal to 2 mm. To attach this layer, you will need self-tapping screws that are recessed into the wood.
- Find out the dimensions of the floor. Boards are cut along them; a special device is used for this, for example, a jigsaw or a hacksaw.
- The tongue and groove boards themselves are attached to the plywood. The first element should be placed with the tenon towards the wall and the round groove away from it. To tighten the boards, use self-tapping screws or nails. This contraction should be performed at an angle of 45-50 degrees, in increments of 30 cm.
- After all the boards have been laid, the gaps between the walls and the floor are puttied and decorated with plinths.
This is the simplest option for laying tongue and groove boards. You can easily handle this installation yourself. Attaching boards to plywood is easy and quick, but more often they use joining elements with joists.
How to do which
Any of the clamps described above can be made independently in a home workshop. Carpentry clamps are made of metal - the wooden frame and jaws of the tool will not withstand the back pressure of the material of the part(s), the clamp will weaken during operation, and the clamp itself will become unusable. With welded and soldered clamps it’s already clear: only metal; wood is a flammable material.
Carpentry clamps for working with valuable wood or products are best made of wood, but you can also use metal ones with spacers made of plywood or even shingles. It is better to use wooden clamps for gluing into a layer (on thick workpieces from several thin ones), even if metal or plastic is being glued - wooden jaws provide a more uniform distribution of pressure over the plane and, accordingly, better gluing quality. Fragile parts (glass, etc.) are compressed for gluing only with wooden clamps.
Self-clamping option
For gluing parts, it is better to choose the simplest clamp model, which has an F-shape. The stores sell various models that consist not only of wood, but also of metal. The cost of such instruments is high. Therefore, many craftsmen prefer to make them with their own hands.
For small jobs, a cam-type clamp is ideal. For example, if you need to glue small parts or fix workpieces. This model works in the same way as the f-shaped element. The tool includes 2 jaws and guide bars. Sponges: movable and fixed. For reliable clamping, it is necessary to fix the workpiece well and rotate the cam 90 degrees.
You can make such a tool yourself with a minimum set of tools and materials. Before you begin, you should draw a drawing of the product. You can use any material for manufacturing, and also change the standard sizes as you wish.
The tire is made of wood or metal. Small bolts and rivets can be used instead of metal pins. It is recommended to make movable and fixed jaws at the same time, since they mirror each other. Their width and length can be changed to increase the grip of the product.
G-shaped
The frames of factory-produced G-clamps are cast. It is impossible to organize a steel foundry in a garage or barn, even in a forge on your own property. Since G-clamps, being the most “graspy” ones, are used mainly in metalworking and welding work with rather long and/or heavy parts, a homemade G-shaped clamp must be made of welded or solid metal.
Craftsmen often weld themselves clamps from sheet steel, pos. 1 in Fig.:
Homemade G-Clamps
Apparently, copying the profile of the frames of factory products, which in this case is incorrect. Profiles of cast frames of clamps are shown in pos. 2. Pay attention to the fairings and fillets (shown by arrows). Smoothing the profile is necessary to avoid the concentration of mechanical stress: they “love” corners and crevices, like bed bugs. But the weld does not work like a fillet! No, the clamp most likely will not break or bend. However, the recoil of the clamped part will move the frame a little, and it will be difficult to achieve precise fixation, and it is possible that the part may rotate when the clamp is tightened.
Homemade clamps made from channel sections are quite reliable (item 3). Disadvantages: labor-intensive, disproportionately heavy compared to the working width. You can cut a channel into clamp frames if you need to compress the parts very tightly. The best option for clamp frames for normal work is made from a square profile pipe, pos. 4. Depending on the size and wall thickness of the workpiece, clamps from corrugated pipe can be made for a working width of up to 1 m or more, see video:
Video: clamps from a profile pipe
Note: for the manufacture of the most important unit of the G-clamp - the screw clamp - see the end, since it is also used in other types of clamps.
G.E.
A type of G-clamp is a clamping one, which could roughly be called a GE-clamp. Clamps are well known to builders of small wooden boats, but they will also be very useful in small wooden construction (for example, a country or frame house, outbuilding, etc.).
Drawings of the clamping clamp and the method of their use are shown in the figure:
Drawings and procedure for using clamping clamps
For example, when sewing, say, a crossbar (truss structure) of a roof, each subsequent board is first pressed tightly against the previous one, and then attached to the rafter beams. Accordingly, the reliability and durability of the entire roofing pie are greatly increased.
Installation of tongue and groove boards on joists
First of all, it is worth noting one nuance - tongue and groove boards must be laid in two stages. At the first stage, the boards are partially fastened (as a rule, one of the five boards in a row is fastened), and after about six months the entire floor must be re-laid, tackling the boards more tightly and attaching the tongue-and-groove board to the joists.
This technology is very important: the humidity of the boards in the room gradually decreases, and after a while gaps appear between them. It is for this reason that the boards must be laid again, securely fastening each of them - this will create a dense finishing floor, and the quality of such a coating will be extremely high.
You can install a tongue-and-groove floor with your own hands as follows:
First, the first board is laid. As the first board, it is advisable to choose the most even board that matches the length of the wall. It is laid tongue-and-groove against the wall, with a gap of about 1-1.5 cm - this way the wood can easily expand under the influence of temperature and moisture. Don't worry about the gap being visible - the baseboard will hide it. The first board should be attached as tightly as possible: screws or nails should fit tightly into the joist.
Further laying of tongue and groove floorboards requires installation and tamping of the following boards. Each subsequent board is laid next to the one laid earlier. Using a rubber block and a hammer, you need to knock the board so that the tongue fits into the groove. We must not forget that initially only every fifth board is attached to the joists. To temporarily secure it, you need to screw the self-tapping screw into the hole drilled in the bottom of the groove.
In order for the boards to remain in place when fastened, they must be properly consolidated using one of the following methods:
- Bonding with staples and wedges. At a distance of 10-15 cm from the board, a bracket is driven into the joist, and a wooden spacer about 60 cm long is applied to the board itself. Two wedges are driven into the space between the spacer and the bracket, and their sharp ends should be located opposite each other. By hammering in the free ends of the wedges, the boards are pulled together: the tongues fit into the grooves quite tightly, as a result of which all the cracks are tightened.
- Rallying with stops and wedges. The technology looks exactly the same as in the previous example, but this time the role of brackets is played by wooden stops (small bars firmly fixed to the joist). It is important that the thickness of the two wedges on the narrow side and the distance from the top edge of the fence to the board match.
- Wedge-shaped compression consolidation with movable bracket and wedges. Having secured the compression to the joist, you need to drive two wedges between its supports, as a result of which the boards are pulled together efficiently and reliably.
- Rallying with a screw jack. Not far from the boards being laid, one support is nailed on which the jack will rest. As a result, the floorboard will be pulled together through the wooden spacer.
Having installed and moved all the boards, you can lay the last row. The end board is mounted in its place, and a wedge is driven into the space between it and the wall. When the board fits tightly into the previous rows, it must be firmly fixed with screws or nails. After this, the wedge can be removed. Naturally, it is necessary to leave a gap between the wall and the outer board for thermal deformation. When the last board is installed, the tongue and groove flooring can be considered complete.
F-shaped
The device of the F-clamp, so to speak, in its entirety, is shown in the following. rice.:
F-clamp device
During use, the shoe is moved along the guide until the heel touches the part. Then with your thumb you move the pawl or press it (depending on the design of the latch), and the shoe becomes wedged on the guide. Then the part is pressed by turning the handle of the screw clamp, or by retracting the trigger of the eccentric clamp. Unfastening and unclenching - in reverse order.
There is no particular point in installing a complex locking mechanism in a homemade F-clamp. Then, to jam the shoe, press on its inner butt, or lightly hit it with a light hammer if the clamp is powerful and wide-grip. As a rule, the slide self-weeds itself when the screw is unclamped or the trigger is thrown into the socket. If the shoe is jammed, wedge it with a light blow to the outer butt from the side of the stop (in the direction opposite to the jamming one).
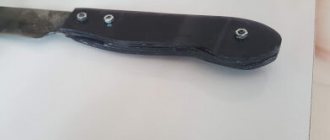
Left on the trail. rice. Drawings of a quick-release F-clamp with wooden jaws are given. In the center is the appearance of the tool, and on the right is the procedure for using it. Dimensions are converted from inch; they may be rounded to the nearest whole mm.
Drawings, appearance and procedure for using an F-clamp with wooden jaws
The main purpose of this clamp is clamping when gluing into a layer. The preferred sponge material is maple, elm, hornbeam, beech, oak or other wood that combines high strength and toughness; For example, the thrust combs of jointing and copying machines for wood are made from such wood. For other options for homemade quick-release clamps, see the video selection:
Video: homemade F-shaped clamp
Video: eccentric clamp
Video: quick clamp - DIY clamp
Special clamp designs
Having mastered the skills of making simple-shaped clamps, you can improve them and make devices for connecting complex parts.
There are homemade clamps made from a wooden hanger, which is sawn into pieces. They combine wood and steel and make more comfortable handles that allow you to quickly tighten the screw. This is especially important if you need to frequently change position or use several clamps at the same time. In the case of complex pieces, you can first cut them out of paper and then transfer them to plywood.
Corner welds
The corner clamp for welding work must be entirely metal. High accuracy of fixation of parts and stability (stability) of their positioning are not required in this case: welding is not a precision work, and a couple of clamps are enough so that the clamp can be removed and welded without it. But the clamp must be applied (or inserted into it) on round and profile pipes, as well as on solid profiled long pieces. A “gentle” clamp is also useless.
Based on these considerations, the best material for the frame of a welding clamp is a steel angle with a thickness of 3 mm, pos. And in the figure:
Angle clamps for welding and soldering work on metal
Closing the corner into a triangle with a transverse tie will greatly increase the strength of the clamp, and by adding a couple more clamps to the crossbar, we get a clamp for welding at angles of 90 and 45 degrees, pos. B. The clamps are definitely screw: the eccentric, firstly, will not hold a heavy length; secondly, from heating during operation it can simply deteriorate.
The procedure for making a clamp from a pipe
For ease of production, you need to make a drawing.
Drawing
Prepare in advance:
- pipe;
- metal rings - 3 pcs., with an internal diameter equal to the external pipe dimensions;
- welding machine.
Perform the work in the following order:
- 2 rings are welded to steel corners that act as a support platform;
- the free ring is welded to the pipe with the nut installed;
- a long bolt is screwed in, a metal rod is welded onto the head, which will serve as a handle;
- a ring is put on the free end of the pipe, the upper coupling is located on it, the lower jaw is drilled to install the pins;
- install the lower ring.
Such homemade holders are used when assembling furniture sets and any construction or installation work.
Carpenter's pliers
Wooden temporary clamps are used in carpentry as widely as steel ones in plumbing and welding. Due to the characteristics of the main structural material, carpentry clamps are made almost exclusively C-shaped (pincer clamps).
The most powerful of the carpentry clamping devices is the alligator clamp, pos. 1 in Fig.:
Types of carpentry clamps
Sponges made of oak, elm, beech, hornbeam, walnut. Threaded pairs – from M12. Clamping parts with a crocodile is a troublesome task, so instead they often use an articulated screw C-clamp, pos. 2. Its “jaws” can be glued from plywood, and only the lining (“lips”) can be glued from durable wood. Instead of a shaped nut, it is possible to use a regular hexagonal nut, pressing it into the handle in a vice; in this case, the handle should be made of maple, beech or elm; oak may split when pressed.
Alligator clamps are used to securely hold fairly large and heavy parts. When gluing, you don’t need a strong clamp, but you need a lot of clamps, at least 3-4 per 1 linear meter. m glue joint. Therefore, carpentry clamps for gluing are most often made of plywood. Each “jaw” is glued together from 3 or another odd number of layers. In one of the “jaws” with a protrusion there will be a middle layer, and in the opposite one there will be two outer ones; In this way, and with the help of a steel pin, a hinge is formed. The clamp is spring (pos. 3 in the figure), and made from available elastic materials, pos. 4.
Cutting out and adjusting blanks of plywood crocodile clamps is a labor-intensive task, but the modern craftsman has at his disposal an excellent substitute - cuttings of large-diameter PVC pipes. A split ring made of pipe, a pair of wooden sticks, the same number of pieces of garden hose, and a clamp for pressing when gluing is ready, pos. 5. Cheap and cheerful. For more information about wooden clamps, see the videos:
Video: DIY wooden clamps
For the second, we advise you to go to YouTube and read the comments, there are tips on the case.
Operating principle
The principle of operation of the clamp is very simple. It is necessary to separate the jaws so that they are separated from each other at a distance of 3 cm greater than the width of the shield that will be installed. Next you need to fix them on the pipe. To do this, tighten the nuts that are located at the edges. The blanks must be placed on the tubes and sealed with glue. Then they need to be pulled together by rotating the “lamb”.
If you know how to use a grinder and a welding machine, you can make the same clamp for gluing wood from metal.
To maintain the plane of the plot with tubes, it is recommended to arrange the clamps in a checkerboard pattern. The main advantage of such a tool is its ease of manufacture and operation.
Vayms
Boards/slats/beams were assembled into shields by the carpenters of Ancient Egypt; By the way, they already knew a wood lathe. But if you look through carpentry manuals and promotional materials from 100-120 years ago, you will find that back then furniture for the poor was made from wood of a quality that would be elite in today’s times. And then, in orders for production (piece by piece) it is stipulated “as the material arrives.” This is the first. Secondly, tastes have changed. Today's ones make us remember the Rococo era - our contemporaries prefer something “natural”, pretentious; if possible - unique. Both circumstances could not but affect the designs of clamps - special carpentry clamps for gluing long lumber along the edges, which is bonding.
If you want to make, for example, a simple kitchen stool “like grandma’s”, and you have straight-layered boards for this, without knots or strands, then it is quite possible to get by with traditional homemade rim, pos. 1 and 2 in Fig.
Archaic (traditional) and modern vaymes
But if you are planning to build a shield like the one in Fig. 3 (and it’s beautiful, after all), then the clamping force will be needed an order of magnitude greater - after all, now the boards need to not only be pressed, but literally pressed into each other, and so that the entire assembly does not swell or turn out.
It is precisely this kind of unification that is carried out by modern Vimes. The rail clamp mentioned at the beginning is an expensive pleasure, and at least 5-6 of them are needed for a tabletop panel. Unfortunately, there is no equivalent homemade equivalent, but pipe and rack wedge stops (item 3) are sold and rented at reasonable prices. A sufficiently powerful rack wedge can be assembled on a section of steel profile pipe, pos. 4. If you need to quickly glue a couple of small boards into an edge, then a mini-frame for this can be built from an unusable hacksaw for metal, see next. rice.
Mini-weapon from a hacksaw
For other designs of homemade weims, see the story:
Video: do-it-yourself wires
On what basis can a floor tongue be laid?
The tongue and groove board can be laid on almost any base. In order for such a coating to last as long as possible, the floor surface must be prepared. Make additional thermal insulation and waterproofing.
Floor tongues can be laid on almost any base, for example, on joists
On what bases can you lay tongue-and-groove boards with your own hands:
- Tongue and groove boards can be laid on a concrete base. If there are pronounced irregularities on such a surface, then it must be filled with a new layer of screed.
- You can also mount such a structure on logs. The logs are attached to the base with screws, dowels or glue.
- If you decide to use tongue and groove boards as the front finish, you can lay down plywood. The plywood is attached to the base with glue or self-tapping screws.
- An old wooden floor can also be covered with tongue and groove boards. The main thing is that all its elements are intact and firmly attached to the base.
Whatever base you use, you need to take care of additional insulation of the floor. First, a waterproofing film is laid on the subfloor, then insulation, for example, glass wool, and the film is laid again as the last layer. Only after all the layers are in place can the tongue and groove board itself be used.
Crimping grip
Band crimp clamps (crimp clamps, O-clamps) are rarely used by home craftsmen. But it’s not a technological circumstance that makes me remember them: 3,000 rubles. For a branded one it's still cheap. Meanwhile, an O-clamp that is no worse can be made with your own hands.
For this you will first need a flat textile sling and 4 swivels for it. The corner clamp, jaw and screw clamp slide are made of wood and fiberboard, on the left in Fig. The procedure for use has some peculiarities (by the way, the same applies to the most expensive branded ones).
Homemade crimping clamp for furniture and carpentry work
Let's say we need to assemble a series of identical photo frames. If they are different, the tool will have to be retooled for each. If not, then:
- The product parts are initially assembled dry, without glue.
- Lay it out on a plaz (flat plane) and use the marks on it to set 90 degree angles.
- Loop the slings and place the clamps in the corners.
- By moving the swivels, we achieve a weak, uniform tension on the branches of the sling (on the right in the figure).
- Gradually tighten the clamp, watching the corners of the product.
- If one of the corners diverges, then you need to apply a little sling in its direction, pulling it through the sotv. swivels.
- The adjustment of the crimping clamp is considered complete if it is possible to use a clamp to bring all the corner gaps “into a thread” - there is no need to turn the screw any more.
Now, if a series of products is being made, after gluing one screw, the screw is loosened, the next one is inserted (with glue in the corners), the clamp is tightened “to the threads,” etc.
Universal device
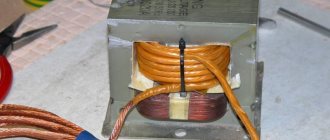
Pipe welding device
This device is useful for welding pipes.
Components needed:
- corners – 2 pcs. 70 x70 (mm.);
- metal up to 10 mm. thickness – 2 strips;
- bolts – 3 pcs.;
- nuts – 5 pcs.
Perform the work in order of priority:
- steel strips are cut at the ends at an angle of 45 degrees;
- drill holes for bolts and fasten the plates with them;
- weld corners 7 cm wide to the iron;
- Hollow recesses are drilled on the body base;
- Nuts are installed by welding on each side.
In such an installation, you can work with pipes at the desired angles. For this:
- unscrew the nuts on the steel support;
- set at the desired angle;
- screwed with top bolts for secure fastening.
If there is a vice, the clamp is fixed to adjust the desired angle.
Screw clamp
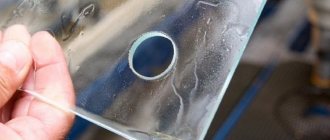
The most unpleasant thing when using a clamp is if the washer (heel) gets stuck on the hinge and begins to rotate the part. The clamp then has to be removed and reinstalled, and the small part may break.
To avoid such a situation, the heels of factory-made clamps are placed on a ball stop, on the left in the figure:
Designs of screw clamps of clamps
Making it yourself is unrealistic: in addition to precision turning, you also need metal that combines high strength and toughness. Therefore, the clamping units of homemade clamps are most often made with cup-shaped ones under a screw with a washer (drawings on the right there). Such a clamp requires regular maintenance: the heel is rinsed in kerosene 2-3 times until the dregs of worn metal cease to stand out. Then add 2-3 drops of spindle, watch oil, etc. to the junction of the heel and the screw. liquid lubricant.
About carving
Threaded pairs of factory clamps, as you know, have a special thread - rectangular or trapezoidal with an increased pitch. A DIYer will most likely have to use a piece of threaded rod and a regular nut with a metric rolled thread. To prevent the clamp from jamming, you must, firstly, go through the nut with a second tap, respectively. standard size. If the thread is larger than M12, then use the second and third taps sequentially. The rod is similarly passed through with a die 2-3 times until the die (the die) starts to “run” freely along the thread when struck with a finger on the carrier of the driver. Secondly, the threaded pair must also be regularly wiped with a rag with kerosene and lubricated with any grease for machines and mechanisms.
Note : if a nut is welded onto the frame of a metal clamp, then the thread in it actually has to be cut anew - the original thread is strongly influenced by welding.
In conclusion, we give a video overview of various designs of clamping washers for homemade clamps:
DIY wooden universal clamp
The easiest way is to make a clamp from a wooden plank and timber. Wood is a fairly affordable material, so if you mark the parts correctly and use the proper tools, you can make a clamp of any level of complexity without much effort.
To make a wooden clamp, you will need the following tools and accessories:
- Tabletop drilling machine with a power of 400-500 W for drills from 1-15 mm. The vertical stroke of the drill chuck must be at least 120 mm;
- Electric grinding wheel. You can do it yourself; to do this, instead of an abrasive stone, use an electric sharpener to install a circle of plywood, 10 mm thick and 350 mm in diameter, on which sandpaper sheets are glued on both sides;
- Hand-held circular saw for wood with a blade diameter of at least 150 mm. You can use a grinder or a band saw.
- All other operations can be done using hand tools. Of course, you can also drill holes and cut grooves with a hand drill and hacksaw, but achieving the required quality and manufacturing accuracy using hand tools will be very difficult.
Corner clamp for furniture assembly: what is it and how does it work?
A clamp is a convenient device that is used in the process of assembling furniture structures. The clamp greatly simplifies the work and reduces the time it takes to complete it. Clamps intended for furniture assembly temporarily secure the components of the structure until they are completely secured. There are several types of these devices. A corner type clamp is used to fasten individual furniture elements at right angles.
This device is a real assistant for the furniture assembler.
It consists of the following components:
- Clamp and two stops.
- Movable block.
- A lever is a mechanism that ensures the transmission of high force.
- Screw – secures the movable part of the clamp in the required position.
- Runners – provide weak clamping of the part.
Knowing the structure and operating principle of this device, you can easily make it yourself.
The main purpose of a clamp is to temporarily fasten elements of a furniture structure.
DIY process
There are several options for making these devices yourself.
Corner for furniture assembly
Those who had to assemble furniture themselves often quarreled during assembly due to the inconvenience of connecting large parts to each other. It is especially difficult to do this if there is no assistant. Such an assistant can be a simple furniture vice, or rather, several simple clamping devices and a durable rectangular table or carpentry workbench, the manufacture of which can be learned from this article.
Grooves are installed on the table to secure parts of the assembled furniture, and carpentry clamps serve as clamps. There are many different options for how to make such devices.
Carpenter's clamp
The simplest screw clamp is made according to the principle of a caliper. To do this you will need several blocks of durable wood and a small sheet of plywood. To fix such a device in a certain position, a screw device with a locking bar is used on the rail of this simple tool.
Self-clamping clamps are often used to press the workpiece to the table. Their operating principle is very simple. On a workbench, such a device is fixed using a screw pin, and the clamping is done with a special lever with a rounded end at the clamping end.
Such tools are very convenient to use for processing a large number of parts of the same shape. For example, when milling or grinding, as well as when drilling and sawing.
https://youtube.com/watch?v=ayx-NSjjB8M
For welding work
Today, a welding machine in the garage is no longer a rarity, and sometimes even a necessity. For welding work, clamping parts at a certain angle is sometimes necessary, like air. Purchased tools often fail due to the dishonesty of their manufacturers, so it is better to make an angle clamp for welding yourself.
Having found a tedious drawing or made it yourself, we prepare the necessary material and tools. After this, we proceed to production according to a simple scheme:
Making the base. We weld steel plates and a corner of the same thickness according to the drawings of the selected option. The main task is to carefully measure the 90-degree angle to secure the parts to be welded. The angle may be different if you are making a tool for a specific purpose. Manufacturing of a clamping device. To do this, you can use large diameter nuts. We secure them with a bolt so that they can be changed if the threads break. You can find screw devices from broken vices or workbenches
Again, it is important to ensure that the clamping jaws are at a right angle or the angle for which our device is designed. Product assembly and fastening. When the base and clamp are ready, they are connected depending on the design of the product: by welding or using bolts and nuts
Here you can consider the option of attaching the device to a fixed surface. To do this, you can drill several holes in the base for such fastening.
Making any option requires a lot of effort and effort. All this will pay off handsomely when the next welding or connection of two slats at right angles goes quickly and smoothly. After all, you will have a reliable assistant who is always nearby and ready to properly serve the one who made it with his own hands.