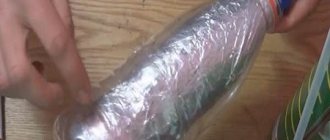
Step-by-step production of a thermal cutter from improvised materials
Processing Foam When making power tools for cutting foam, you can use a variety of elements and devices.
For example, a thermal knife can be made from a soldering iron, a burner and/or an old (unnecessary) jigsaw. Let's look at the five main steps required for this: First you need to make a bushing - a basic and complex element in its structure. The taken plate needs to be bent and turned, then carefully drill a hole into which the thread will be inserted. After this, you need to remove the wire leading to the hole, and then find suitable connectors and carefully solder them into the gap area
It is important that all further work using the finished cutter is carried out with insulated wires. After that, we connect the thermal cutter. The old jigsaw needs to be cut into two parts
In its upper part we install a claw plate on the screws, which had to be prepared in advance. And using self-tapping screws we connect the lower part to the base. Insert the sleeve into the foot. We mark the point under the hole of the sleeve from the hole using a square (or a plumb line). We make a hole in the base with a diameter of 5 mm. Straighten the nichrome wire. First, turn on the burner at full power and touch the nichrome wire with its wires. It is important that the distance between the wires is equal to the height of the device. At the same time, if the device hums or makes strange sounds, and the thread does not heat up (this is a consequence of insufficient resistance), then you should find a wire of thinner thickness.
Foam cutting
The scope of application of polystyrene foam is very wide. This material is used to make parts for aircraft modeling, it is used in the manufacture of toys and furniture, three-dimensional letters or sculptural elements for advertising are cut out of it, etc. We are interested in a very specific area - construction.
Types of cutting
In construction, foam plastic is used as insulation for roofs, walls, floors, ceilings, foundations and other structures. In the vast majority of cases, thermal insulation consists of sheets of foamed polystyrene, which are sold in stores and have standard sizes.
In construction, standard sheets of the same size are used, which are cut on site.
During installation of sheets, they constantly need to be trimmed, and here the following cutting options are possible:
- Longitudinal. This refers to the case when you need to cut a sheet of foam along its plane, for example, into two parts. For example, to make two sheets 25 mm thick from one sheet 50 mm thick: neither a knife nor a hacksaw will help here;
- Transverse. When you need to cut a piece of the desired shape from a sheet, that is, you will cut perpendicular to the plane of the sheet itself. In this case, you can use a knife, saw and other similar tools;
The foam cutter is good for cross-cutting straight lines.
- Through. Often it is necessary to make holes in the thermal insulation layer to enter an electrical cable, pipe or other communications. If you have some skill, you can get by with a knife, but there are more effective tools, which I will tell you about;
Smooth through holes can be made using a pipe.
- Curly. It is used when the edge of a sheet needs to be cut according to a clearly defined pattern with curved lines and a complex profile. An ordinary knife will not work here, and a special tool will be required.
Machine for shaped cutting of foam plastic.
Cutting tool
Cutting foam can be done with a variety of tools. Most popular:
Construction knife. During insulation work, a knife is most often used to trim sheets. It can be a construction, stationery or shoe knife. The main thing is that it is well sharpened. The knife is carefully drawn along the cut line; strong pressure is not necessary. If the sheet is not cut through, it is broken along the slot;
A construction knife is the most common tool for processing foam.
Hacksaw. To cut thick sheets, it is convenient to use a hacksaw for metal or wood with a fine tooth. Special saws for foam plastic are sold;
The saw is convenient for cutting thick sheets of foam.
Nichrome wire. A piece of thin nichrome wire is heated by passing an electric current through it. A hot string, fixed in a certain way and stretched, cuts foam like butter;
A hot nichrome thread is what can be used to cut foam plastic so that it does not crumble.
Thermal knife In essence, this is a soldering iron, the tip of which is made in the shape of a knife blade. The blade heats up and perfectly cuts any plastic, including foam;
A hot thermal knife will cut the foam efficiently.
Laser ray. You can cut polystyrene foam using a laser. This technology is used when making sculptural elements or in large industries to cut out a wide variety of shapes.
Laser cutting of foam plastic is used mainly in production. In construction, cutting of even, rectilinear shapes is most often required, which a knife can handle quite well. In this case, a thermal knife is an ideal option.If you need longitudinal cutting to thickness, a nichrome string is best.
Line cutting cutter
c http-equiv=”Content-Type” content=”text/html;″>lass=”article_show_context_1″>
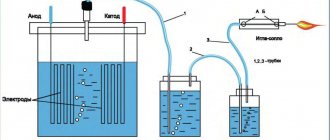
To create such devices, you should prepare a workspace. Usually a table is chosen for such purposes. Two vertical risers are attached to it. Each of them must have an insulator. It is necessary to stretch a nichrome thread between the insulators. A freely hanging load is suspended from it. The nichrome thread is connected to the contacts connected to the step-down transformer.
The operating principle is quite simple. The nichrome thread heats up when connected, which makes it easy to cut foam. Thanks to the suspended weight, the thread remains taut. A weight is necessary because when heated, the thread begins to sag.
The moving foam is cut with nichrome thread quickly and evenly. How thick the processed sheets will be depends on the height of the thread above the working surface of the table. The main thing is that the foam is fed at the same speed throughout the entire cutting period.
To cut sheets vertically, you will need to use a cutter of a different design. In it, the cutting wire is tensioned in a vertical position. In this case, the working surface is made of chipboard. You need to attach a frame to it. It is better if this element is made of a metal profile. However, wooden blocks will also work well.
The frame is equipped with a paw-holder, on which the nichrome wire is suspended. A weight is attached to its end. The wire is passed through a hole made in the working surface. To prevent it from touching the wood, the hole is protected from the inside with a metal hollow tube.
When using thermal cutters, foam plastic is not only easily cut into specific blocks. From large slabs you can cut out various geometric shapes, such as a square, a semicircle, a triangle. Before work, just run a marker along the surface of the slab, marking the cut line.
How to make a machine for cutting polystyrene foam yourself?
Polystyrene foam is an excellent insulation material and a material for making figures of various shapes, but it cannot be cut with a regular knife or hacksaw, as it crumbles. To do this, it is best to use machines for cutting foam plastic; you can either buy them or make them according to one of the diagrams and instructions with your own hands at home. All that remains is to draw a drawing on a piece of foamed polystyrene and cut out the shape.
Types and principle of operation
The principle of operation of string cutting equipment is the same for all models: a stretched string is heated under the influence of electricity supplied by the power supply, then, as the foam with a diagram drawn on it moves forward, it cuts it. The result is an even, neat cut of the required thickness. You can use this type of foam cutting machine yourself at home, the main thing is to read the instructions so as not to overheat or break the string, and also follow safety precautions. When cutting foamed polystyrene, toxic smoke is released that is hazardous to health, so you should definitely purchase protective equipment and ensure good ventilation in the room.
The machines differ in the cutting method and are of the following types:
- horizontal (linear cutting);
- vertical (curly);
- CNC;
- non-contact laser.
In the first case, the thread is located horizontally and only its height can change. This machine is most often used to cut foam plastic to insulate something, for example, walls, since cutting out a shape on it is extremely difficult. With a vertically positioned thread, it is possible to make almost any cutting (letters, three-dimensional objects, baseboards, etc.) and using such a machine is much more convenient. CNC cutting equipment is controlled by a computer through special software; there are models that can cut several identical shapes at the same time due to the presence of a number of strings, such as the SRP-3220, which supports the installation of up to 6 threads.
The highest quality cutting of polystyrene foam is produced by a non-contact machine with a laser. The beam can accurately and accurately cut material of any thickness and cut out absolutely any shapes - stencils, animals, letters. It is most often used to create decorations from foam plastic for store windows, various exhibitions and events. In addition, the laser machine does the job quickly and with minimal waste.
Popular models and costs
Among manually operated foam plastic machines, the greatest demand is SRP-K “Kontur”. Can be used both in construction and for promotional foam products. There is only 1 string, but it absolutely accurately repeats the operator’s actions; in addition, the machine has a compact size, which is important for transportation. Price – approximately 50,000 rubles. And with CNC, the most popular is SRP-3222 “SuperMaxi”, it has a rotary table for creating three-dimensional 3D models, so simultaneous installation of 6 threads is possible.
Table of prices at which you can buy a foam cutting machine:
Machine model
| Working field, mm (length/height/width*) | Number of strings | Cost, rubles | ||
| SRP-3220 "Maxi" | CNC | 1100x1100x2200 | 6 | 190000 |
| SRP-3221 "Maxi Universal" | 2200x1100x1500 | 6 | 190000 | |
| SRP-3222 “Super Maxi” | 2200x1100x2200 | 6 | 204000 | |
| SRP-3223 “Mini” | 700x700x700 | 1 | 170000 | |
| SRP-S “SKAT” (manual control) | -x380x1320 | 1 | 44000 | |
* - the width of the table is equal to the length of the thread.
Instructions for self-production
For a homemade machine with a vertical string arrangement, the following parts will be required:
- nichrome wire;
- aluminum rod (tube);
- main support (perforated hardboard) and 2 additional bars (legs);
- string weight – bolt with nuts;
- 2 wires with clips (“alligator clips”) and a power supply with a rheostat.
Bars are attached to the main support so that it stands securely and there is space for securing the load and one wire. A hole is made on one of the sides with the leg for an aluminum rod, after which it is inserted and checked to ensure that it holds tightly and does not move. To do this, you need to drill a hole through it into the support and secure it with a nail. Now you need to bend it yourself, but in such a way that cutting the foam with a string can be done in the center of the support or closer to the opposite edge from the tube. To do this, you should select a point on the hardboard at which it will be most convenient to do the work, and from it the distance to the rod is measured. It is to this length that the aluminum tube needs to be bent.
Next, you should drill a hole in the cutting table with your own hands, through which the nichrome thread will pass. After this, one end is pulled through it and tightened on a bolt between 2 nuts, and the other is twisted in the form of a loop and put on the rod. A wire with “+” is connected to the tube, and a wire with “-” is connected to the bolt and the power supply is turned on, and the heating temperature of the filament is regulated through a rheostat so that it does not overheat and does not exceed 100°C.
From the same parts, it is possible to make a machine with your own hands at home with a horizontal thread arrangement, with the exception of the tube and weight - instead of them you will need 2 nails and a spring. The assembly diagram is as follows: nails are driven into 2 edges of the support, one end of the thread is tied to the 1st, and a spring is put on the 2nd with a string tied to it. Next, the wires are connected, the power supply with a rheostat is turned on, the heating temperature is adjusted, and now you can start cutting the foam with the drawing.
Shape cutter
When working with large foam sheets, using a stationary cutter will be difficult. Such panels hardly fit on the desktop. In these cases, a handheld foam cutter is used. This tool is often made from a jigsaw. The cutting blade in these tools should be replaced with nichrome wire.
It’s quite easy to build such an electric cutter with your own hands. To make cutting shaped elements more convenient, you can make several devices with different shapes. First, remove the cutting blade from the jigsaw and connect the wire to the handle. The voltage will be low, but the handle and other metal parts should be insulated. Nichrome wire is connected to the cable. Nuts are used for this. The wire is bent in a certain way.
You can use a soldering iron as a cutter for shaped cutting of foam plastic. It needs to be modified a little. The device already has an electrical wire in its design. To create a foam cutter from a soldering iron, you will need to replace the element that heats up with nichrome wire.
This device is highly convenient to use. Thanks to this product, it is possible not only to cut slabs of material into smaller sheets, but also to make recesses in them.
Specialized machines and their prices
Often, polystyrene foam is used not for insulation or soundproofing of buildings, but for the production of advertisements or in interior design. This is possible thanks to the use of special machines designed for figured cutting. What is typical is that with the help of such equipment it is possible to process material simultaneously in 2 or even 3 projections. If desired, you can produce the most complex elements, such as gears, chess, miniature models of cars, various figures, and any decorative ornaments.
Below are the most popular devices on the domestic market, as well as the average market price for them.
FRP-01
This unit owes its enormous popularity to the simplicity of its design and versatility. It is possible to produce molded elements, figures and letters for signs, insulating boards, and so on. The operation of the device is controlled using a computer program included in the kit.
The approximate cost of the unit is 110-115 thousand rubles.
FRP-01 machine for cutting foam plastic
SRP-K "Kontur"
Another wonderful model that allows you to produce various parts for facade finishing and formwork for pouring mortars. The control in this case is manual, but the power consumption is relatively low (about 150V), and it is very convenient to transport.
The average market price is about 42.5 thousand rubles.
Metal plate cutter
There is another way to convert a soldering iron into a foam cutter. To modify the tool, you simply need to replace the tip with a copper plate. Steel will also work, but it takes longer to heat up and is more difficult to sharpen. However, with proper sharpening, a steel plate can cut any synthetic material, including polystyrene.
One side of the plate must be carefully sharpened. Sharpening can be done on both sides. It is necessary that the sharpening angle is not too large. The cutting of the material is carried out not only by the blade, but also by the blade of the plate. Such a cutter has one drawback - you will have to experimentally find the optimal heating temperature for the knife.
Homemade powerful laser. How to make a real laser yourself from old parts.
You want to feel the power of a real laser, but nothing sold in stores can quench that thirst. Laser pointers? Yes, they just shine, and they are absolutely useless, but they can be converted into a full-fledged laser!
To create a real “combat” laser, we will need: a laser pointer (you can easily buy it at a trinket store or find it in a dusty closet), a flashlight with AA batteries. And (most importantly) - a broken CD/DVD-RW burner with a working laser (can be found at a flea market or radio market), several wires, various screwdrivers and a soldering iron. It’s good if it happens, and it’s better if it’s professional. But a regular one will do.
So let's get started.
Removing the laser from the drive. This stage is quite simple, but requires a lot of patience and accuracy. Despite the great abundance of drives, their general structure is almost the same. The main thing is that you have a writing option. Because the laser in the recordable drive is designed for recording. And recording, as is known, is carried out by evaporating a thin layer of metal from the surface of the disk. In reading mode, the laser operates at half power and only illuminates the surface.
By unscrewing the external fasteners, you will see a carriage with a laser moving in two directions. You need to carefully unscrew it; here you will find many screws and connectors that need to be smoothly removed. We need a red diode that burns discs. To remove it, use a soldering iron and carefully remove the screws. Remember that the most important part for making the laser is not subject to shaking or shock, be careful when removing and handling the laser diode.
The heart of the future “real” laser is in our hands. Now we need to think about where to place it and how to power it. A laser “writing” diode requires much more energy than just a diode from a laser pointer. There are several options here.
Replacing the diode in the pointer. For the laser to be truly powerful, you need to remove the old diode from the pointer and replace it with an analogue from the CD/DVD-RW drive. We unscrew the pointer into two parts; in the upper part there is a part that we no longer need. We take it out, install the new diode evenly and secure it with an adhesive base to be sure. To remove the old diode, you may have to use a knife and shake the pointer.
New building. For ease of use of the laser, the possibility of powering it, as well as creating a more impressive appearance, we will use a flashlight housing. We install the upper part of the improved laser pointer into the flashlight body and supply power from AA batteries to the diode. Pay attention to the polarity of the power supply. It is advisable to remove the glass from the flashlight and part of the pointer, because it will interfere with the direct path of the laser beam.
Preparation for use. Carefully check that the laser is securely attached, that the wires are correctly polarized, and that the laser is level.
Now that's it, the laser is ready! The power should be enough to burn paper, films, balloons, as well as to light matches. There can be many options for use, it all depends on your ingenuity.
Attention!
Remember that now you have a weapon in your hands that should not be pointed towards animals and people, it is really dangerous and can cause harm, especially if the beam hits the retina. Moreover, do not give the device to children.
Of course, this laser can be more than just a toy. It can be equipped with measuring instruments (building level, level), made into a powerful target designator (sight) for pneumatic or firearms, used in security systems, etc.
Kozhevnikov Vladislav
Samara, Russia
conclusions
Making a foam cutter with your own hands is quite simple. The methods listed above will help you understand the structure and operating principle of the foam cutter. Such devices are practical and easy to assemble. Each method has its own advantages, so home craftsmen can choose the most suitable one, depending on the available materials.
It is important to exercise extreme caution when working with such power tools. This poses a risk of electric shock. Some homemade cutters are also used for cutting polystyrene foam.
Some homemade cutters are also used for cutting polystyrene foam.
(No ratings yet)
Types of foam
Currently, manufacturers produce several types of foam. The resistance of a material to any mechanical stress depends on its density. Therefore, a certain material is used for different installation work. The higher the density, the stronger and heavier the foam:
- Low density . Not suitable for creating shapes with clear lines. During cutting, the foam will begin to break and crumble. Fireproof and has good moisture resistance. Often used as insulation.
- High density . The material is intended for special conditions, as it retains the thermal insulation of the room well, is resistant to high loads, as well as the appearance of various microorganisms and mold. At the same time, it has a high price.
Features of work
While learning how to make a manual foam cutter yourself, it is also necessary to consider the operating features of such equipment. As mentioned above, such an instrument has a string. It heats up and melts the surface of the foam.
This material reacts quite poorly to heat.
Therefore, it is important to maintain the technology of the entire process. Cutting with a hot thread is quick
This allows you to achieve high quality cuts.
It's easy to check the string's heating level. To do this, a test is carried out on a test piece of polystyrene foam. If, when immersing the thread, long pieces of material remain on it, it has not yet warmed up enough. If there is no foam on the string at all, then the temperature is too high. In this case, you will have to cool the instrument a little. With proper heating, you can perform fast, accurate cutting.
Features of production laser cutters
Not everyone can afford the price of a production-type metal laser cutter.
Such equipment is used for processing and cutting metal materials.
The principle of operation of a laser cutter is based on the production of powerful radiation by the tool, endowed with the property of evaporating or blowing out a molten metal layer.
This production technology, when working with different types of metal, can provide high quality cuts.
The depth of material processing depends on the type of laser installation and the characteristics of the materials being processed.
The design of solid-state emitters is based on the use of specific types of glass or crystals as a working medium.
Here, as an example, we can cite inexpensive installations operating on semiconductor lasers.
Fiber - their active medium functions through the use of optical fibers.
This type of device is a modification of solid-state emitters, but according to experts, the fiber laser is successfully displacing its analogues from the field of metalworking.
At the same time, optical fibers are the basis of not only the cutter, but also the engraving machine.
Gas - the working environment of the laser device combines carbon dioxide, nitrogen and helium gases.
Since the efficiency of the emitters under consideration is not higher than 20%, they are used for cutting and welding polymer, rubber and glass materials, as well as metal with a high degree of thermal conductivity.
Here, as an example, you can take a metal cutter produced by the Hans company; the use of a laser device allows you to cut copper, brass and aluminum; in this case, the minimum power of the machines only outperforms its analogues.
Shaped cutting of foam plastic
Foam plastic is one of the most popular finishing products. Various figures cut from such material are especially popular. Volumetric foam compositions are used as architectural decoration, to create advertising elements, and various design structures for interior decoration.
Figure cutting is carried out using laser systems and special CNC machines. Each device has its own advantages and features of use:
- Laser cutting. Processing foam plastic through radiation allows you to create 2D and 3D shapes of various shapes. This cutting method ensures the minimum cut thickness, helping to increase the detail of products. The entire process on laser CNC equipment is fully automated. Therefore, in the process of cutting the material, defects and errors are eliminated.
- String processing. The formation of volumetric products occurs using the thermal effect of strings made of nickel-chrome. This method of cutting foam ensures accurate cuts according to given sketches. The cost of string processing of cellular material is much cheaper than laser cutting. All actions on the machines are controlled by a special computer program.
Using modern 3D foam cutting equipment, you can produce shapes of varying complexity in a short period of time.
Some good advice
- The cutting process requires medium speed movement of the foam. If it moves too quickly, it will most likely crumble, and if it moves too slowly, the ends of the sheets will begin to melt.
- If the work is carried out in an area without electricity, then you need to connect 3 9-volt crowns together and use them as an energy source. In this case, the machine will be able to operate for approximately 35-40 minutes.
- It is not advisable to use car batteries for this, since they, despite their low voltage, also have a high current strength that can damage the string. And it’s also good if it simply bursts, because it may happen that hot metal splashes out.
- The foam that will be used to insulate the bath must be thick. Moreover, thick material is easier to produce (and it is not particularly popular), which means it will cost less than thin material.
How and how to cut polystyrene foam at home
Foam plastic is a building material used for interior and exterior decoration. It has excellent heat, hydro, and sound insulation properties. Polystyrene foam is made from polystyrene (PS grade) or polyvinyl chloride (PVC).
The quality of processing when cutting foam plastic depends on the sharpness of the cutting tool. A blunt instrument leaves ragged indentations on the surface being treated. The final finishing of the surface is carried out with fine-grained emery cloth, securing it to a flat block.
Polystyrene foam is brittle and friable.
Methods for cutting foam plastic.
- using nichrome wire: the wire is stretched between two “studs” fixed on a flat surface, for example, a sheet of chipboard. This is done so that the distance between the wire and the surface can be easily changed. The ends of the wire are connected to the terminals of the power supply, which supplies a small adjustable voltage (enough to 12 V). In this case, it is better to use a 220/24 V step-down transformer. The foam is laid on the surface and smoothly moved so that the hot wire cuts off the required part from it. The cut is even and smooth (“fused”). This method allows you to cut foam plastic very quickly and efficiently, not only crosswise, but also longitudinally.
-using a string that is heated by a small current passing through it. The string is heated with a soldering iron or burner. You can take a spiral from an electric stove, cut it and apply current through an autotransformer, but not 220V, but 12 - 36 V. Do not forget that the wire (string) considerably lengthens when heated - it must be spring-loaded or a system with a counterweight (weight tensioner) must be made. by analogy with the previous method.
Cutting foam with a string
- using a simple knife (it’s difficult to cut this way): you need to sharpen the knife and heat it up. Under the action of a hot knife blade, the foam will begin to melt, and its edges will be perfectly smooth. This method is used for foam plastic about 10 cm thick.
- a hacksaw for wood. When sawing with a hacksaw (necessarily with fine teeth), do not make quick movements, because polystyrene foam is a good heat insulator, and the heat generated during friction is almost not removed. As a result, the material heats up and “grabs” the cutting blade. Dense foam plastic can be processed well with blunt knives.
- an electric jigsaw, consisting of a frame and a filament stretched across it. The jigsaw does not produce any sawdust. But it is not easy to make, despite the fact that it looks quite simple in appearance. It is much easier to use an ordinary soldering iron to cut foam plastic, slightly modifying it. Remove the tip from the soldering iron, and instead insert a cutter made of copper wire approximately 2 mm thick. Bend the part of the wire that is inserted into the socket into a spiral; its outer diameter should correspond to the inner diameter of the socket.
It is best to make two replacement cutters. Leave one completely straight, and bend the other to the shape of the future part. A straight cutter is convenient for cutting off the bow and stern; a curved cutter is useful for cutting out the bottom, smoothing out irregularities, and making grooves and recesses.
- using a thin steel string with a diameter of 0.5 mm, at the ends of which wooden handles are attached. Pre-mark the foam block on both sides with lines along which the cut will go, and, with a handy hand, begin sawing, moving back and forth at a fast pace. As a result, it heats up and begins to melt the foam, cutting it.
Cutting material using a hot tool
To cut a sheet of foam plastic, you can use the most ordinary knife, if you first prepare it for this procedure:
- You need to make sure that the length of the knife is greater than the thickness of the sheet that will need to be cut.
- Next, you need to mark the lines on the sheet along which it will need to be cut.
- The next step is to heat the knife using a gas stove or a special gas burner. Carefully draw a hot knife along the intended line; the foam will begin to melt and cut clearly along the line.
It is important to consider that it is not possible to achieve a perfectly even cut using this method, and it is also only suitable for cutting small pieces of material. The fact is that even slightly shaking hands will not allow you to achieve a straight line, and a constantly cooling knife will not allow you to make a neat and long cut.
But if your goal is to cut off a small piece, then a hot knife will allow you to do this very quickly and without wasting extra money and time. Please note that after cutting, the knife should never be used in the kitchen or at home, as the foam contains toxic substances.
Knife
A simple soldering iron cutter
If you need to make quite a lot of foam blanks, but don’t want to make an overly complex cutter, then you can use its simple analogue, which works on the basis of a regular soldering iron.
It is important to choose a soldering iron that is not too powerful, since its temperature is excessive for normal sheet cutting. If the power is too high, the foam will smoke a lot, smoke, and be difficult to cut.
The next step will be to select and install a nozzle on the tip of the soldering iron, since the standard tip is in no way intended for these purposes. We need to find or make our own long and flat tip, which will look like a small knife blade, but less sharp. Copper wire folded several times is good for making such an item. Another option is to simply take out the tip of the soldering iron and shape it into the desired shape.
Next, the tip is tightly fixed to the tip of the soldering iron and you can start cutting.
The soldering iron is inserted into a socket, heats up and cuts the foam using a similar principle to a hot knife. The main advantage of this method is that there is no need to constantly heat the knife; cutting can continue continuously.
Soldering iron cutter
Homemade thermal cutter from a soldering iron
Diagram of a thermal cutter made from a soldering iron: 1 – safety screen, 2 – 2 M6 bolts with clamps, 3 – brackets, 4 – stand, 5 – section of a straight tip, 6 – copper plate, 8 – wooden board, 9 – support legs.
To process foam plastic, not only heated wire can be used, but also a heated metal plate. The basis of this thermal cutter (see Fig. 7) is a conventional soldering iron with a power of 60 W, designed for a voltage of 220 V. Instead of the usual tip, this device uses a plate knife, which is the main element of the cutter. It can cut not only foam plastic, but also any hot-melt synthetic material.
The base of the device is a sheet of heat-resistant plastic, plywood or a wooden board (8), to the bottom of which support legs (9) are attached. They are needed because in the middle of the base there is a gap into which the heated knife is lowered. Opposite the slot at the edge of the pad there is a stand (4) with brackets (3) for installing a soldering iron.
The stand is made of a metal tube, and the brackets are made of 2 M6 bolts with clamps (2). A safety screen (1) is also attached there, which protects the worker’s hands from burns.
The thermal cutter knife is a copper plate (6) pressed into the cut of the straight tip (5) of the soldering iron. The cutting edge of the knife is sharpened at a slight angle. It can be sharpened on one or both sides. The degree of heating is selected experimentally.
Changing machine parameters
When making machines for cutting foam plastic, it is necessary to take into account the fact that in the future there will be a need to cut thicker sheets of materials, while short screws can be unscrewed and longer ones installed in their place. In order to press in, you need to make a hole in the base. Its diameter should be less than this indicator characteristic of the rack, the difference should be 0.5 millimeters. When making machines for cutting foam plastic, the racks need to be driven into the holes with a hammer, but to facilitate the procedure, it is necessary to process the sharp edges of the ends with sandpaper. Before you start screwing the screw into the rack, you need to cut out a groove under its head. In order to do this, you need to clamp its end with a screwdriver, while a thin file should be placed under the head, and then rotate. The groove is necessary in order to strengthen the wire in one position, which can move during adjustment. In order for the wire not to sag, elongating after heating, it must be fixed to the springs, and then to the screws. When making machines for cutting foam plastic, you need to prepare all the fasteners, and then strengthen the nichrome wire. In order to ensure reliable contact between it and the current-carrying wire, you need to use a technology called “unwinding with crimping”. The copper wire must have a cross-section of at least 1.45 sq. mm.
Stages of creation
- Cutting part. To do this you will need nichrome wire, approximately a spiral with a diameter of 0.6 mm. It can be taken from old electric stoves or other heating electrical appliances. The length of such a wire should be 14 cm (its resistance will be 2 ohms).
- Transformer application. For everything to be correct, the first step is to calculate the voltage and current for heating the cutting part. This can be done using the formula - Ohm's law I=U/R. Thus, you can determine the power of the power transformer.
- Making a cutter. The base can be made of any metal, but its length must be at least 11 cm. Next, an insulator - a PCB plate - must be attached to the end. Now fasten the contact groups along the edges of the plate; they can be removed from the electrical outlet. It is into these contacts that it will be possible to attach spirals of different shapes.
- How does the cutter work? After the cutter is plugged in, the wire will heat up and become slightly reddish in color. This is exactly what matters, since a heated cutter will make it possible to easily and quickly cut the foam, which will not peel off.
It is important to know: having received such a device, in just three minutes you can cut the required shape from a sheet of foam plastic.
Be sure to follow all safety rules so as not to injure yourself and others. After all, the power of the cutter is enough to damage any part of the body during operation. And connecting to electricity further increases the risk of injury.
What is a foam cutter?
A foam cutter is a special device that allows you to give a certain shape and dimensions to future products made from this material. The tool is useful because cutting foam plastic is carried out without unnecessary effort on the part of a person, which eliminates any unevenness or roughness on its surface. In this case, you will not need to search for and purchase special polystyrene foam, since foam plastic from any household appliance (refrigerator, TV, washing machine), which is supplied with it in the vast majority of cases, will be suitable.
Professional equipment
To cut a part of the desired shape and size, it will be enough to draw on its surface, using standard stationery, places for the cutout and holes. At the same time, it is worth understanding one simple truth: if you work with foam plastic regularly, then in this case it will be advisable to purchase industrial cutting equipment. In all other cases, a homemade device will do.
Step-by-step instructions for making your own machine and cutting foam plastic
Step 1. Preparing the tabletop.
You can take any piece of chipboard of the required size as a tabletop for a machine for cutting foam plastic with your own hands. The surface on which the foam will move must be smooth. Holes for the racks are drilled in the tabletop. It is convenient to use metal pins with threads with a diameter of 10-12 mm as racks. The height of the racks should correspond to the thickness of the foam sheets plus a headroom. The pin is fixed with nuts.
To give the structure stability, bars are attached to the bottom of the tabletop, which will also serve for the safe passage of the electrical wire.
Step 2. Connecting the current supply wires.
From below, under the tabletop, the wires are connected to metal stand rods: the wire is wound around the lower end of the pin and pressed with a bolt.
The second end of the wires must be connected to a power source, depending on the selected method. The best connection is through a plug that connects to the LATER socket. Connection is possible through self-clamping terminals, as well as by twisting and soldering. This depends on the selected power source.
Step 3. Fastening the nichrome spiral
. A nichrome spiral is fixed between two posts. A spring is attached to one end of the spiral (there may be two of them).
The spring is needed to tension the nichrome thread during operation. The fact is that when heated, the nichrome thread lengthens and sags. A thread in this condition will not produce a quality cut. Therefore, the thread is fixed in an initially tense state, so that the spring is slightly stretched.
To fasten the nichrome thread to the pin, washers with an internal diameter slightly larger than the diameter of the pin are used. A small hole is made in the washer for attaching the spiral itself. A small sharpening is also done on the inner diameter side so that the washer can be fixed on the thread of the pin.
A spring with a spiral attached to it is inserted into one washer and placed on the first pin. The second washer is put on the second pin and a nichrome spiral is threaded into the drilled hole. Next, it is tightened so that the spring stretches and fixed.
Step 4: Cutting the foam.
To spread a sheet of foam into two sheets of a given size, the spiral is set to the desired height. The required distance is measured with a ruler.
The machine is then connected to a power source. The thread heats up and now you can cut the foam, smoothly moving it forward along the countertop.
The cutting speed depends on the filament temperature, which in turn depends on the applied voltage and the thickness of the filament itself. You should not try to apply more voltage to achieve high speed, because... this can lead to rapid filament burnout. Here, a balance between tension, thickness and length of the thread must be selected experimentally. The thread should not overheat during operation. When heated, it turns red or scarlet. But it should not turn white - this indicates that the thread is overheating and that it is advisable to reduce the voltage, otherwise the thread will not last long in this mode. Of course, smooth adjustment is easy to do if LATER is available. But if it is not there, then a laboratory power supply can be made from a computer power supply; the video below has more information. After you have made this foam cutting machine with your own hands, you need to make sure that the device is safe.
Step 4: Cutting the foam at an angle.
Sometimes it becomes necessary to cut the foam so that one side is higher and the other is lower.
To do this, the spiral is set at an angle with the required parameters. In this way, foam sheets of various sections can be obtained.
Useful video
We also recommend:
Polystyrene foam is a durable, lightweight material that has thermal insulation properties. Carrying out work with such insulating material seems to be a very simple task. But still, there are some nuances when working with the material. Since it is made in the form of large slabs, trimming is necessary quite often. Trimming can be done with an ordinary kitchen knife, but it will not cut beautifully. It is for this reason that craftsmen recommend using a special foam cutting machine for this purpose.
The danger of manufacturing a thermal cutter based on LATR
Adjustable laboratory autotransformers are often used in the manufacture of homemade thermal cutters. This is what FORUMHOUSE user Sidyakin did.
Sidyakin
Assembled a cutter for dissolving foam plastic. The basis of the machine is the desk cover. We also needed two studs, nuts, washers, a spiral from an electric stove, an LATR and a switch.
Oleg Lvovich
I see in the photo that the cutter is set to 40 Volts. On my cutter the transformer produces 36 volts. I advise you to be more careful when working with LATR. If there is a breakdown, then a voltage of 220 Volts will go to the wire.
Anton48 FORUMHOUSE user
I also want to make a foam cutting machine. I'll take a nichrome thread from an old electric stove. I also have LATR-2M. Would this be good for a cutter? There are six exits. I don’t understand, where to connect the network and load?
Andrey-AA FORUMHOUSE user
You cannot work with one such LATR - it is dangerous, you can get under 220V, because the LATR does not decouple the output from the input, regardless of the voltage set on it. You either need an additional transformer, or connect the inputs and outputs strictly “zero to zero”. That is, without plugs and sockets, but constantly, knowing exactly where the zero is and where the phase is.
Electron
Such a system cannot be phased for safety. There will always be a dangerous voltage on the nichrome thread relative to the ground. This is an autotransformer. You also need a transformer at the input. Look how I did. Electrical diagram at the beginning of the article.
Homemade thermal cutter for figure cutting
Diagram of a hand cutter: 1 – cutting wire, 2 – wooden block, 3 – spring, 4 – handle.
For cutting sheets of large size and thickness, or if it is impossible to place the foam on the workbench, a hand-held electric cutter is useful. It can also be made by hand (see Fig. 5).
Its basis is a frame made of wooden blocks (2), hinged. A cutting wire (1) is stretched between the lower ends of the vertical bars. In a taut state, it is supported by a rubber band or spring (3). When working, the tool is held by the handle (4).
A similar tool can be made on the basis of a hacksaw or a hand jigsaw, where the file is replaced by a cutting wire. On one side there should be a tension spring and an insulator.
Thermal cutter, the device of which is shown in Fig. 6, allows you to make indentations in the foam, cut out cavities in its thickness, chamfer, etc. With its help, it becomes possible to handle this material in much the same way as a sculptor handles clay.
Diagram of a manual thermal cutter: 1 – nichrome cutting wire, 2 – screw with nut and washer, 3 – textolite handle 4-5 mm thick, 4 – electrical cord.
This device is designed quite simply:
- nichrome cutting wire (1);
- screw with nut and washer (2);
- textolite handle 4-5 mm thick (3);
- power cord (4).
To expand the capabilities of shaped cutting of foam plastic, it makes sense to make several similar cutters with tips of various shapes (see Fig. 6).
A good shaped thermal cutter for foam plastic can be a wood burning device if you connect a tip made of nichrome wire of the required shape to it. For the same purpose, you can use a pulse soldering iron if its standard tip is also replaced with a piece of thick nichrome wire.
Homemade machine for figure processing
diagram of a homemade machine
You don’t need drawings to make a machine yourself, it’s such a simple device. This machine can be used to produce small parts for fishing or household use.
- We select a suitable table covered with an electrical and thermal insulator (for example, polyamide film).
- At the centers of the long sides of the table we attach one glass or ceramic insulator. Then a filament will be stretched between the insulators.
- We select a suitable fishing line. You can use nichrome thread from an old iron, soldering iron or electric stove. The spiral should be straightened into a straight thread. The thickness of the fishing line should not exceed 0.5 mm.
- To prevent the thread from burning out, we connect it to the network through a step-down transformer or rheostat.
- A fishing line is connected to the coil on the insulator with your own hands, and an electrical installation cable is connected to it, which will go further into the network. Maximum contact between line and cable should be ensured.
- Under the table, the fishing line is pulled to the second insulator and passed through it. The end of the fishing line hangs freely from the insulator, and a weight is screwed to it. The weight of the weight regulates the tension of the heated fishing line during operation; it must be selected by trial. Thus, we make a sliding fastening, which ensures better cutting cleanliness.
- Near the second insulating coil, another electrical cable is attached to the fishing line, directed to the rheostat (slider terminal).
The performance of a do-it-yourself machine will depend on the heating temperature of the fishing line, that is, its thickness and current voltage. It is not recommended to apply high voltage to speed up the process. Because the thread will burn out faster. It is necessary to monitor the condition of the thread; it should heat up to a bright red color, but not white. White color indicates overheating. That is, the current voltage must be reduced and made acceptable for operation.
DIY tools for cutting foam plastic
Home insulation materials are always available for sale. It is best to glue the foam onto a flat wall, but if protrusions are found, you will have to adjust the shape of the foam. Foam cutting is carried out both with purchased equipment and with self-made equipment.
To build a structure, it is important to select parameters and drawings. The type of work also depends on the design and its dimensions
Cutting polystyrene foam at home is carried out using improvised means, the main thing is to choose the materials correctly. It is important to comply with safety requirements; when cutting, the product may slip and damage the limbs.
Homemade thermal knife for cutting
It is possible to adjust the shape of insulation products, cut out small products and blanks using a thermal knife. To cut foam plastic you will need:
- A crown-type battery with an output voltage of 9 volts, or a set of finger-type products.
- Nichrome fishing line stretches between the plates, length no more than 10 cm.
- Several wires will connect the ends of the wires to the battery.
The simplest cutter can be assembled from available materials; it will help chamfer corners and perform the necessary adjustment of polypropylene parts. It is necessary to install a power button that will activate the device, this is done for convenient, safe operation.
DIY nichrome cutter
Do-it-yourself production requires the availability of certain means. In order to efficiently assemble a tool for cutting foam, you will need:
- nichrome wire, it can be purchased in radio parts stores of the required size;
- a 12-volt step-down transformer, which can be used as a computer power supply or a car battery charger;
- long knitting needle;
- rheostat, which makes it possible to regulate the current strength;
- The electrical wires are long enough for the connection.
https://youtube.com/watch?v=DuKzOuVNqHQ
The device can be mobile or mounted on a table. The frame is made of wood, the wire is installed at a height of 10-15 cm, on the adjusting screws. The screws that secure the nichrome wire must be of a suitable length to adjust the height to the required level. A weight is suspended from one side of the screw to tension the wire for a straight cutting level.
Exposure to current leads to splitting of the wire; the foam is easily exposed to temperature effects. The edges are sealed, this prevents the structure of the material from disintegrating. Cutting the foam begins after the appearance of a red tint on the wire; there is no need to bring the incandescence to a high level, in these cases the width of the cut will be too large.
Nichrome cutter
When performing the procedure, you should use personal protective equipment, a mask, and gloves. The melting process produces toxic fumes.
Design features and principle of operation
The string expands when heated, adding up to 3% in length; cutting with a sagging cutter will not be of high quality, so a special mechanism is added to the design. When operating at low frequencies, it is possible to use a spring; it will gradually tension the wire to the desired state. Massive use means rapid stretching, so it is better to use a suspended weight on one side of the string.
Nichrome cutter design
The foam cutting device is powered by energy sources with an output voltage of 12 to 36 volts. The most successful option is a laboratory transformer. The device is capable of withstanding high loads and smoothly adjusting the output voltage.
DIY thermal knife for SIP panels
Construction from SIP panels using Canadian technology provides a lot of advantages to the happy owners of a new home. However, everyone wants to add elegance and style to their project, not limiting themselves to faceless rectangular structures. This requires cutting panels and forming parts of complex configurations.
If the project is ordered from a contractor company, there will be no problems. But if the construction is carried out independently, you will need special equipment, in particular, a thermal cutter.
Panel cutting
The SIP panel is quite easy to modify. When construction is carried out independently, cutting occurs as follows:
- two surfaces of OSB panels are cut using a jigsaw or circular saw;
- Along the cutting line, part of the panels that go to waste simply breaks off.
The most important problem remains: forming a groove for mounting the strapping beam.
To do this, they often use a grater, plane or cutter, which simply removes the required amount of SIP panel filler in small portions.
At the same time, doing it yourself is not difficult, but the construction site becomes littered, filling with fine “snow” of filler particles, which are constantly moving and difficult to remove.
How to make a groove in SIP panels
To make a groove in SIP panels, there are two methods:
- industrial, using a machine-type cutter that removes filler with knives, with forced removal of waste;
- Using heat treatment, a cutter is used that gently melts the filler and allows you to immediately form a groove of the desired depth.
Today there are enough models on sale; you can buy a thermal knife that will be regulated in power, temperature, and allow the formation of a groove of the desired depth. However, such a tool can be made with your own hands. The design of the knife is not complicated, so it can be easily replicated in a handicraft product.
How to make a thermoknife yourself
The temperature impact knife must have the following functionality:
- temperature adjustment of the cutting part;
- The thermal knife must allow you to adjust the depth of the groove;
- the design must be such that the knife can be used without preliminary work after cutting SIP panels.
Important to know: Standard sizes of SIP panels
Despite the apparent complexity of the task, making such a thermal knife is quite easy. With its help, cutting SIP panels with your own hands will be simple and fast. To create a device you will need:
- two strips of rigid steel or fiberglass laminate of small thickness. Their strength depends on the required depth of the groove that needs to be obtained;
- nichrome wire, which the knife will use to melt the filler;
- a plate that will act as a limiter, setting the thickness at which cutting will be done.
It is easy to use a powerful battery charger as a power source, which allows you to regulate the voltage on the filament. Naturally, to make a thermal knife with your own hands, you will need a comfortable handle that will hold the side plates of the cutting part.
Assembling the thermal knife
It is very easy to assemble the structure with your own hands. Voltage from the power supply can be supplied to the nichrome wire by soldering it to the contacts where the voltage supply wires fit. And with a small thickness of steel plates, power can be supplied to them, while the wire can simply be screwed into the lower part; you only need to drill two holes.
The initial rigidity of the structure is determined by the handle block. Each side plate is attached to the corners with two bolts located vertically. The limiting bar increases the rigidity.
For example, these could be simple bolts and U-shaped brackets placed on the side parts.
Conclusion
Despite the simplicity of the design, a thermal knife for processing the filler of SIP panels works very effectively, even if made by yourself. Thanks to the small thickness of the side plates, you can get rid of the need to form a side cut, especially since you can sharpen the edge of these parts if they are made of steel.
Important to know: Are SIP panels harmful to health?
Using a voltage regulator, the nichrome thread has the desired temperature (selected experimentally) for quick selection of the groove. As a result, such a cutter can guarantee fast work and cleanliness on the construction site. In addition, such a thermal knife will cost literally several tens of rubles and can be assembled using existing equipment.
Tools for cutting foam plastic of different densities ↑
Tools for cutting foam sheets differ from each other both in functionality and in the complexity of working with them.
Most popular hand tools:
- a sharp knife for foam plastic (painting knife, stationery knife or shoe knife);
- thermal knife in the form of an attachment for a soldering iron, operating on 220V;
- jigsaw or string;
- a hacksaw for metal (sometimes even used for wood, but with fine teeth).
The most common painting knife
Most builders don’t even think about how to cut polystyrene foam at home - this is the most common painting knife, which is also called a construction knife or stationery knife. The main requirement for such a tool is a solid, sharp blade, which can always be replaced, and in some cases, simply shortened - the main thing is that its length is sufficient for the thickness of the panel. A similar tool with a shortened blade (used for drywall) does not work well here.
Professional innovative thermal knife
Such products, as in the top photo, were declared by the Patent Department quite recently - only in April 2010, but, despite their “youth,” they very quickly gained popularity in the market. The main obvious advantage of such a cutting tool is that after cutting PSB of any density, there is practically no debris left in the form of granules.
This device is ready for use immediately after removal from the original packaging, and it takes literally 1-2 seconds to heat up. The handle here is made of lingofol (something like wood, but with higher mechanical strength), and the cutter is made of stainless steel and ceramic. This combination provides a fairly long service life if the breakdown is not done intentionally.
String for cutting PSB
In the top image, there is another option for cutting foam plastic so as not to crumble - this is a homemade unit made from a charger and a string from a piece of nichrome. You can, of course, use unregulated current sources, for example, a battery or a charger for a cordless drill (screwdriver), but here, of course, the design will lose quality.
In addition to the power source and nichrome, you will need some kind of frame - you can even use a small coffee table. Fans of figure cutting will appreciate this device.
You can use a hacksaw for metal
It is not always possible to cut polystyrene foam at home with a paint knife or other devices described above due to their absence; for this you can use a hacksaw or a separate blade. Only in this case should you be prepared for the appearance of debris in the form of granules, since PSB consists of them. The teeth, even small ones, will destroy the structure, but if the cutting is done for insulation, then this does not matter from a technological point of view.
CNC Laser Cutting Machine
Of course, you can use not only a string or a knife to cut foam, but also more modern devices with numerical control. If you do this on an industrial scale, then CNC machines, which are controlled by a computer, are precisely suitable for such purposes. The advantage of such equipment is that an entire workshop of such units can be controlled by just one person from the operator’s cabin.
It is almost impossible to make such a car by hand.
There are different machines, or more precisely, their software is specified in different ways and in different volumes. That is, older models (they are still being produced, but not in the same quantity) have integrated software, and you cannot change it in the usual way, and in later developments you can independently add certain programs for making three-dimensional figures with the most bizarre and complex shapes.
3D foam processing
Various unique shapes made using this method can be used:
- in the metallurgical industry for casting certain alloys;
- for tuning in the automotive industry;
- in industrial construction for the manufacture of formwork, sleeves for insulating pipelines, as well as for pouring any architectural forms;
- theater stage decoration;
- advertising logos, inscriptions and so on.
Sleeves for insulation of external and underground pipelines
This tool for cutting foam is the most accurate of all of the above, since computer programs, unlike the human eye, do not produce errors. Consequently, you get a minimum amount of waste thanks to the ideal calculation of the area and volume of the figure in relation to the workpiece. There are special programs that, with a little help from the operator, can develop any configurations and transfer them to the machine.
Cutting foam with a hacksaw and grinder
Using the first tool, cutting insulation is much easier, although the principle of the work performed is no different from what happens when using a knife. It is often preferred when there is a need to cut slabs up to 8-10 cm. To cut foam sheets, you can use a hacksaw for metal or wood, but in any case, the blade must be of optimal length and have small teeth. With such cutting elements, the cut will be noticeably smoother, and the amount of debris generated will be an order of magnitude less. You can carry out work using this tool in almost any convenient position.
When cutting, it is only important to make a smooth movement of the hacksaw, and not jerkily
Cutting foam sheets can also be done using a grinder and an electric jigsaw, but in this case it must be taken into account that a significant amount of debris is generated during the work. This is due to the fact that in the first situation the tool circle rotates at high speed, and if the disk also has large teeth, then during the cutting process there will be significant destruction of the insulation structure at the cut site. If you reduce the speed to a minimum value, the foam will begin to burn and melt, which must be avoided to avoid damage.
In general, the grinder is excellent for cutting slabs up to 50 mm thick, but the quality of the cut will be an order of magnitude better than when using a knife, hacksaw or other electric tool. To obtain an optimal result, you need to use a thin diamond-coated wheel, which, after passing through, creates a better-quality cut than when using a disk designed for working with metal.
When carrying out work, you can also use a jigsaw, but with its help it is not possible to achieve perfect evenness on the cut due to the vibration of the file, and also a lot of small debris appears during the cutting process. A significant advantage of its use is the ability to make shaped cuts, which are much more difficult to make using the other tools listed above.
Advantages and disadvantages of the material
The best thermal insulation material - polystyrene foam - has many positive and negative properties. Its advantages:
- This is a special insulation that is capable of high-quality soundproofing not only individual rooms, but also entire buildings.
- It does not contain harmful substances, so the material is environmentally friendly.
- Used as ceiling coverings. Decorative products have different textured patterns and colors.
- Used during transportation. For high-quality sealing, the product is additionally sealed with polystyrene foam.
- It can be transported, unloaded and stored without problems due to its light weight.
- The material is resistant to fungi and mold.
Under the influence of high temperatures and some technical substances, the foam begins to collapse. Therefore, when working with the material, it is necessary to follow certain rules. Do not use gasoline, acetone or white spirit. The foam board will begin to crumble and collapse from the inside at air temperatures above +500 degrees. Because of this, in places where insulation is used, the temperature regime must be observed.
Features and benefits of polystyrene foam
The material is made in white color, consisting of almost 95% air. Due to the absence of harmful substances in its composition, the insulation is environmentally friendly and cannot harm human health. Polystyrene foam is manufactured in slabs of different sizes and thicknesses, and is also used for many different tasks due to the huge number of the following positive qualities:
- Resistance to moisture, due to which the insulation is not negatively affected by various fungi and mold. In addition, due to its resistance to humidity, the insulation does not age and is not susceptible to destruction under its influence.
- Light weight, allowing you to easily transport and carry the foam, as well as use it when carrying out repair work and performing many other tasks that are conveniently carried out not only with someone, but even alone with your own hands. Due to its extraordinary ease, when installing outdoors, you need to take into account that its sheets can fly away even with a weak breeze.
- The material withstands low and high temperatures, as well as temperature changes, which is why it can be used not only for internal, but also external insulation of a house. In addition, polystyrene foam can be used for a number of other tasks, for example, it can be used to insulate a metal entrance door.
- Ease of cutting. Thanks to this, you can cut foam plastic with your own hands at home without the help of specialists, using various tools.
- High thermal insulation and sound insulation performance. In the first case, the insulation provides reliable protection of the premises, preventing the penetration of cold from the street, as well as retaining heat inside the buildings, which makes it possible to significantly reduce the cost of heating them. Good soundproofing qualities significantly reduce the amount of incoming and outgoing noise and allow, for example, when living in an apartment building, to listen to music louder and not create any inconvenience to neighbors.
Taking into account all the above indicators, polystyrene foam is an excellent thermal insulation material, which, in addition to all of the above, also has a fairly long service life without losing its positive qualities over time.
Options for homemade electric foam cutters
Conventionally, such devices can be divided into groups:
- cutter for linear cutting of foam plastic,
- cutter for shaped cutting of foam plastic,
- cutter with working metal plate.
But despite this division, all cutters have one thing in common.
To make them, you cannot do without a step-down transformer.
Such a transformer must be designed for a power of at least 100 W. Its secondary winding must be designed for a voltage of 15 V and have a winding wire cross-section of at least 1.5 mm.
Return to contents
Required tools and materials
Polystyrene foam is a lightweight material that can be cut using a variety of tools. In some cases, the accuracy and cleanliness of the cut is of no small importance. These properties can be achieved using the following tools:
- an ordinary sharp knife;
- small stove or hacksaw;
- strong string;
- knife with thermal effect;
- thermal cutter;
- cutter with laser beam.
Each builder has his own preferences regarding the choice of one of the tools. All tools allow you to process foam plastic efficiently and form an even line. Foam plastic has low resistance to mechanical stress - this should not be forgotten when choosing a tool.
Nichrome wire cutting
To use this tool, you will need to additionally assemble the device. It will include not only a nichrome thread, but also a 12 or 24 volt transformer. You also need to take a piece of small pipe and a table in advance. The string tension will be organized by a spring. Nichrome is a material that is part of any hair dryer. The device must function in such a way that the thread heats up and can melt the foam. Thanks to this, it is possible to obtain various complex shapes from the material.
How to cut foam. Step-by-step instruction
- The first step is to find a sufficiently thin and sharp object that will be used to form the cut.
- If you don't have a special tool, you can use a credit card, a table knife, or any object with thin edges.
- The foam can be easily broken along the cut line. It is most convenient to do this at the edge of the table. You can apply only light pressure.
- If there are any convex pieces left, they can be cleaned off with a knife.
Advice from professionals
To quickly and efficiently cut foam, it is recommended to follow the following professional tips:
- It's not very convenient to cut with a regular knife. It is best to use a soldering iron instead. You can quickly and efficiently cut polystyrene foam if the round side can be easily flattened with a hammer. Additionally, you will need to put a metal cap on the electrical device. The knife blade must be well secured. Only after this should the soldering iron be plugged into the network. You can only work with the tool in a well-ventilated area. It is best to open the windows additionally. When heated, a soldering iron releases gas, which has a toxic effect on the respiratory system.
- It is most convenient to cut the foam with nichrome thread. Thanks to it, the process will go quickly, and the edges will be smooth.
- Nichrome material is found in hair styling devices, hair dryers, irons, and boilers. If it is not possible to get such a thread, then you can use steel wire. It should be stretched across the table. One side is attached rigidly, and the other only with the help of a spring. A transformer is connected to both of them. It must first be connected to the electrical network.
- The foam sheet must be placed on top of the wire. The current charge directly depends on the thickness of the working material. It is necessary to ensure that the wire turns red. You should not allow it to become heated, because in this case the cut may turn out to be too wide.
- It is most convenient to carry out all manipulations if the table is at an angle of 20-60 degrees to the floor. Thanks to this, the foam itself will be supplied under its own weight. However, for this to happen there must be a sufficient level of slip.
- Nichrome wire will become larger during use. That is why it is important to secure it to one side with a spring. Thanks to it, length regulation will occur.
- To cut foam plastic, you can use a grinder or jigsaw. It is also recommended to use a file with a wavy blade.
- If you need to create figures from foam plastic, then dough molds are quite suitable for cutting them out. However, in this case, you can only take foam whose thickness does not exceed 1.27 cm.
- To quickly smooth out the ridges, simply rub the foam against each other.
- When working with polystyrene foam, it is recommended to perform all manipulations on a cutting board. In this case, the likelihood of damage to the table is minimized.
Today, foam figures are very popular in interior design. To create them, it is advisable to use a special knife or automatic device. To obtain smooth edges, it is advisable to carry out all manipulations with a preheated object. You can make a knife yourself from an old soldering iron. This tool is very popular among interior designers.