A gazebo is one of the main attributes of country life. Here you can relax, play board games, chat with friends, and have small family gatherings. But for all this to become possible, a table and benches must be installed in it. Garden furniture not only fulfills its main function, but also creates an atmosphere of warmth and comfort.
A small wooden hexagonal table will fit into any gazebo
Types of tables for gazebos
Based on the shape of the tabletop, there are 3 types of tables:
- square (rectangular);
- round;
- polygonal.
Round tables are considered the most popular and convenient. The smooth shape makes them ideal for all types of gazebos.
Several materials can be used in the manufacture of tables: metal, plastic, wood, as well as their combinations. Each option has its pros and cons. Metal tables are durable, but they are expensive and get very hot in hot weather. Plastic options are inexpensive, but will not last long.
The combination of wooden tabletops or seats with brick bases looks very interesting, especially if the same materials were used in the construction of the gazebo.
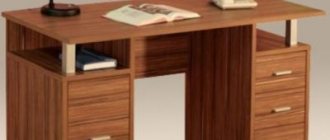
Wood is considered the most affordable material for making gazebo furniture. Wood is environmentally friendly, easy to process, and has an affordable price. A wooden table can be bought at any specialized retail outlet, but the owner’s special pride will be furniture made with his own hands.
How to make a table with your own hands: drawings, materials, descriptions
A table is the piece of furniture with which any novice furniture maker can begin their thorny path of knowledge. The simplest design can be easily implemented in half a day. If your soul yearns for something original, you need to stock up on time and patience. As a result, the novice carpenter will be rewarded for his efforts not only by the birth of an exclusive “household member”. There will be pride in your brainchild - a feeling that literally pushes you to conquer new heights. But it will come later, but for now we need to study the question of how to make a table with our own hands, drawings, materials, descriptions.
Why not buy, why bother yourself?
Not everyone likes to follow long-trodden paths, although shopping is faster and easier. However, making your own table allows you to:
- get furniture that you won’t find in the store;
- spend the saved money on something useful;
- choose really high-quality material that guarantees durability;
- increase your self-esteem every day by admiring the creation of your hands.
All the items on this list are attractive, leaving no room for thought.
The choice is small - the material
In stores you can buy interesting tables made of stone, metal, plastic and glass. All these materials require skills, so wood is still the most favorite - it is environmentally friendly, easier to process, and fits perfectly in almost any interior.
Each tree species has its own characteristics, which must be taken into account. In the furniture industry they often use:
- Birch. Its strengths are strength, resistance to cracking and deformation. The Achilles heel is the fear of permanent humidity, which causes wood to rot. This weakness is eliminated by antiseptic treatment.
- Beech. The material is easy to work with and pliable, although it is a hard rock. Not so resistant to deformation when drying out. Rotting is also a defect that can be eliminated by treating with antiseptics.
- Oak is a beautiful wood; it is distinguished by its noble texture, special strength, and much greater resistance to decay than its previous representatives.
- Spruce is a knotty wood. When processed, it exhibits a tough temperament and becomes capricious when soaked in antiseptic.
- Larch. It is durable and can resist deformation and rotting. The downside is that it tends to crack and is not suitable for rooms where there are frequent changes in temperature and humidity.
- Aspen. Easy to process, does not crack, and almost does not rot. The disadvantage is that it is soft, leading to mechanical damage even from a pencil or pen.
- Fir is a good material for amateurs, as it is easy to process. Fir products are very susceptible to moisture, so they are not suitable for outdoor furniture.
- Pine. It is distinguished by its lightness, but strength, softness and pliability. The deformation is insignificant and can be treated well with antiseptics.
Despite the fact that soft woods promise easy work, it is better to choose a harder material. Among the favorites are beech, oak, larch, and pine. With them, a novice carpenter can be sure that his first table will become a reliable, durable piece of furniture.
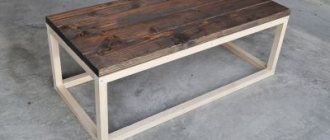
Classic table: drawing and description of work
This is the simplest option for a “full-fledged” table for a small family. Other typical sizes are 600x900, 120x180 mm, but the master is free to change them according to his “wants”.
Any table consists of a tabletop, a support for it, consisting of 4 drawers, and legs. For the latter, timber is usually used; its dimensions depend on the dimensions of the selected furniture: 40x40, 50x50 mm. Boards used for support are 25x50, 25x70, 25x100 mm.
Preliminary preparation
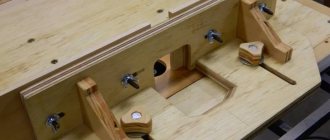
Approximate diagram of the construction of a wooden rectangular table and bench
Before starting work, you need to consider several important points:
- The size of the table must match the design of the gazebo. If the space is small, then it is better to go with the classic version - a tabletop fixed on a durable stand. If space allows, you can install a table on two supports.
- The shape of the tabletop should be in harmony with the configuration of the gazebo. For example, polygonal or round tables are considered a good option for 6-sided buildings.
- The optimal table height is about 80 cm. But here you need to focus on the average height of family members.
- It is advisable to think in advance whether the table will be portable or stationary and decide on the number of legs.
- The size and placement of furniture should not impede movement within the building.
Portable furniture is a great option for small gazebos. If necessary, it can simply be removed or moved to another location.
Table drawing with dimensions
Let's look at the step-by-step production of such a table as in this photo:
The finished product will have the following dimensions:
- length - 2 m;
- width - 0.75 m (5 boards, each 15 cm).
- protrusion beyond the leg – 0.3 m;
- leg height – 0.7 cm;
- height to tabletop - 0.7 m.
Depending on the parameters of your gazebo, you can proportionally increase or decrease the size of the table proposed for consideration.
This table is suitable for both small and medium gazebos. In large gazebos it is necessary to use longer and more solid material.
Tools
To make a wooden table you will need a certain set of tools:
- electric or chainsaw (you can use a simple hacksaw);
- chisel;
- axe;
- hammer;
- electric cutter;
- roulette;
- sandpaper.
If you have the skills, you can easily make a wooden table of any shape with your own hands.
Some nuances of the installation process should be taken into account:
- Fasteners must be made of stainless materials.
- Nails can become loose over time, so assembly is best done using anodized wood screws.
- To extend the service life, wooden parts must be treated with special antiseptics.
- If the upcoming work is new to the master, then it is better to practice on unnecessary parts in advance.
How to make a table out of wood with your own hands: step-by-step master class
Who said that a table is a simple piece of furniture? In fact, creating a table is a fascinating activity, especially with your own hands from natural wood. Today, in our editorial review, we will tell you how to make a wooden table with your own hands, what knowledge you need to have in order for your structure to serve for many years without complaints.
Ideas for making a wooden table with your own hands: photos, recommendations, drawings and step-by-step instructions
Before getting to work, it is important to decide on the following points:
- Dimensions and operating conditions. The functionality and additional measures that need to be taken will depend on this.
- Find (draw) a plan diagram.
- Choice of material and accessories.
For a beginning master, it is better to choose simpler sketches. Here are some sketches that you might find useful.
Country table made of natural wood
Related article:
DIY furniture made of wood. Photo examples, drawings, diagrams, materials; features of making furniture for the garden, children's room, bathhouse, gazebo, tips and recommendations from craftsmen - read in our publication.
Wooden table for the garden and home: choice of material
It is best to use natural wood. Even old boards will do for an experienced craftsman. A few movements with the plane and the raw material is ready for work. The prepared wood must be dried.
Sometimes you can use different raw materials
The advantages of wooden tables made of natural wood are that they can be easily restored
Tools needed to create a DIY wooden table
To make, for example, a wooden garden table, you will need a minimum set of hand tools: a hacksaw, a hammer, a miter box, a screwdriver, nails, screws, a tape measure or ruler, a square and a pencil.
Set of woodworking tools
Related article:
Furniture made from pallets : what is it, advantages and disadvantages; step-by-step production of a coffee table, armchair, sofa, bench, rack; decor features with photos - read in the publication.
DIY wooden table: drawings, photos and step-by-step instructions
For work, you can use both solid boards and chipboards. Carry out an audit of old furniture, you may find materials that can be used.
Wooden portable table
A portable table made of boards is a strong, stable, reliable and lightweight structure. The dimensions of the tabletop must correspond to the dimensions of the gazebo itself.
Assembly steps
Table top:
- Mark the required length of the boards.
- Cut the material.
- Secure the boards.
- Using self-tapping screws, install several guide bars on the back side of the structure.
Legs:
- The table legs are made of the same material as the tabletop.
- The number of supports depends on the size and shape of the table.
- The legs of the structure must be stable.
- When installing supports, the floor level should be taken into account. The slope of the surface must be compensated by different lengths of the legs.
Each element of the future table must be thoroughly polished and treated with an antiseptic!
At the end of assembly, at least 2 layers of varnish must be applied to the product.
New version of tensegrity table
The author of the table himself has improved his design over the past month since its debut. Added chains in the middle. And the structure has become much more stable. Meet the tensegrity table from a Russian programmer, version 2.0.
Tensegrity table v.2.0 from Russian programmer Alexey https://imgur.com/a/ehLYw8O
Tensegrity table v.2.0 from Russian programmer Alexey https://imgur.com/a/ehLYw8O
Tensegrity table v.2.0 from Russian programmer Alexey https://imgur.com/a/ehLYw8O
Tensegrity table v.2.0 from Russian programmer Alexey https://imgur.com/a/ehLYw8O
Tensegrity table v.2.0 from Russian programmer Alexey https://imgur.com/a/ehLYw8O
Tensegrity table v.2.0 from Russian programmer Alexey https://www.youtube.com/watch?v=W-5iD3MP73s
Checking the stability of the new tensegrity table https://www.youtube.com/watch?v=Kyn3CIh5D4A
Timber table
For work you will need from three to five beams.
An example of a rectangular table made of natural timber
A strong and reliable table can only be made from even beams that are carefully adjusted to each other.
Stages of work
Legs:
- Measure 4 pieces of timber: two – from 0.5 to 1 meter wide, two – slightly smaller.
- The long beam will become the base of the legs, and the shorter one will lie on top.
- Adjust the material to each other, connect with wood glue or self-tapping screws. For reliability, the bottom side can be secured with slats.
- Cut another beam equal to the length of the tabletop.
- Lay it across the assembled structure.
- Further collection proceeds in the same way as points 1-3, only the shorter beam is laid first, and then the longer one.
- Fasten the parts with wood glue.
- Lay and secure wide thick boards on top.
To ensure that the wood sets as firmly as possible, let the table stand under heavy pressure (for example, under several bags of mortar) for several days.
Finally, you need to sand the sharp corners and sand the surface with sandpaper. Don’t forget about protective equipment: water-repellent compounds and parquet varnish, which will extend the life of the table for several decades.
Step-by-step instructions for creating a wooden table
The entire process of manufacturing an interior item can be divided into several stages, each of which has its own characteristic features. Preparation of materials is the first and one of the most important steps in the entire technological process.
Read about the use of various small architectural forms in the landscape design of a site.
Material processing
At the material processing stage, it is necessary to cut the boards based on the measurements that were taken earlier. Once prepared, they should be left in the sun to dry thoroughly.
In addition, drying guarantees convenient and quick work with an angle grinder, since the tool will not become clogged with wood fibers . You can replace this unit with a plane, in which case the above-mentioned problems with wood processing will not arise.
Important! If the boards are not completely dry, subsequent sanding will be unsuccessful.
Making table parts
It is better to start making a table for a gazebo by processing the tabletop. After it is ready, you can start working on the legs and fastenings for them. If you start work in the reverse order, problems may arise with the proportions of the finished product. Legs that are too large and massive will be inconvenient to attach, while legs that are too elegant may not support the weight of the tabletop.
Tabletop
It is best to prepare five boards of equal length and width for the tabletop . These plates are connected to each other by four slats (50x50 mm). In the future, the table legs will be attached to these parts. There should be at least 25 cm from the edge of the slats to the edge of the table. In the future, the tabletop will be sanded on all sides.
Legs
Having cut the boards in advance, you need to start manufacturing. Two boards are inserted into slats attached to the tabletop at a distance of 5 cm from each other. Then 4 rectangular parts are cut out, after which their sides are cut at an angle of 40°. These segments are attached at the bottom of the legs parallel to each other. This way you can create a platform on which the table will stand. Once the pieces are fastened together, they must be sanded thoroughly to ensure that the piece of furniture is stable.
Stalls
For each bench, based on the size of the table, it is necessary to cut identical wide boards, and then carefully sand them. Both wood and metal pipes are suitable for the legs. Most often, the first option is used for gazebos. The form of fastening may be different.
Important! The smoother and cleaner the wood is selected, the less processing will be required in the future, and, as a result, the working time will be reduced.
It is best to do the same as with the table:
- cut two slats and attach them across two boards prepared for the bench;
- then turn out the legs and insert them between the slats and then secure them.
Coverage and design
It is better to coat the finished product with a special varnish - this way the wood will not get wet and will last much longer. The simplest option is to paint the tabletop with paints. This is done before covering the furniture with the final layer of varnish, otherwise the paint will simply rub off. Another design option is to lay out mosaics. This option is easy to implement on a summer cottage. You can make decorations using glass, broken tiles, or even dried flowers and leaves.
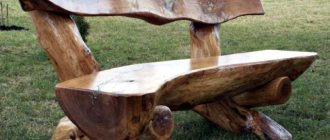
Tree stump table - simplicity and originality in one bottle
Table for a summer house made from a stump - an original solution for decorating a gazebo
A table for a gazebo can be made from an ordinary stump. This will be an original and environmentally friendly design that will appeal to lovers of everything unusual.
- To work you will need a wide stump. If there is nothing suitable at the dacha, then the material can be found in the nearest forest.
- Dry the workpiece.
- Using a chisel and chisel, remove the bark from the stump.
- Use a plane to level the surface.
- Sand it with sandpaper.
- Clean cracks from dust.
- Cover the structure with varnish or wood paint.
To avoid damaging the floor of the gazebo, you need to use wheels or a furniture stand to install the table.
Such a table in itself is an original decoration for the gazebo, but for additional decoration you can use mosaics or pieces of tiles.
Construction tools and material for work
To build a wooden table for a gazebo, you will need:
- dry board 15 cm by 5 cm (about 20 meters);
- bars, measuring 5 cm by 5 cm and 70 cm long (4 pieces);
- a plane or grinder with a grinding wheel;
- galvanized wood screws;
- screwdriver or drill;
- electric saw or jigsaw.
On the Internet there are many photos of wooden tables for gazebos, which are made from waste. This option reduces the time spent searching for blanks, as well as the cost of purchasing them. It’s just impossible to get good quality using this option.
The disadvantages of such a design will be not only a short service life due to low strength, but also the appearance of the table, which leaves much to be desired.
To build a good, solid table, you will need high-quality materials. Conifers such as pine and spruce are usually used.
Deciduous trees have high strength, especially oak. Such materials are difficult to process, but their service life increases significantly. It is also worth noting that hardwoods contain less resin.
The workpieces must not be damaged. Boards with falling knots and resin stains are not suitable for work. Gray spots on the surface of the board must be cleaned off. This is mold that will gradually destroy the array.
The main task is to buy 20 meters of board. Self-tapping screws cost pennies, and you can ask friends for the missing tool or rent it for the weekend.
Round table
A round wooden table is one of the most popular solutions for a gazebo.
If the gazebo is small, then you can install a round table on one leg. assembly steps :
- To make a support, you need to take a beam with a cross-section of at least 10 by 10 cm.
- Drill a hole in the lower part of the future leg.
- Clean the recess from dust and coat it with epoxy glue.
- Insert a wooden or metal pin into the hole (it will help keep the table on the floor).
- Drill a hole in the floor.
- Make 4 sawn spacers and fix them to the support using self-tapping screws or glue.
Table top:
- Take a tongue and groove board and assemble a rectangular or square shield from it.
- Drive a small nail into the middle of the structure.
- Build a homemade compass. To do this, take a long thread, tie one end to a nail, and the other to a pencil. Stretch the thread and draw a circle on the tabletop.
- Cut the workpiece.
- Nail 3-5 cross members to the underside of the structure.
- Connect the support and the tabletop.
- Fix the structure to the floor.
Tensegrity from designers
Before Alexey’s table appeared on the Internet, there was no such excitement for tension-connected structures. Now, if you Google them, you will find them in different formats and sizes.
So, someone else, three months before the appearance of the table, hesitantly experimented with a tensegrity stool.
Levitating stool from Junkerfunker https://pikabu.ru/story/levitiruyushchiy_taburet_7199022
And now new products have appeared. It's only begining.
Tensegrity table from YAflash https://www.yaplakal.com/forum2/st/50/topic2109615.html
Tensegrity table from xylafoxlin https://www.instagram.com/p/CAG76kVHNKy/
Tensegrity table from xylafoxlin https://www.instagram.com/p/CAG76kVHNKy/
Tensegrity table from xylafoxlin https://www.instagram.com/p/CAG76kVHNKy/
Tensegrity table from xylafoxlin https://www.instagram.com/p/CAYzOZUHMJ2/
Tensegrity stand from jo.it.yourself https://www.instagram.com/p/CAk7D74nt1l/
Tensegrity stand from jo.it.yourself https://www.instagram.com/p/CAk7D74nt1l/
Tensegrity stand from jo.it.yourself https://www.instagram.com/p/CAk7D74nt1l/
Tensegrity stand from jo.it.yourself https://www.instagram.com/p/CAk7D74nt1l/
See also:
- Tensegrity table from a Russian programmer