Why do you need a heel?
- Heeling repeatedly extends the life of heels made from various materials.
- The new heel promotes correct foot placement and prevents it from falling in or out.
- Walking around with unevenly worn heels is bad manners for both men and women.
- Not a single man has ever been left indifferent to the clicking sound of women's heels. This sound effect makes the heel more muffled and less irritating to the ear.
Replacing heels is more correctly called prevention rather than repair. Heel repair is required if replacement is not made on time. We are accustomed to heels being placed on heels, but shoe repair specialists also make heels on the toes of shoes, especially men’s ones.
How to make heels with your own hands?
Heels on shoes are made specially.
They protect the heel from inevitable damage during shoe use. Note that heels are installed on both women's and men's shoes. As a rule, we are talking about classic shoes (shoes). Of course, the heels need to be replaced regularly. This requires some financial expenditure. It is quite possible to repair shoes yourself if you understand the essence of the negative impact on heels. In the vast majority of cases (if we are talking about branded manufacturers of men's/women's shoes), the box contains additional (spare) heels. Due to this, the service life of the pair increases by 100%.
Prevention
The sole does not have to be restored if the shoes are used carefully. To extend the life of your favorite model, you need to take preventive measures. They are as follows:
- To avoid abrasion of summer models, you need to glue outsoles to their base. For a sedentary lifestyle, stickers 1 millimeter thick are considered the best option. For frequent walking on asphalt, it is better to give preference to two-millimeter rolls.
- It is recommended to install protection with high wear-resistant and thermal insulation characteristics on winter shoes. Such measures will also prevent slipping on a smooth surface in icy conditions.
- To prevent moisture from getting into the seams of demi-season shoes, their soles must be treated with water-repellent aerosols for shoes. A budget option is castor and linseed oil.
In most cases, the soles of shoes crack due to lack of proper care. Regardless of the type of model, all wet products must be dried in a timely manner. In this case, the use of heat sources is not allowed. It is better to let the boots dry on their own at room temperature. Shoes also need to be cleaned regularly to remove dirt and dust. However, it is strictly prohibited to wet the products excessively.
Knowing the reason why the sole of a shoe burst and how to restore it at home, you can solve several problems at once. Firstly, no longer make the mistakes that led to the deformation of the product. Secondly, by carrying out repairs yourself, you can save a lot.
To avoid abrasion, you need to stick on the outsoles
Install anti-slip protection on winter shoes
Treat with water-repellent aerosols for shoes
Regularly clean from dirt and dust. Dry promptly.
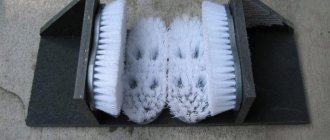
The best material for creating heels
By and large, heels can be made from a variety of materials:
- rubber;
- metal;
- plastic, etc.
However, if you plan to carry out repairs yourself, it is recommended to pay attention to sheet polyurethane. This material can be found at almost any construction market.
The attractiveness of sheet polyurethane lies in its ease of processing (it is cut with a sharp knife). At the same time, it withstands mechanical damage very stoically. Professionals recommend cutting heels along the outer edge so that they don't end up being smaller than the heel.
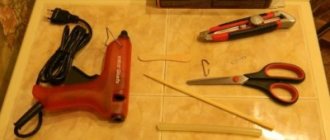
How to prepare the new heel for installation
First of all, I would like to highlight that the best material for heels is considered to be sheet polyurethane, having a thickness of 5 to 6 mm. Its hardness must be medium. You can check this by pressing on it with your fingernail, after which it should bend, but only a little. So, let's get to work:
- To make a heel, you need to put its outline on a polyurethane or rubber plate, attaching the heel to the workpiece and tracing it around the perimeter with a pen. Do not neglect that the shape of the right and left heel will be different; take this into account when cutting.
- After marking, cut out the new heel. This can be done using a sharp knife, the tip of which must be moistened in water to improve gliding, or using a jigsaw on which a wood file is mounted. The 2nd cutting option is preferable, since it will be much easier to work with.
- Clamp the plate with the markings applied to it in a vice and start scolding. Once you have cut a few mm, pull the plate with your hand so that the jigsaw file is not pinched. This will speed up the work. Saw along the outside of the strip so you don't save too much. Anything that turns out to be unnecessary can be done with a knife or sharpened using an emery board.
The 2nd step of the work is completed. The next step is to prepare the heels.
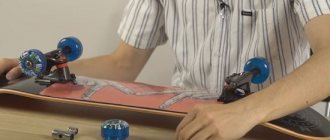
Heel height can cause injury
When creating heels yourself, it is important to remember that the shoes (already with heels) must stand with the entire sole and heel on the surface. Under no circumstances should there be any additional tilting.
This will only lead to an increase in injuries (when walking, you will hit the ground with your heel).
The heel is installed using shoemaker's nails. Of course, it’s also impossible to do without using glue. It is important to understand that nails do not hold heel in place like glue does.
They guarantee that the heel cannot be rotated around its own axis.
To avoid damaging the heel itself when driving nails, it is important to remove the existing pin and fill the hole with a wooden insert. This is where the nails will be driven. When removing protruding parts of the heel, it is recommended to use a machine. Of course, you can do it with ordinary sandpaper. But in this case, it increases the risk of damage to the outside of the heel (risk of scratching).
The video demonstrates how to absolutely not install heels:
Restoring leatherette after reagents
During the winter months, roads are sprinkled with chemically active mixtures - special reagents. They minimize the risk of injury, but have a negative impact on the condition of the shoes. During this period, try to devote as much time as possible to her care.
For work you will need: ammonia (ammonia alcohol), vinegar, water, brush and cream. Follow these steps to repair leatherette products:
1. Take care of shoe maintenance. Household departments sell special products to protect against moisture and chemical components. Spray your shoes with a spray, dry naturally, and repeat the procedure. This will protect your pair of shoes from hazardous substances.
This is interesting: How to soften leather shoes
2. Apply cream with mink oil to the leatherette to protect it from getting wet.
3. Boots will have to be treated constantly. After each use, clean the pair with a brush dipped in ammonia solution. Dilute a tablespoon of ammonia in a liter of water, wet the brush and apply to the boots. Dry them. Carefully lubricate the skin with cream.
How to replace a heel at home
The heel is one of the most worn parts of a shoe. The most common breakdowns are wear and tear of the body, abrasion of the heel, kinks, cracks, and loss of strong adhesion to the surface of the shoes (boots). You can easily replace the part at home, saving on the services of a shoemaker, but you need to understand that after the repair, the heel must fit tightly to the sole so that new creases and cracks do not form. Before you try to repair your favorite shoes, it is advisable to practice on old ones. This will prevent damage to your beloved couple.
Ragged, scratched shoes - removing scratches
Your first step is to determine the scope of the problem. Feel the damaged area: if you feel roughness, this indicates that the skin itself is damaged.
If roughness is present in both directions, then only the coating is damaged.
The next step is to test the shoe polish on a specific area. This only applies to aggressive substances.
After testing the product, proceed to restoration: remove dust, dry and degrease.
The boots have visible stripes from the soles, which can be quickly removed. Use acetone and cotton wool. Spread the coating over the damaged area. Work carefully so as not to damage the shoes.
Some types of leather require delicate treatment. Use nail polish to cover up scratches. Apply it to the area under the scratch. Choose a suitable color or use a colorless option.
It is acceptable to use professional glue, which is designed for processing leather. If it is not there, then use the previously mentioned tool. Wrap the damaged area in a cloth and leave for five minutes. The product sets quickly and lasts a long time.
This is interesting: How to remove the smell of cat or dog urine from shoes without damaging them
DIY shoe repair
The replacement procedure consists of a number of steps:
- Carefully tear off the old element without damaging the sole. After bending the insoles, remove all fastening nails (if the insoles do not give in, they can be moistened with warm water). Remove the staples using a screwdriver or nail puller and unscrew the screws.
- Examine the heel part. If it is too worn, a new heel pad made of insole leather is glued in.
- To make the heel part as strong as possible, you need to put the shoe being repaired on a last, and put dried, moistened, coated with glue and compacted felts on top with a hammer. The latter are fastened with wooden pins. Flicks of two or three elements are also suitable. The upper part should be made of strong sole leather.
- The new heel is selected according to color, style, height and angle of inclination.
- The surface of the shoe footprint and the base of the heel are pre-sanded with sandpaper.
- For gluing, a polyurethane-based product is used.
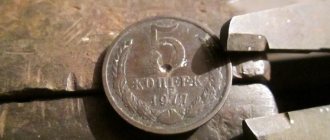
- Reliable fixation of the connected parts is ensured by metal bearings, which have holes for nails and screws. The latter should be about twenty-five millimeters long and about three to four millimeters in diameter.
- It is better to use special shoe nails. When tightening them, maximum effort is required to ensure strong adhesion of the stud to the trail. The metal thrust bearing should press the instep support.
- It will be easier to screw it on if you first make small holes in the heel using a thin drill. The screwed part must be hammered down. Then it will achieve the desired compaction. The side part can be trimmed if desired to ensure a complete fit to the track.
- Nail the heel.
- When the repaired shoes are dry, reseal them by hammering.
- Remove the pads and bend the protruding ends of the nails with a hammer. Glue the insole on top.
The replacement procedure cannot be called simple and quick. To perform it, you need to purchase special staples and nails, stock up on shoe leather, and, of course, find a new heel. Therefore, before you start repairing your favorite shoes, you need to think: perhaps a shoemaker can do this job better?
Restoring sagging soles on winter shoes
Shoe shops rarely undertake such repairs, so you can try to correct this defect at home. To repair minor damage to a shoe sole yourself, you will need an adhesive material, namely: “Crazy Hands” epoxy sealant, “Moment” glue or a polyurethane-based adhesive – Desmokol. Restoration is carried out as follows:
Initially, it is necessary to process the structure on the sole, which resembles a honeycomb. Remove the covering rubber membrane and thoroughly clean all pores of accumulated dirt. Now we fill the honeycombs with crushed raw materials with microscopic pores (you can use old summer flip-flops), carefully compact them, and fill them with silicone sealant. The next stage is carried out when the sealing composition has completely hardened. If the crack is small, it is pressed with the same composition that was used to fill the honeycomb. To restore volumetric damage and a deep crack, it is necessary to cut out a piece of microporous material or soft rubber so that it fills the hole in the sole in size. An elastic rubber insole is cut out to match the shape and size of the shoe sole. The workpiece is glued over the entire surface of the sole using an adhesive.
Now you need to place the shoes under the press and let the adhesive dry. The drying time is determined by the instructions that come with the glue. Most often, drying takes about 12 hours.
After such repairs, the soles will not sag, and you will not need to spend money on a new pair of shoes for some time.
Repairing cracks and scratches
Once the shoes are completely dry, you can move on to the next step—filling the cracks. Be sure to stuff crumpled up newspapers or rags inside your shoes first. This will help maintain their shape. Fill the shoes as much as possible so that there is practically no free space left. The newspaper will not only help maintain the shape of the boots, but will also absorb any moisture that may get inside.
Appetizing cakes with a creamy texture in the form of cute flowers
The release of the Resident Evil 4 remake has been postponed to 3023: game development has been restarted
Water scarcity on Earth is increasing: March 22 is World Water Day
Apply a moisturizer to your shoes, for example you can use mink oil. Pay special attention to the cracks, they need to be filled first. Do not skimp on the product, it should completely cover the creases. You can always remove any excess with a rag.
To help the product penetrate the cracks better, you can heat the shoes a little. Place it next to a heater or blow warm air with a hairdryer. This will help absorb the oil faster. Apply it not only to the cracks, but also to the entire surface of the shoe.
Why do I use mink oil? First of all, it is more convenient because it has a solid structure. It can be applied by hand. Moisturizers are made from wax and natural oils, so they are runny.
Painting and dampening leather shoes
Over time, even high-quality shoes and genuine leather lose their color. After filling the cracks, you can also paint it and further dampen it. This will help prevent new wrinkles from appearing. Take shoe polish and apply it all over the shoe. For this you can use a sponge or cotton cloth. The cream not only helps restore color to dull skin, but also polishes it, making it smooth and shiny. Remember to only choose a color that matches the shade of your shoes.
The cream also works well on filled cracks. Therefore, it needs to be applied to them most of all.
Once the color cream is absorbed, wipe the shoes with a clean cotton cloth. It will help quickly remove any remaining cream and make your skin smooth and shiny. I start wiping down each shoe from the top. The cream is best removed with small circular movements.
After this, place the shoes in a well-lit room. Check if cracks are noticeable. If you did everything correctly, both shoes should look the same. It is important that the skin color is uniform without dark or light spots or streaks. If cracks are still visible, repeat the procedure and apply more filler.