People's imagination has no limits. “Knife makers” are a separate caste of humanity, capable of making a blade from all kinds of materials on the planet. Our resource contains several options for making knives yourself, using various materials. Let's add another interesting method - making a blade from a hacksaw blade.
Homemade knives from saws.
Necessary materials
Before you start working on your future knife, you should design it.
The main part of the instrument is the blade. Various technologies are used for its production. This part of the knife can have any shape, so when choosing a handle you should carefully consider its appearance. It is recommended to prepare a drawing that will take into account the nuances of the future product.
According to manufacturing technology, all-steel and all-iron knives are considered the simplest. Welded blades can be made of steel and iron.
The raw materials for the handles are:
- Plastic.
- Tree.
- Birch bark.
- Leather.
- Various artificial materials.
The handle should be easy to use and visually attractive.
Steel selection
The type of knife determines the conditions in which it can be used. Materials must be selected that can withstand the loads during use of the knife.
Damascus steel blade.
When choosing iron or steel, you need to consider the following properties:
Hardness - the ability to prevent the penetration of foreign particles into the structure of the material chosen for the blade
It can be obtained after heat treatment using the required mode. Impact toughness, which is responsible for resistance to fracture and minimizes chipping. Corrosion resistance, which is necessary for possible contact with liquids and for working in special conditions. Wear resistance is an important property for increased loads on the blade, increasing resistance to deformation and abrasion. For handmade blades, damascus and damask steel are considered the best options
But their use requires professional blacksmithing skills. You can purchase a blank, but it has a high price. More often, in order to make a simple knife, alloy steels are used, which are more convenient for processing.
For handmade blades, damascus and damask steel are considered the best options. But their use requires professional blacksmithing skills. You can purchase a blank, but it has a high price. More often, in order to make a simple knife, alloy steels are used, which are more convenient for processing.
Forming the cutting edge
Before you begin shaping the cutting edge, it is necessary to carry out preparatory work. It consists of applying markings on the edge of the workpiece. The markings are placed exactly in the center and serve as a guide for making a symmetrical descent.
To do this, paint over the edge that will be cutting with a marker and, using a drill equal in thickness to the workpiece, scratch the markings. The drill has a conical sharpening. Therefore, if you place the drill and the workpiece on the same plane, the tip of the drill will be exactly in the middle.
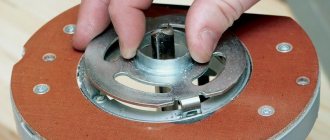
Edge cutting device
Then, using a coarse file, you can begin shaping the cutting edge. If you do not have the proper skills to create a smooth edge, you can use a simple device. It consists of a base, an angle and a guide with a platform for sandpaper. 180-grit sandpaper is glued onto the platform with the guide. Several holes must be pre-drilled vertically one above the other in the corner. The knife is fixed flat on the base and the guide is inserted into the hole at a height so that the angle between the plane of the base and the platform with sandpaper is the same as that chosen for forming the slopes. A universal angle is from 22 to 30 degrees.
Having made an even descent to the middle of the thickness of the workpiece, turn the knife over, then make the same descent on the reverse side. Using such a simple device, you can easily form an even blade.
Creating a knife layout
The first step is to create a model of the future knife from a saw. At this stage of work, you can decide on the shape of the blade of the future blade and the shape of the handle. The layout is best made from thick cardboard or thin plywood. You can also use thick plastic. A rigid pattern will allow you to understand how a knife from a circular saw will lie in your hand and how convenient it will be to use.
When making a layout, it is important to adhere to the following rules:
- Right angles must be avoided. A right angle is a place of stress concentration. The blade of the knife most often breaks or cracks in this place.
- The shape of the blade must be chosen based on the purpose of the future knife. The most versatile forms are with straight or descending butt. Such a blade can cut and stab equally well.
- The dimensions of the layout must correspond to the size of the circular saw blade.
Knife preparation
When making a model, you should also remember that a knife can be classified as a bladed weapon. It all depends on the shape and size. Manufacturing and possession of bladed weapons is criminally punishable. Therefore, in order not to fall under the article of the criminal code, it is necessary to create a layout that complies with the following rules:
- The length of the blade or cutting part should not exceed 9 centimeters. Exceeding this length even by 1 mm will allow you to classify a homemade blade as a bladed weapon.
- A knife with a blade thickness of more than 2.6 mm is also a bladed weapon. This parameter can be neglected, since the thickness of the saw blade is usually 2 mm.
- Hardness should not be more than 42 units. This parameter relates to hardening, so we also skip it at the stage of making the pattern.
- The handle should have a limiter that protrudes beyond its limits by no more than half a centimeter. If there is no limiter, then the sub-finger recess should be less than 4 mm deep.
Once a layout that satisfies the letter of the law and personal preferences has been drawn, you can proceed to transfer the layout to the saw blade. The pattern is applied to the saw blade and outlined with a marker. It's best to use a fine marker. A thin line will allow you to cut the workpiece more accurately and avoid unnecessary filing of the workpiece.
Hardening
Heat treatment will give the knife the necessary hardness; it will not become dull during use.
To harden the knife from the saw, it is necessary to heat it to a temperature of 750–920 degrees. If you do not reach this temperature, the steel will not be hardened, and if it is heated too much, the blade will be too brittle.
At home, it is not possible to determine the exact temperature. However, there is a way out. A simple magnet is suitable for temperature control. As soon as the blade blank stops being magnetic, it is heated to the required temperature.
After the temperature of the workpiece has reached the required limits, it must be kept in this state for approximately 1-1.5 minutes for every 1 mm of thickness. In the case of a homemade knife from a saw, the holding time for hardening is 3–5 minutes. It would be enough. Next, the workpiece is lowered into vegetable or machine oil preheated to 50 degrees. This procedure should be performed carefully. Oil vapors can ignite from a hot workpiece, so you should have a fire extinguisher on hand.
Knife hardening
A little about the hardening forge. If it is not possible to use industrial equipment, then you can make a forge yourself. To do this, it is necessary to build a fire of such a size that it is possible to evenly heat the workpiece. Next, as the firewood burns and coals appear, a homemade knife is placed on them. You can use a household hair dryer or a pump for inflating mattresses as bellows.
Where is it used?
A tool with a 7 mm blade is usually used only for paper. It will be very difficult to cut material that is thicker or denser with such a stationery knife. Why? The blade of this tool is too narrow. When cutting dense material, it will bend greatly, and the cut area will be uneven.
A tool with a blade 9 millimeters wide is more common. With the help of such a stationery knife you can cut plastic, thin leather, cardboard, paper and other materials, among which even linoleum should be mentioned. It is worth noting that this is the tool most often used in construction. Of course, it can also be used at home.
But there is another stationery knife. 18 mm is a wider blade that allows the tool to be used exclusively in construction. This knife is not suitable for office work.
Sanding and varnishing a knife handle
Final sanding is done using sandpaper. Gradually increasing the grain size, it is necessary to remove all rough marks from paper of a larger grain size. It is enough to complete the process of sanding the knife handle with 600 grit paper. The last step in making the handle will be its impregnation.
There are several ways to impregnate a handle to better preserve it. This is oil impregnation, wax impregnation or varnish coating.
Each method has its own advantages and disadvantages. For example, wax must first be melted by heating it, and heating has a detrimental effect on the strength of the glue that glues the handle. Oils must be updated periodically. And the varnish serves only the function of surface protection.
Making a knife from canvas
Making a knife
If the blade is large and does not have much wear, then several blades for different purposes can be made from it. The effort and time spent are worth it.
A knife is made from a circular saw with your own hands in the following sequence:
- A pattern is applied to the canvas, and the contours of the blade are outlined. Scratches or dotted lines are applied over the marker with a core. This way, the design will not be erased when cutting out the workpiece and adjusting it to the desired shape.
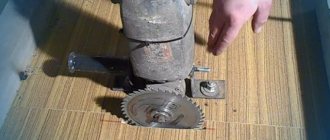
- Workpieces are cut from a circular saw blade. To do this, it is better to use a grinder with a metal disc. You should leave a margin of 2 mm from the contour. This is necessary in order to remove the material burned by the grinder. If you don’t have a grinder at hand, you can sharpen the workpiece using a vice, a hammer and a chisel or a hacksaw.
- Any excess is ground off on the grinding machine. You will have to spend a lot of time on this process so as not to overheat the steel. To prevent this, the workpiece must be regularly immersed in water until it cools completely.
- The blade is outlined. Here you need to be careful to maintain the contour of the knife, not burn it and maintain an angle of 20º.
- All straight sections are leveled. This is conveniently done by placing the workpiece on the side of the grinding wheel. The transitions are given a rounded shape.
- The part is cleared of burrs. The blade is ground and polished. To do this, several interchangeable wheels are used on a grinding machine.
Separately, we should dwell on how the handle is made. If wood is used, then a monolithic fragment is taken, in which a longitudinal cut and through holes are made. After this, the blank is placed on the blade, and holes for fastening are marked in it. The handle is fixed to the blade using rivets or bolts with nuts. In the case of a bolted connection, the heads of the hardware are recessed into the wood and filled with epoxy glue.
When the handle is assembled from plastic, 2 overlays are used, which must be symmetrical. To give the knife originality, the plastic linings are painted on the inside. You can make cavities in the overlays that can be filled with jewelry, items made of non-ferrous and precious metals, small compasses and photographs.
After fastening to the blade, the handles are ground until they acquire the required shape and smoothness.
Manufacturing of rivets
The adhesive attachment of the handle to the shank is not reliable. To avoid breaking the handle, the wooden plates must be fastened with rivets. The rivets are made of metal that is not subject to corrosion. These can be alloys of non-ferrous metals or stainless steel. You can also use a copper or brass tube as rivets.
Making rivets for a knife
A blank for the future riveting is sawn off from a rod of suitable length. It should be 2–3 millimeters longer than the thickness of the handle. Holding the rivet in a vice, use a hammer to flare one end. It should look like a mushroom at one end of the rod. Next, the rivet, pre-lubricated with epoxy glue, is inserted into the holes in the handle and also flared on the other side of the handle. To flare a rivet made from a tube, it is best to use a ball from a bearing.
Advantages of a standard hacksaw
The first advantage is financial savings. If you have a lot of effort and time, then there is absolutely no need to spend money on more expensive electric saws. In this case, they are simply not needed.
If you need to saw off just one or a few parts over a long period of time, then there is no point in spending money on a more expensive, possibly electric saw. After all, there is no obvious need for it.
The third plus smoothly follows from point two. When using a standard hacksaw, there is no need to spend on electricity.
While electric saws typically don't use much power, they still require electricity to operate. There are situations when you need to do something with a saw, and the lights are turned off.
Types of saws for wood
There are several clearly distinguished classifications of hand saws:
Classic. The most common variation of the saw, which is kept at home by every man. It may have a different blade length and number of teeth on it.
Most often it has removable and replaceable blades, which, in turn, come with the saw when it is sold. It is usually called a hacksaw.
Electric hacksaw. Some improved version of a regular hacksaw. It is capable of performing a large amount of work in a fairly short time, does not tire the owner, and is often used when cutting material.
This saw is good because it can have different blade lengths, different blade widths, and also different tooth sizes. Due to this, the saw becomes almost universal.
If you look at how to make a hand-held circular saw with your own hands, it becomes clear that this is far from being an analogue of a regular hand hacksaw. This variation is capable of performing deeper and better cuts.
These four types of saws are the most common in life. They are the most popular. There are many more different types of hacksaws, but there is simply no point in loading your head with them.
Materials and tools
To make a homemade knife, you will need the following equipment:
Graph of knife thickness versus steel hardness.
- Woodworking Machine. If you don’t have one, you can use an electric jigsaw to pre-cut the handle. For final sanding, sandpaper of different grits is used.
- Nails or better copper wire for rivets.
- Wood.
- Machine for grinding and sharpening. In its absence, you can use a grinder, a hammer drill, or a high-power drill. In addition, nozzles or circles are needed with which these operations can be performed. One of these tools should be firmly secured and then work done.
- Files with various types of cuts.
- Marker.
- Brass plate and rod, if the handle will not be attached with rivets.
- Epoxy adhesive.
Knives should have a comfortable handle. The most suitable material for it is wood. The most commonly used are birch and oak blocks. These rocks are the hardest and are less susceptible to moisture during prolonged use. They are pleasant to the touch and have a beautiful texture. Since the manufacture of a knife handle does not require a large amount of raw material, for these purposes you can use 1 parquet board, a scrap of board or block
It is important that the wooden workpiece is not damaged, cracked and does not contain chips or other defects
After the blade is sufficiently calcined, you need to cool it.
In order to make a knife, it is necessary to use certain grades of steel. It should be remembered that the characteristics of the metal depend on how the metal was hardened technologically. For example, as hardness increases, the fragility of metal products increases. Steel grades R6M5 or R3M3F2 are suitable for the knife. In this case, a metal thickness of 2 mm will be sufficient.
The strength of a homemade knife does not depend on the thickness of the metal. It is influenced by its geometric dimensions: length, width, shape of the blade and trigger. With the right choice of these components and careful processing of the metal, an excellent knife is guaranteed. Such grades of steel are used in the production of disks, blades, and tools such as, for example, a circular saw.
Cutting and primary processing of the workpiece
The fastest way to saw a workpiece is with a grinder with a thin metal cutting disc. If it is not possible to use a grinder, you can use a hand hacksaw for metal
It is important to correctly install the file into the hacksaw. The saw teeth should be directed forward and the hacksaw should cut while moving away from you
Cutting and preparing the workpiece
First, the approximate shape of the knife is cut out using straight cuts. Then the bends are cut out. The easiest way to cut them is with several oblique cuts converging at one point.
It is important to leave an allowance of 2-3 millimeters to the drawn outline. This is due to the fact that when using a grinder, the metal at the cutting site overheats
By grinding off 2–3 mm using a file and sandpaper, you can remove the overheated edge of the metal.
Is it possible to make a knife from a circular saw blade? DIY circular disc knife
By making a knife from a saw with your own hands, you can get at your disposal a cutting device whose performance characteristics are much better than those of factory analogues. When making a knife with your own hands, it is given exactly the shape that suits the master most. Factory-made knives are beautiful, but not always reliable. There is no guarantee that they will not fail at the most crucial moment.
A homemade knife made from a disk, a hacksaw for wood, or a saw for metal will last for many years, regardless of the conditions of storage and use.
Let's look at how to make a knife from factory-made metal parts, what is needed for this and what you should pay special attention to
Tools and materials
The raw material for making a homemade knife can be any new or old cutting part made of hardened steel. It is better to use metal cutting discs, hand and pendulum saw blades as a workpiece. An old chainsaw is a good option. From its chain you can forge and sharpen a blade that is not inferior in quality and appearance to the famous Damascus steel.
In order to make a knife with your own hands, you will need the following equipment and materials:
- Bulgarian;
- grinder;
- electric drill;
- ruler;
- hammer;
- sandpaper;
- whetstones for sharpening;
- files;
- core;
- epoxy adhesive;
- copper wire;
- marker;
- bucket with water.
Separately, you need to think about the issue with the handle. The finished product should fit comfortably in your hand.
To make a handle it is better to use:
- non-ferrous metal (copper, bronze, brass, silver);
- wood (oak, alder, birch);
- organic glass (plexiglass, polycarbonate).
The raw materials for the handle must be intact, without traces of cracks, rot or other defects.
Rules for working with metal
In order for the blade to be strong and elastic, during its manufacture it is necessary to follow the rules of working with metal. They are as follows:
- The workpieces must not have visible or hidden damage. Before making a knife, the workpieces must be inspected and tapped. A solid part sounds loud, but a defective part sounds dull.
- When designing the shape of the blade, angles must be avoided. In such places the steel can break. All transitions must be smooth, without kinks. The cuts of the butt, handle and fuse must be ground at right angles.
- When sawing and sharpening, do not overheat the steel. This leads to a decrease in its strength. An overheated blade becomes brittle or soft. During processing, the workpiece must be constantly cooled by completely immersing it in a bucket of cold water.
- When making a knife from a saw blade, you need to remember that this product has already gone through a hardening cycle. Factory saws are designed to work with the hardest alloys. If you do not overheat the canvas during the turning and finishing process, then you will not have to harden it.
Techniques for handling metal
In order for the blade to be strong and tight, during its creation it is necessary to adhere to the rules of handling iron.
The semi-finished product should not have noticeable or unexpressed defects. Before starting work, the workpieces must be examined and tapped. A complete element sounds loud, while a defective element sounds muffled.
Circular disk for making a knife.
When creating a design and drawing of a cutting component configuration, you need to avoid corners. In such areas, steel can break. Transitions must be made smooth, without sharp turns. The bevels of the butt, fuse and handle must be ground at an angle of 90 degrees.
When cutting and processing, do not allow the metal to overheat. This leads to a decrease in strength. An “overcooked” blade becomes fragile or soft. During processing, the part must be cooled regularly by completely immersing it in a container of cold water.
When creating a knife from a saw blade, you must not forget that this element has already undergone a hardening procedure. Factory saws are designed to work with strong alloys. If you do not heat the product excessively during turning and processing, then it will not need to be hardened.
Making a knife from a saw with your own hands
Looking at the finished blade, the average person will think – what’s so complicated about it? I sawed it off, sanded it, sharpened it and attached a handle. No.
Knife making is a whole science, which gradually often turns into art. A self-made blade has multiple positive qualities:
the handle is easy to make to fit the palm of the owner of the product; there is no need to worry about the quality of the workpiece and the final product; It’s not difficult to make a product unique.
The ability to use the tool is useful for a beginner. Following the instructions, the blade will turn out unambiguously. And the quality depends on the directness of the manufacturer’s hands.
Do-it-yourself knife from a saw.Cutting and primary processing of the workpiece
The initial stage of making a blade from a hacksaw blade, similarly from other materials, is a preliminary sketch. You need to have an idea what the result will be. Marking will help you cut out the workpiece of the required shape:
- right angles should be avoided; the layout must be marked with a small margin of 1.5 - 2.5 mm;
- it is necessary to know the future purpose of the blade; the shape of the sketch directly depends on the role of the product;
- Along the way, it is worth remembering the laws of manufacturing edged weapons.
On our resource, the legislative aspect regarding the carrying of knives is considered separately.
Having finished making the layout, you should transfer it to the saw blank. It is necessary to outline with a sharp object; a marker is used only when absolutely necessary. Seeing the contours of the sketch is the main task.
Blank for making a knife from a saw.
Having secured the workpiece in a vice, the future blade is cut along the contour. The part must not be overheated; it is necessary to pour water on it; excessive heating of the steel will lead to brittleness of the product. It is permissible to expose small areas to high temperatures; the margin when marking is made for a reason. It is better to remove them on a sharpening machine.
In this case, overheating is unacceptable. Excess metal must be removed gradually and periodically by lowering it into a container of water.
Rough finishing can be done with files. Having removed the burrs, it’s time to start making the handle. There is no need to harden the blade; factory heat is enough.
Making a handle
The previously made decision on the overhead method of attaching the handle gives full right to use a drill. A drilling machine is a luxury; if you have such a “miracle”, there is no shame in resorting to its help:
- In accordance with the sketch, there is a need to make two or three holes in the shank. Depends on the length of the handle.
- Split the prepared block of wood exactly in half.
- After fitting the wooden blanks to the shank, sand them until they fit tightly. In one of them you should cut a recess for the shank.
- Having perfectly adjusted the parts, holes are made in the wooden overlays.
- Rivets are cut from a copper rod. Final fitting and preliminary assembly.
- Wooden blanks are roughed and adjusted to the anatomy of the owner’s palm.
- Final sanding of the handle, making a brass bolster.
- Assembling the parts of the handle with coating the shank and pads with epoxy glue.
- Driving copper rivets. Drying the product.
Knife handles.
One day is enough for the glue to dry. Use a grinding machine to finally adjust the handle. Sand with fine grit sandpaper.
Trips and sharpening
Finally, the blade is sharpened to meet the necessary needs. The sharpening angle of the RK depends on the purpose of the knife. There are plenty of ways to derive the correct RK.
Previous Making knivesDo-it-yourself rapid knife Next KnivesSteel 420S45
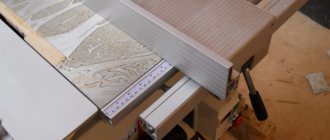
Giving the workpiece its final shape
The rough workpiece is brought to its final shape using a file or emery. To avoid overheating of the future knife from the saw, when processing it with sandpaper, it is necessary to periodically lower it into a container of water. This will allow the workpiece to cool. When processing a workpiece with a file, no additional cooling is required. The most optimal way would be to roughly process the workpiece on sandpaper, and then fine-tune it with a file.
Processing the knife blank
During finishing, special attention should be paid to the smoothness of the bends. It is important to ensure that the bend is smooth, without depressions or bulges. Miniature depressions can be easily checked with a file. To do this, use a marker to paint over the end of the workpiece being checked. Next, apply a file with light pressure along the workpiece along the entire bend. There are depressions in the places where the marker trace remains.
Processing continues until not a single depression remains.
Next, the workpiece is cleared of burrs and sanded using sandpaper. You can start with 60 grit and finish with 320 grit. The workpiece will still be subject to heat treatment, so finishing the blade will be polished later.
How to make a knife from a mechanical saw with your own hands
The thickness of the mechanical saw is usually 2-2.5 mm, unless you find another option. This is quite enough to perform all knife tasks. They are light in the hand, hold an edge for a long time and are completely legal. Just don't go wrong with the length. And in terms of other qualities, the knife will not fall under the article on edged weapons.
Handmade knife from mechanical saw.
This process can be divided into several stages. For a detailed and understandable description, we will do this:
Of course, the first thing is a layout drawing. If you don’t have enough experience, don’t disdain this moment, it’s really important. Measure the “saw” workpiece itself, the model should not protrude beyond the edges, and do not forget about the shank and handle. All these points must be taken into account initially. Trace the sketch onto a piece of saw with a black marker. We clamp it in a vice and use an angle grinder to cut off a piece of the length we need. At the same stage, cut out the shank so that you don’t have to return to the vice and grinder again.
After rough work, “remove” all burrs with a file. Particular attention is paid to future descents. This process is the most important and must be taken seriously.
We take almost the “blade” and paint it over with a black marker, then use a caliper to mark it. We measure the slopes in accordance with the layout. Then carefully and, most importantly, symmetrically draw a strip along the blade using a caliper. A scratched line should appear on the black paint. We do the same on the other side. Be sure to outline the markings with a silver marker, preferably with aluminum powder. To remove triggers, it is best to use a special device; for more details, see the article: “How to make triggers on a knife.” It will be much faster and, most importantly, more accurate. And now about the marker with aluminum dust, when working on a grinding machine, the workpiece will heat up. A simple one will simply “burn out”, namely the one described above, on the contrary, it will begin to harden and will not fall off. Thanks to this little trick, the descents will be perfect. A belt on the grinder for making descents is not needed with very fine grain, P80 and P120 are enough. You can make it perfect later, but this is a draft version. Start making descents from the handle, after removing one side, do the same on the other. After making sure that everything is in order, you can walk around with a felt circle with paste. Then you should wrap the blade with masking tape several times - this both protects against cuts and prepares you for working with the handle. The handle will be made of wooden symmetrical overlays. We drill holes in the shank. We mark the block and divide it into exactly two parts. In accordance with the holes on the blade, we drill them on the linings. Then you need to cut along the handle, in accordance with the shank. Having marked everything out and tried it on, we begin to work on the shape of the handle; here, be guided only by your taste. Read more in the article: “How to make a handle for a knife.” When the parts are ready, you can connect them with rivets. The knife is almost ready, all that remains is to treat the handle in hot wax. If you don’t have it, you can use natural oils, latex-based compounds, silicone or special wood impregnations.
Homemade knife from a mechanical saw.
The attentive reader may notice the list of tools, half of which were not used. Let us explain, it is better to have a supply of everything you need, so any little thing can take the work a little differently
So don’t disdain these things and let them always be at your fingertips.
Under no circumstances should you leave the blade simply closed. To do this, we make leads on a diamond stone with the smallest grain. And we bring out the cutting edge. The process is best done with soapy water.
A little history
In the old days, when there was no Internet yet, people sent paper letters by mail. A stationery knife was invented for the purpose of unpacking envelopes. He was very sharp and got the job done. But the problem was that when it got dull, there was no way to give it the same edge. First, a replacement blade was invented. This was already progress, it became dull - replaced it.
But a little later than the mid-20th century (the exact date is unknown), a Japanese inventor came up with a breaking blade. There is no need to change it entirely; the tip breaks off, and you again have a fully functional stationery knife in your hands. This invention was put into mass production and they were right: a stationery knife for paper of this type was snapped up like “hot cakes.” Later it became clear that this design and simplicity of the product can be used not only for working with paper, but also in many industries.
Time passed, and new and more thoughtful variations of the stationery knife appeared. They began to receive an increasingly wider range of uses. You can easily find which option suits your needs. Today they are produced in various forms. The handle of such knives comes in three types:
1. Plastic, the most common type of handles. But they have a small disadvantage. With prolonged use, plastic tends to wear out, and a small “play” appears, which will interfere with operation.
2. The knife is made of metal; it has a reinforced structure that, with proper care, will last for many years. They are used for construction purposes; they can cut thicker surfaces than paper.
3. Wooden, rather rare types of handles, but they also have their uses. Fits quite well into the expensive interior of the executive's office. Or, if you work with electricity, it is also better to choose a wooden handle, in this case safety comes first.
It is clear that the knives themselves exist, of different sizes and blades, for each variety. They are also sold wider or narrower. The thickness (butt) of the blades can also be of different sizes, so make no mistake when purchasing. Recently, very miniature products have become popular, and they also manage to build a pencil sharpener into them.
Here's a sheet metal knife
This time we will try to figure out how to make a knife like this with an interesting handle with holes for the fingers. In some ways, this handle resembles brass knuckles; however, no one forbids using a knife for such purposes. Making this knife is not difficult, but it uses a rather small set of tools. The material used is old sheet steel with a high carbon content, since this is the kind of steel that can be hardened.
As for the profile of the blade, in my opinion, it does not seem very convenient, but this does not prevent you from making any other one that you like.
List of materials:
- sheet steel (high carbon content); - wood for the handle; - paper, pencil, drawing supplies for making a template; - epoxy glue.
List of tools:
- belt grinder (small); ;— sandpaper and more.
Knife making process:
Step one. Preparation of material
First of all, we prepare the material for making the blade. For these purposes, the author used sheet metal. He had it lying around a little, so it was covered with a layer of rust. We clean off the rust using a grinder.
Step three. Drilling holes
The author made the handle quite difficult to manufacture, but it contains the entire uniqueness of the knife. The most difficult thing is to drill large diameter holes for the fingers. For these purposes, you will need a drill, or better yet, a drilling machine, as well as bits of the required diameter.
In addition, using a drill, the author also cuts out the profile of the knife in some places, which would be difficult to do with a grinder and other devices.
For hard-to-reach places, you can use regular drills. Just drill a series of holes, and then this part can be broken off along the line of the holes.
When you heat the metal to the desired temperature, cool it in old motor oil; the oil can also be heated so that the metal does not deform.
After hardening, the author forgot to perform one more step - tempering the metal. If this is not done, your blade will be too fragile and will crumble at the slightest impact. For the holidays you will need an ordinary household oven. We heat it to a temperature of about 200 degrees Celsius, place the knife for an hour and let the oven cool with the door closed.
Step eight. Final sanding
After hardening, there will be scale, burnt oil and other contaminants on the metal. All of them will need to be cleaned and the metal brought to its final state. For such purposes we use sandpaper, a belt sander or an orbital sander.
Don't forget to drill holes for your fingers in the right places. First we drill small holes, and then we bore them to the desired diameter.
Step ten. Protective layer
The knife is ready, apply varnish or other protective coating, for example, linseed oil, to the wood. Thanks to this, the handle will look more beautiful, and it will also not absorb moisture and, as a result, crack.
Receive a selection of new homemade products by email. No spam, only useful ideas!
*By filling out the form you agree to the processing of personal data
Sawing out the handle blank and preparing for gluing
To finish working with the knife, you need to make a handle. There may be different variations of materials used as a handle. The most popular material is wood. The wooden handle is impregnated with linseed oil to prevent the harmful effects of moisture on it.
Select a flat plank from the wood of your favorite species. The thickness of the board should be at least half a centimeter for convenience. A thick board can be sawn lengthwise. Using the knife blank as a template, markings are applied to the board, including holes for rivets. For a good fit of the future handle to the shank, it is necessary to create a plane of contact using sandpaper.
Interesting ideas on what can be made from a two-handed saw
If a two-handed saw is not used for its intended purpose or a certain number of teeth are missing on the blade, then there is no need to rush to get rid of it. If it cannot be used as a large saw, then many different, interesting and useful devices can be made from it. First, let's find out why a two-handed saw is used to make various devices? The reasons for this popularity are as follows:
- The instrument of the USSR era was made using high-quality high-strength steel grade 9ХФ, with a thickness of 1 to 3 mm. Nowadays it is almost impossible to find such steel
- Strict compliance with GOST 980-80 and manufacturing standards, which improves the quality of the canvas
- Corrosion resistance
Now that we know why it is worth choosing a two-handed saw of the “Friendship-2” type for making various devices, let’s figure out what can be made from it.
- Hand saw.
The first thing you can make from the two-handed hacksaw Druzhba-2 is a hand hacksaw. The principle of making an ordinary hacksaw is simple - you need to draw the shape of the future tool on the canvas with chalk or pencil. Then, using a grinder, cut it according to the template, and attach the handle to the resulting workpiece. The handle can be bought or removed from a Chinese file - Knife from a two-handed saw Friendship 2
(or throwing knives) - similarly, the blank of the future knife is cut out using a template, and then the blade is sharpened and the handle is prepared. When sharpening, you must take into account that this must be done with a file, but not emery. After all, excessive heating of the metal will lead to a decrease in strength properties - Spring
- the type of device in question has enormous shock-absorbing properties, which allows the device to be used for the manufacture, for example, of a catapult or other similar devices
There are many options for using unnecessary crosscut saws on the farm. What to make from it all depends on what is needed on the farm - a good knife, a hand saw or other tools.
To summarize, it should be noted that a two-handed saw is worth giving it a second life. After all, Druzhba-2, even from those times, is a real rarity that can last at least a couple of decades. Today you can also buy modern two-handed hacksaws from manufacturers such as Zubr, Matrix, Sibrtech and others. If you compare their quality with domestically produced files, they cope with the tasks no worse. The cost of a new cross-cut saw ranges from 400-600 rubles, which depends on the manufacturer.
Design features of the file
This two-person tool is also called a crosscut saw, which belongs to the category of hand-held devices and is used primarily for sawing wood materials of various sizes and thicknesses. For this purpose, the saw has different lengths of blades - from one meter to two. It is inconvenient for one person to hold such a long blade, so the design of the device has two handles. Not only in Soviet times, but even today, the production of two-handed hacksaws continues in compliance with standard sizes:
- 1 meter or 1000 mm
- 1.25 meters or 1250 mm
- 1.5 meters or 1500 mm
- 1.75 meters or 1750 mm
The blade does not have a straight shape, but a rounded one, which is made specifically to increase the efficiency of sawing, as well as reduce the load. The teeth on the blades are large compared to hand saws, and their size is 20 mm. Even if you use a meter-long file, it is inconvenient to work with it yourself. There are several reasons for this:
- The large length does not allow the sawyer to make a strong swing
- Large saw teeth are difficult to bite into wood, and therefore the sawyer alone cannot cope with actuating the cutting device
- Strong vibration increases the load, as well as reduces the efficiency of the actions performed.
Saws with blades of 1000 and 1250 mm are popular due to the fact that they have a simplified design. Hacksaws with blades of 1500 and 1750 mm were used primarily in industry for sawing construction and wood materials. If they are found in the household, they are exclusively saws with blades of 1 m and 1.25 m. They have classic triangular links, the sharpening angle of which varies from 35 to 70 degrees.
- To cut dry and frozen logs, it is recommended to use a cross-cut saw with a tooth sharpening angle of 50-70 degrees.
- For sawing soft wood, a tool with sharpened links at an angle of 35-40 degrees is used.
Two-handed saws with blades from 1.5 meters have a complex design, which simplifies the use of a large unit. Special sharpening and shape of the teeth on large saw blades are needed to perform high-quality and fast cutting of wood material. The principle of sawing with a hacksaw with a long blade (1.5-1.75 m) differs from the operation of saws with 1 m and 1.25 m in that half of the teeth are responsible for cutting through the fibers, and the second part contributes to the rapid and efficient removal of chips from under the cut site.
This is interesting!
If ordinary hacksaws for wood and two-handed saws up to 1.25 meters long can be sharpened independently, then a hacksaw with a blade of more than 1.5 meters, which has a complex tooth shape, can only be sharpened by specialists with extensive experience and experience.
If you come across a saw with a complex tooth shape, do not rush to sharpen it at home. If you do not take into account the difference of fractions of millimeters in the complex design of the teeth, then an attempt to restore integrity will lead to complete damage to the two-handed saw. The consequences will be approximately as follows:
- If the difference in the ratio of angles between the cutting and clearing teeth is reduced to one value, then instead of sawing, the blade will tear the wood and only complicate the physical work of sawyers
- If the difference in the ratio of the teeth is large, then the chips will not be effectively removed from the cut, which will also complicate the work
That is why sharpening a crosscut saw requires an appropriate and competent approach. The principle of sharpening a two-handed saw from 1 m to 1.25 m is similar to the process of sharpening the teeth of hand saws.