On New Year's Day, we strive to decorate our home in an original way. The upcoming holiday season is a great time for creativity. And what would winter decor be without sparkling New Year's stars? A stylish, original DIY Christmas tree decoration will become an artistic element of decoration or a non-standard accent.
The star can be made from a variety of materials. The desire to create, imagination and our detailed diagrams will help you create New Year's decorations and gifts.
You will learn how to create a star for a Christmas tree:
- From wire
- From threads
- From paper
- Simple cardboard products
- Origami
- Illuminated decor
- Shiny decoration
- From foil
- From foamiran
- From matches
- From felt
- Using quilling technique
- How to make the star stick?
- Templates and diagrams for manufacturing
- Video master classes
- Various photo ideas
Wire decor
We suggest starting with such an interesting and unexpected material as metal wire. It can be in a colored plastic case (insulation) or “bare”. To make your own New Year's decor, any one will do, the main thing is that you can bend it yourself. To do this, you will need round nose pliers - a tool similar to pliers, only with curved thin tips. It is very convenient for them to give the material the desired bends.
To create a star for your Christmas tree from wire:
- Draw the outline of the future pendant on the base, measure the length of the lines with a ruler.
- Cut the required piece of material.
- Gently bend in the marked places.
- All that remains is to make a loop from a piece of thin wire or thread.
To make the decoration more impressive, you can:
- wrapping it with a thin garland with LEDs;
- colored threads or contrasting wire;
- adding small details and curls.
Hundred rays
This craft is very similar to a balloon, consisting of hundreds of small rays. Straight as a fan. The rays are strung on a thread one by one.
The tips of the star are connected and after that the product can be hung from the ceiling or used to decorate the top of the New Year tree.
Thread toy
You can create decor in different ways from various pieces of colored threads or yarn.
The first step-by-step master class on how to make a toy.
- First you need to prepare the frame. Take a soft foam food tray (cookies or chicken). It must be dry and clean. Draw a silhouette on it with a pen or pencil. Stick matches or toothpicks in the corners.
- Next preparatory step. Pour a few tablespoons of PVA glue into a small bowl. If it thickens, dilute with water.
- Cut a piece of thread 1.5-2 m long and dip it in glue. The thread should be thoroughly saturated with the solution. Squeeze it lightly so that drops of glue do not interfere with your work.
- Tie the end of the thread to one support (toothpick). Next, start wrapping the template, giving the desired shape to the product. You can lay out patterns inside.
- After drying, the product will become durable and can be hung.
The following method will give you the opportunity to create decor in a fashionable eco-style.
- Cut out the outline from thick cardboard. A shoe box, for example, will do. Pay attention to the photo instructions. The outline should be 2-3 cm wide.
- Wrap the cardboard tightly with jute (hemp) twine. The tip can be fixed with glue.
- Leave a loop.
- If desired, you can add decorative berries in New Year's colors or glue pine cones.
The third way is to wrap threads around a template cut out of cardboard completely.
If you are not satisfied with the color of the threads, you can paint the Christmas tree craft with acrylic paints.
Winding with thin threads will take a little longer, but as a result you will get unusual crafts that can be hung on a Christmas tree or presented as a homemade gift.
The fourth way to make Christmas tree decorations from threads. First we need a strong frame. You can use pre-prepared twigs or take sushi sticks or kebab skewers. They must be the same length. Wooden sticks can be glued with wood glue (special strength PVA) or Moment. Next, wrap the frame at your discretion with thread or natural rope (string).
Braided star
You will need: willow twigs 5 mm thick, flexible branches no more than 3 mm thick, pruning shears, ruler, thin wire.
Master Class
- Prepare 5 sticks 12 cm long.
- Take 2 sticks and wrap their ends very tightly with wire. Do the same with the second pair of sticks.
- Form the star frame. It is worth noting that one of the sticks should be on the outside and the other on the inside so that the frame does not fall apart and the sticks cling to each other.
- Attach the fifth stick and secure with wire.
- Take a thin twig and secure it to one of the tops of the star.
- Braid the entire star with thin twigs, as shown in the image.
The wicker star in eco style is ready!
Paper stars
Perhaps the easiest way to make decorations for the New Year is to cut and glue it from paper. To ensure that the product turns out beautiful and even, use these simple tips.
- Use only sharp scissors for cutting. Dumb people will tear and crush the material.
- Always draw the template first, then cut it out. Remember the saying: measure seven times, cut once? This is exactly the case.
- Use thick paper so that the finished Christmas tree craft holds its shape and does not wrinkle. The range of ornamental materials is very wide:
- velvet;
- foil;
- with embossing, with drawings and patterns;
- paper for scrapbooking (plain or with a pattern).
So let's get started. Using the template provided, cut out the required number of parts. Coat the valves with glue (PVA or pencil), press and glue.
A spectacular star can be made from two colored squares according to the instructions below.
You can make the product more interesting using a shaped hole punch. Use a themed “winter” pattern: snowflakes, Christmas trees, balls, silhouettes of gifts, etc. Remember that holes must be made before gluing.
Here is the same star in a different design.
A short step-by-step master class on making paper decorations.
Below is a diagram of how easy it is to create an unusual pendant. Please note that this craft requires thick double-sided colored sheet material.
And here are the templates for it.
Here are other star stencils for cutting out (large set)! Go ahead and use it.
You can create an original and stylish decoration from the pages of an old book. No template is needed for production. Step-by-step master class:
- Roll the pages into cones and secure with glue or a small piece of tape.
- The edges of the tubes can be further decorated. To do this, pour the glitter into a saucer, grease the edges of the cones with liquid glue and dip into the glitter. Gently shake the excess back into the saucer.
- Glue the tubes together as in the photo, with thin ends towards the center.
- Attach a hanging ribbon to the back. Ready!
How to make a “shining star” Christmas tree topper?
The “shining star” decoration looks very beautiful on the top of the spruce tree. It’s very easy to make it yourself; you don’t need any special materials or skills, but it will look great.
The work flow is as follows:
- For magic you will need: scissors, glue, paper (newspaper), glitter (glitter paint). You also need additional elements (optional) in the form of beads or tinsel.
- First you need to make the body of the star. Almost everyone is familiar with the papier-mâché technique from childhood, so gluing finely torn pieces of paper onto a spherical base in several layers will not be difficult. Moreover, you must remember to leave an unsealed gap in diameter. After drying, the halves are removed from the base and fastened together using paper and glue - a ball is obtained. To make a small toy, you can take a tennis ball and make a hole in it to put the top on the tree. All other actions are performed in the same way.
- Next, the sheets of paper are rolled diagonally as tightly and thinly as possible until hard “sticks” are formed, with sharp tips on both sides. The size of the sheets is selected “by eye”, based on the size of the base ball and the fact that each “stick” is cut into two rays. Moreover, some will need to be cut in the middle, while others will need to be shifted slightly to get rays of different lengths.
- Then the rays are glued to the ball (spacers are cut at the flat end) - everyone makes the density and arrangement of long and short rays at their own discretion.
- When the product dries, you can decorate it: paint it with shiny paint or cover it with glue and sprinkle with sparkles, attach beads to the ends of the rays, stick tinsel on the rays, and so on, as your imagination dictates.
Simple stars made of paper and cardboard
A few ideas on what you can do if you don't have a lot of time for creativity. We tell you how to make a fantastic decor in the form of a Christmas tree on the wall.
- Using a stencil, cut out identical silhouettes from bright paper. You can take companion colors that combine with each other. There should be 15-20 parts.
- Mark a template for the future New Year's tree on the wall. Apply decorative tape. This material is good because it peels off without leaving marks on the wallpaper.
- Place an LED garland on top of the tape.
- The “branches” of the Christmas tree can be made of yarn or jute twine, securing them to the wall with the same decorative tape.
- Place the stars on the “Christmas tree” as you like. You can attach them with small pins, decorative clothespins or paper clips.
Craft cardboard decorations can be used as toys for the Christmas tree, interior decoration, or to decorate a gift. Cut out the silhouettes according to the diagram. Patterns can be applied to them:
- White gel pens or even a simple stationery proofreader. The uneven lines will give the finished crafts a country-style charm.
- Shiny acrylic paints in gold or silver color.
For the following crafts, we will also need corrugated cardboard. You can take brown (from boxes) and combine it with colored smooth and corrugated cardboard. Cut out paired silhouettes of toys - larger and smaller. Accessorize them with decor made from plastic buttons, straws, ribbons and hemp twine.
DIY rocket
A rocket made from a plastic bottle is more complicated than the one we offered for kindergarten crafts, and is more suitable for younger schoolchildren.
You will need:
- plastic bottle;
- cardboard;
- glue;
- scissors;
- foil;
- double sided tape;
- 2 toilet paper rolls/yogurt jars or something similar in shape.
To decorate the rocket: electrical tape in three colors: white, blue and red.
Progress:
- Cut off the bottom of the bottle.
- Cut a circle out of cardboard and build a “nose” for the rocket: cut a triangle out of the circle, fold it into a cone and secure it with glue.
- Wrap the body of the bottle, the cone and the bushings (or jars) with foil - the future jet engines of the rocket (see the master class at the link below).
- Attach the cone to the neck of the bottle.
- Use double-sided tape to secure the rocket parts together.
- Stick 3 strips of electrical tape of different colors on the rocket body in the form of a Russian flag.
- Cut out circles from cardboard - portholes. If you wish, you can paste on them pre-printed images of the first cosmonaut dogs Belka and Strelka.
- Attach the windows to the rocket using double-sided tape.
Origami for the Christmas tree
Origami is the ancient Japanese art of folding figures from a whole sheet of paper without using scissors. Since we will need a pentagon for the New Year's craft, scissors will still come in handy. Below is a detailed diagram of how to fold a piece of paper and get an elegant pendant that resembles a flower.
Origami is a simple art only at first glance. It takes practice to succeed. Therefore, before making origami from expensive colored sheets, it is worth practicing on a regular office one. Drafts will also do. Having understood the principle, feel free to start creating beautiful origami stars and snowflakes.
Origami star
You will need: 6 square sheets of double-sided black paper.
Master Class
- Take a square of paper and fold it diagonally to form a triangle.
- Rotate the workpiece 90 degrees and bend the top sides to class=”aligncenter” width=”720″ height=”701″[/img]
- Fold the bottom sides towards the center to create a diamond shape.
- Fold the bottom up to the right, then up to the left to form a cross.
- Bend the lower ponytail in half lengthwise, then move it to the right.
- Make 5 more modules in the same way.
- Assemble the modules together in a circle, forming a star.
The star using modular origami technique is ready! I recommend watching the video master class!
Paper Star Modular Origami Star
Illuminated star
The decor can also be luminous. To make such a decorative item you will need:
- Suspension cord with socket and light bulb or ready-made garland;
- Hard cardboard that holds its shape well;
- Durable glue;
- Self tightening cutting mat;
- Special tools for making holes (awl and hammer).
Step-by-step instructions on how to create a lamp:
- Cut out the template and bend the parts along the marked lines.
- Make holes.
- Connect the parts using a glue gun or Moment, dry thoroughly.
- Place a garland or insert a light bulb inside the workpiece. Never use an incandescent lamp to avoid fire. LED light bulbs consume little electricity and are absolutely safe.
- You can place a New Year themed picture on the front (optional).
Patterns on a decorative lamp can be:
- openwork;
- geometric;
- winter themed;
- zoological, etc.
Star of Bethlehem
made from A-4 paper (you need about 50 sheets, you can take colored)
Cut sheets of paper in half lengthwise, twist each half into “balls”, coat the edges with glue and roll tightly. Using a stapler, staple 3 “rays” in the form of a fan, and then string the fans onto a thread, pulling them tightly and tying the ends. You should get a star, shaped like a ball. If the paper is white, you can spray paint it.
Shiny Star
For the top of the festive tree, you can create a large shiny decoration from thick cardboard with your own hands. We will need:
- cardboard itself;
- glitter and glue for applying them;
- hot glue gun;
- double sided tape;
- shiny brush (chenille);
- thick and soft aluminum wire for fastening;
- tools and accessories: side cutters, winding stick, ruler, breadboard knife for cutting.
So, how to make a sparkly Christmas decoration.
- First we make the fastening. Wrap a wire 50-60 cm long around the stick, leaving a straight section of 7-8 cm. Remove.
- Using a stencil using a breadboard knife, cut out 2 symmetrical pieces from cardboard.
- Glue them together with double-sided tape, placing a fastening blank inside. To prevent the crown from losing its shape, you can additionally put a sheet inside, rolled into a ball.
- Apply glue (liquid or from a spray can), sprinkle with glitter. Shake off excess after drying.
- Apply a brush around the perimeter using a heat gun.
- Place trees on the tops of their heads.
Alternatively, the decoration can be decorated not entirely with sparkles. Individual parts can be left matte or painted with gold contours from tubes.
The star on the Christmas tree can be glued directly from shiny material. Or combine several types of material.
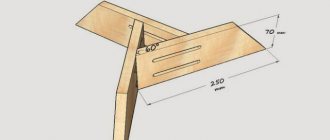
Spruce star
You will need: 5 wooden rulers, tape, fir branches, gloves, green wire, ribbon.
Master Class
- Make a star frame from 5 rulers and secure with tape.
- Prepare the spruce branches.
- Attach the fir branches to the rulers using green wire.
- Tie a ribbon bow and attach it to the star.
The spruce star is ready! I recommend watching this video!
DIY PAPER STAR WITHOUT GLUE | NEW YEAR'S DECORATION | TOY FOR CHRISTMAS TREE
Foil decorations
To create a star from foil, see the instructions and diagram for making pendants from threads and a cardboard silhouette (above in this article).
Wrap the cardboard outline with strips of shiny aluminum foil 2-3 cm wide. Additionally, you can attach beads, snowflakes, bows or other decorative elements with a glue gun.
Twine star
You will need: 10 wooden slats, wood glue, twine, glue gun.
Master Class
- Lay out a star from 10 slats.
- Glue the slats together to form a star frame.
- Leave to dry.
- Use a glue gun to secure the end of the twine to the rail.
- Wrap the star with twine and secure the tip with hot glue.
The twine star is ready! I recommend watching this video!
christmas ornaments\New Year's Star pendant made of twine/DIY Christmas tree toy
Foamiran toys
To make a Christmas tree pendant from foamiran, use a material with a shiny surface. The first way to create decor is from petal cones. To do this, cut out 6 identical circles. You can fasten the parts with a regular stapler. Then use a hot glue gun to glue the cones into a star shape. The joints can be disguised with beads, patterns applied with paints, and ribbons.
You can make openwork decorations from strips of foamiran and hang them not only on the Christmas tree, but also on a window or in a doorway.
The easiest way to decorate the top of a tree is by cutting out 4 identical parts of a star from foamiran and gluing them in pairs.
Original star top
A very beautiful Christmas tree decoration will be made from completely ordinary materials that can always be found at hand. Such a top star will look very original on the evergreen beauty and create a festive New Year's mood. And the process of making it is quite simple and will not take too much time.
Materials required for manufacturing:
- cardboard from the box;
- wire;
- special tool pliers;
- comfortable scissors;
- scotch;
- dry glitter;
- bright tinsel;
- Polish for hair.
Let's get to work
You need to cut out two identical five-pointed stars from cardboard. Bend them so that they are voluminous. Glue them together with tape, after putting pieces of fabric, crumpled paper, and cotton wool inside to give more volume. In order to subsequently put the finished product on the top of the Christmas tree, a spiral of wire must be placed inside the star. To prepare such a spiral, you need to take the wire and wrap it tightly around a stick. The excess piece of wire must be cut off. It is best to create the product when the Christmas tree has already been installed, and you can more accurately compare the actual dimensions of the spiral and the star itself.
Lubricate the voluminous star generously with glue and carefully sprinkle it with glitter so that the cardboard underneath is not visible. Allow the product to dry thoroughly. Later, use hairspray to cover the top with glitter so that it does not fall apart. The edges of the star can be decorated with elegant tinsel. The top star is ready, all that remains is to put it on the Christmas tree.
Stylish decor made from matches
You can create an incredibly stylish and original piece of furniture with your own hands from matches. Please note that this work is not quick. However, the result will be stunning.
How to make a Christmas tree craft from matches.
- Prepare a cardboard template.
- Matches will need to be fired, without sulfur heads. You can vary the degree of firing and play with the color of the finished work.
- Lay out a pattern of matches on a cardboard base, fixing them with PVA glue.
- Dry the product for 24 hours at room temperature.
Interesting ideas for tops
For those who do not want to decorate the top of the fir tree with a star, there are many other options, you just need to use your imagination. It will be especially original if you make jewelry with your own hands.
Some interesting ideas include the following:
- A large bow on the top of the tree, which can be made of thick shiny fabric, will look original.
- From bright multi-colored wide ribbons you can build something like lush butterfly wings, connected together in the middle. The result will be something like a bow, but very lush and brightly colored. Nowadays it is fashionable to combine gold and red.
- A special top decoration can be various items: a festively decorated hat, a shiny crown, a bunch of artificial fruits.
- An LED topper for your Christmas tree will look great.
- Figurines of angels, a snowman or a large plastic snowflake in sparkles are suitable to complete the top of the spruce tree.
- A bouquet of fir cones will look great on top. They can be varnished and sprinkled with glitter or small foam balls to imitate snow.
Felt toy
There can be an infinite number of felt Christmas tree decorations. Today we invite you to sew New Year's stars and asterisks. The preparation is standard: for decoration you need two paired parts. They can be sewn with an over-the-edge stitch using matching or contrasting threads. Try to keep the stitches uniform and small. This way the edge will be smooth and neat.
You can create an original eight-pointed felt decoration using the following idea. From white or milky felt, sew 8 identical triangular rays according to the pattern. Connect them symmetrically to create a double-sided decoration. Take silver or lurex threads.
Supplements to felt include:
- scraps of contrasting or complementary fabric;
- ribbons, braid, ropes, lace;
- buttons, beads, sequins, sequins, beads;
- burlap or canvas.
Salt painting
Simple table salt is an unusual material for painting. You can offer this craft to both kids and primary schoolchildren.
You will need:
- cardboard;
- paints;
- sponge;
- pin;
- PVA glue;
- pipette;
- colored water;
- salt.
Progress:
- Use a sponge to paint a sheet of cardboard to your liking.
- Make splashes - constellations (using a brush or toothbrush).
- Use PVA glue to draw the outline of future cosmic figures (planets, rockets, etc.) and fill them inside with glue.
- Sprinkle the picture with salt. Let the glue dry.
- Shake off excess salt from the painting.
- Pour water into several glasses, paint it in each container a different color.
- Use a pipette to collect colorful water and use it to paint the shapes made of salt. Let dry.
More details in the video:
Stars using quilling technique
Using the quilling technique with your own hands, you can make not only postcards or decorative panels for interior decoration, but also individual exquisite non-standard pendant crafts.
In this case, strips of paper should be preferred in light shades:
- white;
- pastel;
- silver;
- mother-of-pearl.
Twist the parts in the shape of droplets, petals, ovals, triangles. The more details you use, the more complex and sophisticated the pattern will be.
Connect the parts as usual with PVA glue. Be sure to dry thoroughly before hanging.
Materials for 3d stars
- Thin cardboard. You can use cardboard from a box of cookies, candies, muesli, etc. A cardboard folder for papers will also work.
- Aluminum foil , which we usually use for cooking.
- Pencil, scissors, hot glue gun. You can also use regular glue. but then you need to choose something from the quick-setting ones (for example, Moment Crystal, etc.).
- Star template. You can find it on the Internet, or you can try to draw a neat five-pointed star yourself. By the way, there are many lessons on drawing stars on the Internet. One note: the size of the star template is always slightly larger than the finished star, since the blank will bend along the lines, acquiring 3D contours.
How to make the star stick?
To decorate from cardboard or paper, you can attach it with wire, twisting it like a spring. You can wrap the material around a pencil. One end is inserted inside the star. The other is placed on the top branch of the tree.
If the craft is massive and heavy, you can use the following as a base:
- a piece of polypropylene water pipe;
- cut neck from a plastic bottle.
The tube is inserted inside the product and glued using hot glue or Moment. Don't forget to paint the base the color of the crown.
Christmas star
You will need: wire hanger, pliers, foil, beads, scissors, glue.
Master Class
- Form a star frame from a hanger using pliers.
- Cut the foil into strips and twist them into ropes.
- Twist the flagellum into a spiral and wrap it around the star. Thus, fill the entire surface of the star with foil.
- Glue beads as decoration.
The Christmas star is ready!
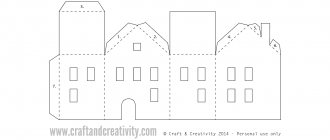
Templates and diagrams for making stars
Below are several patterns and templates for creating luxurious New Year's stars. They are free to download, print, cut and use as you wish. Please note that some toys on the pattern have flaps for connection and some do not.
Tags
volumetric New Year's star foil with foil simple from foil and foil with your own Foil and foil with your own hands with your own hands with your own hands with your own hands with your own hands with your own hands Dictionary of handicrafts with your own hands Cardboard Furniture with your own hands Shoes with your own hands Clothes with your own hands Candles with your own hands Bags with your own hands Packaging with your own hands Share your option freely access.Do-it-yourself jewelryDo-it-yourself furniture
decorarticlestoyscommentssummerhousesplasticinewewillgiftscreatesitesimilarallviewreplycontent
Various photo ideas
In conclusion, we would like to present a small selection of ideas for inspiration. Surely some option will push you to create your own creativity for making a star for the Christmas tree. Create New Year's beauty for yourself, your loved ones and friends. Happy New Year!
New Year's star
As they say, or, more precisely, it is sung: “The New Year is rushing towards us, everything will happen soon.” What will happen? New happiness, new joy, new luck. And I really want to believe that all miracles will come true. For this purpose, we decorate the Christmas tree, and observe signs, and make wishes, and do not skimp on wishes for each other. But so that Santa Claus does not get lost, so that the New Year comes to our house, as our grandmother told us, we need to attach a star to the tree, at the very top, which will show the way to our dear guests. This, it turns out, is what the New Year's star
.
These beautiful stars are made from construction paper and printed from a free template. Shall we make these together?
How to decorate the top of the Christmas tree?
The most popular decoration that crowns the top of a tree is rightfully considered a star. It makes the Christmas tree elegant, stylish and solemn. Despite the rich assortment of stars in stores, there are many ways to make the main decoration for the Christmas tree yourself, in the right color and with exactly the decor that ideally matches the overall style of the room.
On a note! Any homemade design can be decorated with LED strips, garlands and cords, or supplemented with glowing balls.
It is not at all necessary to place a star on the top - it can be a completely different New Year’s decoration:
- large white or blue snowflake;
- a huge ball painted in bright colors;
- Christmas angel;
- decorative knitted hat with scarf;
- a large candy (if the tree is decorated with edible decorations);
- a toy is a symbol of the year, a zodiac sign;
- decor made of fabric, felt, ribbons;
- bow made of satin or nylon fabric;
- watches in gold or silver color.
Decoration for the top of the Christmas tree