Decorating various holidays, meetings and events with luminous elements has become fashionable for a long time. One of the most spectacular and attractive decorations is multi-colored or transparent glowing balls with LED backlighting. They can be purchased in specialized stores, but it is much easier to make them yourself. The process is not particularly difficult and does not require special preparation. Before you make a luminous ball, you should stock up on the necessary materials, tools, and also study the manufacturing steps.
Making glowing balloons with LEDs
So, this whole structure, that is, an illuminated balloon, consists of several elements.
Of course, this is the ball itself first and foremost. Next, an LED (usually 3-volt) and a battery, which will power this LED. LEDs can be of different voltages. It is best to buy 3-volt LEDs, and pick up the same battery for them, that is, 3-volt. A CR 2032 battery is well suited for this. This is a flat battery, in the form of a small tablet. This is on the motherboard in computers. In addition to these three components, we also need adhesive tape. With its help we will attach the LED to the battery. As for LEDs, there are many different colors on sale today. It is best to take white LEDs. They can be placed in balloons of any color. If you take an LED of a different color (for example, green) and stuff it into a colored ball (for example, red), then the color of the ball when the LED is turned on will be an unspecified color. But here you can experiment and take any combination of colors of LEDs and balloons.
How to do it?
Now the “most complicated” process of assembling such balloons with LEDs. To assemble the luminous element itself, the LED legs are simply placed on opposite sides of the battery. Usually, the LED lights up immediately. Don't be afraid, you won't get shocked during this operation! But it may not catch fire.
If it doesn’t light up, then simply turn the battery over, that is, change the polarity. The LED should now be lit. To prevent the LED legs from moving away from the battery, glue them to the battery with tape. That's all, our luminous element is ready.
Next, we push this assembled luminous element inside the balloon and inflate it. What to cheat with is up to you. If, in the old fashioned way, that is, with the help of your lungs, then such luminous balls, of course, will not fly. But if you inflate them with some kind of volatile gas (helium, for example), the balls will easily take off. Even an LED with a battery inside cannot hold them, because this entire luminous element assembled is not that heavy. You can make as many of these glowing balloons as you need. It all depends on how many LEDs, batteries and the balls themselves you currently have.
Of course, such a ball cannot glow forever. Here, it all depends on the type of LEDs themselves and the battery. But, usually, such LED balls glow from 24 to 48 hours. The more time passes, the less bright the glow becomes. After all, the battery is gradually draining. I think this time of glow of the balls is quite enough for any holiday.
When the balls go out, you should not throw them away with all their contents. The batteries will, of course, completely run out and you won’t be able to use them anymore. But the LEDs themselves, when replacing the battery, will still glow. Therefore, we take them out of the balls, put them away for storage, and wait for the next holiday to come. There they will be useful to us again.
If I didn’t explain something clearly, then after watching this video, I’m sure you’ll understand everything. The whole procedure of making such an LED glowing balloon is shown here very well. Let's see.
For those who like to do everything themselves
How to make a gel ball at home? For fun, you can use several fairly simple methods and get a similar result: take ordinary balls and fill them with volatile gas. To do this, you can use hydrogen or take a special container for gel balls.
If you need to prepare and blow a small number of colored bubbles, you can use the following “innovative” ideas:
- use the reaction of copper sulfate with table salt;
- obtain gas from the combination of soda and acetic acid.
When you plan to make jewelry from a large number of elements, it is better to use a container for gel balls.
Assembling a firefly bear: main steps
The main parts for assembling the figure are ready, but that's not all. The way the teddy bear was designed, it should have rounded ears.
To make the ears, take a spool of tape and wrap it in cling film.
Place the reel on its edge and place gauze soaked in a water-adhesive solution on top. A couple of layers are enough, as long as they keep their shape when dry. When all this is dry, remove the bobbin base and trim off the excess edges of the gauze.
If everything is done correctly, then you should have two such blanks. These are ears
Then everything is very simple: you need to assemble the figure. Use a glue gun for this purpose. Two large balls are glued to one another. After this, add smaller balls: two below and two between the large balls.
On the top large ball, which is the head of the bear, glue semicircular ears
Inserting LEDs into balls
If you are lucky and you bought large balls, then the LED can easily get inside. If the ball is small, then you need to carefully push it deep into the ball.
Important!
Better take big balls. You can also stretch the ball and put LEDs inside. It will be much faster. In addition, by stretching the ball, you additionally test its strength. And if there are holes in it, then it will break.
4
DIY LED ball
Step Three: Assembling the Hemisphere Assemble the hemisphere and place the metal ring inside. Next you need to solder the LEDs to the ring. The bottom ring houses eight LEDs. The technician first marked all the GND pins with a black marker. Place all LEDs so that GND is on the bottom and VCC is on top.
So you need to mount six rings.8 LEDs14 LEDs18 LEDs20 LEDs24 LEDs26 LEDs
Note that you only need one sixth ring for the entire sphere - this is the middle ring. The second hemisphere will have five rings. The WS2812b LED is an individually addressable RGB LED
Simply put, you only need one wire to light it up with any color of the rainbow. Unlike classic LEDs, in which the brightness of the LEDs is adjusted according to the amount of current flowing, the WS2812b receives constant power, and the light is controlled using a digital signal. The LED has four pins, two for power supply and two for controlling the LED (one DIN input of the signal wire, the second DOUT output to the next LED).
Step Four: Installing DIN and DOUT Now you also need to connect the other 2 LED wires - DIN and DOUT. DIN is located next to the GND pin, and DOUT is located next to the VCC pin. The master used 5 mm long wires to connect
This is also very important to do correctly. Make sure data wires do not touch ground or power rings
Be careful not to solder the data pins to the power rings.
Install one ring after another, starting with the lowest one. The upper and lower rings are connected using semicircular jumpers. Such jumpers will add strength to the structure.
After making the second hemisphere, the master performs testing. First, use a multimeter to check for a short circuit between the power wire and the ground wire. Then he solders two short wires to each of the ground and power hemispheres. Connect the power wires to the 3.3V pin of the ESP32 board and ground.
As a result, all LEDs are connected to one long circuit. Next you need a smaller ring (5 pieces) and connect its DIN to the IO21 pin of the ESP32 board, DOUT to the DIN of the second hemisphere. Next you need to turn on the ESP32 board and download the code.
If some of the LEDs do not light up, then the installation needs to be corrected.
Step five: installing the microcontroller and battery You need to unsolder the switch from the board and solder two wires in place of the contacts. There are 3 or 4 holes for screws in the corners of the board; the master tins them with solder.
Next, you need to place the board in the smaller hemisphere so that the USB and battery connector is directed outward from the sphere through the smallest ring. Solder a piece of wire between the corner and the bottom ring. Pulls two switch wires through the hole and solders the previously soldered switch onto them. The switch has a metal body, soldered to a small ring so that it can be accessed, but does not interfere with the ball's rolling. Be careful not to short the wires.
Next you need to take a piece of straight wire and solder it to the 3.3V pin on the ESP32 board. Then solder the other end to the last (positive) ring of the sphere. The craftsman also reinforced the internal structure by soldering several pieces of wire between the ground rings and the GND pins of the board. Next, you need to connect the main DIN pin to the IO21 pin of the ESP32, connect the battery and check the operation of the device. If everything works, you can attach the battery with glue to the back of the ESP32 board.
Step Six: Final Assembly Now you need to ground and add a short wire between the mounting holes of the ESP32 board and the nearest GND pin of the board - this will provide grounding for the second hemisphere.
Next, solder the jumpers connecting the DOUT of the first hemisphere to the DIN of the second hemisphere. Cut the wires 2 mm long and solder them to the top ring of the second hemisphere.
Step seven: code Now you need to download the file. ino for the Arduino IDE project. The wizard uses the https://github.com/Makuna/NeoPixelBus library to control the LED "strip". It has a nice interface and animation support.
To be able to control the animation, he made a table of 11 rows and 26 columns. This way, you know exactly where the LEDs are located on the sphere, and you can light exactly the LED you need.
There are currently several animations:
vertical circlehorizontal circlevertical rainbowhorizontal rainbowrainbowrandom pattern
The master had to limit the brightness of the LEDs to approximately 20% of full power. There are 194 LEDs, and at full power they consume 10A.
Balls with light inside
In versions with backlighting, a standard inflatable ball is usually used, into which a capsule consisting of an LED and a battery is placed. Popular brands for this type are Lumi-Loons and iLLooms. But on AliExpress, of course, there is a huge selection of cheap analogues that are no worse in quality.
You can choose ready-made LED balls, where the LEDs are already attached inside the balls. Capsules are also sold separately, which can be placed in any balls you like.
Ready-made kits
In these balls, LEDs are usually attached to the upper inner part. To turn on the backlight, you usually need to pull a paper tab protruding from the base of the ball. Given the location of the capsule inside the balloon, when inflated with helium, they can tilt to the side.
On average, LEDs glow for up to 15 hours until the batteries run out. You can choose models with a static glow of a certain color, or you can choose ones with multi-colored shimmer. Keep in mind that the glow is not very bright because there is usually one small light source inside. Therefore, the greatest effect can be obtained by using such balls in the dark or in a darkened room.
They can be inflated either with air, using the mouth or a special pump, or with helium. The packages usually come with special measuring strips to help prevent the balloons from breaking when inflated.
Pros:
- Easy to inflate with air or helium.
- Long service life.
- Adequate cost.
Minuses:
- Not very bright.
- The LEDs may not light up immediately; you need to tap them to turn them on.
Capsules with valve
LED capsules can be purchased separately, but often kits also contain simple inflatable balls. The capsules are placed at the base of the ball, they have a valve through which air enters.
It will no longer be possible to inflate the balloon with your mouth. You will need a helium tank if you want flying balls, or a special pump. Supposedly you can use a regular car pump, but this method does not always work.
You can activate the backlight here by pressing a special button through the ball both before and after inflation. Unlike the first option, here you can choose three modes: always on, slow or fast flickering.
The stated backlight operating time is 8 hours. Unlike one-piece kits, a balloon inflated with helium will not tilt to its side. Another advantage is that you can choose a white ball and multi-colored backlight, or you can choose a colored ball and white backlight. It all depends on your preferences.
Pros:
- 3 different backlight modes.
- Well compatible with helium.
Minuses:
- Difficult to inflate; you either need a helium tank with the correct nozzle or an electric inflator.
- Short service life.
Simple flashlights
These are small, lightweight, battery-powered LED lights that you turn on and then insert into your latex balloon. They come in white, red, green, blue and purple and glow for about 8 hours.
They are often used not only in latex balloons, but also in paper lanterns, flower arrangements and other decorative items.
Pros:
- Easy to use.
- Can be used for other decorations as well.
- Cheap.
Minuses:
- Short service life.
- Not very bright.
Let's start assembling
The most important and crucial moment remains - to connect all the elements into a single structure or place LEDs in balls. The easiest way to assemble an LED-battery device is, of course, to fit into large balls. But if the product is small, then everything should be done very carefully so as not to pierce the ball itself or interrupt the contact between the battery and the diode. Assembly proceeds according to the following scheme:
- we check the strength of the prefabricated device;
- stretch the hole in the ball and carefully push the LED with the battery inside. In addition to introducing the LED, stretching allows you to test the strength of the product. If there is a defect or hole in it, it will definitely break at this stage;
after that we inflate the balloon. Here, to prevent eye injury if the product ruptures, be sure to wear safety glasses. You can inflate either with your mouth or with a balloon;
As you can see, it’s easy to make LED balls with your own hands. Just follow the instructions above and your holiday will be a success!
Decorating various holidays, meetings and events with luminous elements has become fashionable for a long time. One of the most spectacular and attractive decorations is multi-colored or transparent glowing balls with LED backlighting. They can be purchased in specialized stores, but it is much easier to make them yourself. The process is not particularly difficult and does not require special preparation. Before you make a luminous ball, you should stock up on the necessary materials, tools, and also study the manufacturing steps.
Method for creating magic balls
To begin, gather all the necessary materials. You don’t need anything fancy; all the ingredients can be found at your nearest store, even a grocery store. To create a confetti ball you will need the required amount of inflatable balloons, confetti, a funnel or tube, scissors, and ribbon. Now let's prepare the work area. Confetti can easily fly around the room. Therefore, cover your work area with newspapers, a napkin or paper so that all the necessary materials are in place. Once the balls are ready, all you need to do is roll up the newspaper or paper and throw away the excess. This is convenient at least because after finishing work you don’t have to bother with cleaning and collecting confetti all over the room for another half hour.
Assembly steps
Option 1. Assembling the LED toy takes only a few minutes and even a child can do it.
Main assembly steps:
- Connect the battery and LED. To do this, go to the handle: insert AA batteries, turn on and check the operation of the LED cord. Next, we extend the LED through the stick. We fix the stick itself to the handle.
- We insert LEDs into the balls. Most of the LED cord should come out from the ball holder side. Then you need to securely fasten the ball to the holder - there is a special hook on the side for this. Stretch the tape around the entire circumference, 2 times crosswise. Attach the remaining tip to a convenient place in the holder.
- We inflate the balloons. To begin with, the balloon must be stretched well in all directions in order to inflate better. After this, connect the pump, inflate and fill with air. Tie the neck tightly in a knot.
It turns out an LED ball. Size depends on model.
Option 2. Assembly steps:
- Connect the battery and LED. To do this, you need to insert the battery between the antennae of the LEDs, choosing the position for better contact. Take adhesive tape (insulating tape) and screw the LED tabs to the battery with it.
- We insert the LED with the battery into the ball.
- Inflating the balloon.
Carefully inflate the balloons using a pump and bandage
Note! If you want them to float under the ceiling, you need to fill them with helium. Option 3
Glowing ball of thread
Option 3. Glowing ball of thread.
The rubber ball from the previous method can be replaced with a thread ball. It looks very extravagant.
The work uses:
- latex balloons;
- PVA glue;
- LEDs;
- 3 Volt battery;
- iris threads;
- vegetable oil;
- gloves.
Manufacturing stages:
- Inflate the balloons and coat them with oil to make it easier to remove the threads in the future.
- Pour glue into a container and dip the threads into it. Wrap them around the balls. After complete drying, pierce the inside of the balls with a needle and take them out.
- Connect the battery to the LED following instructions #2. Insert the battery between the antennae of the LEDs, choosing the position for best contact. Take adhesive tape (insulating tape) and screw the LED tabs to the battery with it.
- Place this light source inside the ball of thread.
LED balls are an excellent decorative element; they can be used to decorate any event: parties, graduations, birthdays, or just to lift your spirits. And at night they create a special, fabulous atmosphere. Such a gift will delight not only a child, but also an adult. Glowing thread balls will add coziness to your home interior; they will look exclusive in the design of cafes and restaurants.
Decorating a birthday party with balloons In order for the holiday to be a success, it is not enough to serve delicious food and hold interesting competitions, since the main thing at the celebration is its atmosphere. Decorating a birthday party with balloons will transform any room and become a highlight of the event. Decorating a room with balloons Balloons are an affordable and inexpensive room decoration element for any celebration. Proper use of balloons when decorating a room allows you to create a festive atmosphere. How to decorate a children's party with balloons. Organizing a children's event is not as simple a task as it seems at first glance. Ideas for decorating a boy's birthday with balloons. We decorate a boy's birthday with balloons. Interesting ideas and compositions from balloons for decorating a room for a holiday Decorating a room for an anniversary with balloons - Original decoration of the room Current ideas for decorating an anniversary with balloons. We give examples of elements made from balloons, options for their use and placement in the hall for anniversary decoration. How to make a fountain out of balloons with your own hands. Let's look at several options and find out how to make a fountain out of balloons with your own hands. What is required for this? Step-by-step instruction
Decorating various holidays, meetings and events with luminous elements has become fashionable for a long time. One of the most spectacular and attractive decorations is multi-colored or transparent glowing balls with LED backlighting. They can be purchased in specialized stores, but it is much easier to make them yourself. The process is not particularly difficult and does not require special preparation. Before you make a luminous ball, you should stock up on the necessary materials, tools, and also study the manufacturing steps.
Possible options
The basis for production will be ordinary balloons, which will decorate the interior of wedding halls, bars, restaurants and other premises. You can use multi-colored or pure white samples; any option will look chic and attractive.
In addition, you can make light balls from threads with your own hands or use special transparent silicone “LED balls”. When inflated, you get an absolutely round transparent ball that harmonizes well with the lighting. To do this, you can use several options:
- a light stick, which is equipped with a battery and a chain of several LEDs;
- a conventional signal LED connected to a metal button battery;
- the stationary element of the internal combustion engine is fixed in the upper part of the luminous sphere.
Let's look at how to make one of the simplest and most attractive versions of ordinary inflatable light balls with fixed internal combustion engine elements.
Method No. 6 – based on pine extract
In this method we will use a minimum number of components. To get them, just visit a nearby pharmacy. To get liquid to fill sticks that will glow in the dark, you need to prepare:
- Aluminum container. You can use an aluminum tablespoon;
- Boric acid - cheap, available without a prescription;
- Coniferous concentrate - easily available in any pharmacy;
The cooking process is quite simple. In an aluminum container, mix boric acid with pine extract, add a small amount of water and put on low heat. The resulting liquid must be boiled until all the moisture has evaporated.
Bubbles that will form during the boiling process must be burst with a needle. When all the moisture has evaporated, you need to leave what’s left to cool. As soon as the resulting mixture has cooled, it must be mixed with water and very quickly poured into sticks. The sticks need to be screwed tightly so that no air gets in, otherwise all your work will go down the drain.
Inflating the balloons
When you inflate balloons, you must protect your eyes, because no matter how good the balloons are, there will definitely be holes in them. And when the ball bursts and the LED flies out, it can injure your eyes.
Important!
First rule of safety: Protect your eyesight by always using eye protection.
We put the ball on the gas cylinder. You need to inflate it until a small balloon appears. If you overinflate a balloon, deflate it a little because an overinflated balloon will pop on its own. We make a drop-shaped ball and tie it with a ribbon.
Balloons and bright lanterns are a common attribute of many holidays. Separately they are good, but together they are even better. Creating glowing balls will not take much effort or free time, but the result will exceed all expectations.
You will need: ordinary multi-colored balls, button batteries, LEDs, scissors, adhesive tape/duct tape, eye protection, a gas cylinder, and ribbons to tie the balls together.
Assembly steps
Option 1. Assembling the LED toy takes only a few minutes and even a child can do it.
Main assembly steps:
- Connect the battery and LED. To do this, go to the handle: insert AA batteries, turn on and check the operation of the LED cord. Next, we extend the LED through the stick. We fix the stick itself to the handle.
- We insert LEDs into the balls. Most of the LED cord should come out from the ball holder side. Then you need to securely fasten the ball to the holder - there is a special hook on the side for this. Stretch the tape around the entire circumference, 2 times crosswise. Attach the remaining tip to a convenient place in the holder.
- We inflate the balloons. To begin with, the balloon must be stretched well in all directions in order to inflate better. After this, connect the pump, inflate and fill with air. Tie the neck tightly in a knot.
It turns out an LED ball. Size depends on model.
Option 2. Assembly steps:
- Connect the battery and LED. To do this, you need to insert the battery between the antennae of the LEDs, choosing the position for better contact. Take adhesive tape (insulating tape) and screw the LED tabs to the battery with it.
- We insert the LED with the battery into the ball.
- Inflating the balloon.
Carefully inflate the balloons using a pump and bandage
Note! If you want them to float under the ceiling, you need to fill them with helium. Option 3
Glowing ball of thread
Option 3. Glowing ball of thread.
The rubber ball from the previous method can be replaced with a thread ball. It looks very extravagant.
The work uses:
- latex balloons;
- PVA glue;
- LEDs;
- 3 Volt battery;
- iris threads;
- vegetable oil;
- gloves.
- Inflate the balloons and coat them with oil to make it easier to remove the threads in the future.
- Pour glue into a container and dip the threads into it. Wrap them around the balls. After complete drying, pierce the inside of the balls with a needle and take them out.
- Connect the battery to the LED following instructions #2. Insert the battery between the antennae of the LEDs, choosing the position for best contact. Take adhesive tape (insulating tape) and screw the LED tabs to the battery with it.
- Place this light source inside the ball of thread.
LED balls are an excellent decorative element; they can be used to decorate any event: parties, graduations, birthdays, or just to lift your spirits. And at night they create a special, fabulous atmosphere. Such a gift will delight not only a child, but also an adult. Glowing thread balls will add coziness to your home interior; they will look exclusive in the design of cafes and restaurants.
Order delivery of helium balloons in Moscow on the website
Assembling the pen
Pass the LED filament through the hollow tube and fix the stick on the handle.
Please note that the original length of the tube, if it is too long (70cm), can be shortened. This is done with ordinary scissors.
On a shortened stick, the ball looks much more aesthetically pleasing and beautiful! And due to this, it will be possible to make more turns of the LED garland around the bubble.
This is done with ordinary scissors. On a shortened stick, the ball looks much more aesthetically pleasing and beautiful! And due to this, it will be possible to make more turns of the LED garland around the bubble.
The tube should fit into the seat of the handle quite tightly, not twist or dangle.
If this is not the case, wrap up a couple of layers of electrical tape or tape.
Insert a funnel-shaped plastic nozzle on top of the tube. From the side of the ball holder, the garland cord should come out like this.
It must not go under the lower edge of the rim, in a triangle.
Next, we attach the garland to the ball.
How to properly inflate and tie a glowing balloon
Let's start with the ball itself.
Mistake #1 Never try to inflate it in its “factory” state, as they say out of the box.
First you need to stretch it thoroughly with your hands. Feel free to apply some effort, it is very elastic.
First stretch from the center to the edges. And then the edges themselves.
Moreover, you need to stretch on both sides. They pulled it in a circle on one side, turned it over, and pulled it on the other.
The better you stretch it in the “cold” state, the smoother it will inflate.
To make stretching easier, you can use a simple life hack. Take a regular hair dryer and warm the shell with warm air for 20-30 seconds.
Mistake #2 The main thing is not to overdo it and not to overheat! Otherwise, the walls of the ball will stick together.
After such heating, the ball stretches in all directions without any problems. Its shell becomes soft and pliable.
The most popular models have a diameter of about 20 cm, and eventually inflate to twice the size (40-45 cm).
By the way, you can add multi-colored confetti to the inside of the hollow sphere before inflating. To do this, cut off the neck of a plastic bottle in the form of a funnel.
Insert it into the nose of the balloon and pour confetti there. Push the confetti with your finger and blow in with all your might.
After all the preparatory work, insert a tube or hose from a hand pump into the ball and begin pumping air.
Mistake #3 Do not try to inflate the sphere with your mouth.
You will succeed only if you know how to inflate a heating pad in the same way
After forming the estimated diameter (40-45cm), pull out the pump, pull the spout towards you as much as possible, twist it and tie a knot, like on a regular balloon.
In order to ensure that the inflated bubble does not deflate at all for several days, some advise additionally tightening the spout with a regular rubber band for money or a ShDM ball.
These are used to make all sorts of funny little animals and crafts. Just use it as a rubber rope to secure it.
Stretching and then narrowing, it tightly tightens the inlet. The ball itself is ready.
Error No. 4 Do not further assemble the entire structure until you check the functionality of the garland.
Insert AA batteries into the unit and turn on the LEDs.
If everything is lit and glowing, you can proceed to assembling the handle.
How to wind a garland correctly?
There is a seam on the surface of the ball. The very first turn should go exactly along it.
This allows the thread to be perfectly centered.
To do this, first make two turns around the lower tail of the ball, and then go up along the seam.
Walk around the entire sphere, after which you twist the garland around the tail twice more. The second turn is made crosswise.
Moreover, it is better not to just lay one thread on top of the other, but to overlap between them at the top of the head.
That is, place the second turn under the first and make a revolution. After that, go downstairs again and tie the garland around the ponytail again.
The tip of the garland becomes very prickly in the cold and can accidentally pierce the ball.
It needs to be hidden inside a hollow tube.
You cannot leave it on the surface of the sphere.
Also be careful when walking with an already inflated balloon along paths with low trees. An accidental snag on branches ends in a puncture.
The ball is quite strong compared to a rubber one, no one can argue with that.
But he doesn't like sharp objects.
Preparing for work
First of all, you need to connect the LEDs to the batteries. If these are ordinary metal “tablets” at 3V, no problems will arise. The main thing is to observe the polarity of the connection. If you make a mistake, nothing bad will happen, but the LED element will not glow. A standard signal-type LED has an anode with a longer lead and a cathode (minus) with a short lead. For a battery, the minus is the entire surface of the battery, and the plus is a small circle at the bottom. With any battery, the positive contact is always smaller than the negative one. This is useful to know if you have to use a different type of power source.
In addition, it is important to correctly match the color of the ball and the LED. If you insert a green element into a ball of the same color, the effect will be weak
A red LED in yellow, red or orange balls looks good. White elements are suitable for any occasion. Their glow is quite distinct not only in the dark, but also in low light conditions.
Necessary materials
To assemble the glowing ball you will need:
- conditional alarm LEDs;
- 3 V metal batteries (similar elements are found in computers);
- tape for fixing the lighting inside the ball;
- scissors, thread.
- inflatable rubber ball, one or more parts;
For convenience, you can use plastic tubes, which are used as rigid rods for support. If you want glowing balloons to float in the air, they are inflated with helium. In this case, cope with ordinary strong threads or thin twine.
How to make an ice ball with fresh flowers ideas, instructions, photos
A very unusual and cute option is to make balloons with flowers and various decorative elements inside. To do this, place a small flower bud inside the ball, then fill it with water. Please note that when filling the ball with water, a flower or any decorative element will rise up. Therefore, the composition will turn out mainly from above. It is best to use small flowers. The ideal option would be rose buds. Try to use flowers without thorns or sharp tips so as not to puncture the ball when filling it with water.
After this, the ball is tied in the standard way. Often, instead of flowers, use thuja twigs, rowan seeds and citrus slices. Such compositions look very impressive and unusual. Ice balls with flowers and various decor are used not only to decorate the area near the house. This is a great option to decorate the New Year's table. Place these balls in several places on the New Year's table.
ice ball with fresh flowers
ice ball with fresh flowers
What is the best way to use the balls?
There are a lot of options, the most important thing is that the balls match the style of the room and look appropriate.
To make your decoration really look decent and attract attention, use the following tips.
Hang balloons on furniture.
Pay special attention to window sills, floor lamps, chairs and so on. Helium balloons can also beautifully decorate the ceiling.
For example, you can release a bunch of balloons in the corners of the room before a party, and it will look very impressive. Tie helium balloons pre-filled with LEDs. Hook them onto door handles or tie some weight to them and place the balloons around the perimeter of the room as decoration.
- If you are decorating for a more formal party, the balloons can be placed on tables. You can attach several balls in the corners without any problems. Most often, balloons are attached to the edges or corners of tables to add a special touch to the party.
- You can make any composition out of balls, combining a variety of colors and shapes.
You can also play games with balloons. The most popular of them is “Stay away.” The players must do everything to prevent the ball from touching the floor, so they take turns hitting the ball into the air. Of course, you can use a regular ball, but playing with balls is much easier. Especially when they are so beautiful. From the outside, the game will look more complex and visually attractive. Give free rein to your imagination, and every guest will remember your holiday for a long time.
Confetti balloons will be a great decoration for parties and various celebrations. Of course, most often ordinary balloons are used in decoration, but the room will look much more impressive if the balloons are filled with confetti. Colorful decorative elements will be an excellent option for decorating for any holiday, and they can also become an excellent photo zone for guests. Balls can be collected into large compositions, made into arches and various shapes. This method can be considered the most effective and at the same time inexpensive and simple.
Method two: salt and copper sulfate
How to make a gel ball at home? This option requires good preliminary preparation. You will definitely need the following substances and items:
- a little copper sulfate;
- regular table salt;
- water;
- liter plastic bottle;
- a piece of thick aluminum wire;
- hose;
- disposable syringe.
You need to make two holes in the plastic bottle cap. One end of the prepared hose is inserted into one, and a syringe with an aluminum rod attached to it is inserted into the other (small). Use a wire to stir the mixture inside the bottle. Balls will be attached and secured to the second end of the hose. Place a little copper sulfate, salt and water in a plastic container. After all substances are completely dissolved, the bottle is tightly screwed on with a lid. The aluminum rod should sink into the blue water.
The reaction that begins occurs with a strong increase in temperature and usually causes the container to become very hot, so it is better to place the eggplant in a basin or bowl of water. The released gas will very quickly inflate colorful balloons, lifting the spirits of the participants in the action.
Balloons are perhaps the most common decoration used to decorate banquet halls and apartments for the holidays. Meanwhile, luminous inflatable balloons began to be used relatively recently.
Children will especially appreciate this type of decor. Multi-colored glowing balls look really magical and attractive. If they are also filled with helium, they will be located near the ceiling, creating a fabulous effect.
If you decide to decorate the room yourself using flying glowing balls, it is recommended to acquire the following:
- helium balloon;
- button batteries CR2032 (3 V);
- bright LEDs (white light);
- tape or tape.
There is nothing difficult in creating glowing balls. The only thing that complicates the process is the time spent on it. However, if the balls are being created, for example, to decorate a wedding celebration, children can be involved in creating the glowing balls.
Creation method – simplicity and speed
First you need to make sure that the ball is not defective. With one breath, fill the ball with your lungs, pinch it with your fingers and make sure that it has no holes and holds air without any problems.
However, the air that is in the lungs is warm. This may cause condensation (water droplets) to form inside the ball. It is not good. For this reason, it is better to use a special pump to inflate the balloons.
Carefully wrap the battery and covers with electrical tape or tape. This will ensure a constant glow, as well as protect the ball from punctures by sharp covers (contacts) of the LED from the inside.
After the luminous element is placed inside the ball, you just need to fill it with helium from a balloon and tie it tightly so that the gas does not escape from it. As you can see, even a child can cope with such a task.
Balloons can be considered the most striking and sought-after decoration for any holiday; preparing them for a celebration is very simple, and modern advances in the field of decoration have made them indispensable elements for decoration. The ability to fill balloons with light gas - helium - allows you to create flying elements that have a special attractive force and do not leave anyone indifferent.
How to make a jar of glycerin correctly
We will assume that you have prepared everything on the list above. You can start crafting. It is very important how correctly and thoroughly you wash the jar and the figures that are located inside, otherwise bacteria will grow in the water and make the water cloudy and dirty. For this, soda and boiling water are used.
We have everything prepared, let's start attaching the figure. To do this, generously lubricate the back side of the lid with glue and place the chosen fairy-tale character on it. To quickly set the glue, lightly press the figure onto the lid and hold the pressure for a minute or two.
It’s good if your figurine has a large base for attaching to the lid. If not, then you can place several pebbles nearby and increase the area of contact, for example, with a Christmas tree with a narrow trunk. You can kind of clamp the Christmas tree with these pebbles so that it holds better.
Place the main character of the composition strictly in the center of the lid so that he can easily fit into the neck of the prepared jar. After finishing working with glue and pressing down, let the glue dry completely, do not rush to close the jar.
Now let's prepare the contents of the composition in a jar. Fill it three-quarters with distilled water, add three teaspoons of pharmaceutical glycerin. It is glycerin that creates the viscosity of the liquid in the jar and allows the snowflakes that we will now place there to slowly circle and then settle to the bottom.
Snow can be made from glitter (sold in the store), finely chopped tinsel, and foam balls.
A sense of proportion is important here. If there is a lot of snow, your central figure in the composition will not be visible through its thickness
It is better to choose glitter to match the color of real snow, that is, silver. Colored sparkles are also possible. New Year is a fairy tale, and all sorts of miracles and transformations happen there! Foam balls can also be painted using paints and a brush at your discretion.
At the next stage, when we add “snow” sparkles to the jar, they must be carefully mixed with a clean spoon. Then we close the jar with our palm, slowly, tip it back and forth several times to see which sparkles have not settled to the bottom. Such pieces must be caught and removed, as they will always float on top and spoil the entire appearance of the gift.
While we were preparing the composition of the liquid for the jar, pouring artificial snow, the figure on the lid should have dried well from the glue. Screw the lid on slowly, tip the jar over, and remove any droplets from the lid. To ensure a complete fit to the neck, you can use glue, which we recommend spreading along the inner edge of the lid using a pipette or sewing needle.
We can say that our New Year's gift is ready! However, if desired, someone will want to decorate the lid as well. This is mainly done to hide the border between the jar and the lid. Here your imagination gets complete freedom! We will only offer you a choice of several design options: using adhesive tape; regular ribbon that is tied into a bow; cardboard tape to which you glue the twine, tightly placing its turns around the lid and neck.
The main thing in this case is not to lose taste and not to overdo it with the design. Remember, you should not distract the main attention from the contents of the jar - the figurine and the snow falling on it.
Types of wire
The question of why it is worth choosing the wire for a craft and what kind of wire deserves special attention. Initially, figured decorations for street decor were made from thin reinforcement by welding. For urban compositions, a similar method is still used. After all, this design is wear-resistant and therefore durable. The main thing is not to forget to tint the figure with paint so that the product does not rust.
However, it is more accessible for the average person to acquire wire, which has a number of advantages:
- it can be easily deformed manually or using pliers;
- will ensure the stability of the structure;
- guarantees durability;
- has aesthetic appeal.
In addition to thickness, wire can be made of various metals:
- steel is the hardest and most wear-resistant alloy;
- aluminum is considered the most malleable and easy to work with;
- copper has an attractive golden hue.
Wire with a smaller cross-section is often available in enamelled, galvanized and plastic-coated versions. If the base of the frame is made of coarser rods, then the winding can be made of thin wire with a decorative color design. In this case, you will not need to use additional paints and varnishes.
My secret
- How to Make a Glow in the Dark Table Using Photoluminescent Resin To illuminate the table, you use photoluminescent (glow) powder mixed with resin. For illumination, they fill in the recesses in the board that were formed naturally. In partial or complete darkness, the table emits blue light in cool shades, having previously been charged with sunlight, of course. Materials:
By
Festive lighting of a country house, streets ★ New Year's, holiday or themed interactive lighting, lighting design, illumination of building facades has turned into a kind of art - it has become possible to create programmable original lighting compositions, distinguish a building from the rest, advantageously emphasize individual architectural elements, give the facade an extraordinary appearance appearance LED light decorations allow you to create a truly festive atmosphere!
Decorating a kindergarten with ice balls: ideas, tips, photos
Ice balls are often used to decorate areas near kindergartens. Get the kids involved in making ice balls. To do this, give the children a balloon and show them how to put the balloon on the water tap. Tell me the volume of water that needs to be poured into the ball. Help the children tie the balloons and put them in the freezer or take them outside if it is very cold. Once the balloons are frozen, take the kids outside and decorate the area where you usually play.
You can make a Christmas tree out of green balls or make a kind of rim in the sandbox. You can line the entrance to the kindergarten with ice balls on both sides of the steps that parents climb to pick up their children.
Decor with ice balls Decor with ice balls Decor with ice balls
Ice balls are an excellent option for decorating the area of a private home, as well as a way to decorate your New Year's table. Ice balls are often used to decorate the New Year's table and serve it. The balls are placed on a plate and candles are lit around them. This composition looks quite impressive and beautiful.
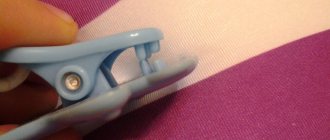
How to tie a ball to a stick?
The ball itself is attached to a stick by tying the tail to a funnel-shaped nozzle. How to do this correctly so that the sphere does not constantly move to its side and is exactly in the center?
To begin, turn the hook attachment towards your face.
Pass the tail into the triangle to your left. Wrap it once around the back of the triangle and pull it towards you.
The ball will stand up like this. It’s a little crooked so far, right?
To center the base, pass the tail through the hook and then insert it into the space between the back bar and the tail.
Then pull it out towards you.
Once the ball is centered, secure the tail with one more turn on the hook.
Wrap the remaining end with transparent tape.