For any child, the loss of a pacifier can be a huge shock, which is why caring parents purchase a high-quality pacifier in specialized stores. But the fittings used in the product do not always meet hypoallergenic standards, and the fixation of small parts may not be reliable enough. That is why it is better to make a pacifier holder with your own hands. Various master classes will help you get a truly reliable and durable device. The main thing is to choose high-quality consumables.
Variety of models
Today, not only the baby’s parents, but also a caring brother or sister can make a high-quality pacifier holder with their own hands, since there is nothing complicated in this task. But before you begin the most important stage, you need to decide what accessories there are for pacifiers:
- Stationary suspension. This option is convenient because the product will always be at hand. The device allows you to discipline the baby, since many children even after two years indulge in nipples. At this age, the child is able to remember exactly where his favorite pacifier is located, so that after use he can hang it back in place (when he needs to eat or take water procedures). To make a stationary pendant, use a wide tape, with Velcro attached to one edge and a small ring to the other. You can make such a pacifier holder with your own hands in just a few minutes. The finished pendant is attached to a crib, bedspread, or clothing.
- Pin. This is the most popular type of holders. The pacifier is always at hand, regardless of where you are (in the house, on the street, in a clinic or at a party).
Universal die holder
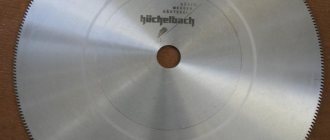
A universal die holder will help you make a threaded connection even at home
This device can be used not only to hold lugs of different diameters, but also to tighten nuts of any size.
This is what the tool itself looks like
To make a universal die holder we need:
- Tie Rod;
- steering tip;
- piston pin;
- bushing or nut;
- bicycle chain;
- two M12 nuts.
1. First you need to remove the part of the rod that is screwed into the steering rack
2. We put the piston pin on the rod
3. After the finger, we put on a metal sleeve of a suitable diameter or lock it with a nut, which we fix with a welding point
4. We cut off the excess part of the steering tip with a grinder
5. We weld two M12 nuts to the steering end
6. Screw the end onto the rod
7. We push a piece of chain through the nuts and weld it to the piston pin
And we fasten the die in such a way that it rests with a groove on the corner of the tip, so it will not rotate
Now you can cut threads of any diameter
We recommend watching a useful video: about a homemade die holder
Source
Common materials
You can make a pacifier holder with your own hands from available beads, pieces of fabric, and threads. But caring parents most often choose the following materials:
- Polymer clay.
- Felt.
- Wooden and plastic beads.
- Volumetric knitted elements.
- Beads.
The main task of any parent is to come up with a truly original design in the form of small keychains, toys, binding beads, ribbons and other elements. In this case, you can show all your imagination. It is worth noting that if you purchase several silicone beads in advance and add them to the holder, the fashion accessory can also be used as a teether. Even the simplest model can always be diversified, making it more interesting.
DIY personalized pacifier holder
Today there are many baby accessories on the market, including pacifier holders. But something made with one’s own hands, and also personalized, certainly wins over mass-produced products. After all, the craftswoman mother will choose only safe and high-quality materials, carefully assemble the parts, and most importantly, she will put her soul into her creation.
Interesting idea
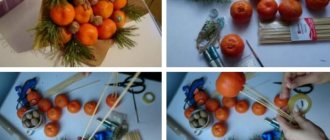
This option is suitable for creative mothers who love to do handicrafts. You can make a pacifier holder with your own hands, and even with homemade beads, in just 1-2 hours. You just need to prepare everything you need in advance. To make beads you will need polymer clay. Main nuances:
- Material. When buying children's polymer clay, you need to make sure that the packaging contains information about safety and certification.
- Acrylic paint. It will be useful for coloring letters on beads.
- Silicone mold. This is a classic shape for creating a desired shape or simulating texture.
- Knives, stacks, plastic card, pin.
It is worth noting that the necessary letters must be squeezed out on uncured clay with an ordinary wooden stick, a stack or a toothpick. Only after complete hardening can paint be applied.
Manufacturing of accessories
A DIY pacifier holder with homemade beads looks stylish and unusual. In order for the result to meet all expectations, you need to decide on the shape and size of the fittings, since the final quality of the products depends on this. Polymer clay should be divided into several equal parts. A neat ball is downloaded from each blank. If you need to get a square-shaped bead, then the workpiece needs to be flattened on four sides. A plastic card is ideal for these purposes. The hole should be such that the thread can pass through it freely. For expansion, you can use a regular stack. After this, you can squeeze out the desired letters. If you have a silicone mold on hand, then you can build additional figures. The prepared beads are laid out on plain paper, which will prevent them from sticking. The preparations are baked in the oven for 20 minutes at a temperature of 120 degrees.
How to use a tool to cut a thread on a pipe?
The die holder is also used for cutting pipe threads. It differs from metric in its dimensions. In this case, it is better to use dies rather than dies as a thread-cutting tool, since the latter have a special entry into the pipe. In a simplified form, working with clamps can be described as follows. The clamp is fixed in a die holder (similar to a die) and put on the pipe. After this, you can begin threading.
To secure the clamps, it is better to use a die holder with a ratchet, which is not suitable for working with conventional clamps. You can also cut pipe threads using special dies (J or K), but working with them is somewhat more complicated, since, unlike dies, they do not have a special entry. To prevent distortion, a small chamfer is removed from the pipe, after which a pipe line is installed.
The principle of working with the tool is very simple. The die or clamp is secured in the holder body with screws that ensure reliable fixation. The steel coupling on the tool body has an internal thread through which the sleeve is screwed in. Three nuts welded to the sleeve are used to install stopper bolts. The diameter of the sleeve is selected so that the pipe being processed easily passes through it.
The device is screwed onto the bushing so that the distance from the coupling to the end of the thread on the bushing corresponds to the length of the area being processed. After this, a pipe is inserted, which should rest against the die with its end. After installing and adjusting the position of the pipe, it is locked with three screws. Rotation is carried out using handles, as a result of which the coupling with the die is screwed onto the sleeve, ensuring the movement of the threading tool with the required pitch.
A holder with a ratchet is also more suitable if threading needs to be done on a pipe located in a hard-to-reach place or against a wall. Even in this position, the ratchet tool does not need to be constantly rearranged. Using such a die holder, you can even make specific threads with your own hands.
Die holders for round tools are manufactured in three sizes:
- type I - for thread-cutting tools with an outer diameter of 16 mm;
- type II - for leks with an outer diameter of 30 mm;
- type III - for dies with an outer diameter from 25 to 200 mm.
In addition to their sizes, die holders differ in their scope of application - manual and machine, as well as in the number and location of the clamping screws. Placed at an angle of 60° are used to fix the dies. Other screws located at an angle of 90° are offset axially from the center of the die and are used to adjust the thread diameter.
Classic master class
Making a stylish pacifier holder with your own hands using a photo is not so difficult. For a clear example, you can study the video of craftswomen. To work, you will need a strip of ordinary knitted fabric or cotton fabric 4 cm wide and 50 cm long, a piece of fabric and non-woven fabric, and an elastic tape 300 mm. For fixation, a clip with a decorated tip and a chalk pencil are useful. The ends of the strip need to be tucked to a width of one centimeter. A neat stitch should be laid at a distance of 2 cm from the edge. On one side, thread the threads into the eye of a darning needle and tie tightly.
Using a safety pin, thread the elastic band. The ends are stitched together and an elastic band is secured. One end of the holder is wrapped around the pin of the clip and sewn on by hand. A satin ribbon must be carefully secured to the nipple. To do this, the material is folded in half. The folded end is wrapped around the pacifier holder. The hole is stitched, fixing the ends of the tape.
Product on a clothespin
At the first stage, you need to arrange the beads in the right order in order to know exactly the order of assembling a personalized pacifier holder with your own hands. The fittings are strung on a cord, the length of which must be at least 22 centimeters. The base should be a little longer, as it will be folded exactly in half. The tip must be melted with a lighter so that it becomes hard and sharp. One side of the cord must be tied into a knot. The classic length of the loop is 8 cm. You can hide the knot with a protective bead. First, simple fittings are strung, and then blanks with letters. All that remains is to secure the clip. The cord is threaded through the retainer ring and three knots are tied. They must be scorched with a lighter and hidden in beads.
Universal die holder made from scrap metal
A universal die holder will help you make a threaded connection even at home
This device can be used not only to hold lugs of different diameters, but also to tighten nuts of any size.
This is what the tool itself looks like
To make a universal die holder we need:
- Tie Rod;
- steering tip;
- piston pin;
- bushing or nut;
- bicycle chain;
- two M12 nuts.
1. First you need to remove the part of the rod that is screwed into the steering rack
2. We put the piston pin on the rod
3. After the finger, we put on a metal sleeve of a suitable diameter or lock it with a nut, which we fix with a welding point
4. We cut off the excess part of the steering tip with a grinder
5. We weld two M12 nuts to the steering end
6. Screw the end onto the rod
7. We push a piece of chain through the nuts and weld it to the piston pin
And we fasten the die in such a way that it rests with a groove on the corner of the tip, so it will not rotate
Now you can cut threads of any diameter
We recommend watching this useful video:
about a homemade die holder
Source
Recommendations from craftswomen
You can build a pacifier holder with your own hands from a strong thread, decorated with various beads, with a small loop for securing the pacifier on one side, as well as a clip for attaching it to clothing on the other. To implement the classic personalized option, you need to prepare the following materials:
- Security beads. One of the holes in them is necessarily widened, due to which a small bundle can be hidden there.
- Beads. The main detail of any name holder is small details with letters, through which you can add the baby’s name. The shape and color are selected according to personal preferences. You can add contrasting beads to the alphabet beads. They can be made of wood, silicone, polymer clay.
- Clip. It must be made exclusively from high-quality material. It is imperative to ensure that there are no sharp fragments on the product that could injure the child.
- Scissors and lighter.
You can use a strong, thick thread as a base. It is best if it is satin, waxed cord, monofilament.
How to quickly and easily make a pacifier holder with your own hands
For work you will need the following tools and materials:
- Wooden beads: plain square light wood colors, round colored beads, flat colored beads, stem beads, heart beads and round beads;
- Wooden buttons in the shape of a baby figure and a butterfly;
- Clip for holding a pacifier. In our case it will be used in the form of a pacifier;
- White waxed lavsan cord;
- Scissors;
- Thick needle;
- Ruler;
- Lighter.
Before getting started, you need to decide on the size of the pacifier holder. The standard length of the holder is approximately 50 cm. Of course, you can choose the most optimal and suitable option for yourself.
Our cord measures approximately 110 cm when unfolded. In our work we will use a white waxed lavsan cord. This cord is very strong. You can also use cotton cord or satin ribbon.
Let's fold the cord in half and make a loop at the end so that in the future we can attach a pacifier to it. The loop is approximately 7 cm. Let's make a regular knot and tighten it a couple more times over it. This is done so that the knot is voluminous and the beads do not slip off the holder. For convenience, burn the ends of the cord with a lighter. In this form it will be easier to thread them into beads.
Our holder will use beads with the girl's name and her date of birth.
If you cannot find beads with letters printed on them, you can make them yourself by writing the desired name with a regular felt-tip pen or marker.
Now let's start making the rattle. Take a 15-20 cm waxed lavsan. We string a wooden button on one side, then tie a knot and seal them with a lighter.
Next, you need to assemble the structure, as in the photo. Pay attention to him.
We will pass the half-filled cord of the holder through the round yellow bead. Next, string the beads again in the intended order. Next, at the tip of the personalized pacifier holder, you need to attach a clip, which will cling to clothes or a stroller. The cord must be threaded through the clips, as shown in the photo.
Now we will make 3-4 strong knots. The remains of the cord must be cut off and the base burned with a lighter.
As a result of the work done, we get such a beautiful pacifier holder.
Let's consider another option for a pacifier holder that will suit a gentle girl.
For work you will need the following tools and materials:
- Round beads;
- Cube letters;
- Clip;
- Cord;
- Decorative element;
- Scissors;
- Lighter;
- Needle.
Our product should be about 22 cm in length. Let's take a polypropylene or cotton cord, fold it in half and start putting beads on it using a needle and thread or a hook. A security bead can be used as a bead at the base of the knot.
We will tie the ends of the holder into a knot and hide it in a bead. Use a double knot to tie the clip to the base of the product. We cut off the excess threads and solder them using a lighter.
As has already become clear, creating a pacifier holder yourself is not particularly difficult. If you follow the instructions in the master class and pay attention to the photos presented, you can do this job perfectly.
By making the holder quickly and easily with our own hands, we know exactly what materials were used and whether the fittings are environmentally friendly. Such a product will definitely not harm the baby, but on the contrary, it will delight him with its bright appearance.