General tips and tricks for sculpting a dog from plasticine
To make a plasticine dog as similar as possible to a real one, you need to follow the following recommendations:
- Before you start work, you need to visually study the breed of the animal. Dogs have different body types, coat lengths, and skull shapes. Tails, paws and even ears differ. The correct proportions must be observed. Photos of dogs found on the Internet will help with this.
- To work on small details, you will need a thin needle or toothpick.
- If you plan to sculpt a large figure, then to save material you can create bases from foil. Aluminum is rolled into a ball, giving it the desired shape, and then coated with plasticine of a suitable color.
When sculpting dogs of different breeds from plasticine, it is recommended to follow a number of tips
- If the body turns out to be weighty, and the animal’s legs should be thin, then the plasticine from which they are made will not bear the load. It will sag and become deformed, spoiling the overall appearance of the figure.
To avoid this, you must use matches, toothpicks or wire as the base of the paws. They are installed in the finished body, and then covered with plasticine, giving it shape.
- To imitate spots or other coloring features, you need to rub a small ball of plasticine over the surface of the body, trying to blur the sharp boundaries.
- It is recommended to style long hair using a special device similar to a kitchen garlic press. This way, the strips used to imitate strands will be even and of equal thickness, and the work will look neater.
- Very small parts are attached to the figure using tweezers. For example, claws or eyes. To prevent the plasticine from remaining on the instrument, you can moisten it with water.
- To imitate curly wool, you should use plasticine shavings. To do this, you need to scrape a piece of uncrushed material with an iron ruler.
An important tool for shaping are special knives called stacks.
These instruments are made of plastic or wood. They are used to cut even pieces and shape finished products.
How to work with polymer clay correctly?
Polymer clay is considered one of the most common materials for handicrafts. And this is not a surprising fact, because this material is very elastic, completely non-toxic, and the crafts made from it are simply incredible. At the same time, you can make not only jewelry from polymer clay, but also a variety of other products that will undoubtedly be able to decorate your life.
Before you start working with polymer clay, you should stock up on it. The entire success of the work depends on the choice of material. This clay can be purchased at specialized craft stores. There are many brands:
- "Tsvetik" is a domestic brand of polymer clay. This material is inexpensive, but it is not suitable for sausage blanks. In addition, this brand is not distinguished by a wide selection of colors. There are no special effects, such as mother-of-pearl or metallic.
- If we talk about foreign manufacturers, the most common brand is “FIMO” . Here the buyer is offered a wide range of colors. The color of the clay remains virtually unchanged after baking. This material is suitable for almost any modeling technique.
- Premo brand looks more like wax than clay. This material is easy to sculpt. It is ideal for sausage preparations.
- KATO brand can cause some inconvenience, since the material must be baked at a very high temperature. Softening it is also quite problematic, unless you use a hammer.
- It is also worth paying attention to polymer clay from Polish manufacturers . It is distinguished by its strength and is very affordable.
- Cernit brand is ideal for those who plan to sculpt dolls and imitate stones such as marble.
Plasticine Dalmatian puppy
How to make a dog with an unusual spotted color from plasticine is described in detail in the master class below. To work you will need black and white material. The latter should be 2 times larger. For a medium-sized figure, a standard piece of white and a quarter of black plasticine will do.
In the process of making the body, you should not worry too much about the cleanliness of the light part. Because all errors will be hidden when applying black spots.
Step-by-step instructions for creating a Dalmatian:
- The white material needs to be kneaded well and divided into 9 parts. All of them must correspond to the size of future body parts, these are:
- body (largest part);
- head;
- 4 paws;
- Tail;
- 2 ears.
You can start creating crafts.
- First, the blank is sculpted in the form of a cone with a round base. Then a part similar to a boomerang is formed from it, one end of which will be thicker and shorter than the other. In this place there will be the dog’s neck, and on the opposite side the tail.
- To form the paws you will need 4 matches. They need to be coated with plasticine, giving the desired shape. Dalmatian puppies have short and thick paws, while adult dogs, on the contrary, have long and graceful paws.
- The tail is rolled with your fingers, giving it the shape of a thin carrot.
- The paws are attached to the body, and the joints are carefully smoothed out until they become completely invisible.
- The tail is attached in a similar way.
- All that remains is to sculpt the head and attach it to the body. It should be noted that the muzzle of small Dalmatians is rounder and shorter than that of an adult animal.
- The ears should be in a semi-erect position.
- To imitate the unusual coloring of this breed, you need to separate small pieces of black plasticine and apply it to the dog’s body. The edges of the stains are gently rubbed with your finger.
- The final stage is the design of the muzzle. Eyes and nose are added.
The plasticine Dalmatian is ready.
Dog breeds
To create a figurine of a purebred dog, you will need high-quality stacks, tweezers, toothpicks and plasticine, the color of which will match the natural coloring of the four-legged dog.
Among the most popular and convenient breeds for making with plasticine are Husky, Dalmatian, and Spitz.
Note!
- How to make slime - the best ways to make slime at home. Simple and quick recipes with a step-by-step master class for children (150 photos)
- Clay products: basics of modeling, tips for beginners. Master class on making clay crafts + photo reviews
Animals made of plasticine - a master class on creating crafts with your own hands. Unusual modeling ideas + photo examples of finished works
Husky
The husky's body is molded from gray or ocher plasticine. To decorate the face and light areas, you will need white or beige, and black for the pupils and dark spots. The eyes of dogs of this breed are blue.
How to make a husky from plasticine:
- The sculpting process begins with the head. You need to roll a round ball of the main color.
- Cheeks and an elongated muzzle are formed from light plasticine.
- Small flat black circles indicate the eyes. A blue iris is attached to the top, and then a small, black pupil.
- The nose is indicated in the form of a dark drop.
- Three thin stripes are made from white plasticine and a pattern is laid out above the eyes, reminiscent of eyebrows. The position of these eyebrows should give a stern look to the dog's face.
- The ears are made from a basic and light color. From each piece of plasticine, 2 equal parts are separated. Then combine dark with white. The base color should be the back of the ear. The details are placed on the top of the head. The ends of the ears point away from each other.
- The body should be oblong and stocky. In the neck area you need to imitate white fur. To do this, you need to pass a small piece of mashed material through a crusher. Carefully place the resulting strips on the dog’s chest in the form of strands of fur.
- The front legs are formed from white plasticine. They should be thick and of medium length. No matches will be needed.
- The hind legs are made of two colors. The thighs will be a basic color, and the part below the knee will be light.
- The husky's tail widens slightly towards the end. If desired, you can add a light spot.
All that remains is to connect the head and torso. It is advisable to align all joints and blur their boundaries.
Muzzles with folds.
Plasticine is an excellent material that can be used to imitate folds on the face of pug dogs. We take as a basis a flattened round shape of beige color. Place a black platinum ball on its lower half and press it slightly with your fingers.
We press the holes of the nostrils on it with a stack. From the nose downwards there are nasolabial folds and folds of the mouth. Fill the space between the fold lines with mustache dots.
And then we need to roll out beige and black sausages - arrange them in an arc around the beads of the eyes. It turns out to be an IMITATION of folds on a pug's face.
Spitz
This dog breed is one of the easiest to breed. You will need plasticine of the same tone and a plastic knife.
Manufacturing:
- The work begins with the dog's chest. To do this you need to roll into an even ball.
- The next detail will be the back of the body. It should be smaller than the chest and slightly thinner towards the tail.
- For the head, roll a ball with a smaller diameter than the chest.
- An elongated muzzle is formed from a separate strip.
- The head and body are connected, and the joints are carefully sanded with a finger.
- From 4 identical parts you need to mold short, thick legs. They are attached to the body.
- The whole body is smoothed with the fingers. The plasticine is smeared to the bottom. To imitate lush hair, a strip of plasticine is attached from the top of the head to the shoulder blades and smoothed out. If the breasts are not lush enough, then similar steps must be taken.
- The ears are attached to the head, and the tail is attached to the back of the case. It needs to be made from a flat strip that widens towards the bottom. The Spitz's tail lies on its back.
- All that remains is to work out the small details using the stack. You need to draw wavy and long hair, and also mark the place for the eyes.
When designing the muzzle, you need to take into account that Spitz eyes are small and close to each other.
How to bake polymer clay correctly?
You can use a conventional oven for baking. The baking temperature should be 110-130 degrees . The products are baked on a special baking sheet, which must be covered with paper folded into an accordion. Much also depends on what exactly will be baked. For example, beads can be strung on a toothpick and stuck into foil. Flat elements are best placed on glass or ceramic tiles. The glass can be placed in a baking sleeve. In this case, you will have to get the craft on the street if there are doubts about toxicity.
Shepherd
The plasticine shepherd is made of two colors - brown and black:
- The base of the head should be a small brown ball.
- The muzzle is made separately, from black plasticine. It should be quite large, elongated and wide. In the places where you plan to place the eyes, you need to lift the black plasticine from the muzzle and lightly smear it.
- The eyes are made of brown with black pupils.
- The ears are shaped like sharp triangles, the corners of which should point slightly away from each other.
- The nose is indicated by a small brown oval.
- The body is formed from black plasticine. It should taper towards the back. The front of the chest is brown.
- Paws are sculpted from light plasticine. The back legs of the Shepherd are slightly shorter than the front legs.
All that remains is to attach the tail and smooth out all the joints.
What else can you fashion a friend from?
A good material is polymer clay. This is a modern synthetic substance based on polyvinyl chloride.
It hardens at a temperature of 110 degrees, so it can reliably retain the shape that the material was given for a long time. It’s as if nature specially made this material for handicrafts.
A puppy made of polymer clay, unlike its counterpart made of plasticine or mastic, is able to “settle in the house” for a long time. This could be the famous Beethoven or any other breed.
Chihuahua
How to mold a dog from plasticine, which is considered one of the smallest breeds in size, is described in this master class.
Step-by-step production:
- You should prepare plasticine in light and dark shades that are characteristic of the color of this breed.
- A small ball is rolled out of the dark one - this is the base of the head. The muzzle is made of light plasticine, in the form of a small tubercle.
- The nose is molded from black plasticine.
- For the eyes, using a stack, make small holes. First, they are filled with white plasticine, and then black pupils are added.
- Chihuahua ears are large, with pointed ends. They should be placed on the top of the head, perpendicular to the eyes.
- The body is made of a material of the main color. Well-kneaded plasticine is given the shape of a rhombus with rounded corners.
- The head is connected to the body using a match.
- Wooden sticks are needed to decorate the paws. Chihuahuas have rather slender legs, and if they are made of plasticine, they will not support the entire structure.
- The tail of these dogs is small, shaped like a cone.
You can use a stack to draw small details and fur.
What can't work be done without?
- First of all, without a workplace. For such a creative process, it is best to find several sheets of tiles or a piece of glass, since you will have to work with a knife. You can also use a thick sheet of paper as a working surface, but this is only as a last resort.
- You will also need a very sharp knife for the job. It is advisable to purchase a special knife for working with polymer clay in a specialized store. If this is not available, you can use a stationery one. It is worth paying special attention to the sharpness of the knife - the material should not be smeared as a result. When it comes to price, it's worth looking at a mid-priced tool, as one that's too cheap will be dull, and one that's too expensive will often have a thick blade. These include Japanese knives.
- To work with polymer clay, you will need a rolling pin, but you should not use plastic options. You can also use a special roller to roll out the material.
- Toothpicks will be needed to form holes in beads and small parts. You can also use stacks, but only non-plastic ones.
- To work, you will need various accessories in the form of buttons and pendants. Such elements can make a toy or flower a unique product.
- Emery cloths with a water-resistant effect, which can sand well and remove fingerprints from products, will be very useful. A dense material, such as felt or denim, will help with polishing.
- You will also definitely need varnish. Water-based construction acrylic coatings can also be used, but Sculpey or Fimo .
Dachshund
This breed of dog is considered one of the most unusual, and it is very easy to mold it from plasticine. For this you will need black and brown colors.
How to make a dachshund dog from plasticine
Manufacturing:
- The base of the body and head is made of black material. The body should have an elongated shape. Narrower at one end than the other. For the head, roll a round ball, and then make a narrow, long muzzle from brown plasticine.
- The nose and pupils of the eyes are indicated in black. Iris – brown. The nose does not have a simple round shape, but an elongated one. Part of the plasticine needs to be stretched to the bridge of the nose.
- A light stain should be applied to the lower part of the body.
- The paws should be thick and short. They need to be made of two colors. Dark on top and light on the bottom.
- The tail is made from a thin sausage that tapers towards the end.
Dachshunds have floppy ears. 2 parts resembling the shape of a drop are molded from black plasticine and secured to the sides of the head.
Bobik
To make an easy plasticine dog craft for children, you will need a minimum of colors - orange, white and brown consistency. In addition, the technique for performing the animal is quite simple:
- The body is a standing cone;
- Head - oval;
- Paws - four identical balls;
- Ears - two flattened sausages;
- The tail is a round piece or sausage;
- Connect the elements: attach the head to the body (top of the cone), ears to it, and then place the legs and tail at the base. To complete the puppy you need to make the eyes and nose. The sitting orange dog is ready!
Rottweiler
A plasticine copy of this breed is made by preparing all the parts in advance. The material is used in two colors: brown and black.
Manufacturing:
- A black body with a broad chest and thick neck is molded. It should taper slightly at the back. A brown spot is applied to the chest.
- To create the head, a black ball is rolled, and the muzzle is sculpted from brown. It should be short, but slightly elongated.
- The eyes and nose are made black. Frown eyebrows are formed from light plasticine on the dog's face.
- The Rottweiler's ears have a semi-erect position. You can arrange them in the form of docked ones.
- The hind and front legs should be two colors. Lighter ends and dark base.
- All parts are connected to each other.
Usually this breed does not have a tail, or it is very small, since at a young age this part of the body is trimmed.
We sculpt a hunting terrier
The dog that we suggest you make belongs to one of the terrier breeds. Take the instructions below and make your own dog.
Hunting Terrier (Step 1)
Before molding a dog from plasticine, prepare:
- plasticine in dark shades;
- knife for working with plasticine;
- board;
- toothpick.
To create a realistic dog, it is advisable to use brown and black colors for the base material. You can combine colors if you want to design an exact copy of the presented breed.
Let's start sculpting:
- Take a brown block and separate half of it. Warm the material and knead it. You need to mold something similar to a bullet, roll the material in your palms and press lightly to get a long body. On one side, the body needs to be slightly raised. Do this so that the end of the part takes on a right angle - this is the neck. We made the central part of the future dog.
- Let's start making the paws. Roll four sausages, note that the two blanks for the front legs should be slightly shorter and thinner than the two that are designed for the hind legs. The paws located in front do not need to be changed much. We leave them as sausages and lightly expel them below. Press the curved part down on the sides and top. (Step 2)
- When the paw blanks are ready, we attach the rear parts first. Carefully iron the joints, make stretching movements along the body. Glue and iron the paws located in the front part.
- Roll out a thin worm for the tail. Attach it.
- Pinch off the black plasticine and make a small cake. Attach the resulting piece to the back and smooth it thoroughly. For a natural look, extend black from the back to the ponytail. (Step 3)
- Let's start making the muzzle. Its shape should be oblong and resemble a crescent. We carry out the work in brown. We bend the lower part of the muzzle towards the bottom, this will highlight the jaw. Additionally, we glue a small part for the jaw.
- Glue the nose, eyes and ears onto the finished base. Ears need to be lowered.
- Using a toothpick, press lines throughout the entire product to obtain a fur texture. The same toothpick can be used to firmly attach the head and torso. Carefully insert the piece of wood into the body and place the head on the protruding end. After fastening, iron the elements so that the joint is not visible.
The terrier is ready. Now you know how to make a dog out of plasticine. The finished craft can be an excellent talisman made by yourself. Take the prepared dog with you on the hunt. Who will we look for? For example, a plasticine hedgehog, and you will learn how to make it from the article that we published earlier. A dog of any breed can be made using a similar principle.
Bolonka
You can mold a long-haired dog from plasticine without creating each strand separately.
In order to make a lapdog, you will need one solid piece of white material, which needs to be given the correct shape and grooves drawn on it, just like waves are drawn.
Step-by-step production:
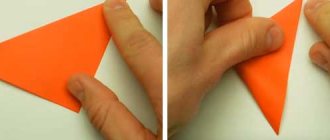
- You need to make a piece in the shape of a heart, one of the corners of which will be smaller than the other. The shape must be stable. Therefore, the lower corner needs to be made flat and attached to the surface of the table.
- Now you need to roll out a round layer of the same color and cover the workpiece. This layer will imitate long and thick wool. There is no need to press it tightly to the base. First, from the folds you need to form long ears, a short, blunt muzzle, and a tail. These details do not have to be clear, it is only important to indicate them.
- Using a match, you need to push through the shallow sockets for the eyes. They are decorated with black plasticine. The lap dog's eyes are quite large, as is the nose.
All that remains is to draw the fur growth line using a toothpick. You need to start drawing the line from the top, having previously outlined the parting line from the crown, along the spine.
Ideas for working together with children
Before you sculpt a dog from plasticine with a small child, you need to take care of the material itself: if the baby is not yet ready to knead the plasticine on his own, you should do this for him in advance or buy special air raw materials that do not require heating.
At the same time, you need to roll the blanks themselves - balls, ovals, sausages and cones. In addition, the baby will be interested in simple cartoon characters that do not require special technology and precision.
Some of the simplest examples of positive puppies are the following:
- Bobik;
- Jack;
- Puppy in a box.
Saint Bernard
To make a St. Bernard, you need 4 blocks of material of different colors:
- white;
- orange;
- brown;
- black.
You will also need matches and a plastic knife:
- The white body is made first. It should be wide at the base and slightly tapering towards the end.
- Then they make the paws. There should be matches inside each of them.
- The St. Bernard's tail is made of white plasticine. It has a slightly polar shape.
- All white parts need to be connected to each other.
- Using brown and orange, you need to make three large spots on the back of the animal.
- To make the head, you will need to roll out an oval shape from a dark color.
- The muzzle is made of white plasticine. It is important to remember that the St. Bernard has a slightly retracted jaw shape and drooping cheeks.
- The location of the eyes is determined and a dark color is applied. You can add tiny pieces of white plasticine for a glare effect. There should be a white stripe from the base of the mora to the middle of the forehead, between the eyes.
- Above the pupils you need to make hanging eyelids from thin strips of brown color.
- The ears of this breed are large, drooping and dark.
The head is attached to the body with a match, all joints are covered.
Spaniel
To create this dog you need 2 colors of plasticine - coffee and white:
- The head is made from an oval blank. At the end of the muzzle there should be a light spot from which a white stripe extends to the middle of the forehead.
- The spaniel's body is elongated and squat. It almost does not taper towards the back and remains uniform from start to finish. Therefore, you need to make an oval blank, in which the place of the neck will be marked.
- The paws of this breed are thick and short.
- The tail is shaped like a sausage with a blunt end.
- The spaniel's ears hang almost to the ground. Parts in the form of elongated drops are created from brown plasticine and secured to the sides of the head.
- For the eyes, you need to make small depressions and insert black balls into them, filling the eye sockets halfway. The bottom part should remain empty. Overhanging eyelids are indicated at the top.
All that remains is to add a black nose, and the plasticine spaniel is ready.
Materials and tools
Before you mold a dog from plasticine, you need to carefully select materials and tools. This is especially true for those cases when you are engaged in professional sculpting and want to make a cast of your work.
For children's creativity, it is best to buy simple plasticine, which can be seen in any stationery department. Firstly, it is inexpensive. And secondly, it is multi-colored.
Also, stock up on stacks. And in order not to stain the table with plasticine, buy a special plastic board. Perhaps during the sculpting process you will also need a wet cloth, since sometimes plasticine stains the skin of your hands.
Boxer
How to make a dog of a popular fighting breed from plasticine is described step by step in this master class:
- The boxer's body is molded from brown plasticine. It should resemble a boomerang, one end of which is shorter than the other. The body stretches towards the back, and expands towards the front.
- This dog's legs should be slender but powerful. In order for them to be able to hold the structure, it is necessary to insert matches into the paws.
- The tail of Boxers is usually docked, so it can be depicted as a small tubercle.
- The muzzle is sculpted as usual, but its length is slightly shortened. The jaws should be white, and a light stripe should be drawn from the nose to the forehead.
- Eyes are indicated in black. Brown stripes decorate the dog's eyelids and cheeks.
The final stage of creating a plasticine boxer is the ears. They should be relatively large, pointed and straight.
Knitted and crocheted dogs: video mk
Since knitting is not such a quick and simple thing, I decided to make a selection of video master classes on this topic.
First of all, I suggest you knit baby booties (this is done with knitting needles). If you or your family have a small child, this will be a great gift.
But the next three dogs are crocheted using the favorite crochet hook. The result is completely different and dissimilar dogs, each of which claims to be a designer toy (which costs a lot of money in stores). Thanks to detailed instructions, you will learn how to make exactly the same dogs.
The first one is made of fluffy yarn, which makes dogs very soft. The rest are made from ordinary threads, but also have their own charm.
The next two dogs are knitted according to the amigurumi principle, a very popular type of knitting now. Thanks to it you can create very cute creatures.
Finally, I suggest you make a square dog like this. Here is a detailed description of the creation process along with patterns at the end of the document.
That's all for today. Happy New Year to you, friends! Create creative dogs with your own hands and come visit more often. I will be glad to see you here and in other articles on my blog. See you soon!
Sincerely, Anastasia Skoracheva
Most of us have beloved pets at home. One of them is a dog, which can be not only a guard in the house, but also a faithful friend. Let's try to make a little dog like this using polymer clay.
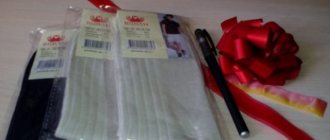
For work we will need:
- polymer clay;
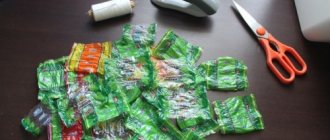
- foil;
- pin stud;
- stationery knife;
- stacks;
- roller for rolling out plastic.
Pug
To create a pug you need beige and coffee plasticine:
- The body of this dog has an oval shape.
- For the head you need to roll a round, even ball. The head should be quite large in relation to the body.
- The pug's legs are short and strong. No matches needed here.
- The prepared parts are assembled into a single whole. A tail in the shape of a short carrot is added to them.
- A flat muzzle with hanging cheeks is sculpted from coffee plasticine. The color black represents the nose and large, round eyes.
- Pugs' ears are in a semi-erect position, at a wide distance from each other.
Finally, you need to smooth out all the joints and use a toothpick to mark the folds of the skin.
Molded and streamlined shape
In the older group, we are increasingly working with plasticine using the “Cast Sculpture” technique. When the silhouette is defined as a single cast streamlined shape. Where all the parts are glued to each other.
Here in the photo we see a dog where the head smoothly passes into the chest and torso. It is more difficult to sculpt such dogs, but more interesting. If you’re going to practice the technique of smearing and pulling, do it on dogs. It's nicer and more fun.
Puppy in a plasticine box
If you put a plasticine dog in a gift box, then this figurine can be given to friends as a souvenir.
Step-by-step instructions for creating a craft:
- You need to start with the box. You can make it round, this will greatly simplify the task. It is necessary to roll out a layer of material about 5 mm thick. Then, cut out a round bottom and a strip that will serve as the walls. Connect the parts together.
- It is not necessary to create the puppy's body; you can only sculpt the head and front paws. A small ball is rolled for the head, then the lower part is extended to take the shape of a muzzle.
- There will be a cardboard lid on top of the dog’s head, as if the dog was looking out of the box by lifting it. Therefore, it is better to make the animal’s ears drooping.
- The paws are made from thick “sausages”. The fingers are separated with a plastic knife.
- The eyes and nose are indicated in black.
- The lid of the box is made according to the shape of the bottom. For beauty, you can put a bow on top.
The main feature of such a craft should be large, plaintive eyes with glare. They can be made from small pieces of plasticine.
Dog from the box
Another way to use various masses for modeling is to mold a dog from light plasticine. It does not stick to hands and tools, it is very elastic, pliable and becomes durable when it hardens, so working with it will bring pleasure to children and minimal hassle to parents.
A beautiful, cute and easy-to-make craft in the form of a puppy sitting in a box:
- Roll out a block of plasticine into a cylinder, then cut off a thin plate - the lid of the gift, and a longer one - the box itself. Connect them, giving the appearance of a slightly opened gift;
- Sculpt the puppy’s head and paws: the head is in the shape of a cone, where the narrowed part will be the muzzle, and the two front paws are sticks with drawn fingers;
- Complete the design of the head with drooping flat ears, black and white eyes and an oval nose;
- Attach all the parts to the cut of the cylinder, under the cover;
- Decorate the gift with plasticine ribbons and a bow.
Cute plasticine puppy with white spots
How to mold a dog from plasticine that looks like cartoon characters is described in detail below:
- The body and paws of the puppy must be made from one piece. To do this, a small portion of plasticine needs to be shaped into a quadrangle, with the sides bent towards the center. The puppy will lie as if he had fallen and was flattened on his stomach.
- The animal's head is depicted as a black, smooth ball. White plasticine marks the muzzle and one spot in the eye area.
- Recesses are made for the eyes, inside which brown balls of suitable size are placed. You can add small highlights of white.
- Above the eyes there are two small, light spots that resemble “house-shaped eyebrows.”
- The nose should be oval and brown.
- The ears are dark and drooping. The tail is short, with a white tip.
The result was a cute and clumsy dog.
From plasticine you can create a miniature New Year's decoration in the form of a dog dressed as Santa Claus.
How to make it:
- Roll out an oval from red plasticine and flatten it. This will be the body of the dog.
- Add sleeves by rolling them out of sausages.
- The edges of these sleeves and hem should be marked with white stripes. Add protruding paws.
- You can “put” boots made of red plasticine on your hind legs.
- The dog's head is made from two balls. One of them is the main one, the muzzle is molded from the other.
- The nose should be made triangular and dark. The eyes are white with black pupils. The ears are hanging, matching the head.
The final stage will be the production of a cone-shaped cap in red with white edges. The New Year's decoration is ready.
Having learned how to sculpt dogs correctly, a child will be able to create a copy of a pet, or make a dream come true in a plasticine miniature. An adult who has acquired modeling skills will be able to organize creative games with homemade figures and help children expand their horizons.
Article design: Natalie Podolskaya
Do-it-yourself dog: symbol of the New Year 2022 with photos and master classes
To make a dog yourself, you don’t need any special skills or hard-to-find materials. Almost everything is clear from the master classes, and sometimes even from the photos themselves. The main thing is to be patient and do something really practical.
By the way, a dog can be given not only for the New Year. After all, this creature is the personification of loyalty and devotion, so by presenting it, you seem to want to strengthen the connection with the person to whom you decided to give such a surprise.
Dog costume
To create a dog costume, it is not necessary to sew a full-fledged outfit for going out. It is enough for him to acquire, for example, a cool mask of this furry creature. It can be printed on a color printer or used as a template for cutting out felt.
If you want to make the image complete, then I advise you to take a closer look at the following simple ideas for the holiday. What and how can you make a cute New Year’s costume for a child and more?
Look at the girl: she is wearing a fluffy tutu skirt, which is complemented by an openwork top, striped tights and a headband with textile ears. Two cute ponytails will help complete the look. A small nose is drawn on the nose.
It’s easy to make a tutu skirt yourself; for this you will need a large amount of translucent fabric, which will need to be folded in several layers and gathered at the top with an elastic band.
For a boy, you can adapt a fluffy suit from pajamas (for example, a Japanese onesie) or sew it like one. For such an outfit, only approximate body parameters (height of the child and waist circumference) are useful, so even a not very experienced seamstress can handle the creation.
Do you want to do it easier? Make a cap with ears, the creation process of which is described below. Take fur, fleece or velor for her. Velsoft is also suitable if you can handle it (it stretches quite strongly).
Other options for hats can be seen in the following pictures. For example, a hat like this could be a good alternative to the previous option. You will need fleece with long pile.
In the future, such a hat can be worn outdoors as the main headdress. In this case, it will be enough to match such a hat with a T-shirt and pants (skirt) in the color of the dog. The image will be almost complete.
Another headdress is sewn using the same patterns, but the muzzle here is completely different, as well as the ears. Fleece here can be taken with much shorter pile.
How about a flirty dog hat? Choose a cartoon character and make a catchy addition to your look.
Progress:
- Cut out a circle base from thick cardboard.
- Cut a circle of fabric, one and a half to two times the diameter of the base, and tighten it using a “forward needle” seam along the edge. Place a solid base inside.
- Using a similar principle, make the top of the cylinder.
- Side part: Cut a long strip of thick cardboard and cover it with fabric so that the edges do not stick out. Join at the back using a blind stitch.
- Sew or glue the top of the hat to the side so that the side fits tightly to the top and forms a cylinder. Attach the design to the bottom base and decorate the hat.
You can attach this to your hair using hairpins or a headband.
You can also sew ears on the headband; for this you will need the headband itself and ear patterns. The first option is more complicated; it implies that the inner part will be slightly smaller than the outer part. To create it, it is best to use fur or fleece.
But the ears are simpler.
To look real, take regular gloves in the color you want and some felt. Cut out the details of future paws from felt and attach them with a thin layer of glue or thread. You can make these gloves in literally 10-20 minutes!
Crafts from scrap materials and more
We got the costume, but what about the Earthen Yellow Dog crafts? We will do them in a variety of ways. Paper cards and souvenirs, even matchboxes - all this will be used and will delight you with its unusual appearance.
Paper fantasies: postcards and origami
You can make cards and original origami from cardboard and paper. For example, what do you think of this cartoon dog? You can print it out and trace it around to create your own original card. Congratulations can be written on the card itself, or the text part can be attached inside as a separate layer.
The second option with a simpler form looks no less original. And if you try, you can also make such a dog with a surprise: if you pull the tongue, the ears will open.
Try transferring this dog to felt. This way it will last much longer than the paper version and can be used even after the New Year.
The next dog can be used as a bookmark, which will certainly come in handy around the house. Make it from a regular square of paper.
FROM such paper dogs you can create a New Year's tree garland that will remind you of the symbol of the year.
Here's how you can fold napkins on the holiday table. This form is quite stable, but at the same time it does not take much time to assemble. Fans of Scottish Terriers will especially appreciate it.
The last one in this series is a very cute and inventive dog: it is made from a matchbox, and a heartfelt message is left inside. A series of such boxes will make all your family and friends happier. If you coat the box with a special varnish for paper, then even snow and rain will not be a problem for such a gift (although you still shouldn’t wash it).
Wooden doggies
Warm material that is perfect for celebrating the upcoming New Year. Make a key holder or some sort of hanger for dog things out of plywood. Woodworking skills, templates for cutting out a dog, and acrylic paints with specialized wood varnish will come in handy.
As children, many of us made toys from plywood. This hobby can be turned into something more by making a full-fledged home sculpture.
And here is a very childish way to prepare for the holiday: a dog with movable legs, which can be made from cardboard or plywood.
New Year's toys
In fact, you can hang almost anything on a Christmas tree. For example, I decorate a green tree with small soft toys – purchased and made by myself. Try sewing the dogs you see below. You can literally take them from a photo and get ready-made patterns.
A great way to surprise your friends and family is to paint your own Christmas tree balls. To do this, buy plain round balls and acrylic paints.
We use polymer clay and plasticine
Many children really like to create figures from plasticine, dough or polymer clay (by the way, using the presented mk you can make both). But this develops fine motor skills and in many ways has a very positive effect on the child’s psyche. Therefore, when preparing for the New Year, let’s take this important factor into account and create several cute dogs.
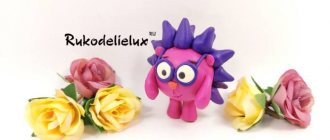
The production of such figurines is generally the same, but has some differences. If you're good at sculpting techniques, you can jump right into something like the dog below.
If you still consider yourself a beginner, then start with simpler forms, which can be repeated right after the photo, as in the picture below. It turned out to be a very cute pitbull)
The pug is also not inferior to its brother. Thanks to its simplest form, even very young children can do it.
With the following three step-by-step master classes, you will create several dogs of completely different breeds. All of them can be done with children.
The souvenir can be either close to real-life dogs or have the appearance of a cartoon character (in the second case, this may turn out to be even more interesting).