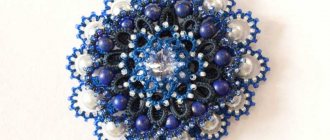
It has long been noted that it is the dog’s wool that is superior to sheep’s in many qualities. Those who do not throw away, but process the material obtained by combing their shaggy friend, act very wisely.
The effectiveness of this raw material has long been confirmed by traditional medicine.
In order to spin dog hair at home, you need to learn this skill constantly, acquiring the skill every day.
It’s wonderful when people know how to make things themselves from valuable medicinal yarn, while reaping great health benefits.
Healing qualities of yarn
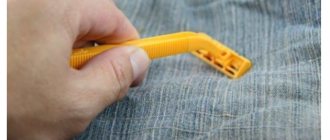
Since ancient times, people have known how to properly spin dog hair. Everyone is well aware of the healing properties of yarn. It is widely used in the treatment of joint pain and colds. To obtain greater benefits, it is recommended to wear knitted products exclusively on a naked body.
Yarn in contact with the skin has an irritating effect and leads to blood flow to the sore spot. Gradually relief comes. A wide range of therapeutic and preventive effects of yarn on the human body have been noted.
But there are some peculiarities in how to spin dog hair.
How does dog breed affect wool quality?
Selecting wool for spinning requires taking into account certain factors. For example, the down of a Husky dog is hypoallergenic and odorless. It can be used for people suffering from allergies.
I would like to know how to spin dog hair at home and what breeds of long-haired dogs are best to use. For example:
- Collie is a Scottish Sheepdog.
- Sheltie.
- Samoyed dog.
While any dog's hair has been proven to be beneficial, the difference lies in the length of the fiber and its stiffness.
How to choose wool for spinning
It is very important to distinguish between the outer coat (long and harsh) and the undercoat (down).
Down is obtained by combing dogs. To obtain high-quality and durable thread, it is spun by hand using a spindle.
It is advisable to use only dog fluff, but you can also use clipped hair. The resulting material should be well combed.
The longer the fibers, the better. It must be taken into account that in the end the yarn will be stiffer and prickly than that made from fluff.
When combing wool, you can immediately put it into different bags to figure out how to spin dog hair and with what tool. Place the soft fluff taken from the withers and back into one bag, and everything else into the other.
Content:
The first “mechanism” for twisting relatively short fibers of flax, cotton, wool, hemp, etc. A continuous long thread was formed by dexterous hands, with which the craftswomen twisted strands of these fibers into one thread. Things went much faster when the spindle appeared. But only the self-spinning wheel (Fig. 1), which took on the functions of both twisting the spinning wheel and winding it, significantly facilitated the work of yarn, limiting its work to the uniform supply of wool or other fibers into the hole of the flyer (bag) of the self-spinning wheel. Of course, the craftswoman also had to operate the spinning wheel, that is, rotate the wheel, but with her foot.
And if with the help of a spindle it was possible to spin a little more than two skeins per day from fiber, then a self-spinning wheel helped to make up to five such skeins daily.
How to prepare material for spinning
How to spin dog hair at home? A difficult question for those who decided to do this for the first time.
The very first thing to do is to sort through and free the available material from debris and tangles. If there is still dirt left that cannot be removed, then it is better to wash it. To do this you need:
- Place the wool in a mesh bag designed for washing woolen items.
- Place in a container with powder; you can use liquid detergent.
- Pour warm water for thirty minutes.
- Remove wool from container.
- Rinse with plenty of water.
- Hang bags to drain water without squeezing.
- Lay the material out to dry for at least two days.
After this treatment, the wool is combed well. Does not smell of dirt. She is good at teasing with combs and carders.
How to comb wool
For easy and high-quality spinning, the dog’s undercoat must be combed out on time and well. Thorough brushing should be done no more than twice a week. The accumulated wool must be pulled manually before spinning, or hand combs are used for this.
In small portions, the wool is placed on one comb and combed with the other comb in counter movements until an air lump is formed. It is necessary to repeat this several times, ensuring that the wool becomes uniform. Then remove the soft fluffy lump from your hair. The resulting lumps are collected into one large tow. Tows are made in different sizes, depending on your convenience.
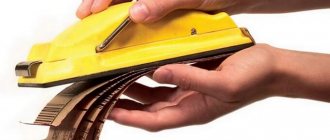
The combing process will go faster if you use a drum carder.
Looking at the resulting air tow, it becomes clear how to spin dog hair.
What spinning methods are used at home?
Depending on the tool used for spinning, you will need to attach a tow.
There are several methods for spinning dog hair:
- Hand spinning without the use of tools.
- Manually using a spindle and a wooden spinning wheel.
- Using a mechanical spinning wheel with a pedal.
- Using an electric spinning wheel.
How to spin dog hair using at least one of these methods?
It's best to start with hand spinning. This method will help you clearly see how the thread is twisted, how many turns you need to make to get even yarn of a certain thickness and strength.
What types of spinning can be used at home?
Once the dog's hair has been combed and the roving is ready for spinning, you can begin to create yarn.
According to the technique of execution, yarn can be divided into three types:
- Thread based.
- Single.
- Twisted.
Warp spinning is used when making yarn from short fibers. For this you can use cotton or silk thread. During spinning, the fluff curls around the warp, and not vice versa. Care must be taken to ensure that the opposite does not happen. If the yarn is too twisted, you can try to fix it. Rewind the resulting thread several times into balls, back and forth.
You can rewind on a spinning wheel in the opposite direction. It is recognized that spinning with a warp is much easier than without using an additional thread.
Spinning dog hair without warp is used when making yarn from hair from long-haired dog breeds. A single thread is made by pulling the fiber from the tow and twisting it. Such a thread need not be twisted.
To twist means to twist two strands into one.
You can mix strands obtained from different dogs, as long as they match in thickness and preferably in softness.
Knitted yarn differs in volume and looks smoother in a knitted fabric.
How they spun on a spinning wheel in the old days, the spinning process
Prepared wool, fluff or other fiber, which was called tow, was tied to the upper edge of the blade. The fibers were carefully pulled out and twisted by hand. The twisted thread was tied to the base (heel) of the spindle and the spindle was wrapped in wide circles along its length. The thread was fixed on the pointed edge of the spindle using a sliding loop. The thread was turned over and put on the tip of the spindle, thereby fixing the thread.
The heavier the spindle, the more difficult it is to twist a thin thread on it; it will break. And vice versa, the lighter and smaller the spindle, the stronger and thinner the resulting thread.
The wool fibers are stretched to the desired length. The place where the wool has not yet been pulled out of the tow must be held with your fingers, otherwise the unstretched wool will begin to curl. The spindle unwinds and the thread is spun. Next, the spinner intercepts the twisted yarn with the other hand and pulls the fiber out again. The spindle is always turned in one direction, as convenient for the spinner.
When the thread has reached the required length, the sliding loop is removed and the thread is wound onto the spindle. A fixing loop is made again. Thus continuing the spinning process. The process is painstaking and requires skill.
The spinning process is preceded by lengthy preparation. Everything was done step by step and manually. The wool had to be prepared first. Mostly unwashed wool was spun, only in some cases it was washed. They sorted it with their hands, thereby freeing it from grass, burrs, manure, and various debris. Next, the sorted wool was combed using a comb. And only after that it was spun.
Spinning was practiced almost everywhere. A girl is taught to work from childhood. The main time for this work was the months free from field work. They gathered in the evenings and spun with songs and gossip. The light source was a simple torch or candle.
A simple way to spin without a spinning wheel
If you don’t have a spinning wheel at home, but you have dog hair, and you really want to spin it, then the question certainly arises of how to spin dog hair without a spinning wheel. There is a way out, you need to take the tow and attach it to something.
For example, tie a skein of wool to a stick or to the back of a chair and try spinning. To do this, you need to slowly pull out a thin thread of equal thickness from the tow and constantly twist it, otherwise it may break. Once you have obtained the yarn of the required length, thickness and twist, you need to wind it onto a spindle. Then continue in the same order. When the ball has become approximately the size of a fist, the thread should be cut off.
You don't have to tie the tow to the chair.
Before spinning dog hair with a spindle, you need to take a ball of fluff in your left hand. With your right hand, pull the thread out of the ball while twisting it. In this case, the spindle should be on a plate or some kind of bowl with a flat bottom without a recess. The twisting of the strand occurs quickly. If the thread was spun thin, and suddenly a thickening appears, then it needs to be untwisted and straightened.
Next, spin about fifty centimeters and wind the resulting yarn onto a spindle. Tie the thread with a fixing knot at the top of the spindle. In this way, continue to pull and twist the thread until the spinning tow runs out.
When you don’t know how to learn how to spin dog hair with a spindle, you can try using a flat wooden stick or pencil. All other actions are the same. Pull the thread from the tow, twist it and wind it around the middle of a pencil or stick.
Hand spinning methods
The spinning procedure can be performed without a warp or with it. It is recommended to use wool or acrylic thread for the base. The resulting product will become elastic and hold its shape well. Although mastering such needlework is difficult, with sufficient skill and patience everything will certainly work out. If you spin wool without pre-washing, the thread removed from the spindle or spool must be rewound again into a spool, then tied with colored thread at two points and washed. This material will tell you about crane fabric for sewing clothes.
Spinning on a spinning wheel
The best known version is my grandmother's version of spinning dog hair by hand at home. The spinning wheel is placed on a stable surface, such as a stool or bench.
A hand spinning wheel consists of a vertical part, on which the tow is attached, and a horizontal part (bottom), where the spinner sits.
After you have fixed the fluff on the spinning wheel, you need to pick up the spindle. It is best to attach the fluff to the spinning wheel with an elastic band. Tie a cotton thread to the middle part of the spindle and wind it clockwise. The tow should be on the left side of the hand. They begin to pull the fibers out of the tow with three fingers of the left hand. Connect the cotton thread to the strand and at the same time rotate the spindle clockwise. Thus, the thread and strand were spliced. Secure the twisted strand at the top of the spindle with a locking knot so that the thread does not fall off when rotating. Continue to rotate with your right hand, slowly releasing a small amount of fluff from the tow with your left hand for twisting. At the end of spinning, rewind the thread from the spindle into a ball.
For knitting, double-ply yarn is used. To do this, you need to connect two threads and twist them.
Spinning dog hair by hand is quite difficult and time-consuming. In order to obtain high-quality thread, you need to have spinning experience. Therefore, to help the spinner, a spinning wheel with a wheel was invented, which has survived to this day.
SPINNING WHEELS, BUT NOT GRANDMOTHER'S
The times of scarcity seem to have passed, but many grandmothers prefer to knit warm clothes themselves, especially socks and mittens, in the old fashioned way.
The best material for these products is, of course, wool yarn. Probably, one could buy it, but grandmothers prefer to spin wool themselves. Probably, in this case, the yarn absorbs and forever retains the warmth of grandmother’s hands, and that is why self-knitted items warm so well. But over the years, women’s fingers become less obedient and agile, and therefore it would be nice for them to mechanize the spinning operation, so that they do not wonder how to knit mittens. A foot spinning wheel in this case also does not provide any particular advantage. So it’s best to make an electric spinning wheel, especially since this mechanism is not that difficult to make. The elements of the electrical circuit are not scarce, and the parts of the mechanisms can be made by yourself.
The unifying structural element of the electric spinning wheel is the base, made of a 10 mm thick duralumin plate (it can also be made from textolite, getinax, and other suitable materials). The base also serves as a chassis on which massive parts of the control electrical circuit are mounted: a drive electric motor, a power transformer, a transistor with a radiator, and a diode rectifier bridge. The coordinates of the mounting holes in the base drawing are given only for the electric motor bracket, since the handles of the drive pulley and the handles of the driven pulleys of the spinning wheel must be in the same vertical plane. The remaining elements can be arranged in accordance with the general drawing or even in a different order by drilling holes in the base for fastening them in place.
Support posts are attached to the side edges of the base with M4 screws, on which the shaft with all the parts of the spinning wheel is based. The racks are made of steel sheet 4 mm thick and differ from one another only in the size of the grooves for the opposite ends of the shaft.
Low rubber bosses - shock absorbers - are glued to the sole (lower plane) of the base in the corners.
Electric spinning wheel (top view shows positions under the casing):
1 — casing (steel sheet s0.7); 2 support stand (steel sheet s4, 2 pcs.); 3— shaft (bronze, circle 14); 4 — hooks (steel wire Ø1.5, 26 pcs.); 5 — coil disk (getinaks, sheet s10); 6 — coil bushing (bronze, circle 12); 7 — small driven pulley (getinaks, sheet s15); 8 — large driven pulley (getinaks, sheet s12); 9 — nut M6 (left, duralumin D16); 10 — belts (from a tape recorder); 11 — bagel (getinax, sheet s18); 12 — base-chassis (duralumin, sheet s10); 13 - diode rectifier bridge; 14 - radiator with transistor; 15 — bracket-holder for the electric motor (duralumin D16); 16 — electric motor DPR-52; 17 - drive pulley; 18 — lock nut M4 for fastening the pulley; 19 operating mode switch (spinning-twisting) - changing the engine rotation to the opposite direction (toggle switch P2T-2); 20 power switch (toggle switch MT1); 21—variable resistor SP4-2M; 22 — transformer TVK 110LM; 23 - safety sleeve (rubber tube)
Electrical elements and devices located on the chassis are covered with a casing made of 0.7 mm steel sheet. The casing is screwed to the front and rear edges of the base. The front (front) panel of the casing contains controls and alarms: toggle switches for turning the power on and off and changing operating modes (spinning and twisting), an LED, and a potentiometer knob.
The rotation of the spinning wheel shaft is carried out by an electric motor DPR-52. The motor is inserted into the hole in the bracket and clamped there from above with two M3 screws, and the bracket is tightened to the base with four M4 screws. I will give one explanation regarding the operation of the electric motor. According to the passport, it should be powered by a voltage of 27 V. But I have verified in practice that this electric motor works well from a lower voltage - down to 5 V. Thus, changing the supply voltage of the electric motor using a variable resistor (potentiometer) only affects the decrease or increase number of engine revolutions.
A drive pulley of a belt drive with two streams is installed on the electric motor shaft and secured with an M4 nut. Two rubber belts, replacing V-belts, transmit torque to the driven pulleys, one of which is fixed to the shaft, and the other to the reel (spool) of the spinning wheel. The driven pulleys differ slightly in diameter - the one on the reel is slightly larger. Passengers can be used from an old tape recorder or even those used to tie up stacks of banknotes. The tension on the belts should not be strong.
A safety rubber tube-sleeve is inserted into the hole in the side stand through which the power cable passes.
The dimensions of the spinning mechanism parts are taken from an antique foot spinning wheel. The mechanism consists of a slider and a coil. The runner is formed by a bagel made of getinax and a shaft made of bronze (can also be made of brass). The bagel is placed on the shaft using epoxy glue. In each branch of the bagel, 12 hooks made of 1.5 mm steel wire are inserted (also with epoxy glue) into pre-drilled blind holes (sockets), and one more hook is inserted into the jumper, near the mounting hole.
Control pedal:
1 — base (duralumin D16, sheet s6); 2 — body (aluminum, sheet s1); 3 — cover (aluminum, sheet s1); 4 — locking screw M3 (2 pcs.); 5 — leash (steel 20, sheet s1.5); 6 — cam (steel 20, sheet s10); 7 — pin (M4 screw); 8 - potentiometer; 9 — angle bracket for potentiometer (steel sheet s2); 10 — bracket fastening screw M3 (4 pcs.); 11 — angle bracket for the leash (steel sheet s2); 12 — driver axis (M4 bolt); 13 — spring (normally compressed); 14 — spring anchor (M3 screw); 15 — lock nut M10 potentiometer
The coil consists of a bronze (or brass) bushing and a disk made of getinax mounted (with epoxy glue) on its end. A small driven drive disk is also mounted on the other end of the bushing on epoxy. The coil is loosely put on the shaft, and then the larger driven drive pulley is screwed onto its end and tightened with an M6 nut with a left-hand thread. After this, belts are thrown onto the shaft, the mechanism is inserted into the grooves of the racks using the “skew” method, and the belts are put on the pulleys.
Before you start spinning, you need to pass a strong thread about 30 cm long through the axial hole in the shaft, the hooks of the bagel and secure its end to the spool. Use the other end of the thread to grab the beginning of the prepared wool in the bun. After this, you can start the spinning wheel by turning on the power and turning the potentiometer knob a little, and spin the yarn, pulling the wool from the bundle until the thread is of the desired thickness.
To fill the spool consistently and evenly, you need to move the yarn from hook to hook in a timely manner. With the acquisition of skill, you can increase the speed of rotation of the mechanism with the potentiometer.
Due to the fact that the pulleys on the spool and shaft have different diameters, the bagel will rotate slightly slower than the spool, providing tension on the thread.
The direction of rotation of the mechanism (when viewed from the left): when spinning - clockwise, when twisting - vice versa.
Continuous operation of the spinning wheel is about three hours.
For greater convenience of working on a spinning wheel, it is better to equip it with a pedal in which it is necessary to mount a potentiometer R21 (see control circuit diagram) to change the voltage supplied to the electric motor, and thereby reduce or increase the number of revolutions by pressing the foot.
The design of the pedal is also not complicated. However, large deviations from the nominal dimensions should not be allowed: the smaller the gaps between the interacting parts, the better the pedal will work.
Control circuit of the spinning wheel
In the pedal, on a base made of a 6 mm thick duralumin sheet, two support brackets are installed in which the corresponding parts are mounted: a leash and a variable resistor. The potentiometer is secured with its lock nut, and a cam is put on its shaft and secured with an M3 screw. A pin (also an M4 screw) is inserted into the other hole of the cam and also secured with an M3 screw. One end of the spring is attached to this locking screw; the other end, when the spring is in a tense position, is also attached to the base with an M3 screw.
In another bracket, on the axis, a driver is installed, into the groove of which the cam pin is inserted. After this, the base with the mechanism is encased in a housing, and the housing is covered with a lid.
In the side wall of the case there is a hole with a diameter of 8 mm, through which the wire from the potentiometer comes out and is connected to the control circuit of the spinning wheel using the PC-4 connector.
A variable resistor must be installed in the corner bracket so that when the power source is turned on and the pedal is depressed, a voltage of about 5 V is supplied to the electric motor.
With this setting of the potentiometer, the angle of rotation of its shaft, and therefore the increase in voltage supplied to the electric motor, is quite enough for normal operation of the spinning wheel.
Also of no small importance is the selection of a spring, which should not be too stiff, but could always return the cam, together with the driver and the cover, to the initial position.
Y. KURBAKOV, Tula
We recommend reading
- SECRETS OF AN OLD PAINTER Usually, a film or even a crust forms on the surface of stored paint, and when removed, particles often remain in the container: if they get on the brush, they can ruin the work. Not…
- THE KEY IS IN YOUR HAND! Drill another hole on your “most important” key (for a house, garage or workshop) offset from the standard one, and it will always “fall out” of its own...
Wooden self-spinning wheel helps you spin quickly
A mechanical self-spinning wheel with a foot drive has become a home assistant for women. The spinner no longer turns the spindle, it simply does not exist. Pressing the pedal with your foot sets the spinning wheel in motion.
The tow is attached to a stick or spinning wheel. The cotton thread is attached to the spool of a spinning wheel and passed through the hooks of the bobbin. It must be combined with a strand of tow. Using your left hand, pull out a small strip of wool from the tow and place it on a cotton thread. At the same time, they begin to rotate the spinning wheel by pressing the pedal with their foot. The process of twisting the thread and winding it onto the spool begins. At this moment you need to look to see if the thread is too twisted.
If this happens, you need to manually pull the thread and unwind it in the opposite direction. The speed of the spinning wheel is controlled by a pedal. The more often you press the pedal, the higher the speed of rotation of the wheel.
The thread tension is regulated by belts that are stretched over the wheel housings and the pulley. The spinning process is fast. Spinning dog hair, like any other hair, on a mechanical spinning wheel is not very easy; it requires certain skills.
Young technician - for skilled hands 1980-01, page 14
alzheept e schr&zyami
The Russian spinning wheel is not only the simplest machine for hand spinning, but also a wonderful work of art. We want to tell you about one of these ancient spinning wheels. It is kept in the family of Anna Mikhailovna Orekhovskaya from the village of Levkovo, Vyazemsky district, Smolensk region. She got it from her mother. The spinning wheel has seen a lot in its lifetime and would hardly have survived to this day if it weren’t for Anna Mikhailovna’s father. During the difficult years of the fascist occupation, he saved it as an expensive family heirloom, as a tool that helped in the difficult life of a peasant.
The spinning wheel mainly consists of turned parts, and its quality and beauty primarily depend on the skill of the turner. For the manufacture of turning parts, well-dried birch wood is used. Birch wood is hard, dense, uniform and rarely susceptible to cracking. Therefore, from ancient times, all kinds of parts for weaving and spinning machines were made from birch. If some parts of the spinning wheel can be turned from other wood (for example, from linden or pine), then the stag 12, the rim and the hub of the wheel 8 must be turned from birch.
All parts, with the exception of the rim, are turned on a center lathe.
In the pictures you see drawings of the Levkovskaya spinning wheel. All its parts are turned on a simple lathe. But look how skillfully they are made. How much love, work and art is put into every spoke of the wheel.
If you make such a spinning wheel according to our drawings and give it to a needlewoman, then, really, she will sincerely
I'm glad for your gift. You can also make a spinning wheel for the school museum - either in full size or in a reduced size. Our great-grandmothers' little working machine will be an interesting exhibit.
The spinning wheel consists of three main components: a frame, a wheel and a stag. The bed is a kind of foundation of the spinning wheel, assembled from two posts - rear 1 and front 2, base 4, legs 7 and crossbar 9. Turn all parts, except the base, on a lathe. Use a chisel to hollow out a cavity in the head of the rear pillar, and drill a hole in the end part. Connect the frame parts together with glued wedges.
In addition, according to our drawings, make parts connected to the frame with a movable connection: the upper post-support 11 with a leather bearing 10, block 14, clamping screw 13, pedal 5 with axis 6 and rod 3. Place the leather bearing in the hole hollowed out in the rack -support, and insert the support into the conical hole of the crossbar. Place the block into the cavity of the head, screw the clamping screw into it. You will have a device that regulates the tension of the drive cord. Cut out the pedal and rod from the boards. Connect the pedal to the axle. Drive nails without heads into the ends. Drill holes in the front legs for the axle.
14
Electric spinning wheels spin well and quickly
The invention of the electric spinning wheel has several advantages. This is compactness and speed. Experts say that working on it requires virtually no skills. The principle of forming a thread from wool is the same for spinning wheels - the strand is pulled out of the tow, twisted and wound into a ball.
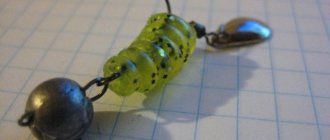
Then the finished yarn must be twisted. If the spinning wheel does not have such a function, then you can twist it manually on a spindle.
The photo shows what this device looks like. We spin dog hair on an electric spinning wheel in the same way as in other cases - separating small pieces of combed wool and twisting them.
How to wash finished yarn
Tie the rewound yarn in several places and put it in the wash:
- Place the skein in a container with warm water and liquid detergent.
- You need to wash it carefully.
- Rinse in water with hair balm.
- The last thorough rinse is done in a large amount of water with the addition of a few drops of essential oil.
There is no need to wring out the wool. Hang the skein on clean gauze or on a clothesline. As the coat dries, it takes on a wavy appearance. In order for the yarn to straighten well, it must be pulled back with a weight. Gradually, weight can be added to make the thread smoother.
To ensure you have enough hair, collect it every time you brush your dog. You can knit warm clothes for loved ones with your own hands, since this wool is also medicinal. The pleasure from the work and the resulting handmade products will last a long time. The best thing is to leave the pet's fluff and learn the material, how to spin yarn from dog hair.
Creative project using the “Spinning Wheel” technology, grade 10
Selecting a topic and justifying the project.
How often do we hear that things made with our own hands bring warmth and comfort to our home. To achieve this you do not always need to spend a lot of money.
Why did I decide to make this particular product?
Our family has two wonderful dogs.
We love them very much, but there is one problem: a huge amount of wool. As you know, dog hair is medicinal and throwing away such goodness is simply blasphemous. To process this wool, a spinning wheel was required, which was purchased online.
But this spinning wheel couldn’t handle dog hair, so I decided to try making a spinning wheel myself. To do this, I had to research a lot of information on the Internet.
Project research.
Spinning wheels came to us from ancient times. It was traditionally women's work - spinning yarn. “The spinning wheel” was the name of the spinning wheel in Ancient Rus'. From autumn until Lent, in the “low lights” by a splinter, with a quiet song, the spinners sat at their work until midnight. The spinning wheels that came to us from the distant past, none of them repeat the other. Each has its own peculiarity. Apparently, every owner of a spinning wheel, and the owner, most likely, put their efforts, invention and imagination into decoration, convenience, and to make work easier. In Rus', spinning wheels were made from maple, aspen, birch and linden.
What is a spinning wheel? A spinning wheel (or “spinning” in Ukrainian) is a device for manually making thread from tow (purified fiber). The word “spinning wheel” came into Russian and Ukrainian from Proto-Slavic, from the verb prędti (to spin). It is interesting that in other Slavic languages, this item was called differently. In Polish, a spinning wheel is called kądziel, which is similar to the word “tow”, which in this language is called pakuły - and also means tow (a fiber unsuitable for spinning). In Belarusian the spinning wheel is called “kalaurot”, and in Bulgarian it is called “khurka”. For Czechs it is přeslice, and for Slovenians and Slovaks it is preslica. What types are there? Having understood what a spinning wheel is, it is worth finding out what types were used in ancient times and today. There are such devices for making threads.
Distaff.
Features of a manual spinning wheel A wooden manual spinning wheel was the most common, and most importantly, accessible to ancestors, device for making threads. Based on their design, there were two types of spinning wheels: composite (assembled from horizontal and vertical parts) and solid (made from the root and trunk of a tree). Regardless of what type the hand spinning wheel belonged to, it had an unchanged design. Its horizontal lower part was intended for the spinner; here she sat while working. This place was called “dontse” (in Ukrainian: “bottom”, “sidtse” or “squat”). The vertical part of the spinning wheel consisted of two elements: a paddle or spade (in Ukrainian “kuzhivnik”) and a leg or neck (“derzhivno”). Despite the availability of this type of spinning wheel, one had to work on it for a very long time to produce a sufficient amount of thread. Therefore, even the biggest lovers of antiquity today prefer a mechanical spinning wheel.
Mechanical spinning wheel or self-spinning wheel
.
Household electric spinning wheel.
Alternative project options.
When choosing the design and manufacturing technology of a product, various options are possible:
Option #1. Hand spinning wheel.
Advantages:
optimal economic costs, it is possible to show individuality.
Flaws:
very low labor productivity
Option No. 2
: Mechanical wooden spinning wheel.
Advantages:
The spinning wheel is made from environmentally friendly materials. Good labor productivity. Can be used as an interior decoration.
Flaws
: Quite a complex design, expensive material.
Option #3:
Mechanical spinning wheel made of thick plywood.
Advantages:
High labor productivity, takes up little space, available material.
Flaws:
Complexity of design.
Advertising.
- If there are handicrafts in your family: grandmothers, mother or sisters, then a spinning wheel will help you save on the purchase of yarn. And if you or your relatives like to collect items from Russian everyday life, then this product will be the best purchase!
Selecting the optimal project option.
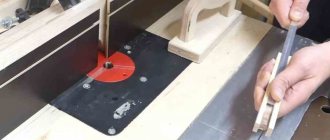
After analyzing all the options, I decided to carry out the third option, to make a mechanical spinning wheel with a foot drive from thick plywood. Such a spinning wheel will not only be used for its intended purpose, but will also become a piece of furniture. I have decided on the choice of product, all that remains is to choose an affordable and suitable material for this product.
Selection of materials and tools.
Materials: Plywood 12, 20 mm, metal, bearings, aluminum, screws, glue, putty, primer, stain, acrylic paints.
Tools and equipment: carpentry workbench, welding machine, hacksaw, ruler, pencil, chalk, electric drill, drills, lathe, jigsaw, chisels, calipers, miter box, bow saw, sandpaper, pencil, ruler, brush,
Environmental assessment
Environmental assessment Environmentally friendly materials were used to make the spinning wheel. The stain has a state certificate and is approved for use. Acrylic paints were used for painting. Therefore, the use of this product will not lead to violations of the ecological environment of society.
Bibliography.
- Folk art: artistic crafts of the USSR. M.:
Planet 1987.
- N.A. Ponomarev technology. Project activities. 2010
- Internet resources.