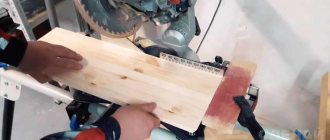
Recently I had a real tragedy - the monitor holder broke. I had to urgently come up with a backup option. In the end, I made the tripod itself out of wood, which turned out even better than the factory one. Now I can adjust the height of the monitor and also rotate it left and right.
Consumables:
- plywood 2 cm thick;
- wooden dowel 2.5 cm;
- wood glue;
- screws;
- T-nut 0.8 cm;
- Bolt 0.8 cm.
Bracket Assembly Details
The necessary organs for two brackets of the opposite sex were found in the Krepezh store, which cost me 200 rubles. Below, I will list them in detail.
- mounting angle 50*50*35 8 pcs.
- dowel 10*61 4pcs.
- self-tapping screw 6*70 4 pcs.
- M10 washer 4 pcs.
- M10 wing nut 2 pcs.
- bolt 10*20 2 pcs.
- washer m10 2 pcs.
- M8 washer 4 pcs.
- screw m4*12 20pcs.
- screw m4*16 8pcs.
- nut M4 20pcs.
- mounting plate 200*40*2 2 pcs.
Parts listed are for two brackets. This is what the plates look like.
Stands for studio monitors: characteristics and selection rules
For those who work in a studio, the equipment used to record and listen to audio materials is especially important. Headphones and speakers very often distort real characteristics. To prevent this from happening, they use studio monitors that are installed on special stands.
Markings for assembling the bracket
There are holes on the back of the monitor for attaching the bracket. The distance between them on my monitors is 100mm. After turning the plates in my hands, measuring the distances between the holes and combining them with the corners, I found the optimal location. It was to drill as few “holes” as possible.
In each plate for attaching to the monitor, only one hole is suitable for us. The plate manufacturers poked these holes with diabolical calculation, so that they could not be used for symmetrical fastening.
Let's drill one more. For this we measure exactly 100mm. I couldn’t drill it perfectly straight, so I slightly increased the diameter to make adjustments. The main thing is that the screw heads do not fall into the holes. See photo.
We perform the same operation with attaching the corners to the plates. The photo below shows which hole in the plate I used and which I drilled additionally.
If a thought gets firmly stuck in your head, you won’t throw it away so easily. Recently, the idea of hanging a monitor on the wall using a bracket has firmly settled in my head. A monitor stand takes up a lot of space on the table, and even more so if there are two monitors.
Having visited the habitats on the Internet and studied the anatomical structure of the above-mentioned brackets, I was convinced that I could very well create such an individual on my own and at a lower cost.
Şərh • 11
Well done author. Alternatively, why not. But not for serious work.
Well done, it turned out great! Initially I planned a slightly different design, but now I’ll think about your option. Thanks for the tip)))
It's strange that the video hasn't been deleted yet. Was it really difficult to study the propagation of sound? How. Where. nightmare. The monitors in the corner stand this time. The vibration through wood and iron will also be transmitted to the table to the listener, this is two. early reflections will also interfere with this three. in short, it’s cute, but COMPLETELY USELESS. If you just listen to music, then why buy studio monitors. What kind of people are they.
@Grigory Prometey I laid out the triangles, in principle I’m happy with it)
@Connection People There are special foam stands for monitors on sale
Question. Is regular treble acoustic foam suitable as pads for monitors?
@Clyde Rockway if space allows, you can do anything!
@You Tube do whatever you want!
What the hell are monitors for? Speakers and that's it. I came here to see the weighing monitor (well, the screen) and saw very flimsy standing speakers
Because these are studio monitors, for working in a recording studio, monitoring sound, mixing. They convey sound quite accurately if the studio room is soundproofed. Something like this.
Grigory Prometey it’s because you’re not me, they would have disappeared long ago, I just sometimes climb onto the table and shake it, but I still don’t understand why the monitor?
ha ha ha. )))) made me laugh. Gas water heaters? Or water pumps? Or small columns?))) Great and powerful is the Russian language! And these flimsy “speakers” have been standing for two and a half years!
Source
Markings for assembling the bracket
There are holes on the back of the monitor for attaching the bracket. The distance between them on my monitors is 100mm. After turning the plates in my hands, measuring the distances between the holes and combining them with the corners, I found the optimal location. It was to drill as few “holes” as possible.
In each plate for attaching to the monitor, only one hole is suitable for us. The plate manufacturers poked these holes with diabolical calculation, so that they could not be used for symmetrical fastening.
Let's drill one more. For this we measure exactly 100mm. I couldn’t drill it perfectly straight, so I slightly increased the diameter to make adjustments. The main thing is that the screw heads do not fall into the holes. See photo.
We perform the same operation with attaching the corners to the plates. The photo below shows which hole in the plate I used and which I drilled additionally.
| Brackets for two monitors . There are different modifications: | |
| Work complexes . They differ in that in addition to the monitor holder, they also have a special platform for the keyboard and mouse. This solution allows you to create ideal working conditions and arrange all the elements in a way that is convenient for you. | |
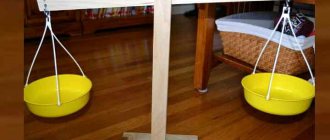
| Models with a support part without fastening to the tabletop . This is a mobile option, which is good because it can be moved to another place or moved to another table at any time. But at the same time, the stability of the structure is an order of magnitude lower, since it is not fixed to the tabletop. The structures can be designed for either one or two displays; it is not advisable to mount more on them due to the large weight of the structure and a significant decrease in stability. | |
| Holders for three or more monitors . These days you can find options designed for three, four, six and even eight displays. Such structures must be especially durable, since they are subject to a large load. The strength of the tabletop is also very important, since the usual version made of chipboard, such a heavy system can simply break; ideally, use a wooden table or metal furniture, which is often used in offices. | |
| Angle swivel options . They differ in that they are placed on a corner, often at the junction of two tables, and, if necessary, quickly turn in different directions. This option is most often used in offices, as it provides convenience in situations where several people are working on a project and periodically need to share your screen with colleagues. |
Characteristic
In recording studios, you can see three options for installing monitors: mounting them into the wall, installing them on the top tier of the sound engineer’s desk, and the most optimal option is using special stands.
Stands for acoustic monitors perform a number of important functions.
The main advantages are convenience and reliability.
Stands for studio monitors are divided according to certain criteria.
In addition, the racks differ from each other in size.
Bracket Assembly Details
The necessary organs for two brackets of the opposite sex were found in the Krepezh store, which cost me 200 rubles. Below, I will list them in detail.
- mounting angle 50*50*35 8 pcs.
- dowel 10*61 4pcs.
- self-tapping screw 6*70 4 pcs.
- M10 washer 4 pcs.
- M10 wing nut 2 pcs.
- bolt 10*20 2 pcs.
- washer m10 2 pcs.
- M8 washer 4 pcs.
- screw m4*12 20pcs.
- screw m4*16 8pcs.
- nut M4 20pcs.
- mounting plate 200*40*2 2 pcs.
Parts listed are for two brackets. This is what the plates look like.
DIY monitor stand - do it yourself
- a frame from an old painting, which will ideally fit the dimensional characteristics of the future product (you can use slats and boards);
- plywood sheets;
- thin slats – 4 pcs. (the length must correspond to the perimeter of the table);
- slats for legs – 6 pcs.;
- bolts and nuts;
- wood glue;
- paint, varnish or self-adhesive;
- brush and hammer;
- hacksaw
DIY laptop stand for the bed
The classic version of the bed table is quite easy to assemble. Even a person who has absolutely no furniture making skills can cope with this task.
Before starting work, it is worth finding finished drawings of the product and adjusting it to the dimensions of the future product. It is important to adhere to the ratio of the parameters of the design parts.
- plywood (sheet thickness should reach 20-30 mm);
- nails and screws;
- paint or varnish for wood;
- primer or putty;
- wood glue;
- sandpaper;
- brush and sponge;
- hand saw;
- hammer.
The finished product with a cooling effect will be quite durable
Important! In a similar way, you can assemble a table from slats. This process is quite labor-intensive, but the result is much more creative.
Which is better: heated floors or radiators?
Warm floorBatteries
DIY laptop stand: with cooling, made of wood, cardboard and plastic pipes
Important! In a similar way, you can assemble a table from slats. This process is quite labor-intensive, but the result is much more creative.
Expert opinion
Strebizh Viktor Fedorovich, leading construction foreman
Among the main advantages of this product with a cooling effect are its low cost and flexibility, the ability to manufacture a device that will ideally fit the size of your own device. If you want to clarify something, please contact me!
DIY knife stands: the best ideas
A homemade monitor stand can cost you pennies if the original one breaks. To make a monitor stand with your own hands, you will need available materials. It’s especially good if you still have them after renovation.
Step 1
. First, you need to decide on the size of the stand. In this case, all calculations have already been made. It is possible that you will have to adjust them. To determine the size of the future stand, use a pencil, paper and hardboard, applying them and clarifying the correctness of your own calculations.
Attach a piece of MDF to the main stand of the stand using self-tapping screws.
Step 2
. In one of the 8.5 x 8.5 cm pieces of plywood, make two holes for the washers. In this project, do not use plywood less than the specified thickness. It simply may not withstand the load and break.
Step 3
. Measure the height of the tabletop on which the monitor stand will be installed. Fix one piece of plywood with holes at the base of the stand, and the second at a distance equal to the height of the tabletop. You can simply attach pieces of plywood using strong wood glue. In this case, for reliability, grooves were made for self-tapping screws.
Step 4
. Insert two washers into the previously made holes in the stand and screw the bolts into them. The washers will allow the stand to be attached more securely, and the bolts will rest against it, preventing the monitor stand from loosening.
Step 5
. Attach the monitor itself to the stand. To do this, use M4 bolts up to 10 mm long. These bolts are universal and fit most monitors.
The monitor stand is ready, you can attach it to the table. Adjust the installation strength with bolts.
How to treat the surface → Room decoration → How to choose the right paint → Surface treatment technologies → Leveling and finishing the walls → Selecting and applying a primer → Removal from the surface → Stretch ceilings and technologies → Reviews and testimonials
Expert opinion
Strebizh Viktor Fedorovich, leading construction foreman
First, decide where the stand will be located on a windowsill, on the wall of a balcony, or simply on a tripod in the courtyard of a country house or cottage. If you want to clarify something, please contact me!
DIY monitor stand | BigHandMade
- Drywall is a material from which you can create models of unusual configurations, but additional reinforcement of the base is required.
- Chipboard is a cheaper option that is easier to process.
- MDF is the ideal choice for this job, characterized by its environmental friendliness, durability and low weight.
- Wood is the best solution, since the stand will ultimately be of high quality, durable, aesthetically pleasing and suitable for any interior.
DIY TV stand: tabletop stands made of wood and floor stands made of metal, other options. How to make them step by step?
To build a laptop table on wheels, you need to ensure that the floor product is equipped with furniture wheels. To create the basic structure, you can take any of the master classes presented above.
Expert opinion
Strebizh Viktor Fedorovich, leading construction foreman
Among the main advantages of this product with a cooling effect are its low cost and flexibility, the ability to manufacture a device that will ideally fit the size of your own device. If you want to clarify something, please contact me!