Crafting table
Dimensions of the workbench
The height of the surface of the tabletop should be such that a worker can operate tools and equipment while standing. The workshop owner determines the height of the workbench himself - according to his height. The height of the desktop ranges from 75 cm to 80 cm.
The size of the countertop is determined by the area of the utility room. The table should not impede free passage around it.
Workbench material
- Tree. A wooden table is often used. The workbench is made of timber and boards. The legs of the table are secured with diagonal crossbars for reliability.
- Metal. The most reliable workbench design is a workbench welded from a metal profile. Manufacturing a welded product requires having a welding machine and experience working with it.
The table top is made in the form of a shield from knocked down boards using pieces of timber. The shield is rested on the legs of the table and fastened with nails or screws. The connection parts are made from angle steel.
The options for assembling a wooden workbench are different, but they have one thing in common - the table structure must be stable and withstand static and dynamic loads.
If the surface of the workbench will be subject to accidental impact from cutting and sharp tools, then the tabletop is covered with tin or a metal sheet is placed on top.
The supporting frame and table legs are welded from steel angle and strip. For auxiliary parts, pieces of reinforcement are used.
The table top is made of metal sheet, 8 - 12 mm thick. A thick sheet will significantly increase the weight of the workbench, which will make it difficult to move.
Construction of houses
0 votes
+
Vote for!
—
Vote against!
All carpentry and improvised tools used by a skilled owner in everyday life should be carefully stored in one place. For these purposes, you need a well-equipped home workshop, where each thing has a strictly designated place, all accessories and tools are laid out on their own shelves. In the workshop it is convenient to make something with your own hands, to repair broken things, but in order for the work to take a minimum of time, it is important to properly arrange this space.
Table of contents:
- Where to set up a home workshop
- How to organize space in the workshop
- Heating and lighting of the workshop
- Necessary home workshop equipment
Where to set up a home workshop
A corner for tools can be allocated anywhere in a house or apartment, but it is much more difficult to attach a small woodworking machine, a workbench with a vice, an electric planer, a grinder and other equipment. With a small amount of available tools, when there is no separate room, you can find a little space in your own apartment. Of course, it is unlikely that it will be possible to equip a full-fledged carpentry workshop in a small apartment with a standard layout if there is no specially designated room for this. Therefore, you will have to find another place to place the machines and tools.
A tool working in a home workshop, being located right in the apartment, will disturb both your family and the neighbors living behind the wall, unless you use it occasionally and for a short time. In addition, the voltage required to operate the tool may cause power outages. When working with wood, sawdust, shavings and fine wood dust are formed, which are difficult to completely remove after working on the machine. The possibility of a short circuit or spark during operation of the machine sometimes creates a fire hazard in the apartment. That is why the workshop and equipment are moved to non-residential premises.
1. If woodworking equipment is used frequently and generates profit, and there is so much of it that it is no longer possible to place it in your home, then you will have to find a separate place for this. This is especially true for machines and other equipment that require sufficient space to operate. It could be:
- an unused summer kitchen or veranda in a private house;
- a small private or rented garage with electricity;
- attic or semi-basement of the house;
- an empty room in the basement of a high-rise building;
- a specially designated extension to the house;
- one of the rooms of a large private house with a separate entrance;
- thorough outbuilding - home workshop: video.
2. If there is no alternative, in the form of an outbuilding or a garage, a small amount of household power tools can be placed in your home. A home workshop in an apartment can be located:
- on a specially equipped glazed balcony (convenient when there are two of them in the apartment);
- on the loggia (equip one side wall with shelves);
- in a well-lit pantry (on shelves);
- in the spacious hallway (dedicate one built-in cabinet for storing tools);
- in the kitchen (pencil case or cabinet only for the master, lockers in the soft kitchen corner);
- in the hallway in built-in wardrobes and on mezzanines (not very convenient, but effective);
- in a niche equipped for storage under the stairs of the first floor (next to the apartment).
Let’s make a reservation that in the indicated places it is only convenient to store the tool, but using it if there is no space will be much more difficult. For any workshop you need at least 2.5 - 5 sq.m of separate premises. For these purposes, it is most advisable to use a loggia, but, again, neighbors will complain about the noise of the instrument. If this is a temporary matter and you don’t have to work for long, then you can refer to repairs, but you will have to simultaneously look for a separate room. For example, if you have friends who have an empty garage next to their house, negotiate an inexpensive rental or for minor repair services.
Attention: If several good machines and expensive power tools are stored in the garage, then it is worth insuring it along with all the equipment. Especially if there is a possibility of fire, flooding, theft and other causes of disappearance and damage to home workshop equipment and stored property! Lightweight, portable power tools that are used periodically are best stored at home - in the pantry or on the mezzanine.
If you are going to earn extra money by renting workshop equipment, strict accounting is important. A special accounting journal must be kept for the instrument being leased, which clearly indicates the date and time of issue, the amount of deposit and rental, the deadline for return, the name of the client (passport details and registration are possible) - so as not to have to search for your property.
How to organize space in the workshop
When choosing a place for a workshop, it is important to take into account the minimum area, without which it is impossible to fully work. The workshop space, ideally, should have several functional areas:
- place for machines near the outlet;
- rack or shelves for accessories and small tools;
- a corner where cleaning tools and a container (box or bucket) for production waste are stored;
- various attachments for the home workshop;
- hanger and shelf for workwear;
- free area for storing finished products;
- wall cabinets for small parts and fixtures;
- a place to store raw materials and materials for work.
There must be enough space in the center of the workshop and at the working surface of the equipment for the free movement of the master and his assistant if help is needed. The area occupied by a machine or workbench is multiplied by 2 - this is the coefficient of the minimum working area. Plus, you need space for free movement, changing working equipment and small tools - this is at least 2-3 sq.m.
Heating and lighting of the workshop
When setting up a home workshop with your own hands in an unheated room, it is important to consider heating in the winter if there is work all year round. Heating appliances will be needed to maintain comfortable working conditions. This is also important in order to periodically warm your hands, especially when working with metal, even if you have work gloves. Heating of the room will be needed when the workshop is located:
- in an unheated garage;
- in the attic;
- in the basement of a private or multi-storey building;
- on a glazed loggia;
- in an attic or attic.
Attention: A room without insulation and proper ventilation, which is heated periodically, results in increased humidity, condensation formation and the creation of conditions for the development of fungi and mold. Dry and fairly warm air is favorable for storing power tools and metal products. Dampness gradually deteriorates instruments and electrical sockets and wiring.
The simplest heating method is to use an electric heater or an oil radiator. It is much more effective to use a fan heater, since it has a directed flow of warm air. A convector or infrared heater is also suitable. But all these devices use a lot of electricity, and it takes time to create the desired microclimate. In an insulated room or with central heating, a working microclimate is stably maintained.
High-quality lighting is not just comfortable conditions for working and making homemade devices for the home workshop. This is also an important safety requirement - with poor visibility or insufficient lighting in the work shop, the likelihood of domestic injuries increases. Troubles from using power tools in insufficient lighting occur approximately 40% more often than under comfortable conditions or with additional illumination of the working plane. The best option is to additionally equip the place near the machine or workbench with a lighting device.
Tip: If you have to work all day in a closed garage or basement without natural light, it is important to provide interior lighting with the right spectrum that is beneficial for vision. Doctors say that combined artificial light is most suitable for the eyes - universal neon (fluorescent) LBU lamps in combination with ordinary incandescent lamps. The flickering light of energy-saving lamps and neon lamps alone is not suitable for constant illumination of the workplace.
When lighting the work area, it is important to provide diffused light so that there are no sharp shadows or distorted proportions and sizes. It is important to consider the total power of electricity consumed so that the machine, air heater and lighting devices do not spontaneously turn off due to overload. It is better to install several sockets to distribute the load.
If connecting electricity to your home workshop is only in your plans, then it is important to consult with a specialist so that such problems do not arise when the operating equipment is fully loaded. To illuminate an ordinary garage, one incandescent light bulb from a manually laid cable is enough, but for a home workshop, the load on it will increase significantly.
Important rules for setting up a home workshop:
1. Each machine and power tool must have its own designated place and free access to the working plane from 2-3 sides.
2. There should be twice as much free space as the space occupied by the equipment.
3. It is better to keep expensive power tools that are not currently in use in a separate cabinet, especially if numerous customers and visitors come into the workshop.
4. The floors in the room must be level and hard for the stability of the equipment.
5. It is important to comply with all fire safety measures, ground machines and equipment, and install a powder fire extinguisher.
6. The room must have ventilation and low humidity.
7. It is advisable to have sufficient sound insulation in the workshop.
8. Daily cleaning of the work area is important for health; it is better to use a powerful vacuum cleaner to remove dust and small debris; be sure to have a rag on hand to remove oily contaminants.
9. It is advisable to separate waste containers - for wood scraps and metal waste, and also separately for other waste.
10. It is advisable to have a small supply of drinking water in the workshop in a closed container in a visible place.
11. Paints, varnishes, stains, solvents and other technical liquids should be stored separately. They need to be removed as far as possible from heating sources, places of possible wiring short circuit and open flame.
12. It is important to remove all waste in a timely manner - throw away used containers containing flammable liquids and technical lubricants, hand over scrap metal and throw away unnecessary containers.
13. There should be a bucket of dry sand in the workshop - it will be needed to extinguish the fire of a machine or power tool. For the same purposes, you can use a tarpaulin, a thick blanket or old outerwear to block the access of oxygen to the flame.
14. Upon completion of work, the machine and workbench must be cleaned, since accumulating sawdust and technical oils contribute to the spread of fire.
15. In any workshop, there must be a complete first aid kit in a visible place (bandaging materials, tourniquet, hydrogen peroxide, iodine, brilliant green, painkillers, plaster and medical glue for small cuts).
Remember: Cluttering your home workshop is a potential threat to life, it can cause fire and suffocation! When using chemical components, use a respirator and safety glasses!
Necessary home workshop equipment
If you have a home workshop, DIY equipment can also be added to what you already have. The base is a work table, workbench or other convenient plane where you can attach the necessary devices.
1. Workbench - there is a metalworker's or a carpenter's one, it is twice as long, and you can make it yourself - video.
2. A woodworking machine is the basis of a carpentry workshop. Sometimes they are made by hand, but it is easier to purchase a ready-made one inexpensively if it will be used often. For occasional work, it is wise to contact a carpentry shop for product blanks. A lathe is often used.
3. Vices and clamps are the main devices for holding the materials being processed.
4. Required set of hand tools for woodworking:
- set of chisels;
- plane;
- hand drill with drill bits included;
- feathers for making large diameter holes;
- hacksaws;
- square and tape measure;
- hammer and mallet;
- pliers, pliers, etc.
5. The most common power tool:
- drill-driver;
- angle grinder (grinder);
- jigsaw;
- circular saw;
- manual electric router, etc.
6. To work with metal you need:
- hacksaw;
- chisel;
- a set of needle files and files;
- anvil;
- metal scissors;
- a set of taps and dies for the main types of threads plus metal drills.
Nails of different sizes, screws, self-tapping screws and other fastening materials should be sorted in a separate box.
Today, multifunctional universal power tools with removable attachments are quite in demand, which successfully replaces several units of power tools for different purposes. The home craftsman should also always have a stocked portable tool box at hand.
Stool
Making a stool with your own hands is quite simple:
- 4 supports, 50 cm long, are made from timber 40 x 40 mm.
- The legs in the middle of the length are fastened with crossbars.
- Grooves are made in the supports using a chisel.
- At the ends of the transverse planks, protrusions are cut out using a chisel to fit the grooves.
- The protrusions are lubricated with wood glue and inserted into the grooves.
- While the glue dries, the supports are tightened with a belt.
- The seat is cut out with a circular saw from a wide board 30 mm thick.
- A seat measuring 300 x 300 mm is nailed or screwed to the legs of the stool.
The main points of creating machines
Important: it is better not to make drawings of plywood machines with your own hands, especially if you do not have strong engineering and technical knowledge. As a rule, professional factory drawings are taken as a basis. Only instead of metal, a wooden plywood sheet is used. As for strength, it is often achieved by increasing the thickness of supporting and load-bearing structures by at least 3 times.
Grinder machine.
When starting to cut a sheet, you should remember that the more revolutions the tool can produce, the smoother the corners and the better the quality of the cut. Both jigsaw blades and replaceable circular saw blades are taken with fine teeth.
The tool on the sheet or the sheet towards the tool should move as slowly as possible, otherwise there will be a lot of chips on the top layer of veneer.
Tip: to avoid chipping during cutting, experienced craftsmen use regular tape. It is glued to the surface and a cut is made along it.
Copy-milling unit.
It’s not for nothing that we mentioned that you need to be fluent in basic carpentry skills. In such structures it is not customary to use nails or self-tapping screws; all connections are made only according to the tongue-and-groove principle. Moreover, the joining must be precise; no gaps or backlash are allowed.
Such requirements are due to the fact that a machine of any type and purpose necessarily, to one degree or another, experiences vibration. And nails and screws in wood can become loose quite quickly during vibration. As a result, your machine will fall apart during operation, which can lead to extremely undesirable consequences, including injury.
Bench jigsaw.
Both the sheets themselves, when joining between planes, and the tongue-and-groove corner joints are often only glued. There are now a lot of adhesives for wood on the market, but most often good old PVA is used, not just the stationery kind, but the construction kind.
Tip: when drilling or milling, there is a high probability of chipping on the bottom jacket of the sheet. In order to avoid such consequences, you need to place unnecessary plywood scraps under the sheet, of which there are enough in any production.
Plywood circular.
Not least important is the final grinding of the assembled unit. This is caused not only by concern for the appearance of the car. Poorly polished corners can lead to splinters. Plus, sharp edges will constantly catch and the veneer will chip.
As for painting and varnishing, this is left to the discretion of the master. But in any case, the machine should at least be covered with primer. In the most budget option, it is a mixture of water and the same PVA, a 1:1 ratio is enough. This protection will keep the veneer from drying out and cracking.
Mini turning unit.
Mini vise made of metal loop
When performing small operations, small parts often need to be clamped. To do this, use a mini vice made from a one-piece door hinge.
Matching holes are drilled in both hinge flaps.
A bolt of suitable diameter is threaded through them. On the other side, a wing nut is screwed onto the bolt thread. The parts are inserted into the opening between the doors and clamped by tightening the nut. The device can be used as a clamp.
Folding table for the master
1. Let's start with a folding table, which will be an excellent assistant in a small workshop. It will help save an already small area. The table has a compartment for all small things. A shelf on which you can lay out the necessary tools. Thanks to the large number of holes, a clamp can be used to quickly and conveniently fix the workpieces. Stops are inserted into them. It is convenient to fix the parts in a vertical position. If we insert it into the guide bolts, we get additional stops. Having a set of clamps and such a table, you can comfortably perform a variety of jobs.
DIY electronics in a Chinese store.
Hammer upgrade
A common occurrence is a wooden handle falling out of the hammer socket. One of the ways to create a reliable handle fastening is to make a cut in the upper end of the handle. The holder is inserted into the hammer socket. The cut is filled with Moment glue. A wooden wedge is driven into the groove.
In order not to look for nails while working, and especially not to hold them with your teeth, a round magnet is glued into the bottom of the hammer handle. Magnetic nails will always be at hand for the worker. It is dangerous for the hammer to accidentally fall out of your hand at height. To prevent this from happening, a hole is drilled in the handle through which the cord is threaded. The worker's belt is threaded through the loop.
Pipe bender
A device for bending metal pipes is a metal rod welded to the frame. I make the rod from a piece of reinforcement. The pipe is placed on a pin, and on the other side a long piece of reinforcement is inserted into the pipe. By pressing the lever, the pipe is bent at the desired angle. The device is suitable for small sections of round pipes.
Making a pipe bender with your own hands
- Two axles are welded to a metal frame from pieces of smooth reinforcement, onto which old car hubs are placed.
- Protruding chamfers are removed from the hubs so that the side surfaces of the rollers are smooth.
- The channel is placed in the opening between the hubs with the shelves facing up.
- The same profile, smaller in width, with the flanges down, is placed into the channel.
- An axle is welded to the top of the inner profile, onto which the third hub is placed.
- A vertical shelf made of steel sheet is welded to the frame.
- A hole is cut in the vertical bar and the bearing is pressed into it.
- A nut is secured to the middle channel by welding.
- One end of the screw rod is screwed into the nut.
- The screw shank is threaded through a bearing in a vertical bar.
- A rotary handle is welded to the shank on the back side of the bar.
- A swing arm is welded to the axis of the drive hub.
The machine is ready for use. A profile pipe is inserted between the rollers and clamped with a screw. The rotary lever drives the rollers, which pull the pipe, bending it. The bending radius is set using the rotary handle of the screw.
A pipe bender made from car hubs is one of the device options. There are many designs of bending devices. In some models, the drive roller is coaxially connected to the motor shaft.
Impact screwdriver from starter
There are situations when it is impossible to unscrew a rusted bolt or screw with a conventional tool. An impact screwdriver does this job perfectly. The tool is made by hand from parts of a car starter:
- The shaft and bushing are removed from the starter housing.
- Part of the shaft is cut off, leaving a splined rod.
- A piece of pipe of suitable size is placed on the sleeve.
- A piece of bolt of equal diameter is welded to the end of the pipe.
- The end of the shaft is ground into a tetrahedron shape, onto which heads of the required size are placed. For screws, a bit is inserted into the head.
When you hit the head of the bolt with a hammer, the shaft slides with beveled splines inside the sleeve, performing a rotational movement. The stronger the blow, the more force the shaft rotates.
Homemade bow saw
A bow saw is a convenient tool for cutting tree trunks and lumber. The design of the saw is simple; making a hand tool with your own hands is not difficult. To do this you need to prepare tools and materials:
Tools
- drill;
- hacksaw;
- chisel;
- hammer;
- knife.
Materials
- cord;
- wooden slats 20 x 40 mm;
- cotter pins – 2 pcs.;
- stalk ø 10 mm;
- saw blade;
- stain;
- wood varnish.
Step-by-step instructions for making a bow saw
- The lath is cut into three parts (two vertical side strips and a middle horizontal strip).
- Grooves are made in the side handles using a chisel.
- At the ends of the centerpiece, protrusions for grooves are cut out with a chisel.
- The centerpiece is connected to the side handles.
- Through holes are drilled at the joints. Wooden cotter pins are driven into them.
- Cotter pins form hinge joints. This is necessary for the mobility of the lower ends of the side slats when the canvas is tensioned.
- Cuts are made at the lower ends of the sidewalls - parallel to the middle.
- Short bolts are inserted into the holes of the saw blade and tightened with nuts.
- The blade is inserted into the cuts so that the bolts are on the outside of the structure.
- Circular grooves are cut out at the upper ends of the handles.
- Loops are made at the ends of the double cord, which are placed on the grooves.
- A handle is inserted between the strings of the cord, the long end of which rests on the mullion.
- The saw string is twisted using a handle, achieving the desired degree of tension on the saw blade.
- The wood is covered with stain and two layers of varnish.
- After the varnish has dried, the saw is ready for use.
The procedure for assembling a homemade device
As practice shows, it is most convenient to assemble a homemade machine for drilling holes in printed circuit boards in a certain sequence. You must act in accordance with the following algorithm.
- The frame is installed, and legs are attached to its underside, if they are provided for in the design.
- A movement bar and a holder frame on which the drilling head will be mounted are attached to the assembled frame.
- The holder frame is connected to a shock absorber, which is also fixed to the equipment frame.
- A handle for controlling the movement of the drilling head is installed, connected to a shock absorber or holder frame.
- An electric motor is mounted, the position of which is carefully adjusted.
- A collet or a universal drill chuck is attached to the shaft of the drive motor using adapters.
- A power supply connected to the electric motor via electrical wires is being installed.
- A drill is installed in the chuck and securely fixed in it.
- The assembled homemade machine is tested by trying to drill a hole in a dielectric sheet with its help.
To ensure that your homemade mini-drilling machine can always be disassembled and modified, it is best to use bolts and nuts to connect its structural elements.
If you want to make your own mini-equipment for making holes in printed circuit boards, you can always use the drawings and advice of those who already own such a machine and are actively working on it in their home workshop.
Homemade folding stand
A very original idea for a folding stand for hand tools. Everyone is in their place. It doesn't take up much space. The design is based on furniture guides. The clamp holds the stand in the upper position. Neodymium magnets prevent instruments from falling out of their stocks. A great idea for DIYers who love to do everything with their own hands.
Cheap homemade grinder
The most budget version of the grinder, created by the Samodelkins. Plastic bottles are used as rollers. They are mounted on bearings. The belt on the rollers is adjusted using thumbwheels. The tension is adjusted with a bolt. The structure is driven by a drill. You can slightly improve Samodelkin’s design by replacing plastic bottles with polypropylene tubes.
Cyclone for carpentry workshop based on a vacuum cleaner
And at the end of the material, we offer our readers a photo selection of homemade cyclones, which are a necessary device for carpentry work.
Option 1
zalman3000 (FORUMHOUSE User):
My first cyclone failed and I decided to make a new one. It took 20 minutes to do everything. To make it, I took a used putty bucket and polyethylene pipe fittings. They hold better and tighten quickly, ensuring the tightness of the assembly.
An oil filter from Moskvich was used as a filter element.
This is what happened in the end.
Useful hammer upgrade
When working with a hammer in an inconvenient place, you often have to take nails with you in your pocket or even in your teeth. Agree, this is not very pleasant.
By installing a small but powerful magnet on the hammer handle, you can at least partially solve this problem. The upgraded hammer will carry the nails itself and you can safely work without holding the next nail in your teeth. It's convenient, and your teeth don't get damaged.
The self-taught Samodelkin’s device became a revelation for the craftsmen
The master is not distinguished by greed, which some masters suffer from, who do not want to share their finds with others and, like a dog in the manger, neither to themselves nor to people. And this self-taught inventor came up with a great device with which you will always be at your best and can even improve your standard of living. Why, you can put such a tool into production and sell it to everyone. Maybe this is too strong a word, but it’s worth thinking about automating and mechanizing all routine work at home.
Products for inventors Link to the store.
8 tools for craftsmen.
You probably haven't seen many of them. Cool instruments are created by DIYers. These devices will help you work more comfortably in the workshop. The video was filmed on the “Hands from Shoulders” channel.
Homemade soldering iron stand with your own hands
Many offline and online stores sell good and quite convenient stands for soldering irons, and inexpensively. But if you wish, you can make them yourself. It will be cheaper, plus you can adapt the stand to your own needs.
There are a lot of ideas for making them, so we decided not to limit ourselves to just one, but to make a selection of the most interesting, in our opinion, homemade soldering iron stands, made with our own hands.
Homemade tool rocks the internet
This video shook up the community of invention lovers on the world wide web. The master thought about this idea for years and finally brought to the public discussion an idea that was ingenious in its simplicity and radically profitable for those who used to chisel walls with a hammer drill, realize their inclinations as a woodpecker and a brilliant builder-grinder, and now can make themselves rich for free, working in silence a workshop in a garage or even in a separate building.
And at the same time, you don’t have to spend money and take money saved for beer out of your stash. All this is free - the master loves to show the whole world the useful things he comes up with.
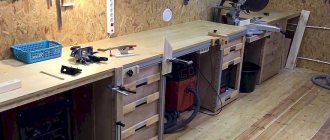
We make a carpentry workbench with our own hands according to the drawings: video instructions and photo examples
Among the common tools for a do-it-yourself carpentry workshop is a workbench. A durable and dimensional table that allows you to securely fasten the workpiece is useful for high-quality cutting of wood and creating various elements from it.
Example of a carpentry workbench
The device package includes:
- Working surface. Hard wood is used for it to increase the life of the device. The thickness must be at least 6 cm.
- Supports. Assembled from wooden beams or metal plates. The main task is to ensure the stability of the entire mechanism.
- Vise for securing the product. If the table is long, you can install two vices at once.
- Tool box. A useful recess or pull-out design that provides quick access to needed small parts.
Purchased folding workbench for work
To assemble a carpentry workbench for your workshop yourself, you should choose a drawing and purchase materials for the work.
Instructions for assembling a wooden workbench with your own hands
You can buy a wooden workbench in a store or through online catalogs, but it’s cheaper to make it yourself. Let's take as a basis a simple option with typical tabletop dimensions: length - 150-200 cm, width 70-120 cm.
The manufacturing work will include several stages:
| Image | What need to do |
| Make the top cover from thick boards to create a shield with a width of 70 to 200 cm. You fasten the elements with long nails, and you need to drive them in from the outside and carefully bend them from the inside. The working surface of the workbench is made only of wood or chipboard. | |
| Make the top cover from thick boards to create a shield with a width of 70 to 200 cm. You fasten the elements with long nails, and you need to drive them in from the outside and carefully bend them from the inside. The working surface of the workbench is made only of wood or chipboard. | |
| Sheathe the lid along the lower perimeter with a 5 by 5 cm beam. This will make it more convenient to attach the vertical supports. The location of the supports depends on the size of the tabletop. It is better to make them from thick rectangular timber at least 120 by 120 mm. | |
| The carpentry workbench must be installed correctly. Be sure to secure it firmly. If it will be mounted outdoors under a canopy, dig holes for supports. Indoors, use other fastening methods. |
Uprooting of seedlings and weeds from a square for homemade people
Good afternoon My long absence from the channel was not in vain; during this time I managed to do a lot of household chores. And of course, I stocked up on a bunch of homemade products that I will show you, my dear subscribers and guests! There is no point in posting everything at once, because this also takes a lot of time, but if possible I will try to post at least one per day. Not only am I sitting at the computer, I can’t leave my workshop. Messing around in the garden is another hobby of mine; I spent a lot of time there in the summer. Caring for plants and weeding, although a pleasant activity, however, also requires a lot of effort. And how I would like to make a lot easier. Wanting alone is not enough, so you need to make useful things yourself that will make your work easier and make it a pleasure, rather than hard labor with a farmhand.
Today I’ll show you a device that I successfully used almost all spring and summer and will, God willing, last for more than one season. Do-it-yourself uprooter To make it, I took a square with walls 40 by 40 mm, 220 mm long. I didn’t cut this length on purpose; I had a lot of such scraps left over from other construction work. I drew two oblique lines along the walls to the corner of the square. Having cut it out, it turned out to be such a spear. A pipe with a diameter of 25 mm was welded into the inner part of the angle. From the outside I welded a square right in the middle of the square. Instead of a square, you can weld a square, but it seemed to me that it would be more convenient.
A metal handle was installed in the pipe so that it would not break under load, because the force falls mainly on the handle. When working with a flat cutter, some types of weeds still germinate after a certain time, especially after rains. And having ripped it out by the roots, I eliminated this possibility and my garden became well-groomed and beautiful. Without damaging the root system, they can also remove seedlings for replanting, which is what I did at the beginning of the season with strawberries and other plants.
Source
Making a carpenter's vice for a workbench with your own hands
Professional “homemade workers” assemble not only tables for work, but also vices with their own hands according to drawings. Any design of such a clamp will include several elements:
- Supports, where each one has a sponge for clamping.
- Moving jaw.
- Metal guides. The sponge moves over them.
- Lead screw for moving elements.
- Collar. Necessary for rotating the screw.
When making a homemade vice with your own hands, you can use various available materials. For example, there is a design option made from a profile pipe. To do this, prepare several pieces of pipe of different sizes, a steel stud with large threads and double nuts.
Instructions for creating a bench vise from a profile pipe:
| Image | What need to do |
| The largest pipe acts as a body. Supports are soldered to it from below. A 3-4 mm steel flange is put on the back side. A hole for the running nut is drilled in the center, and a rear jaw is welded opposite the front support. | |
| The largest pipe acts as a body. Supports are soldered to it from below. A 3-4 mm steel flange is put on the back side. A hole for the running nut is drilled in the center, and a rear jaw is welded opposite the front support. | |
| A front steel flange is welded onto the internal moving part. A stud is mounted in it, with lock nuts attached to it. Thrust washers are placed on both sides of the flange. The last element is a movable tube attached to the front jaw. |
DIY metal workbench drawings
A metal workbench does not differ much from a carpenter's workbench. It is based on a rigid metal rather than wooden frame. A vice is attached to it, and the entire workbench is designed to withstand the force of a sledgehammer.
Option for a home metal workbench
Do-it-yourself metal workbenches can have one, two or three cabinets, and also not have shelves or drawers for small parts. In terms of strength for working in a garage, you can make a regular table made of metal up to 5 mm thick and a reinforced structure where sheets from 10 to 30 mm are applicable.
Here are some useful plans for making a metal workbench for your workshop:
A simple version of a mechanic's workbench
Dimensions of a homemade tool
Combining a workbench and a work table
Fixed vice
The self-taught self-made man rocked the network with his video
The self-taught inventor captivated the online community of craftsmen with his video, in which he presented a fundamentally new utility model for improving the efficiency of work for craftsmen and those who like to work in the garage. The best part is that it doesn't require you to buy an idea. And what’s more, you can do all this yourself and even a novice master can handle it. All this is to the benefit of every resident of the cities in which the masters have settled, because with such a high level of skill, now you won’t want to hammer the walls at home on weekends or rattle with some kind of ultra-decibel grinding machine of unknown purpose. With such a device, you can safely create your own separate workshop and live the rich life of a Russian craftsman.
Knife sharpening device
No home is complete without a knife in the kitchen. It is quite difficult to sharpen correctly without special tools: it is necessary to maintain the desired angle and achieve the ideal sharpness of the blade.
Option for a home device for sharpening blades
For each knife, a certain sharpening angle must be observed:
- A razor and scalpel require an angle of 10-15⁰.
- Knife for cutting bakery products – 15-20⁰.
- Classic multifunctional knives – 25-30⁰.
- For hunting and hiking, take a device with a blade angle from 25 to 30⁰.
- If you want to cut hard materials, then sharpen at an angle of 30-40⁰.
In this way you can adjust the sharpening angle
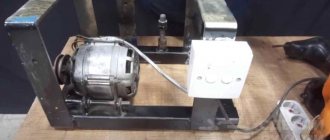
To ensure the desired angle, it is worth buying or making a sharpening device. For example, you can assemble a sharpener from washing machine motors with your own hands.
If you do not use sharpening every day, then 1000 rpm is enough for high-quality results and a long service life of the device.
To assemble such a machine, you will need a motor from a washing machine with a power of 200 W. To create a sharpener from a washing machine engine, prepare:
- the motor itself;
- metal for the casing with a thickness of 2 to 2.5 mm;
- flange tube;
- sharpening stone;
- nuts;
- trigger mechanism;
- cable for connecting to the electrical network;
- a metal corner or a wooden beam for the frame.
There are simple do-it-yourself sharpening machines without motors. For example, you can make a device from bars. To do this, prepare two abrasive stones of the same size and a sharpening stone.
An easy version of the “homemade” sharpener
The progress of work on creating such a simple device will be as follows:
- Sand the wood blocks with sandpaper, removing any burrs. Make markings depending on the desired angle.
Materials for work
- Attach a stone to the drawn line to give the blade a sharp edge. To do this, attach it to the block and mark its width. Then, make cuts on the markings, up to 1.5 cm deep.
- Attach abrasive stones to the resulting recesses so that the grooves coincide. Then, install the sharpening stone by screwing it onto the bolts.
Ready-made sharpener option
There are many ways to make a homemade knife sharpener. Choose the one that suits you and try to create a convenient and useful tool for your home.
Device for sharpening drills for metal
They make their own not only a sharpener for blades, but also a machine for sharpening drills for metal. Here are a few drawings useful for work:
Convenient option for everyday use
Expanded drawing
Ready home machine
Another convenient option
A simple cheap homemade device for picking berries
We recommend this device for DIYers.
Gooseberries are a tasty and healthy berry. The plant itself is quite unpretentious and does not require any special care. The berries grow large and are quite convenient to pick. And everything would be fine if not for the prickly gooseberry branches. Because of these garden “cacti,” my hands used to constantly have small scratches. And several times you will think “do you need it - there are so many berries” before you climb deep into the bush for the harvest. But a few years ago my husband made my life easier. He spotted one very simple but useful device for picking berries on the Internet. What is it used for and how is it useful?
In fact, such a picker can be used not only for collecting gooseberries. I also use it to collect any other berries/fruits in hard-to-reach places that I can’t easily reach with my hand. For example, to remove plums, cherries or apples from high branches. How to make a device for picking gooseberries? Everything ingenious is simple! Take a plastic bottle and cut a droplet-shaped hole on the side. Depending on what berries/fruits your picker is intended for, this is the diameter of the drop. For gooseberries, 5-7 cm is enough, for apples and plums more, so that you don’t have to aim for a long time and try to hit the fruit. The volume of the bottle will also depend on what you are collecting. For berries, a 0.5 liter bottle is better.
The droplet's nose should be directed towards the bottom of the bottle. You can also make a cut a couple of centimeters in continuation of the spout so that the branch can be better grasped. That's it, our device is ready! We will pick berries by holding it by the neck.
It really is much easier to do this with him. Not only do your hands remain scratch-free, but the work also goes faster. After all, the harvested crop will be poured into the top of the bottle. Accordingly, there is no need to “climb out” of the bush after each berry, put the harvest in a can or jar and climb again. Plus, we can get berries even from the most inaccessible places. And the most important thing is that such a device is made in 3 minutes, does not cost a penny, and makes life much easier. If it gets lost or dirty, no problem - we’ll do another one without any problems! So, gardeners, take action! If the article was useful to you, give it a “thumbs up” and subscribe to the channel for summer residents and gardeners “SADOёZH”. Source
DIY garage press options
Homemade garage presses allow you to process various products and materials under pressure. Structurally, the equipment consists of cylinders. In the garage, such a machine is useful for straightening or fastening various elements, as well as for bending sheets of metal or pressing cardboard.
An example of a homemade press
For private use, a capacity of 10-15 tons is sufficient. Most often, a bottle jack is used with a provided hand pump, which acts as the main structural element.
Here are some interesting options for homemade garage presses:
Option from scrap materials
Rails will also come in handy
Ready purchase model
Convenient homemade press
Homemade apple press
4. If the harvest is large, then the question arises, where to put it? A great option is apple juice. For store-bought juicers, apples need to be cut and peeled, which is inconvenient. The grater shown below can handle whole apples. All that remains for Dali is to squeeze out the resulting mass under pressure. As a result, we get natural, tasty juice and almost dry cake.
Second part