For several years I dreamed of purchasing a light table for sand painting. The finished tables I saw were quite large in size and at a decent price. In addition, I didn’t want to overwhelm an already small apartment with oversized furniture.
In this article I will tell and show how I made a sand painting table with my own hands.
We take the LACK table from IKEA as a basis. It has a very small size: 55 cm x 55 cm and a height of 45 cm, there are many different colors, I chose green. At that time it cost 600 rubles.
Stage 1: Choosing the right acrylic (glass)
Ideally, I wanted to make the top of the table from one thick piece of acrylic with a step around the perimeter. However, acrylic must be milky (white) for uniform light dispersion, but it is quite expensive and generally difficult to find with a thickness of more than 5 mm. In addition, in order to make a step you need a router or something similar. My friends in the advertising workshop (where I bought glass) did not have such equipment. Instead, I ordered two sheets of acrylic from them. One transparent, 8 mm thick and one milky, 3 mm thick.
Glass sizes
- transparent acrylic 480mm x 480mm
- milky acrylic 550 mm x 550 mm (table size)
*in the photo the thick acrylic is also white, in fact it is transparent, just the protective film on it is white
Sand painting materials
To learn to draw on sand, you need to purchase a list of materials and equipment. All of them are affordable, you won’t have to fork out a lot of money. Here's what the young artist will need:
- table with sides and a lighting device at the bottom;
- sand;
- antistatic agent in a can;
- additional equipment - art brushes, sticks, sieve, templates;
- a wide and flat brush for sweeping grains of sand from the corners of the table.
An antistatic agent is necessary to prevent sand grains from sticking together, which is inevitable when quartz material is used repeatedly. The spray should be sprayed before each lesson. A regular antistatic agent is suitable, preventing synthetic clothing from sticking to the body.
You can buy a table or make it yourself. Homemade design - sides connected in a rectangular shape with a bottom made of frosted glass or plastic up to 5 mm thick. It is necessary to fix the lamp from below so that diffused light is obtained. The lighting can be anything: in the warm and cold range, even colored. The legs of the table should not wobble, otherwise when drawing you will not be able to draw neat lines.
The finished table is a structure with sides and a bottom in the form of an illuminated tablet. The optimal format is 130x70 cm, but for a child 70x50 cm is enough. The height of the sides should be at least 6-7 cm, but from the side of the drawer it is only 3 cm, otherwise it will be inconvenient to draw the lower elements. It is necessary to leave indentations for sand 10-15 cm wide on the right and left sides. It is advisable that these areas be in the same plane as the space for drawing, this makes it more convenient to use many techniques. But some ready-made tables have tray recesses on both sides.
Any sand will do. You can buy an aquarium one at a pet store, and a special one for creativity at a supermarket in the children's section. You can contact a children's and adult creativity studio where sand animation is practiced, if there is such an institution in the locality. They probably won't refuse to sell a small amount of sand. The fraction of the material can also be any. It is advisable to get different ones, since fine sand is convenient for creating tones and halftones, and coarse sand is convenient for creating large image details.
If there is a river near your house, you can dig up sand on the shore. You just have to filter it through a fine-mesh sieve, then rinse. The washing procedure looks like this:
- Pour 4-5 kg of sand into a bucket. This is the standard amount for drawing.
- Fill with water to the edge of the bucket.
- Stir gently with your hand or a large spoon.
- When dust and dirt particles rise to the surface and heavier grains of sand settle to the bottom, carefully drain the water.
- Repeat the procedure until the drained water becomes crystal clear.
- Dry the cleaned material on the balcony if the weather is sunny, or on a radiator, or in the oven.
You can replace sand with semolina, finely ground salt, and to create darker and more contrasting elements of the image - ground coffee.
Bulk material should be renewed once every 3 months, and if the child draws every day, then once every 1.5 months. If this is not done, the sand will become less pliable, since with constant friction the grains of sand are destroyed and the structure of the material softens.
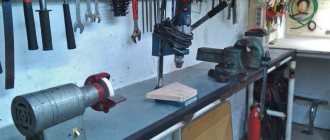
Step 2: Measure twice, cut once
- Carefully mark the top of the table. Check your markings, you can attach a sheet of thick acrylic to make sure that it will fit the cutout in the table. The sheet may not be cut out in exactly the right shape, so it is important to control this point.
- I recommend using only new blades for the mounting knife. To make an even cut, use a ruler as a guide. The ruler should not slide on the surface. Don't rush, because... It's very easy for the knife to jump off the cutting line.
- Remove the cut outer surface of the table. There we will see the honeycomb filling, it also needs to be completely removed.
- Make sure the cutout matches our acrylic.
What will you need?
You don’t need a lot of materials to make a light sandbox:
- boards - approximately 100 by 25 mm for the frame and 20 by 40 mm for the legs, the length of the lumber is at the discretion of the master;
- plexiglass - a piece slightly larger than the planned field for creativity;
- sealant;
- furniture ties;
- varnish or paint;
- diodes for lighting with wiring and plug.
The list of tools is also not too extensive:
- saw or jigsaw for cutting lumber;
- sandpaper or sander;
- cutter;
- brushes for paints and varnishes;
- pencil or chalk for marking.
Stage 3: Trim the corners
Each corner of our table is reinforced with chipboard blocks. They prevent us from installing thick acrylic. If you trim them, they will serve as a good support for the glass. It is necessary to trim to the thickness of the acrylic; this can be done with a regular mounting knife. Be careful, the main thing is not to cut yourself, if you cut off more than necessary, then it’s okay, with the help of scraps and PVA glue you can increase the required height.
Once we are sure that the thick sheet of acrylic fits perfectly into the bed prepared for it, we can begin painting the inside of the table. It may seem that this is not necessary, but it is not. The white color will help diffuse the light more evenly and increase the brightness of our light table.
How to make a canopy
The easiest way to protect your child from the sun's rays is to install a beach umbrella next to the playground. By the way, you can provide a hole for it in the corner of the box. Another option, if there is enough space, is to place the umbrella in the center of the base.
A little more complicated - the tent type. To do this, a crossbar is installed in the center and a windproof fabric such as tarpaulin or nylon is thrown over it. It can be stretched along the edges using pegs in the ground or loops on the curbs.
A roof in the form of an awning is the most complex type of shade canopy. It is installed on two or four support legs.
Instagram @dpolinadel
Instagram @dream_house_from_julia
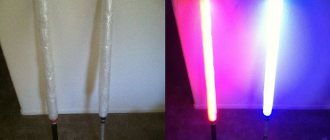
Stage 4: Electrical
Here I had to turn to specialists (familiar advertisers).
- We took 5 meters of self-adhesive LED strip. This tape is powered by 12 volts, so a power supply is required in order for the sand painting table to be plugged into an outlet. The ribbon comes in a variety of colors, but the color chosen was cool white. Because it feels like the brightest.
- We wanted to make a switch, but we didn’t have one at hand
- A hole was drilled in the bottom of the table through which the plug was passed. At the opposite end of the plug, several clamps were tightened so that it did not fall into the hole.
Sand painting technique
The technique of creating sand drawings is not difficult, but when teaching a child you will have to be patient. The main tool is the artist’s hands, but it is possible to use auxiliary devices.
Before your child starts drawing, introduce him to the art material. Offer to immerse your hands in the sand, pour it from one palm to the other, and talk about your feelings. After becoming familiar with the material, you can begin to learn drawing methods.
Fist rash
This is the first DIY sand painting method that a preschooler should master. Ask to take the material into your palm, clench it into a fist, and turn it along a vertical axis so that the grains of sand fall down. Explain to your child that the amount of sand spilled out is regulated by squeezing and relaxing the fist muscles. If more grains of sand spill out, the “mound” becomes denser and darker. This creates images with a smooth transition from light to shadow.
Lines of different sizes
Next, preschoolers master drawing lines of different thicknesses, lengths, and tortuosities. Teach your child to draw dotted lines, curls, and waves. This is the best method of getting used to the original drawing technique for a preschooler of the younger group.
To create a thin straight or curved line, you need to pour a strip of sand from your fist, then put two fingers together - your thumb and forefinger, and run them along the strip. You will get a line of the same thickness throughout. Explain to your child that you should not strain your fingers too much, otherwise the image may turn out uneven. If a thicker line is required, the fingers need to be connected diagonally.
Drawing with different parts of the hand
When drawing on sand, different parts of the hand are used. They move one or more fingers over the material, move them and spread them apart. Large elements and thick lines are depicted with a fist and the edge of the palm extending from the little finger. To create many small details, they poke the sand with their fingertips, and draw fine lines with their nails.
Drawing on dark and light
When the above-described drawing methods have been mastered, you can begin to select a compositional basis. You can draw “in the dark”: fill the background with sand to make light lines on it. Or “in light”, that is, create a dark sandy image on an empty background. Typically, professional artists combine these methods. At the initial stage, it is enough for a child to master them separately.
Drawing with aids
To make sand drawing more fun in kindergarten, let children use not only their fingers and palms, but also additional devices. What you can draw:
- Artistic brushes of different hardness. They are convenient to depict hair and wool.
- Toothpicks, hashi sushi sticks, cooking skewers. Optimal for creating thin and graceful lines, fancy patterns, and detailed drawing. It is advisable to use wooden products; they will not scratch the plastic bottom of the drawing table.
- Comb, small rake. With their help, you get neat waves.
- Colored paper. It is placed on the table and sand is poured on top. Uncovered areas of the design are multi-colored. The method is applicable for creating floral motifs and abstract patterns.
- Funnel. Pour sand through it, create slides, paths, patterns - a fascinating activity.
- Fine mesh sieve. With its help, the table is covered with a thin layer of sand, which can become the background basis for the drawing.
- Stencils. You can use ready-made ones. Or cut them out of plastic lids or cardboard for practice. Or use different flat objects for this purpose. You need to place them on a clean table surface, sprinkle them with sand, and then carefully remove them.
- Pendulum. Attach a round-shaped weight to the thread and give it to the child. Let the pendulum swing over the sandy surface, creating patterns of different depths. This is a wonderful method of strengthening the skill of correct pressure and speed of movement when creating a drawing.
- Cylinder with patterns. You can use a toilet sleeve. Apply patterns on it with a thick layer of glue. Wait until it dries, then give it to your child. Let the cylinder roll on the sand, creating patterned paths.
Stage 5: Lighting Installation
Place the tape on the table, but do not secure/glue it. Make sure that the chosen laying pattern is ideal and the entire tape fits. It is better to start gluing from the end that is close to the connection cable, so that in the end you do not have to drill a new hole. The adhesive tape is quite strong, although I did add a few strips of double-sided tape on the folds and corners just to be safe.
We connect the tape to the power source. Tests show that everything works.
Stage 6: Installation of acrylic
Mark and drill holes in the first sheet of transparent acrylic. Next, we use this sheet as a template for drilling milky acrylic. The holes must be larger than the screws, otherwise the acrylic may crack when screwed.
The corners of milky acrylic can be rounded.
Select fasteners that are the right size for you. There are self-tapping screws of different colors and with different heads; I liked the shiny ones with a round head, which I chose.
Roll it all together and you're done! Try to keep the glass clean, otherwise dust and dirt on the inside of the acrylic or between two sheets will be very noticeable when you turn on the light table.
Lid
The product with a lid has advanced functions:
- allows you to save the image;
- increases safety;
- eliminates rashes;
- when closed, the tablet becomes a convenient shelf;
- the structure on legs turns into an ordinary table that can be used.
Top opening handles
Choose a lid with side fastenings and handles. The smooth surface of the lid looks aesthetically pleasing and can be used as a stand or tabletop. You can buy the cover separately in the online store.
You can make a light sandbox with your own hands
Manufacturing process: step-by-step instructions
- Before treating the surface, the tabletop should be assembled from two prepared boards. Having connected them, sand the base.
- Pour the prepared mixture of epoxy resin and fluorescent paint onto the table. The composition should fill all the cracks, so repeat the procedure 8-10 times. After this, cover the surface with adhesive paper and leave to dry until the next day.
- After removing the paper, sand the finished surface. After cleaning, coat the base with polyurethane paint.
- Run the sander again over the still damp surface. Remove any remaining resin. If necessary, the edges can be cleaned and the corners rounded with a jigsaw.
A table with a luminous surface can be decorated to your liking