Once you start making crafts from this material, you realize that it has enormous advantages, its composition is the simplest and most varied, and you can make anything from it! And today we will learn how to make papier mache with our own hands for beginners, and also look at all kinds of designs from it.
I’ll say right away that there are 2 ways to work with papier-mâché:
- Classic - layer by layer.
- Make a mass like dough. And use it to construct any shapes.
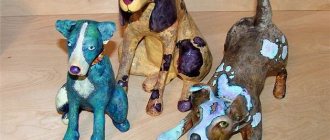
I admit, to get excited about modeling from this material, sometimes it’s enough to look at photos of finished products. And I confidently declare: ANYTHING CAN BE MADE FROM PAPIER-MACHE!
Basic principles of creating papier-mâché
Depending on the product, the work can be of varying complexity, and papier-mâché can be made on any base, which makes differences in the methods of making crafts. But the basic principles of creating papier-mâché with your own hands for beginners are the same in any method. Once these principles are mastered, papier-mâché can become a favorite hobby because it is actually an interesting and relaxing process. Here's how to make papier-mâché:
- Depending on what shape you want the product to be, you need to choose a base. It can be created from any available materials, as well as from paper, wire, plasticine or clay itself.
- The base needs to be protected from glue; to do this, you can cover it with adhesive tape, coat it with Vaseline or vegetable oil, or cover it with foil. All this is done if we are going to extract the base and use it further.
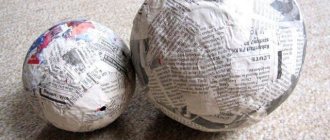
- At this stage, the process of creating papier-mâché begins. Pieces or strips of newspaper or paper are taken, dipped in glue and placed on the base, forming the first layer. Nothing complicated! When gluing the paper, you need to carefully iron it with your fingers, thereby eliminating unnecessary air bubbles, so the fake will be durable and will not get wet. When creating the first layer, make sure that all the pieces are fastened together and lie slightly on top of each other, this is important, because each subsequent layer will rest on this one. This creates several layers, each of which must dry well, otherwise nothing will work.
- When enough layers of paper have been created, the base is separated from the product, if necessary. For example, if a plate or any other important item was taken as a basis. If a balloon was taken, it needs to be deflated. Of course, if the base is wire or something similar, there is no need to remove it, and it won’t work, but the product will become stronger than empty papier-mâché.
- The final stage is painting the product. Not always mandatory, but very interesting, because on it you can show your imagination as much as possible. It’s not very scary to spoil papier-mâché, because it’s a fairly budget-friendly hobby, so you can be as creative as possible. To paint the craft, you can first prime it or immediately start painting the last layer of paper. This needs to be done in several layers so that the paint does not show through. First, apply a layer in one direction, then be sure to let it dry, and then apply paint in the other direction. We repeat this action several times, only in this way the surface will be monochromatic, opaque, and our creation will look as if it was created by a master of his craft.
Technique for making papier-mâché from paper and newspaper
Papier-mâché (the master class for beginners recommends following a number of rules) requires the following recommendations to be followed when making crafts:
- It is more convenient to work on a large table covered with oilcloth. Since all work with adhesives is done by hand, you need to prepare a dry cloth to wipe them off.
- Glue the pieces onto the surface of the mold, lubricate the first layer, and place the next one. To differentiate the first and subsequent layers, you can use paper of a different color, this way you will avoid making gaps and the layers will be uniform.
- There are 2 options for applying glue: on layers or by dipping pieces of paper into a container with glue. The second method is considered more effective, since the glue penetrates the paper better and there are no untreated areas left.
- Objects that are similar in shape to the intended crafts (balloon, mug, plate) are chosen as models. The shape can also be made from plasticine. If the surface of the craft is uneven, it must be treated with water-based putty. When this layer of soil dries, it needs to be sanded over.
- The last stage is decoration. To do this, use decoupage, decoration with acrylic or oil paints. If watercolor or gouache is used, they must be varnished. You can decorate the surface with beads, fabric (organza, chintz, guipure) or paper applique using PVA glue. Crafts are decorated with pasta in the shape of butterflies and spirals, which are painted and varnished. When finishing, they use grains and lay out drawings.
Creating a paste
To make papier-mâché with your own hands, you can use simple PVA glue or for wallpaper, after pouring it into a deep container into which you can easily dip and remove the paper. But real papier-mâché masters create their own paste, which can be prepared in different ways.
The simplest paste can be created with just flour, salt and water.
Sift a glass of flour to avoid unevenness, add a little water and half a teaspoon of salt. Then pour in 3 cups of hot water and mix well. Bring to a boil, stirring constantly, and then cook for another 10 minutes. The cold mixture can be used to make papier-mâché out of paper.
Preparing material for work
For machining and modeling techniques, it is enough to tear the paper into strips or scraps, but for modeling you will need special paper dough. Let's take a step-by-step look at one of the options, suitable for large crafts:
- Tear 10-12 egg boxes or trays and 2 glossy magazines into small pieces.
- Place the paper pulp in a bucket or basin, add water and leave to dissolve for a day.
- Mix the soaked mass with a household or construction mixer until it becomes a homogeneous puree.
- Strain out excess liquid through a cloth, but make sure that the mixture does not dry out.
Ready! Keep in mind that you can prepare a lot of this mass at once, and soak it with water before use.
Important! The prepared paper dough must be mixed with PVA glue immediately before modeling. Wallpaper glue can be added immediately after straining out the water, but this mass must be stored in the refrigerator.
Paper dough
Here is an option for making paper dough for small and thin elements:
Primer of the product
A primer is needed for better painting of the product, smoothing out unevenness and greater durability, although this item is optional. We prime the papier-mâché when it is ready. You can use ready-made primers from art or construction stores, or you can make your own.
The primer should be applied to the product in a thin layer so that it fills all the unevenness, and then allowed to dry. You need to do this several times, and then go over the craft with sandpaper - this will smooth out all the errors.
Painting papier-mâché
To create papier-mâché with your own hands, you can immediately use colored paper or dye newspaper by dipping it in a solution with dye and then letting it dry. But it’s much more interesting to decorate the product yourself with paints.
Paints should be oil-based - this way our creation will look more expensive and brighter. In addition, such paint will protect against external influences and provide additional strength. At the end, the product can be varnished for greater shine.
But if papier-mâché is just fun for children and you don’t want to spend a lot of money, you can always use gouache and not bother too much.
You can paint products in different ways: with a spray bottle, with your fingers, with brushes - the standard method, painting with markers and much more. Everything depends only on your imagination, like everything else in such an activity as papier-mâché. That's why it's so exciting!
What paper is suitable for crafts
In the process of creating crafts, the question often arises about what kind of paper can be used for papier-mâché. Use old newspapers, clippings, notebooks, cardboard boxes, napkins, and toilet paper. Use paper backing of different densities.
The main requirement will be high-quality grinding of raw materials. The smaller all the pieces of paper are, the higher the quality of the finished craft. When kneading paper dough, you need to consider what crafts the dough will be used for. Since when drying, colors from the used paper may appear on the finished product.
Techniques used
For those who want to learn how to work with papier-mâché with their own hands, it is important to choose the most suitable technique. It is more convenient for an adult or a teenager to create masterpieces from the mass prepared with one’s own hands. It is preferable for young children to work with cut-up newspaper or ready-made paper clay.
Working with mass involves three directions:
- modeling a hollow figure on a template;
- frameless product;
- craft on a frame.
If you need to make a large figure or mask, then a template is used for this. Take a mask blank, molded to fit a person’s face, or some utensils, if you need to reproduce its shape. The mass is laid out on this template and hardens. To make it easy to detach, the template either needs to be greased with oil or wrapped very tightly in thin cling film. Sometimes you have to cut the figure after drying, and then connect its two parts with sheets of paper and glue.
The frameless product is molded from paper pulp, like plasticine. Since the figurine must be completely free of moisture during the drying process, it should not be too large.
If there is no template, but you need to achieve significant volume, you should use a frame. It is convenient to twist it from wire, use parts from plastic bottles where they fit the shape, etc. Any suitable material that is not subject to rapid deterioration is suitable as a frame, which is to be covered with papier-mâché paper and adhesive.
For children, the best technology is using scraps of paper. It’s better not to cut it into clear squares or rectangles, but rather to tear it so that you don’t get the characteristic “geometric” protrusions. The first layer of paper is placed on the template object. It can be held in place either by oil or Vaseline, with which the template is lubricated, or by sticking to cling film. The paper will not remain in this state for long, since it urgently needs to be coated with glue and a second layer applied. Every two layers need to be dried, and for strength they need to be applied at least 10. Pieces of paper in each new layer should overlap the joints of the previous level.
The final processing of papier-mâché products is maching, that is, pasting with a paper layer. Machining can be internal or external – as needed.
Technique options
Papier-mâché is made in two ways: by gradually gluing pieces of paper in layers and by fashioning figures from wet paper dough. The art of making such figures requires care and patience, the material takes 2-3 days to dry, and finishing takes up to 2 days.
Step-by-step gluing of pieces in layers (machining)
When mashing, the prepared form is pasted over with pieces of paper.
- You need to prepare soft paper, maybe newspaper.
- Tear the paper into small pieces with your hands.
- It is not recommended to use scissors, since the thick edges of the paper do not align in the dried product.
- The first layer of paper is applied and glue is applied on top.
- About 10 layers are required.
- After applying 2 layers, let the previous ones dry.
- The edges of the pieces should overlap each other, repeat the surface, and not form unevenness.
Machining can be internal or external. For external machining, the model is pasted over from the outside; for internal machining, the model is pasted from the inside. If the mold for the cast is supposed to be left inside the finished craft, it is covered with glue; if not, then with Vaseline.
Small parts of the craft are made from a mixture of glue and paper; when dry, they shrink in size. To achieve the desired size, you need to add the required number of layers to the parts.
It is necessary to dry the figures for 2 days at an air temperature of no more than 22-25 degrees. The product will crack if it is dried near heating devices that are turned on. The last layer is made from scraps of white paper.
Modeling from wet paper pulp
The peculiarity of production is that the crafts are sculpted and do not use models or shapes. For cooking, you can use any type of paper or cardboard, since during the cooking process the material softens and becomes homogeneous.
The quality and durability of the finished product depends on the degree of stickiness of the paper pulp, therefore, when preparing, you need to check the pulp for stickiness. Elasticity and stickiness are achieved by adding glue and paste. Chalk and alabaster in the mixture will make it smooth and durable, but such mixtures must be used immediately.
Three types of crafts can be made from paper pulp:
- crafts are empty inside;
- products with a frame;
- frameless.
In order to make a hollow figure inside, sample models are used, onto which the mass is glued or laid out, then the sample and the craft are separated.
When making the second type of crafts, they take the bases that remain inside the papier-mâché figures; plastic bottles, cardboard, and wire are used as frames. Frameless figures are made according to the principle of modeling from plasticine; there are no voids in the craft, and the frame is the paper pulp itself.
It is necessary to dry the figures for several days at constant air temperature and humidity.
How to make papier-mâché paste with your own hands
Making papier-mâché mixture with your own hands is much easier than it seems. If you need to get it quickly, then you should not use torn newspaper. It is better to take something thinner - napkins or toilet paper. To make wetting happen faster, toilet paper should be torn into pieces. You can use the napkins whole or cut them into large pieces. You need to fill the container with paper and pour boiling water over it. While the boiling water cools, the papier-mâché mixture will swell and become soggy. It is convenient to stir it carefully at this stage with a long object so as not to burn your hands.
The mass that has cooled to room temperature or slightly higher should be crushed. Any mixer is suitable for this. Both construction and household appliances will cope with the task with a bang. It doesn't hurt to even pour the mixture into a blender and stir.
The finished mass should be placed in cheesecloth and squeezed thoroughly so that as little moisture remains as possible. Next, the mass must be mixed in a separate container with an adhesive composition - PVA glue or wallpaper paste. The papier-mâché mixture is considered ready.
Materials
Papier-mâché is paper, either regular colored paper (sometimes newspaper is used), which is torn or cut into pieces and mixed with an adhesive. You can also use toilet paper for the base. It has the excellent property of dissolving uniformly with both water and glue.
How to make papier-mâché at home
You need to start working with papier-mâché with objects that are simpler in shape. A vase or saucer would be perfect. If you manage to recreate a saucer or vase from paper, then you should take on more elaborate figures: a dinosaur, a human head, a Christmas tree toy, etc.
From toilet paper and glue
We discussed earlier how to prepare a papier-mâché mixture from toilet paper and glue. The main secret is to squeeze the paper well before adding glue to the composition. Next, we take the vase, wrap it in cling film and begin to apply the composition. You need to completely cover the vase and make sure it is even. Now you need to leave it until it dries completely. Sometimes this takes several days. We take the dried workpiece and cut it into two halves with a stationery knife. We try not to damage the template vase. Both halves at the ends of the cut are coated with glue, and strips of napkins or other thin paper greased with glue are additionally applied on top to cover the places where the papier-mâché layer separates. The seam should also be allowed to dry before you begin painting the vase.
From the newspaper
Let's take a plate as a base. You need to apply a layer of Vaseline or cling film on it. Newspaper, torn into pieces, is dipped into prepared paste or PVA glue. The pieces soaked in glue are placed on the plate from the bottom, if you need to get a slightly larger craft, or from the inside, if the product is needed a little smaller than the template. A second layer is applied to the first layer of paper, after which the work is dried. Then you need to apply two more layers of newspapers, etc.
To make a papier-mâché object durable, you will need 10–12 layers, or even more. This depends on the original thickness of the newspaper sheet. Crafts made from thicker paper take longer to dry, so it takes more time to fuss with them. But thin material will require more layers to achieve suitable strength.
From paper clay
Working with paper clay is done in almost the same way as with papier-mâché from napkins. Only the stage of preparing the mass is simply omitted. Since paper glue is sold ready-made, you need to study the instructions for working with it on the packaging. In particular, if a template or frame is needed, how the mass will interact with it will become clear from the instructions.
If a figure is molded from paper clay, like from plasticine, that is, without cavities, then you need to pay special attention to the proper drying of papier-mâché. After all, moisture will evaporate from the depths of the product for a very long time. You may have to create the figure in stages, as if in layers. First, sculpt a certain frame, dry it, and then cover it with a new layer, giving it the necessary shapes and bends. Dry again, then apply the finishing layer with all the subtleties of the relief.
Where to start
The technique of working with papier-mâché is easy to master, but for beginners it is recommended to select simple products. The child must get a feel for the material itself and master the basics of creating crafts.
One of the simplest techniques is maching. The principle is to paste over any shape with pieces of paper and coat it with an adhesive composition. After the glue dries, the craft is removed from the mold and painted or varnished.
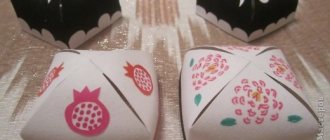
Interesting! The most typical example of the use of mashing is the manufacture of plates or cups. Such crafts are shown in the photo.
The most typical example of the use of mashing is the manufacture of plates or cups.
They are made in the following order:
- First, cut small strips from newspapers or any other paper.
- You can use a plate or bowl of the desired size as a form. The surface of the mold must be coated with vegetable oil or any cream to make it easier to remove the finished product.
- Applying the first layer. Paper strips are moistened in water and carefully applied over the entire surface of the form in a continuous layer.
- The formed layer is covered with PVA glue. The next layer of paper is applied. All subsequent layers are glued one by one until a thickness of 4-6 mm is achieved.
- The workpiece is left alone until completely dry and hardened. After which it is carefully removed from the mold.
- The edges of the workpiece are carefully leveled, and the inner and outer surfaces are sanded with fine-grained sandpaper.
- The final look is achieved by painting. You can apply any pattern, ornament, design.
Another simple craft is “Kolobok”. It is made similarly to a plate, but a balloon is used as a shape.
The inflated ball is pasted over with paper pieces, and after the workpiece has hardened, it is pierced and carefully removed out. After coloring, you get a funny Kolobok.
Another simple craft - “Kolobok”
How to dry the finished product
Making papier-mâché means not only sculpting a masterpiece, but also subjecting it to high-quality drying, which provides almost half the success. If ceramics need to be fired at high temperatures, then with papier-mâché everything is different. The material does not tolerate too rapid heating. It must be remembered that the base is paper, a flammable material, so the figures should be removed away from open fire. There are recommendations on how to dry papier-mâché in the oven of a gas stove, but it is better for beginners not to use this method.
The material dries well in the open air near the radiator, in the sun, next to (but not close to) an electric heater, in an extinguished but heated stove. The oven can be used if you have an electric or combination stove. You should first heat up the gas oven, turn it off, and only then place the papier-mâché product there. You should not close the door completely, because air circulation is important so that water vapor is carried away from the product.
If papier-mâché consists of many layers, then it is better to glue no more than 3-4 of them, and then leave the work for a day so that it dries completely. Only then is it possible to take on the next layers.
Making masks
Some of the most impressive papier-mâché crafts are African masks. Such handmade creations can decorate the interior of any apartment. Their size is 35-37 cm in height, 21-24 cm in width.
The mass is prepared on the basis of toilet paper. One mask will require 2 rolls. The paper is dissolved in hot water, and then mixed with PVA glue (420-440 g), and you need to take thick glue for construction work. To add plasticity, linseed oil (3 tbsp) is added. When mixing the mixture, it is advisable to use a mixer.
Some of the most impressive papier-mâché crafts are masks.
A spherical PVC food tray works well for the shape. Its configuration resembles a mask. A layer of pape-mâché is applied to this form. The main details are laid out separately - nose, eyebrows, lips. Eyes are formed.
Smoothing is provided by the fingers, as well as a stack and a knife. It will take 12-14 days for the craft to completely harden. Then the mask is puttyed with a thin layer and sanded after the putty has dried. The surface must be perfectly smooth.
Such handmade creations can decorate the interior of any apartment.
The mask is dyed in a special mode. First, a primer is applied, and then the entire front surface is painted with white acrylic paint. The next step is to apply black paint on top.
After drying, pearl enamel is applied to the desired places using a sponge. The final operation is coating with acrylic varnish. You can use glossy or matte varnish. The photo shows examples of crafts.
The photo shows examples of crafts.
In addition to the indicated colors, African masks can be painted in other colors. Elements of red, yellow and blue are often used. The craft will also be decorated with special details - piercings.
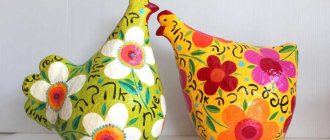
Papier-mâché is rightly considered an excellent material for various crafts. Even small children can make simple products. For teenagers and adults, such creativity develops into a hobby. Their creations can decorate the interior of any apartment.
New Year's toys and papier mache
And again, we take a balloon as a basis, inflate it to the desired size and cover it with beautiful paper or napkins in several layers.
Even if this is your first experience, even if you have no artistic talent, you can handle it! The main thing is to start!
Christmas tree toy
- To make a toy, we will take as a basis a plastic ball of the required size;
- We carry out the set using the method of gluing in layers, described in detail above, option A. The number of layers is 5-6;
- On the dried product, mark the cut line around the circumference with a pencil. Carefully cut the ball into two halves and remove from the base;
- Now the halves need to be connected. Before gluing, we insert a decorative cord in the form of a loop between them. A button or several matches are tied to the end of the loop, which will keep the cord from being pulled out;
- We put a couple of layers of paper along the seam and again paste it with paper of the desired color. Let it dry.
- If we paint with gouache with PVA or acrylic, we decide whether it will be narrative or ornamental. We decorate with ready-made elements in the form of beads or rhinestones either freely or with clear lines and in an orderly manner, in the form of an ornament. But even if you just wrap the ball in foil, it will turn out quite impressive!
New Year's toys, masks and angels, created with your own hands, carry the warmth and creative energy of the author, which is now so lacking in modern products from the store.
Handicraft, antique effect, “vintage” help to recreate the atmosphere of a real holiday from our childhood!
Egg Tray Craft Ideas for Home
By following the step-by-step guide, you can make beautiful items for your own use or as gifts to friends.
Egg Tray Frame
To make the craft, use a mass made from cardboard egg cartons; it must be fresh.
- Take a cutting board and wrap it in cellophane. This is necessary to separate the craft from the board without spoiling it.
- Using a rolling pin, roll out the wet cardboard mass to a thickness of 1 to 2 cm; the mass must be prepared in advance. Cut a rectangle with a width of 15 cm and a length of 21 cm.
- You can create a recess for a photo in a frame using a smaller box. Insert the box into the center of the mass, circle it with a plasticine knife. Pressing along the outlined perimeter, make a depression.
- If there is no box, you can use a ruler and pencil: draw a smaller rectangle inside and deepen it around the perimeter.
- When decorating, use the indentation method, for example, lace. Place the lace on the surface of the frame in the shape of a pattern, push it through, and remove it. You can use a knife for shallow patterns.
- The product must be dried at natural temperature; paints and varnish can be applied to the dry frame.
- To insert a photo, you can use double-sided tape.
Christmas wreath of flowers
Papier-mâché (a master class for beginners will help you make a craft using maching methods and sculpting from wet paper pulp) is suitable for making a Christmas wreath. The wreath will consist of flowers and spruce branches, which will be attached to the base in the form of a ring, hollow inside.
Ring sculpting:
- Mix small pieces of cardboard boxes and boiling water and leave for a day.
- Twist in a blender, drain off excess liquid and add a spoonful of PVA glue.
- Roll out the resulting mass on a cutting board.
- Take a round tray or plate with a diameter of at least 30 cm, place it on the mass and trace it, cut a circle with a kitchen knife.
- Using a plate with a diameter of no more than 23 cm, make an impression of a circle and cut it out.
- Leave until completely dry.
Making flowers:
- Prepare small pieces of paper and tear them with your hands.
- The adhesive base is paste, cook as follows: dilute 2 tbsp. l. flour in a glass of water, pour into boiling water (2 liters), bring to a boil, breaking up small lumps with a spoon.
- Inflate a balloon with a diameter of up to 15 cm.
- Dip each piece of paper into the paste and cover the entire surface of the ball in 5 even layers.
- After drying, cut the ball lengthwise into 2 equal parts, paint it red, blue, yellow. This is what flower petals look like.
- Cut a circle with a diameter of 10 cm from cardboard and paint it in the desired color.
- Glue the petals to the circle with PVA glue with the addition of paint that is used to paint the circle.
Assembly begins with attaching spruce branches - artificial or live - to the ring, then flowers and ribbons are attached.
Papier-mâché vase
Papier-mâché (the master class for beginners advises starting with choosing a method: maching or modeling) is used to make a vase. If the vase is hollow inside, then you need to choose machining. If you need to make a vase without space inside it, turn to the modeling technique.
For sculpting a vase:
- Make a wet mixture from egg trays: soak the trays, squeeze them out and add 1 tsp. glue and 7-10 tbsp. l. paste.
- Make 2 balls of different diameters, one larger than the other at least 3 times. From one ball - sculpt the neck of the vase, from the other - the base. Connect the parts, adding more mass so that the lines are smooth.
- Apply a layer of putty and dry. Decorate to taste.
Making a vase using the mashing technique:
- Prepare an item that will be used as a base. The shape of the dishes should not be complicated, since after the work is done, the papier-mâché must be removed from the object.
- To avoid damaging the surface of the mold, wrap it with cling film.
- Place the base upside down and apply Vaseline to the cling film.
- Pour white PVA (good quality) into a small container.
- Soak the pieces of cardboard in glue and place them on cling film in layers, 10 layers, dry each well. After finishing work, dry the craft for a day.
- If the sample vase has a complex shape, cut the cardboard layer along the product.
- Glue the resulting halves together with several layers of paper, and after drying, apply a layer of putty.
1 way
You can prepare a binder mass using different components. Depending on the size and shape of the sample, an adhesive base is selected. Starch and flour are used as glue, which are pre-brewed and paste is prepared, gypsum, PVA, putty, and construction adhesive.
Any material with drying and hardening properties can be used. To increase viscosity, add chalk, drying oil, crushed grains, and oatmeal.
Garden crafts made from egg trays
The technique is successful for the manufacture of objects that decorate the territory of the garden plot.
Decorative figures for the garden
Figures sculpted using the papier-mâché technique are suitable for decorating a garden: these can be fairy-tale characters, stones, watering cans, flowers, fountains.
Manufacturing stages:
- Since the figures for the garden are significant in size and weight, it is necessary to make a frame (wire, cardboard, bottles). The frame should resemble the outlines of the future product.
- Prepare the adhesive composition: glue and paste.
- Tear the trays into small pieces and, dipping into the adhesive base, apply 8-10 layers to the frame. After every 3 layers you need to dry the product.
- Make small parts of the figure from pieces of toilet paper soaked in glue, so it becomes more elastic.
- At the end of the work, cover the entire craft with toilet paper.
- Paint with gouache, apply a layer of PVA glue, and varnish.
Garland
To make lampshades for garlands, machining is used:
- Inflate balloons of suitable size. Attach the string of the ball to the table. Grease the ball with cream.
- Tear cardboard trays into small pieces.
- Boil the paste: for 1 liter of water – 2 tbsp. l. flour. Boil until the consistency of jelly. Add the contents of one jar of gouache to the jelly in the color of the lampshades.
- Dip pieces of cardboard into the cooled paste and lay them in layers on the ball, making 3-4 layers. Dry each layer. If the cardboard is very thick, it must be soaked in water for several hours.
- After the papier-mâché has dried, deflate the ball and remove it.
- At the bottom of the craft, where the tail of the ball was, cut a hole with a diameter of up to 1 cm.
Steampunk technique
Recently, steampunk figures have come into fashion. In essence, this is a fantastic allegory with the transfer of ancient and outlandish elements.
In such figures, originality and irony are especially valued. The jumble of constituent elements may be the most unexpected, but they should create a unified impression.
Steampunk figurines have come into fashion recently.
As an example of a steampunk craft, consider making a fantastic Fish.
The materials used are papier-mâché, foam plastic panel, cardboard, hardboard sheets, leatherette, nails for upholstery, various small gears, shells and all kinds of spare parts for household appliances.
As an example of a steampunk craft, consider making a fantastic Fish
The base of the Fish is made of a foam plastic panel 1-1.5 cm thick. One longitudinal and several transverse corrugated cardboard ribs are placed on it. The entire base is covered with papier-mâché with the consistency of soft plasticine.
The fins are cut out of hardboard using a jigsaw according to a cardboard pattern and attached to papier-mâché. The scales can be formed from curtain rings and leatherette. Various mechanical parts are installed on top. Here you need to show your imagination, because... no specific order is provided.
It is important that the fish looks like a mechanized monster
It is important that the fish looks like a mechanized monster. Seashells are hung for decoration. You can sprinkle the figure with sand. Then the workpiece is primed to create a brown background, and some details are highlighted with golden acrylic paint. Finally, the Fish is coated with varnish in 3-4 layers. The length of this craft is 85-100 cm.
Step-by-step master classes for beginners
If you do not have much experience with the papier-mâché technique, it is better to choose the layer-by-layer method. Choose simple base shapes, without significant irregularities or bends. Prepare all tools and materials in advance so as not to be distracted from the process.
Master class: how to make Christmas tree decorations from papier-mâché. For Christmas balls on the Christmas tree you will need:
- newspapers, glue or paste;
- paint, glitter, colored paper for decoration;
- varnish;
- thread, needle;
- Balloons.
Operating instructions:
- Inflate the balloon to the desired size. Cover with a layer of greasy cosmetic. Tear newspapers into small pieces measuring 1x1 cm, coat each piece with glue on both sides. Cover the ball in 3 layers, leaving a small hole near the knot. Dry the product for 6 hours.
- Repeat pasting the next 3 layers. Let dry for another 6 hours. Take the balloon by the tail and, without letting go, pierce it with a needle. Pull the rubber casing through the hole and seal it with several layers of paper. Try to ensure that the paper lies smoothly in this place (even with the previous layers).
- Paint the workpiece in different colors. You can draw patterns, decorate with sparkles, beads, or paste over pieces of colored paper. In order for the decoration to serve for a long time, cover it with two layers of varnish. Using a needle, thread a thread through the base of the product and make a loop.
We recommend watching the video instructions:
Master class: stand-holder for rings in the shape of a hand. Prepare for the craft:
- Rubber glove.
- Plastic paper pulp.
- Hand cream.
- Needle.
- Stationery blade.
- Paints, varnish.
Operating instructions:
- Prepare paper pulp for modeling. Apply cream to your hand and put on a rubber glove. This is necessary to apply the cream to the inside of the glove.
- Gradually compact the plastic composition into the glove. You need to start with your fingers. Make many holes in the rubber shell using a needle so that the liquid evaporates and the product dries.
- It may take several days for this craft to dry. Next, carefully remove the glove. Align the workpiece at the base with a stationery blade, paint and cover with two layers of varnish.
- Place the craft on a flat, solid base and secure it in a vertical position.
We recommend watching the video instructions:
Master class: decorative plate made of papier-mâché. Prepare for work:
- Plate.
- Polyethylene film.
- Scissors, blade.
- Newspapers, glue.
- Paints, varnish.
Operating instructions:
- Cover the plate with film. Cut the newspapers into pieces measuring 2x2 cm and sprinkle with warm water. Place an even layer over the entire outer surface of the plate and coat with glue.
- Lay layers of newspapers step by step, moisten and coat with glue. Use a spray bottle to evenly moisten the paper. After laying 4 layers, dry the workpiece for 3-4 hours each time.
- When the thickness of the product is 3–4 mm. Remove the workpiece from the base and leave to dry for a day.
- Trim the edges of the craft using scissors or a blade. Paint and varnish.
We recommend watching the video instructions:
LiveInternetLiveInternet
Source https://masterclassy.ru/2013/01/09/pape-mashe-luchshie-idei-i-sovety.html Items based on the papier-mâché technique were first produced in China, and the technique was widely used and the popularity of papier-mâché developed in France, hence the name, which translated from French means crumpled or “chewed” paper. And if in China papier-mâché was used to make helmets and pads, then in France this technique was loved and widely used for the manufacture of dolls and figurines, masks and furniture.
In order to make papier-mâché yourself, you need the following materials and equipment:
- Paper (newspapers, toilet paper, notebook sheets, cardboard boxes, egg trays, etc.)
- Ready-made glue (PVA or wallpaper) or homemade paste
- Brushes
- Paints or dyes
- Oilcloth for table protection
- Vaseline (liquid soap, melted fat, sunflower oil)
- The base is a form for pasting (optional)
- Gloves (optional)
- Scissors or knife
When all the creative materials are prepared, all that remains is to choose the appropriate papier-mâché technology for your idea and begin to implement the idea.
Variations in the manufacture of papier-mâché can be divided into 3 groups:
- Papier-mâché layering method
For this technique, it is necessary to have a model, which is pre-lubricated with Vaseline, and then finely torn paper soaked in glue is glued in layers. There should be a lot of layers. All layers are superimposed on each other with natural intermediate drying. Depending on the required thickness and strength, five or more layers are applied. Layered papier-mâché is most often used in the manufacture of carnival masks and round, lightweight hanging forms.
- Papier-mâché “Modeled dough”
For this technique, you need to tear the paper into small pieces and pour boiling water over it for several hours so that the paper soaks thoroughly. Next, the paper is boiled, squeezed and dried. After that, the dried lump is grated and diluted with glue, thoroughly mixing the resulting modeling mass - “dough”. You can sculpt different figures from the mass, like from plasticine, you can pour the mass into a pre-prepared mold, or you can stick it to the base. It all depends on what exactly you are going to do.
- Pressed papier-mâché
Papier-mâché is made by pressing flat cardboard blanks coated with glue. Chipboard is also made using this principle. Pressed papier-mâché is used to form flat structures and individual elements.
Advice:
- Hair dryers, batteries and heaters should not be used to dry papier-mâché; papier-mâché products should only be dried naturally. Otherwise, the product may become deformed or crack.
- Regardless of what type of papier-mâché you choose, the dry finished product must be sanded to achieve a smooth surface and remove creases, unevenness and other defects. After sanding, the surface of the craft is primed and then painted, painted or decorated.
Tip: If you need to achieve a perfectly smooth surface, remove pores and irregularities, use putty.
To do this, after sanding, you need to prime the craft, wait until the primer is absorbed and dry, then apply putty using a palette knife and spatula. Wait until the putty dries well, naturally, and sand the craft again using sandpaper (first with a coarser grit, then with a smaller one). After that, prime the craft and then paint and varnish. If everything is done correctly and carefully, you will get the desired perfectly flat surface. Notes: - The best option for putty is acrylic, but you can also use gypsum.
- All products and crafts made from papier-mâché, which are decorated with painting or simply painted, must be covered with aqualac at the final stage of work to consolidate the result.
- If you use Matlatex paint as a coating, remember that nothing will stick to it and the surface will be difficult to decorate. It is better to use ordinary acrylic water-based paints.
Tip: if you need to achieve additional strength in a craft, but not lose its lightness, add cotton or gauze soaked in glue to the inner layers of papier-mâché. This method is called reinforcement. Papier-mâché reinforcement is used when modeling a form manually, without a base. For example, the formation of a sculpture from papier-mâché.
Paste for papier-mâché, or homemade glue, is made according to the following recipes:
- From starch diluted in water (for 1 glass of cold water add 1 dessert spoon of starch, or a teaspoon with a mountain). The starch diluted in water must be slightly warmed to 70 degrees. Use immediately after cooling.
- From flour with water (depending on the required thickness of the paste, different proportions of flour and water are observed: from 1:2 to 1:8). Classic proportion: 1:4, where 1 part flour is 4 parts water. The flour is sifted through a sieve and gradually added little by little to boiling water, stirring constantly. Then the finished paste is placed in a water bath and simmered for about 15 minutes. When the paste has cooled to 37° you can start working.
Note: unlike ready-made glue, paste is a perishable product, so if work on a product using the papier-mâché technique lasts for several days, it is necessary to brew a new paste every day.Is the papier-mâché mold ready? If yes, then you can let your imagination go free and start decorating the craft.
Decoupage and craquelure look very beautiful and organic on papier-mâché crafts. No less interesting are crafts made from papier-mâché, dotted with contours. And of course, don’t forget about beads, sequins, stones and glitter!
The papier-mâché technique is useful and accessible to everyone in preparation for New Year's holidays, matinees, carnival parties, costume performances, etc. Various props, as well as carnival masks, are conveniently, cheaply and easily made from paper using the papier-mâché technique.
We invite you to look at photographs of papier-mâché masks
Venetian papier-mâché masks
Specific Recommendations and Cautions
The following recommendations are made:
- In order not to get confused by the number of layers, you can separate them with colored paper. If you plan to make a white craft, finish with 5-6 layers of white paper.
- To prevent material from remaining on your hands while sculpting from the mass, use gloves and wet them periodically with cold water.
Dry the product under normal room conditions. Do not use a hair dryer or place the craft on a radiator. High temperatures can cause cracks.
- You can use any household items as a frame, or you can make it yourself in any shape. To make the base, use plaster or plasticine.
- To paint products, use thick paints: gouache, acrylic.
We recommend watching the video instructions:
Useful tips
The mass of papier-mâché can be stored simply in a plastic bag for the first 5 days. Over the next week and a half, it is better to put the substance in the refrigerator. It is important to pay significant attention to drying the finished product. Since the figurine is made on the basis of paper, that is, a flammable material, it would be a bad idea to keep it near an open fire. In principle, there are instructions for drying in the oven, but this method is still intended for experienced craftsmen.
Papier-mâché will dry well in the open air near a radiator, in the sun, not far from an electric heater, and also in an extinguished heated stove.
If the product is formed from several layers, then it is recommended to dry it several times - approximately every 3-4 layers.
The easiest way to decorate the finished work is by brushing it with a layer of paint - variegated packaging or regular colored paper. A more complex, but also more attractive method is primer. The figurine is first sanded to make it smoother, and then covered with primer. When this layer dries, it can be coated with paints. A thick paper product can be painted with a marker or felt-tip pen, and then decorated with sparkles and rhinestones. It can also be decorated with pieces of fabric, braid or mesh. By the way, throughout the entire process it is preferable to work on a table covered with oilcloth. Since interaction with adhesives will be carried out with bare hands, you will need to prepare a piece of dry cloth for wiping.
Sources
- https://handskill.ru/479225a-pape-mashe-svoimi-rukami-dlya-nachinayuschih-opisanie-tehniki-foto-izdeliy
- https://AlfaLady.org/rukodelie/394-kak-sdelat-pape-mashe.html
- https://daynotes.ru/pap_e_mashe_svoimi_rukami_dlya_nachinayuschih/
- https://handsmake.ru/pape-mashe-master-klass.html
- https://VseProKley.ru/podelki/kak-sdelat-pape-mashe
- https://vplate.ru/pape-mashe/dlya-nachinayushchih/
[collapse]