Sometimes a situation arises that the headphones do not have a plug. For example, it was accidentally broken when trying to disassemble, or melted with a soldering iron while soldering... Or maybe you got the headphones from a friend without a plug. Finding an adequate headphone plug in stores is not so easy, so we will make it ourselves. And it will not be just any other, but a truly original and immortal headphone plug.
We won’t be able to do without a plug completely, but we only need its inner part with contacts. To do this, we cut off the plug from some Chinese headphones lying around the house and unceremoniously pull out the required part.
Of course, if you have a full-fledged plug from other headphones, you can solder it. How to do this is described in detail in the article Headphones Not Working? DIY headphone jack repair .
Why reinvent the wheel then? The headphone plug is its weakest point, and in the vast majority of cases, repairs come down to resoldering the plug. The proposed option can significantly extend the life of the connector.
Checking the headphones
Having found the inside of the headphone plug from the donor, the first thing we do is solder it to our headphones and see if they work at all and whether it makes sense to torture them further 
If you have difficulties and cannot determine which wire goes where, then I advise you to look at another article, which gives many examples of the colors of headset wires:
Repairing the headset jack or five wires on four contacts
If something doesn’t work after soldering, we look for the problem. And if everything is fine, then we move on to plastic pipes
How to keep drivers safe and operational?
The key part of this compact speaker system is the driver (also known as the driver or driver). How to avoid it breaking? There are several things you should not do when using accessories. Here they are:
- Contact with liquid is prohibited . It is strictly forbidden to get the devices wet, so you should keep the earbuds as far as possible from water, coffee and any drinks. Liquid that has leaked into the inside of the speaker is 100% likely to only cause harm to the headphones.
- Say no to temperature changes . There is no need to leave audio devices in places with abnormally high/low temperatures - for example, in hot weather, inside a car parked on the street, or next to a microwave oven. Radiated heat can cause serious damage to wiring and speakers.
- Do not insert the plug into an already working device . When connecting headphones to a running player or phone, the signal is first sent to the left channel, i.e. 100% of the device's output power goes to one left driver (it should be 50/50). Frequent overloads are the reason why the channel begins to “phon”, distorting the sound. Therefore, it is better to first connect devices to listen to audio, and then turn on music playback.
One of the main taboos is that you should not try to connect on-ear, vacuum and other headphones to equipment that does not correspond to them (the connector does not match, etc.). Carefully studying the instructions is the first step to understanding how to prevent your headphones from breaking.
Interesting read: Headphones from Sony MDR-XB550AP - feel Extra Bass
Material
Yes, you heard right, you will need a piece of plastic pipe. 3-5 centimeters long and any diameter. This will probably be found at home in everyone who has installed such pipes, and if not, then you can ask a neighbor, friend or hardware store seller for trimmings.
These pipes turned out to be an ideal plastic option. Before them, polyethylene was tested from bottles, caps, some jars for medicine... But only then did it dawn on us that these pipes were originally designed for melting. And besides, they conduct heat very poorly, so you won’t be afraid of damaging the connector or getting burned while holding it in your hands during all the activities.
Having found a piece of pipe, cut it into strips using a sharp knife. It is convenient to work with such pieces.
Carefully! The plastic is quite viscous and you can easily get hurt.
Wire exit from the plug
The most vulnerable spot is the wire coming out of the plug casing. This element is also called a jack. The plug and the wire coming out of it are constantly exposed to mechanical stress, even when the headset is not working, but is simply inserted into the phone jack.
Recommendations: How to fix headphones yourself if one stops working
, How to connect broken headphone wires
, DIY headphone repair
Let's look at a few of the most common reasons:
- When listening to music, the mobile phone is usually placed in the pocket. The option is not bad, but you need to place it with the plug facing up. If the jack is on the bottom, the entire weight of the phone presses on it. L-shaped plugs suffer less from this position, since the wire exits the casing from the side. For an even jack, pressing it to the bottom of a clothing pocket is detrimental. The wire at the entrance to the casing is sharply bent at an acute angle, resulting in a fracture of the copper core.
- While listening to music from your phone while traveling, the headset cable is secured to your clothing with a plastic clip. In the event of a sharp turn of the head, the clamp will weaken the force of the wire jerking at the point of attachment to the plug.
- Music lovers have a habit of putting the phone in their pocket after listening to music without removing the headset plug from the jack. This option is detrimental to both devices. The phone's plug and socket gradually become loose. Poor contact will cause crackling noise in the speakers and loss of sound. Finding the location of the fault will become more difficult, since the wire breaks along with the connector and plug.
- Headphones deteriorate even during storage. There is a killer combination - leave the plug in the socket and wrap the wire around the phone. Such storage will kill even the most expensive and high-quality headphones within six months. The plug and the entire wire before connecting to the speakers will fail due to sharp corners at the bend. The hard case provides safe storage of the headset. The wire is wound around three fingers. The coil is obtained without sharp bends and will be safely stored in the case.
- The long service life of headphones is taken care of even at the purchase stage. A headset with a straight plug is the worst design. The wire near the jack will quickly break due to sharp bends. It is better to give preference to a plug with the letter “G” or at an angle of 45°. If your favorite headphones are sold only with a straight jack, additionally buy an L-shaped adapter - an adapter.
- In addition to the adapter, there are female-male adapters. A piece of cable has a plug attached to it at one end, which is inserted into the phone jack. At the other end of the wire there is a socket - an analogue of a telephone connector, where the headset jack is connected.
If the wire near the plug is broken, it is cut off, after which the jack casing is cut off and the wires are soldered to the contacts.
We melt
We brazenly and unceremoniously melt the edge of a piece of pipe to the connector:
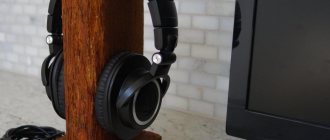
All photographs presented in this article are the first attempt to use this method. Everything was invented on the fly.
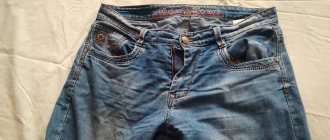
It was decided that if we were to do it, we should make an L-shaped connector, which would be less susceptible to jeans being killed by pockets.
Speaker wire output
The second weak point after the plug is the cable exit from the headphones. Most often, the wire here does not break, but comes off from the speakers. The user is to blame for pulling the earphone out of his ear by the cable. Even if the vacuum headset is deeply buried inside the ear, remove it by holding the body with your fingers.
A wire break from the speaker contact occurs in cheap Chinese models. The wire inside the case is not secured by anything and dangles freely. The branded headset is designed differently. The cable connected to the speakers is tied in a knot before exiting the headphone body.
This creates a kind of stop that prevents the wire from breaking off the contact. However, you still cannot pull such an earphone by the wire. The core will not come off the speaker, but the cable itself will begin to stretch. Over time, a gap forms in the thinned area.
Near the entrance to the headphones, the wire is constantly suspended. Even if you don’t pull on it, over time the cable will tear the wires away from the speaker under its weight. You can ease the load by placing the wire behind the ear. In this position, no force is applied to the cable section near the entrance to the headphones.
How to disassemble headphones: instructions with step-by-step photos of repairing all elements of the headset
Bifurcation section
The headset cable leading to the speakers splits into two. The separation point is secured with a plastic or rubber stopper. In this area, similarly, there is a threat of fracture of the veins, but this happens extremely rarely.
You can protect the split with a voltage reducer, but they are only installed on expensive branded headphones. For a cheap headset, the only salvation is the clip. The area where the bifurcation begins is secured to the clothing with a clothespin.
Comic
As you can see from the comic, by moving a soldering iron along a piece of pipe, you can bend it where and how we need. Then, by running a soldering iron over the surface, you can level it and give it the final look. When the desired shape is achieved, cut off the excess from the contact side.
In my opinion, such a connector is practically indestructible. It is much more likely that the wire will come out of position as it approaches the connector. And to reduce this probability, it was decided to use a spring. We will borrow it from a clicky ballpoint pen.
The spring should wind with difficulty, expanding at the connector. Then later, if you apply a soldering iron to it, it will shrink to its original diameter and melt into the connector.
Carefully!
The spring conducts heat very well and you can accidentally melt the wire sheath with it.
After everything that had been done, the thought came to me that it would be better if, before wrapping it in a plastic pipe, we put a 2-3 centimeter long thermal casing on the outgoing wire. In this case, you don’t have to worry about melting the wire braid when molding the connector and putting on the spring. Yes, and this would give it even more strength.
How to properly strengthen the structure
To strengthen the headphones. You need to know all the weak points. One of them is where the wire connects to the plug. There the wire can bend, eventually becoming damaged. The solution is simple - screw a spring from a ballpoint pen into this place and the problem is solved. Instead of a spring, you can use regular electrical tape by simply winding it.
Another place where the wire often breaks is the connection to the earphone itself. Due to gravity, natural sagging occurs and the wire breaks. To avoid this problem, drop a little glue into the place where the wire comes out of the gadget. The glue will strengthen the connection point and the wire will not bend much in different directions.
How to make a connector yourself
There is a large selection of ready-made connectors available for sale, suitable for all categories of fly rods. But it happens that the device is needed urgently, and there are no specialized stores nearby. In such cases, you can make a connector with your own hands from scrap materials. What could they be?
Soft wire. A piece is cut from it, which is folded in half to form a loop. Its ends are tied to the top with a strong nylon thread impregnated with waterproof glue. When it dries, a loop of fishing line is threaded through the wire loop. The disadvantage of such a homemade connector is that when replacing the equipment, you need to pull the entire line with the float, sinker, and hook through the wire loop.
Fishing line. Installation is carried out in the same way as with soft wire. But the loop of fishing line, which acts as a connector, should be lower than the tip of the rod. The main line is threaded through it and put on the tip. All. In this case, when replacing the fishing line, it is simply untied from the tip.
Safety pin. Take a pin with a ring at the end and wind it with a nylon thread to the tip of the rod so that the ring extends beyond it. The thread is wound only up to half of the pin and soaked in glue. You can change the fishing line on such a connector in a few seconds.
Selecting a cable for your TV
The connection from your antenna to your TV is as important as the antenna itself. A high quality coaxial cable is used for this. First, let's understand what a coaxial cable is and what components it consists of.
First of all, this is the wire through which radio or television signals are transmitted. It is they that distributors use to transmit television networks to individual homes, which is why this service is called cable television.
Their distinct thick, round shape is due to a thick layer of internal insulation, which is designed in part to reduce the effect of magnetic fields on the signal carried by the cable, as well as to reduce the amount of signal loss that occurs when signals travel through long lengths of coaxial cable.
Structurally, a coaxial cable consists of four layers:
- The central wire, which has a perfectly round and cylindrical shape;
- A thick layer of insulation made of plastic or other inert non-conductive material;
- The outer thin layer of metal casing (braid), which also carries the signal;
- An outer layer made of thick plastic designed to protect the metal casing.
The signal carried by a coaxial cable is transmitted simultaneously through the central wire, as well as through a separate metal braid. This is done because both conductors generate a magnetic field, just like any electrically charged wire. However, when two oppositely charged magnetic fields come into contact with each other, the fields cancel each other out. This allows cables to be placed near other sensitive electronic equipment and metal objects without fear of the cables acting as magnets on each other.
Read also: How to cut a hole in wood
All a coaxial cable has to do is just two things:
- Receive the signal from the antenna towards the receiver;
- Conduct the received signal from the transmitter to the antenna without loss of quality.
It is very convenient that there are no complications or misunderstandings in a coaxial cable: you just need to buy a cord with the least signal attenuation, determine the optimal length, wrap it on both sides - and that’s it, the connection is ready!
How can you determine which cable will have the least signal attenuation? Signal loss in a cable depends on three parameters:
- Cord lengths;
- Product type;
- Frequencies (RF channel).
As for the cable length, you should try to make the connection as short as possible. The longer the cable, the greater the signal loss. It is not possible to give universal figures, since the marking of the cable and the frequencies that your antenna receives play a role. RF channels in the VHF band have lower losses than channels in the UHF band. But we can give some characteristics based on the type of coaxial cable. Today there are two groups of such products:
- Thin - with a cord diameter of 5 mm. With their help, local connections are created over short distances, since the signal attenuation here occurs much faster, the delay is 5 ns/m;
- thick - with a diameter of about 10 mm. The design of such products is more rigid and expensive, so special equipment is required for their installation. The signal in such cables is practically not lost, and the delay in signal transmission is approximately 4.5 ns/m.
Each cable has its own marking, which is applied to each meter of the product. For example, the cable brand RK-75-2-3-2-A means the following:
- RK – radio frequency cable;
- 75 – wave impedance in Ohm (ratio of electric and magnetic fields);
- 2 – the value of the nominal diameter of the insulation in mm;
- 3 – insulation material (3 – foamed polyethylene);
- 2 – development number;
- A – purpose – antenna.
You may also encounter the following markings:
Net.on RG-6 white CCS 1.00 (15%) / FPE / Al-Pet-Al Foil Unbonded / Al 32x0.12 / PVC RW 100m, where:
- Net.on is a brand (manufacturer);
- RG-6 – radio frequency;
- CCS – Copper-Clad-Steel, that is, a copper alloy is applied thermomechanically to the top of the product;
- 1.00 – diameter of the central core in millimeters;
- 15% – conductivity coefficient of the central conductor;
- FPE – internal insulation material – foamed polyethylene;
- Al-Pet-Al Foil Unbonded – composition: the film is foiled with aluminum on both sides;
- Al 32x0.12 – characteristics of braided wire (32 aluminum wires, each of which has a diameter of 0.12 mm);
- PVC RW – external insulation material (PVC);
- 100 m – product length.
When choosing a coaxial cable for your antenna, listen to these recommendations:
- The characteristic impedance of the product for a high-quality picture should be 75 Ohms;
- The diameter of the cord must be at least 6 mm;
- Shielding coefficient – from 60 dB and above;
- The purchased products must be complete and must be labeled;
- The product must bend smoothly and not have deformations, cracks or breaks.
Most often, to connect cable television in an apartment, they buy an RG-6 cable. It is available with 2, 3 or 4 layers of shielding. Three or four layers provide better interference protection, are stronger and more durable, but are slightly more expensive and less flexible than double shielding.
The RG 6U cable is a product with a solid central core, which is galvanized with copper, and the shielding braid is made of aluminum foil and copper. This is an excellent cable option in terms of price and quality ratio.
RK-75 is an improved version of RG-6. It has similar characteristics, but this type comes with a better screen and can transmit a satellite TV signal.
Connecting the cable to the antenna
Connecting the TV cable to the antenna should be carried out in compliance with the rules for switching electrical appliances, guided by the diagrams available in the technical data sheet of the TV. To complete the work you will need:
- splitter;
- antenna cable;
- antenna amplifier;
- wire cutters;
- sharpened knife or scalpel;
- soldering iron
The cable is connected directly to the TV antenna using screw terminals.
The cable, splitter and amplifier must be installed next to the separated cable. In an individual home, the best place to place all appliances is the attic. The end of the cable coming from the antenna is connected to the amplifier through a special terminal. From the amplifier the signal goes to a splitter, to which the television receivers in the house are connected. When connecting to a satellite dish, you will need to use a receiver to which a cable is connected via the antenna connector. Preparing the cable is similar to cutting it before connecting it to the plug.
Two ways to improve your headset
When you buy new headphones, don’t rush to use them right away. There are two simple ways to improve your headset by increasing the cable's resistance to mechanical stress.
1. The first method is aimed at protecting the input to the plug. To prevent the wire from sharply bending into a break, you will need a bandage. A stiff spring is taken from a fountain pen or children's toy and wound in coils onto the cable. Next, the bandage is lowered along the wire to the connector, where a couple of turns are screwed onto the jack casing. The defense is ready. An elastic spring will never allow the wires to bend at an angle of 90°. A similar bandage can be screwed onto the area where the wire begins to bifurcate.
2. The second method is aimed at protecting the headphone output. The wire constantly dangles in the hole in the housing, causing insulation failure. The problem can be easily solved. A drop of glue is injected into the hole. It will securely fix the wire to the headphone body.
Compliance with the rules of use, together with improvement, will extend the life of your favorite headphones.
Thematic materials: Independent production of simple headphones and a headset with a microphone
, 10 most expensive headphones
5 Best Wireless Hi-Fi Headphones
, If water gets on the headphones or inside the mobile phone jack
, How to properly warm up headphones and whether it is necessary to do so , How to solder a headphone plug
, How to fix headphones yourself if one stops working , How to improve the sound quality in headphones
, Hi-res music: how it differs and how to use it
Extension of a television cable using an F-socket - F-socket adapter
To connect two cables using an adapter, you need to purchase 2 pieces of F-plug for wrapping on the cable and a TV F-socket - F-socket adapter. The plugs come in three sizes, designed to fit onto television cables of different diameters. Purchase F-plugs in accordance with the diameter of the connected television cables.
With little effort to cut through the cable shielding, the outer sheath of the cable is cut a few centimeters along.
After the cut, the shell is turned in the opposite direction and removed at the point where the cut begins.
As shown in the photo, the aluminum screen is bent in the opposite direction - foil and braided copper wire. There are three types of screen in television cables. Copper braid only, aluminum foil combined with copper braid and staniol foil only. For the demonstration, I specifically chose a television cable with a combined screen, aluminum foil in combination with copper braiding, for clarity.
To give mechanical strength to the foil, it is coated on the inside with a thin layer of lavsan or polyethylene. It is almost impossible to remove the plastic. If the F-plug is wound onto the inside of the foil, there will be no contact of the screen with it, or it will be very poor.
To avoid bad contact, you need to return half of the wrapped foil back, then the conductive side will be on the outside. If the outer diameter of the television cable is smaller than the threaded hole of the F-plug, then before turning the screen, several turns of insulating tape are wound to ensure a tight fit when screwing the F-plug onto the cable.
Next, using a knife blade oriented almost parallel to the cable, carefully cut off the insulation from the central core. The main thing is to avoid notches in the copper wire of the central core, since notches reduce the mechanical strength of the core and it can easily break off.
When the ends of the coaxial cables to be connected are prepared, the F-plugs are wound onto the foil and wrapped onto the cable.
The central cores of the cables are shortened so that about 5 mm protrudes from the F-plug.
All that remains is to screw the ends of the television cable equipped with F plugs onto the TV F-socket - F-socket adapter.
The result is such a beautiful detachable connection for a television cable.
If the need arises, it will be easy to install a television signal in this place to feed several televisions.
How to prepare the cable
Before connecting the antenna cable, it must be prepared. The wire itself consists of several parts. In the very center there is a copper wire or steel wire coated with copper. Next is the internal insulation. It is made of a special dielectric substance. After this comes the screen and braid. They are made of aluminum foil. This is necessary for the second conductor.
There is insulation on top of all materials. It is created to prevent various types of influences, including mechanical and climatic ones.
It is worth paying attention to the markings of the wire. It is placed on insulation along the entire length, every meter. It contains information about the type of cable, brand, manufacturer, resistance and frequency of signal transmission.
To prepare, you will need a knife and pliers. All tools must be prepared before starting work.
To connect the cable, you need to crimp it. To do this you need to follow the instructions:
- Cut off the top shell at a distance of 1-1.5 cm from the beginning. Do not damage the foil in this case.
- Fold the foil over the wire or remove it completely.
- Fix the screen braid on one side. It is necessary for signal transmission. The braid can be in the form of steel wire or hair.
- Remove the internal insulation so that only the copper wire remains.
After this, the cable will be ready to be connected to the plug. For more information on how to prepare the antenna wire, watch this video.
The aluminum foil should not touch the copper wire. Otherwise the signal may be distorted.
How to connect without a plug
To quickly temporarily resume television viewing, you can quickly connect the television connector to the television cable with an ordinary contact.
- First you need to find some kind of tube, cut it and put it on the slot of the socket in the TV device.
- Next, the TV wire is stripped, the core is bent in half to form a loop. This way the core will be in good contact with the inner surface of the central groove of the antenna input.
- The braid needs to be fluffed up and the core inserted into the connector. Then, using a screwdriver or other thin object, the braid is tucked into the free space of the socket.
You can understand the installation principle from the figure below.
To make the contact more or less reliable, you can insert several matches into the input, which will press the shielding layer more firmly to the input contact.
Selecting a TV plug
In order to have a constant high-quality connection to the TV, whether to a cable broadcast network, or to an antenna, you need to purchase a television cable and F-plugs. The task may look simple, but if done incorrectly, the image quality may be unstable and of poor quality.
When buying a television cable, you should correctly understand its structure: in its very center there is a wire made of copper or steel, which is covered with a layer of copper during manufacturing. On top there is insulation made of a material that does not conduct electric current. Next comes the shielding material, and on top of it there is an aluminum braid, which serves as the second conductive material. You should choose not only a high-quality TV and related equipment, but also peripheral tools: cable and connectors.
An expensive cable differs from a cheap one by the presence of an additional aluminum braid. Cheaper models use only copper. Also a big plus will be the presence of a dense, hermetically sealed sheath that protects the wire from adverse environmental conditions.
How to connect the antenna plug correctly so that the current flow is problem-free and the picture quality is high? This may not be the easiest task. The current flow in an electrical network and a television cable is different. The latter carries a high-frequency current, which is why sometimes even a thin layer of silver or gold is used in the coating.
Why does one ear break when wearing headphones?
It's all about the principle of operation of the speakers: the left and right channels should be loaded equally, and when connected to a playing gadget, the entire load goes to the left channel, and then is only distributed to the right. Because of this, the left earphone begins to hum faster or stops altogether.
Interesting materials:
How to access the clipboard on Xiaomi? How to log into Clash Royale from another device? How to enter voice chat in Discord? How to enter voice chat in telegram? How to log into iCloud Photos? How to log into iCloud and view contacts? How to log into Belarusbank m banking? How to access the Android menu? How to enter the menu in Xiaomi? How to access music in telegram?
What is needed to extend the antenna cable
Ideally, the signal cable should be laid in one piece without breaks or connections to ensure:
- minimum active and inductive resistance of the transmission line;
- uniformity of wave resistance along the length;
- continuity of the screen, for protection against electromagnetic fields.
As practice shows, lossless connections are not possible with HDMI cables designed to transmit signals in Ultra HD format. A high-quality connection of sections of a coaxial antenna cable cannot negatively affect the level of the received TV signal.
The list of necessary materials and tools for joining will depend on the chosen connection method. And it will be described in detail when considering each method separately. However, no matter what option you choose, you will definitely need an additional piece of cable of the required length.
If you go to a specialized store, you will come across at least 5-10 types of cable, significantly different from each other. The sales consultant will tell you about the product presented and advise you on the best option, but you need not just a piece of high-quality wire, but a piece of cable with the most similar characteristics to the existing one.
IMPORTANT! The best result will be obtained by connecting sections of the same cable.
Therefore, before going to the store, carefully study and write down the markings on the piece you have, or even better if you can cut off and take a small piece with you for a sample.
Do you need an antenna amplifier?
The question of purchasing an antenna amplifier arises when signal loss becomes systemic.
Due to insufficient transmission, the receiver or digital tuner cannot cope with the processing of the organization. You may see a “no signal” or “weak signal” message on the TV screen.
If communication is carried out without an electronic intermediary, then signal loss can be expressed by the absence of sound, a “freezing” image, an unclear or “pixelated” picture
If the signal is too weak, an antenna amplifier is installed, the main purpose of which is to make the signal more powerful. It is integrated into the TV system on the section of the route between the television receiver and the antenna.
Most often, external devices are used that cut into the antenna cable using two connectors. More “serious” amplifiers look like a set-top box, and some have an additional power supply
Active type antennas already have built-in amplifiers; installing a second one will not help. Also, it will not cope with its function if the antenna is broken or, due to its parameters, is simply not able to receive a signal at a long distance.
In the area of stable reception, the amplifier can even cause harm, since too powerful a signal is also one of the reasons for the failure of the digital tuner.