Types of tandoors
Tandoors differ from a conventional oven in their special configuration, thanks to which you can forget about undercooked meat and vegetables. They also prepare aromatic oriental flatbreads - right on the walls. Externally, a classic tandoor resembles a clay jug in which firewood is placed, and then skewers are hung.
Uzbek tandoor
To create Uzbek tandoors, sand and camel hair were added to fireclay clay. A volumetric dome with a wall thickness of about 5 cm was sculpted from it, dried for 3 weeks and used as a top for the hearth. It is very difficult to make such a blank without experience, but now ready-made forms are even sold.
Photo: apriltime.ru
Armenian tandoor
The tandoor in Armenia is called “tonir” and it is also used to heat houses. Armenian tandoors were made from fireclay bricks, because local clay is not so pliable and durable. Essentially, it is a brick cylinder with clay joints and a plastered inner surface.
Photo: zen.yandex.ru
Earth tandoor
An earthen tandoor is made in a hole about 1-1.25 m deep with an air duct hole. The walls and bottom are lined with fireclay bricks and clay mortar. Or you can immerse a ready-made clay piece into the pit and compact it well. Such stoves retain heat best of all, but they cannot be dug in every soil.
Photo: sdelai-lestnicu.ru
Ground tandoor
As is obvious from the name, the ground tandoor is completely above the ground and is more reminiscent of a classic Russian oven. Firewood is placed in the roasting pan, and the draft is provided by a hole at the bottom. Fuel is loaded from above or from the side, and when it is completely burned out, you can lower the food.
Photo: icepohod.rf
Mobile tandoor
Compact portable tandoors are great for the garden and can be taken with you. They are made in the form of a barrel or jug from durable fireproof clay with a lid and handles. Larger models can be reinforced with steel strips.
Photo: nyctandyr.com
Wood-burning tandoor
This is a classic tandoor that uses firewood or coals. There is always a hole at the bottom for air flow and ash removal, so that the lid can be tightly closed during cooking. Only hardwood firewood is used due to the specific resins in the pine needles.
Photo: ventkam.ru
Gas tandoor
This is a modern variation of tandoors for professional kitchens and bakeries. There is also a clay pot inside, but the main body is made of steel. Gas is used instead of firewood, so using such a tandoor is no more difficult than using a home stove.
Photo: ru.m.wikipedia.org
Electric tandoor
Another modern variation, in which heating elements - tubular electric heaters - are placed on the bottom instead of fuel. They do not burn or smoke, so the device can be used even indoors. But keep in mind that the taste of cooked products will not be the same as when cooked over wood.
Photo: frutisad.ru
Preparing the base
First, they roughly estimate how much area should be allocated for the tandoor itself, and where it will be located.
As with any street fire, it is necessary to maintain the required distances to buildings, fences, and trees. And don’t forget about the factors that influence ease of use - the prevailing wind rose, leeward location, proximity to the recreation area.
Then they mark and arrange a small area in the form of a slab. And it can be monolithic or prefabricated. In Central Asia, a tandoor is installed on a platform made of stone or brick, held together with clay mortar, but it is safer to install a monolithic slab.
The step-by-step process for making a platform made of monolithic reinforced concrete looks like this:
- Remove the fertile soil layer to a depth of 20 cm.
- Level and compact the bottom of the recess.
- Pour sand into the bottom in a layer of 10-15 cm. Water it with water and tamp it down as well.
- Cover the bottom with roofing felt.
- Laying the formwork. For a square area - four boards. For a round area, provided the soil is dense, use a strip of a piece of roofing material folded in half.
- Reinforced. You can put four pieces of reinforcement with a diameter of 6-8 mm on stands and tie them with wire, or use a piece of road mesh made from a 3-4 mm bar. The main thing is that the reinforcing frame lies in the middle of the concrete and does not reach the ends of the slab by 3-5 cm.
- Concrete grade M200-M250 is prepared. Poured into formwork. Cover with a piece of roofing felt to prevent it from drying out.
The concrete is kept for at least a week until it gains sufficient strength (about 70% of the original strength). After this time, you can walk around the site and lay bricks.
Tandoor dimensions
To decide what size tandoor you need, consider how many foods you want to cook in it. For one or two simple mobile stoves are enough, but for company trips or family gatherings you need a larger option. Tandoors can be roughly divided into small ones up to 40 kg, medium ones up to 80 kg, large ones up to 100 kg and very large ones heavier than 100 kg.
Photo: cyprus-oven.ru
Welding hinges, lids, handles
Having secured the grill to a solid base, proceed to the next stage. To avoid the hassle of opening a hot lid, it is recommended to weld it to the bottom of the structure. If it is not removable, use loops. They are welded or secured with bolts and nuts. Rivets are not a good option because they can withstand moderate temperatures and can melt if exposed to an open flame.
If you place the hinges in one direction, the cover can be removed in the future if desired. By welding them in the opposite direction, they act differently:
- the hinges are fastened on one side;
- then put on the lid;
- install the hinges on the lid on the other side and begin to weld them to the barbecue.
In this case, the structure will not be dismountable. To freely use the barbecue grill, attach the handle. It is located in the center of the metal cover. This element can be welded, which is more reliable, or connected using standard fasteners. The second option involves drilling two holes on the lid. The handle is installed here. It is desirable that it be made of metal. Wooden elements will quickly burn out and may rot, since the finished product will be constantly exposed to the open air.
If the structure is used only as a barbecue, you can also weld a grate. It is usually located directly above the rounded bottom. The structure can also be used as a barbecue, in which case it is better not to attach the grill. A store-bought barbecue with a handle is installed on the ribs of the former cylinder. In this position, closing the lid will be difficult due to the protruding elements of the large grille. It is also made removable, but then you need to weld the corners near the edges. A grate is placed on their lower shelves.
Well, and a video of all the work done.
You can even try to make everything in the form of a steam locomotive, as in the photo below.
To prevent the lid from completely swinging open, you can weld a metal rod or chain. Due to this, this element is limited in movement. It is allowed to paint the barbecue, but it is better to do it outside. The inside still remains hidden from view. Use paints that are resistant to high temperatures. They must withstand up to 800?C. It is recommended to apply paint only after the surface has been coated with a special primer.
Old gas cylinders are most often used to make garden grills.
A propane container works well , although any container will do as long as it has a fairly thick bottom and walls . Leaky, rusty or patched areas are not allowed.
DIY brick tandoor
Most often, modern tandoors are made from brick, because it has optimal fire resistance and thermal insulation properties. In addition to this, you will need cement, a sand-gravel mixture and a ready-made fire-resistant masonry mixture. And also mesh, asbestos fiber, paint, fittings and wire.
Foundation preparation
A brick tandoor is quite heavy, so a reliable foundation is required. On heavy soil, a simple columnar one is enough, but on light sandy soil you will need a monolithic concrete slab. The optimal size is about a meter per meter with a slab thickness of 10 cm, but first remove the soil layer 15 cm deep and make recesses in the corners for the verticals.
For reinforcement, use fiberglass reinforcement, and fill the bottom of the pit with sand. It is most convenient to make formwork from roofing boards and reinforcing mesh. For pouring, use a concrete mixture with the consistency of thick sour cream: sand with gravel in a ratio of 3:1 and cement grade 400 or higher.
Photo: drive2.ru
Photo: dizlandshafta.ru
Laying the base
Lay out the base of the tandoor from the same fireclay bricks from which you will make the walls. Keep in mind that regular red is not suitable for this purpose because it will not survive such temperatures. Fireclay has higher fire resistance and frost resistance, and is also denser and better able to withstand the pressure of the structure.
Before laying the brick base, the concrete foundation was covered with waterproofing roofing felt. For masonry, use a special oven mixture. To make the tandoor round, use a regular cutting wheel for cutting.
Photo: yaplakal.com
Tandoor body
The tandoor body is called the “rule” and according to the standard its height is equal to the width of the base. The diameter of the neck is one third of the diameter of the bottom substrate. For convenience, use a wooden pole and guides in increments of 25 cm.
Lay the bricks strictly vertically and do not skimp on the mortar for better adhesion. Each row must be tied together with wire according to the principle of rings on a barrel. Connect the inner edges as tightly as possible, and fill the distance between the outer edges with mortar.
Photo: fanerus.ru
Photo: mkdou19.ru
Photo: bani-nsk.ru
Tandoor coating
When the brickwork is dry, it needs to be plastered with a special oven mixture. Apply it in a layer of 1 cm and round the top edge so that it resembles a roller. While the plaster is drying, cover the structure with film to protect it from moisture and sun. After this, cover the tandoor with fireproof acrylic paint.
Photo: landscapedizajn.ru
Manufacturing scheme
If you decide to make such a heat-resistant bowl based on a barrel, the barrel itself should be filled with water and left filled for a day. It should be thoroughly saturated with water and swell. After this (or better yet, in parallel), you can start mixing the solution, that is, mixing kaolin with sand and wool (or a plant ingredient). The mixture should infuse for about a week.
Next, the water from the barrel is drained and the barrel is dried naturally. Then the container is well lubricated with vegetable oil and soaked in it for about 20 minutes. Finally, you can stick the clay mixture onto the walls of the barrel, a layer of clay - 6 cm. At the end of the work, the mass is leveled by hand. The neck of the tandoor narrows towards the top, which means the clay layer thickens. The place where the blower will be equipped is outlined.
The preparation must be kept for at least 3 weeks in a dark, always dry place with good ventilation. As the wooden components dry, they will move away from the clay; after a month, they, as well as the metal rings, can be carefully removed.
If you decide to do without a barrel, the instructions will be different.
Foundation
For this part you need to dig a hole, the depth of which is approximately 20-25 cm. The bowl-shaped hole is either round or square. The parameters of the pit should be 15-20 cm larger than the base of the stove. If it is planned to be made with a meter diameter, then the size of the hole should be 120-130 cm. Half of the hole must be filled with sand, and the obligatory crushed stone layer must be laid on top.
After this, the formwork is installed so that the foundation is above ground level. You can lay the reinforcing mesh and finally pour the concrete. Those who have at least once participated in construction work with concrete are unlikely to make a mistake at this stage.
In any case, you need a solid foundation, because a tandoor is not a thing for one season, but a wonderful device that will delight its owners for many years.
Base
You definitely need to make markings, mark exactly where the tandoor will be located. The shape of the base of such a brazier is a circle, which means it will be convenient to mark with twine or a strip, one end of which is fixed in the center. Fireclay bricks need to be placed in such a circle. It would be a good idea to lay them out without mortar, and then adjust if necessary.
When the bricks are laid thoroughly, the seams between them are filled with previously made fireclay clay. Some people use a special mortar for laying stoves, which is also acceptable in principle.
Forming cone
To make it easier to sculpt the walls of the tandoor, a template is installed. It is usually made from moisture-resistant cardboard. And sand is poured inside to make the structure stable.
The prepared strips can be laid around a cone-shaped template. Be sure to smooth out the joint areas. The surface of the resulting walls must be brought to uniformity; no gaps should remain. When the walls of the tandoor are finally flush with the cardboard template, you can make a hemisphere for the top of the roasting pan. You'll need a little more sand.
The surface is covered with newspapers soaked in water. These wet newspapers are covered with a layer of clay with a thickness exactly the same as the thickness of the walls. Then the stove dries (more on this below), and the lid can simply be cut off. For fitting, you can take a bucket of the desired size.
Newspapers, as well as cardboard with sand, can be taken out - they have completed their mission. A special hole is cut out at the base for blowing, its dimensions are on average 10 by 10 cm, maybe a little larger.
Drying
The clay structure should last a week, or even two, until it reaches complete drying. If the climate in the region is damp, it may take longer to dry. After the walls are ready for further processing, they should certainly be coated with vegetable oil from the inside. Ideally, this is cottonseed oil. This will allow the walls to become smooth, that is, those flatbreads that will soon be cooked in an Uzbek tandoor (or another version of the stove) will not stick to its walls.
Having missed the mark, you can proceed to the primary firing. How to do this: light a flame inside the tandoor. Heating, as well as cooling, should be smooth; no sudden temperature jumps are allowed. The more slowly this goes on, the fewer cracks will appear in the walls of the stove.
So, first a fire is built - wood chips and brushwood go into it. The fire should not be extinguished for several hours, then firewood is added there. The complete process can be lengthy, with firing taking a day. During this time, the material will warm up properly.
During firing, the inner walls of the tandoor will become covered with soot, but in the end it will burn out and the walls will clean up as if by themselves.
Finishing
Then the structure should cool down; there is no need to specially cool it, only naturally. If you notice that cracks have formed in the walls of the tandoor, they are covered with sand and clay. And they burn again.
How to make a tandoor from a barrel
You can make a very simple tandoor with your own hands from a 200-liter metal barrel and brick. You'll also need sheet metal, stove grates, an old tire, and door hinges. And little things, like wire, fasteners and working tools.
For the foundation, dig the tire halfway into the ground and fill it with concrete. While it's drying, cut out a small rectangle in the barrel, make a frame out of sheet metal and screw it to it. When you fill the barrel with bricks, leave a path to this hole for blowing and cleaning.
Lay out the second layer of the bottom and place a metal grate instead of a brick above the hole. Fill the barrel up to the top with bricks and fill all the voids with mortar. Make a lid out of sheet metal, screw the door onto the frame, and place the barrel on the foundation.
Photo: drive2.ru
Photo: les-tish.ru
Photo: blog.sputniksadovoda.ru
Photo: drive2.ru
Cylinder cutting
When the water has been removed from the container, you can proceed to the main stage - making a barbecue. To do this, remove rust from the gas cylinder, if any. Then they move on to cutting. If the hole layout is already ready, cut the metal with a grinder. To protect the flame from the wind in the future, it is better to leave the side rings. The cut should be as close to the weld as possible. Dimensions as in the drawing below.
To make straight cuts, you must first mark them. If you need to get an open grill from a cylinder, just cut it in half. In this case, the cut will also take place along the side rings. To make a barbecue from a gas cylinder with your own hands, you need to study the drawings, photos and videos of the entire process before starting work, because such a design is somewhat more complicated due to the configuration of the hole.
All step-by-step instructions can be seen in the video.
You should be guided by the parameters: horizontal lines run along the center of the cylinder, along; vertical - parallel to the side rings at some distance from them (10–20 cm). Working with a grinder, move from the center of the cylinder to its edges. Considering that the length of the product is significant, the grinder disc may burn out. To avoid this, it is recommended to not cut the metal completely in some places. In these areas, the walls are removed with a chisel. To create the possibility of blowing the flame, holes (up to 10 pcs.) are drilled at the bottom and in the side rings.
DIY clay tandoor
Choose heat-resistant yellow or gray clay for kiln work with the expectation of the highest possible temperature. On a production scale, reinforcing components are added to the clay, strips are rolled out and a tandoor is sculpted from them. But this technique cannot be repeated with your own hands without experience and the necessary materials.
At home, cut thick cardboard into strips 30 cm wide and wrap around the diameter of the fireplace. Fill the container with sand inside and wrap the outside with special mortar tape. Then gradually add clay to even out the width and increase the height.
Photo: zen.yandex.ru
Photo: jamaster.ru
Photo: tan-door.net
Tools and materials
To get an idea about the structure of the barbecue, it is recommended to look at the photo/video. First you need to prepare tools and materials:
- grinder for cutting metal;
- welding machine with electrodes;
- electric drill;
- hammer;
- hacksaw;
- chisel;
- screwdriver;
- loops (2 pcs.);
- rivets;
- empty gas cylinder.
First, you need to draw up drawings or sketches, which will indicate the overall and auxiliary dimensions, as well as information about the characteristics of the finished product. Based on the developed documents, the type of support is determined: brick or metal legs. In accordance with this, additional material (corner, pipe) is prepared. If you make a barbecue from a gas cylinder yourself, at the initial stage you determine how to open the lid. For convenience, a metal handle is used.
DIY pit tandoor
To make a pit tandoor, dig a pit of the required size, adding 20-30 cm around the perimeter. Fill the bottom with a 15 cm thick layer of crushed stone and compact it well. Saturate it with hot mastic or lay heat-resistant waterproofing on top.
It is recommended to do the masonry around the perimeter in two layers, and lay thermal insulation material between them. Don't forget to move the chimney pipe to the side. You can coat the walls of the tandoor with special fireclay clay or leave them brick.
Photo: putivodi.ru
Photo: sdelai-lestnicu.ru Photo: na-dache.pro
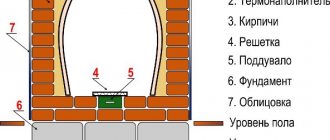
Creating the outer wall of the tandoor
Regardless of the method used to create the inner chamber of the furnace, it requires the creation of additional clothing. The main functional task of creating the outer ring of the tandoor is the formation of a cavity for its further filling with a material that creates additional thermal insulation.
The outer wall often also serves a decorative function. The final finishing of the finished tandoor can include either lining it with brick or clinker, or plastering with stone paving. The main requirement when building the outer wall is its further connection with the inner chamber at the top of the tandoor.
Tandoor design diagram Source sdelaikamin.ru
How to cook in tandoor?
First, put coal in the tandoor and wait until it burns out completely. For the convenience of loading products, special skewers, hooks, grates and other useful accessories are sold. In a properly made tandoor, one load of fuel is enough for 5-6 hours of cooking.
Traditional oriental cakes are glued directly to the clay walls. To do this, you need to wash them well in advance from the old soot and wait until the new ash burns out completely. In order for the dough to stick to the surface better, it must first be well moistened with water.
Photo: doorsindom86.rf
Troubleshooting Possible Problems
The main mistake of those who are in a hurry to make a tandoor is the refusal to use a lid that protects the stove during drying. If it rains, water will get inside the not yet completely dried tandoor, and this can destroy all the efforts of the master. A temporary cover and a waterproof canopy over the tandoor are prerequisites for the slow manufacturing stage.
Here are the rules you need to know to avoid mistakes during use.
- In winter, it is important to increase the temperature inside the stove gradually, otherwise there is a risk of cracking the walls. In summer such caution is unlikely to be required.
- The tandoor should be two-thirds filled with fuel. With less filling there is a risk that it will not heat up completely. You can put more fuel, but this is irrational from the point of view of heat conservation.
- If there is a good, safe canopy over the tandoor, you can use the stove in any weather.
- It is also necessary to clean the tandoor and do it regularly. Burnt firewood, as well as ash, are removed after each use. If the walls of the stove are stained with grease, or even food debris, you don’t have to wash them - everything will burn out later.
The question often arises, which tandoor is better - clay or ceramic. But both types of stoves are good; just making a ceramic one with your own hands will be very difficult. Although there is a trick here: you can take a store-bought ceramic flower pot and turn it into a tandoor. But if you want authenticity, then the optimal material is clay, and nothing else.
Tandoor is not only juicy flatbreads, but also vegetable dishes with meat, samsa, baked fish, kebab, and wings. On your own site, in a tandoor made with your own hands, all these dishes will be even tastier, and this has been proven!
To learn how to make a clay tandoor with your own hands, see the following video.
Gazebo with tandoor and barbecue: photos, prices, construction
The gazebo has long ceased to be an ordinary place for relaxation and gatherings.
Now it’s interesting to cook food almost next to the feast. This can be done with the help of a tandoor and a barbecue complex, which may include it. Tandoor is a jug-shaped device for cooking. It belongs to Asian culture, although it is currently widespread throughout the world. You can use it to fry meat, bake bread and prepare other dishes.
Below we will show the most successful examples of gazebos with a tandoor, which can stand either separately or as part of a large stove complex. Let's consider full-fledged construction taking into account fire safety requirements, and also estimate the average prices for the finished option.
How to use the stove outdoors
On a ready-made tandoor you can heat food, bake flatbreads, samsa, fry kebabs and kebabs. In this case, the cook must wear gloves. Working with the stove cannot be called 100% safe ; the internal walls of the oven heat up by several hundred degrees , and even experienced cooks often get burned due to inattention.
Remember that the height of the flame is sometimes more than a meter and do not allow others, especially children and animals, near the operating tandoor.
Source of the article: https://ogon.guru/stroitelstvo-svoimi-rukami/tandir/na-dache.html
Where to install a country tandoor: a gazebo or veranda under a canopy
open areas with a stone base are suitable for installing the stove , and it would be nice with an additional elevation.
Cooking in a tandoor involves working with an open fire, which rises to 1 m . There should be no vegetation, wooden structures, or other foreign objects within a radius of approximately fifteen meters
A mobile or portable tandoor can be brought into the gazebo or onto the veranda where the participants of the meal have gathered, in order to distribute portions to everyone there. But this is only allowed after the coals have burned out and died out .
Uzbek model: economical and practical construction
The version of the stove invented by the Uzbeks is suitable for particularly zealous owners. A single addition of fuel will allow the cooking process to take place within 3 hours. Creating a design takes time, but does not require significant expenses. Thanks to this technology, it will be possible to create a stationary or mobile tandoor.
The Uzbek stove model can vary significantly depending on the wealth of the owner and the region in which it is used. The main material for making the structure is clay. There are special fittings inside (inserts made of kaolin or refractory bricks).
A pitcher-shaped clay tandoor is the most economical choice. It allows you to be as careful as possible with fuel consumption.
To create the base, they use not only a special type of clay (“live”, with a high content of kaolin), but also animal wool (camel or sheep). Both materials are mixed, the resulting composition is aged for about a week. Time allows the solution to “mature”. At the same time, daily intervention in this process is inevitable: the composition needs to be “stirred”.
The finished material, aged for a week, is used to sculpt the base of the furnace. There are plenty of technologies for this. We will consider the most common and affordable way to make a tandoor oven yourself below.