Who is not familiar with the picture - the shelves in a linen closet or chest of drawers are littered with chaotically lying linen, among which it is not so easy to find the right set or pair of socks. And the order put in place during general cleaning, all these neatly folded piles turn into a heap again after a few days.
In order to easily navigate your shelves and not waste time searching, humanity came up with organizers that help maintain order. Of course, you can buy them - fortunately, the choice of sizes, colors, and functional purposes is great. But it’s much more pleasant to make it yourself, because this way you can create a unique thing that will meet exactly your needs.
DIY laundry organizer from a box
- This is the simplest and most common version of a DIY laundry organizer. But for all its simplicity, it involves a wide variety of solutions and design options. All you need is a box of a suitable size, the sides of which need to be adjusted to the height you need and then arranged inside so that you can lay out the laundry in “storage areas”.
So, we arm ourselves with a cardboard box of a suitable size, glue, a roll of wallpaper (as an option - colored paper, bright magazine covers, sheets of wall calendars, etc.), a ruler and pencil and, of course, scissors. A stapler and staples for it will also not hurt.
Do-it-yourself laundry organizer, step-by-step instructions:
- Step 1. Measure the dimensions of the box into which the organizer will be inserted. They will become the width, height and length of your product. It should be taken into account that a few millimeters will be added when you cover the box, so it is better to immediately plan the dimensions about a centimeter smaller than the dimensions of the box. And, by the way, for a sufficiently large box, it is possible to provide for the production of a couple of organizers at once.
- Step 2. Select a box of the required size. If you don’t have one at home, you can ask in stores; often they simply throw away various cardboard boxes of goods, and of a wide variety of sizes.
Selecting the size
- Step 3. Let's start marking. We measure the height, making it approximately a centimeter less than the height of the box itself, and with a pencil and ruler we draw its line along the entire perimeter. Now, using scissors or a stationery knife, we cut off the excess cardboard along the line, without throwing it away - it will serve as the internal filling of the organizer.
We measure
- Step 4. Paste over the box, giving it a beautiful appearance. By the way, the bottom needs to be pasted over first, because it is what will most often be in front of your eyes. You can also put a beautiful cardboard compatible in size at the bottom of the box.
Paste over
- Step 5. We proceed to making the organizer partitions, for which the cut edges of the box will be useful. They are used to make dividers that cross the box lengthwise and crosswise. Decide on the width of the cells you need and divide the box along their borders with beautifully pasted cardboard partitions.
We also cover the divisions with wallpaper.
- Step 6. To make the partitions stable and not “drive”, cut grooves in them and insert one partition into another. And one more subtlety, if you paste over the cardboard, leaving a small “reserve” of paper, then the remaining paper millimeters can be used for additional fastening. Just glue these “tails” to the side walls of the box when you install the partition - it will hold more securely.
Slots for stability
- Step 7. Our organizer is almost ready. Inserted and secured partitions and the bottom make the entire structure seamless. The final touch will be the final fastening of all cardboard walls, which are fastened with a stapler or smeared with glue and attached.
Fastening
- Step 8. Give your organizer time for the glue to completely dry, and now arrange toilet items in the cells in the order you need.
Things are in place
Linen house made of cardboard
You can buy a ready-made laundry organizer in a store, but it’s much nicer and more creative to make it yourself. In addition, this is a less expensive way to obtain a case.
Boxes for storing linen can be textile or cardboard. This is an individual preference of each individual person.
A simple master class on making an organizer for underwear from cardboard will inspire you to create this storage unit.
To create the product we will need any boxes. This could be packaging for shoes, household appliances or toys.
The size of the future linen chest depends on the place where it will be located. Based on this, we choose a suitable box or glue it ourselves.
Also for work you will need:
- Paper for decorating the box: old wallpaper, newspapers, pages of a music book, sheets from glossy magazines, colored paper;
- Long ruler. It is more convenient to use than a short-length tool;
- Brush and PVA glue;
- Stapler with staples;
- Simple pencil;
- A utility knife or sharp scissors.
Let's start tinkering. First, let's think about how many things will be stored in this box. The number of cells into which we will divide the organizer depends on this.
Based on the size of the cabinet where the linen chest will be stored, we determine the height of the box. Measure out what you need and trim off the excess with scissors.
Don't throw away the rest of the box. They are useful for making partitions. The lid will also serve this purpose. The optimal cell size is 7x7 cm or 8x8 cm. Based on these data, we mark the box and cut out blanks for the walls.
We decorate the details at our discretion. A box covered with old newspaper clippings or sheets of music will look impressive. For a classic, simple design, you can choose plain wallpaper.
The inside of the box itself is glued to match the partitions. It is better to choose wear-resistant paper for decoration. A bright and contrasting design with several colors and paper textures will look interesting and unusual. It is better to start work from the sides and finish with the bottom.
We decorate the outer side of the organizer with scrap paper, fabric or thick packaging material. Small allowances and folds made from paper of a different quality and color look beautiful.
We assemble a grid from blanks for cells. To do this, we make cuts on the parts to the middle of the height and connect them as shown in the photo.
We insert the grille into the box and secure it with a stapler or glue. The product is ready!
The video will help answer the questions that arise when making a linen organizer with your own hands.
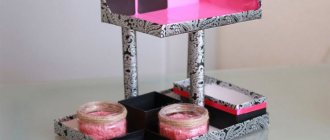
DIY laundry organizer made from plastic cups
- Nice round identical cells filled with socks, knee socks, ankle boots and other “clothing” for the feet can be made from ordinary plastic cups. There is only one drawback - placing cups is impossible without leaving a lot of empty space between them.
- In order to make your own laundry organizer, in addition to plastic cups, you will need a ruler (or centimeter), tape, scissors, nail polish, thread, as well as several ribbons and a regular lighter. After you have prepared everything you need for work, you can begin making an organizer from plastic cups.
Available materials
- Step 1. We start by measuring the box in which the glasses will be placed to determine how many pieces will fit in it.
- Step 2. You need to make small holes in the cups using scissors - this is done on the sides, maintaining the same distance. For cups that will be placed along the side walls of the box, you need to make not two, but one hole.
- Step 3. We burn ribbons about ten centimeters long (if you have long ribbons, you need to cut them into short ones) at the ends - that’s what you need a lighter for. The calculation is as follows: for one row of cups - four ribbons.
- Step 4. Now you need to thread the ribbon through the holes and tie it with a beautiful knot and then with a bow. We repeat this procedure for each glass, obtaining several solid lines of glasses.
We connect
- Step 5. Using double-sided tape, carefully connect the glasses to the drawer. To enhance the beauty of the product, cover the top with nail polish, which will highlight the cells. Your DIY plastic cup organizer is ready!
You can put underwear in each compartment
Super budget ideas for storing underwear and socks
Hello, my dear readers! Today there is a very delicate topic on the agenda. And it is dedicated to storing underwear and socks. Who knows, but I take this very seriously and therefore I will share with you options for organizing them.
A woman's underwear is her secret. No matter how much there is, it is always not enough. Moreover, on the market you can find goods for every color and taste. And recently, various devices have become popular where you can neatly fold panties and put them in the closet. But it was not always so. I remember that in my drawer it was not clear what was lying where, in short, everything was upside down. Naturally, it will take a lot of time before I find what I need. I think many people are familiar with this situation. But as time goes on, people come up with gadgets that make life and storing things much easier.
And so I was faced with the question of how I could organize the storage of underwear so that it was not only neat, but also convenient. In search, I turned to our favorite Internet and this is what I found.
DIY laundry organizer made from milk cartons
- Almost every housewife has a carton of milk (or juice as an option) in her refrigerator. They usually end up in the trash bin after they are empty, and to no avail. You can use them to make an organizer for underwear or socks with your own hands. And it’s not at all difficult to do.
You will get this result
- Step 1. Having collected several of these bags, cut off their top and bottom edges, calculating so that they are commensurate with the height of the box. The foil inside the bag must be washed thoroughly, using soap or detergent if necessary, and then wiped and dried just as thoroughly.
- Step 2. The bags must be inserted into the box, better fastening their walls with tape or a stapler. Such neat storage will help you always keep your laundry items in order and quickly find what you need.
Staple and place in the box
DIY laundry organizer made of fabric: sewing
- This DIY laundry organizer is quite durable and practical. Its other advantages include compactness, mobility and versatility, since it can be placed on almost any shelf.
- To make such an organizer, you will need durable fabric (preferably brightly colored), less dense fabric, different in color, to make partitions from it. You also need to take a piece of synthetic padding and a decorative ribbon or edging. And, of course, all the necessary tailoring supplies: threads, needles, pencils and rulers for patterns, scissors, etc.
Beautiful result
- Step 1. From the main fabric and from a piece of padding polyester, you need to cut out rectangles of a size slightly smaller than the bottom of the box - this way your organizer will not wrinkle.
Rectangles
- Step 2. You need to sew partitions onto the main rectangle of fabric. They are made like this: the length is equal to the base, and the width should be twice as large as the walls of the box. These blanks need to be sewn in the middle, and then folded with the seam inward, thus obtaining a double partition.
- Step 3 . We estimate how many cells we need, and based on this, we draw them. Let's draw the wall based on the number of cells needed.
- Step 4. Stepping back one and a half centimeters from the edge, we begin to sew on our rectangles.
Sew on
- Step 5 . Then we make partitions that will go across, folding the material in half. It is better to iron them by first turning them inside out.
- Step 6. We sew all the small parts together.
Sew the details
- Step 7. Now we make the side parts and also sew them to the base.
Sides
- Step 8 . All that remains is to decorate the top and end parts with piping or ribbon, which will add elegance and aesthetics to the product. Enjoy using this organizer!
Adding a border
Textile organizers with pockets
Organizers for storing things with pockets are not difficult to make. To make the basic version you will need simple materials.
This:
- a large piece of fabric for a 2-sided base of the craft;
- smaller fabric for pockets;
- durable thin plastic for fastening parts (replaced with dublerin, which is glued with an iron);
- bias tape or tape for processing the product;
- eyelets.
Execution order:
- Sewing is done by hand or on a sewing machine.
- First, it is recommended to decide on the size of the fabric model and the size of the pockets. Sheet A4 is used as a standard template.
- Cut out rectangular shapes of the appropriate scale from plastic material, and from fabric - blanks 2 times larger. You should leave 2-3 cm for the volume of the parts and take into account seam allowances.
- Fold each pocket segment in half with the right side out, place a piece of plastic inside and stitch along the top.
- Iron the material on the sides outward in the form of an “accordion” so that there are allowances on the side.
- Next you need to stitch the edge folds of the pocket. Treat each pocket in the same way.
- To make the base of the organizer, you need to place a plastic piece between the layers of a double fabric blank.
- Place small parts on the created base and secure them with pins.
- Sew the pockets to the main module.
- Then take a round object and use it as a template to round the corners of the base.
- Treat the craft with tape or ribbon in a circle.
- Mark the installation location for the eyelets and attach them.
Option for making an organizer for the hallway:
- The first stage involves cutting out 2 rectangles from dense material, measuring 80x40 cm (any size can be chosen as desired).
- Sew the created segments first with the wrong side up, then turn them right side out and stitch along the edges.
- Cut 4 strips from this or another suitable fabric.
- From the stripes, make 4 pocket lines, each with 2 pockets.
- Next, fold the upper edges of the fabric runner and trim it with colorful braid or decorate it with applique.
- Each pocket should be given depth using 2 folds that are not secured at the top.
- Sew the strip with creases on 3 sides and between the pockets.
- Seal the bottom edge of the sewn bags with finishing material or braid. It will cover the edge and secure the folds.
DIY laundry organizer made of fabric and cardboard: pattern, sewing
Required
- Step 1. Measure the dimensions of the box. For example, it is 50 cm in length, 30 cm in width, and 10 cm in height. From these dimensions we will calculate the pattern.
- Step 2. Take cardboard and cut out two long strips (50 cm long and 10 cm high). We make two more strips 30 cm long. We will provide 14 cells, each 15 cm. And we also need to prepare jumpers the size of the width of the cells.
Cut it out
- Step 3. Now, to make the organizer beautiful, we will cover it with fabric, which needs to be cut into strips of 50 cm and 30 cm, adding a centimeter on each side, since the fabric will need to be folded.
Will need to glue
- Step 4. Glue the cardboard strips onto the fabric, leaving slight gaps to make slits.
This is how we will create a lattice
- Step 5. Separately, we will make the outer part of the organizer for storing linen, and then we will sew the partitions to the fabric that we left from the edges, fixing it.
Organizer design
- Step 6. The bottom of the organizer is also made from cardboard covered with fabric, which is hemmed to the outside. However, this element is not necessary if the inner surface of the box is smooth.
DIY laundry organizer: tips
- Linen organizers can be made from various materials. It is best to buy plastic ones Wooden ones can only be made if you have the materials and tools, which not every home has. But cardboard and fabric ones are the best option for making them yourself, since they do not require expensive materials and open up wide scope for imagination. All you need is sheets of cardboard or cardboard boxes and any thick material you have on hand.
- For fabric organizers, denim fabric, which is quite dense in structure, is often used. Experienced housewives advise, before starting to make a structure, to boil old jeans in boiling water, thus preventing the possibility of the fabric fading.
Fabric
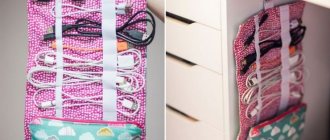
- Most often, organizers are installed in drawers in a horizontal position, but they can also be vertical (or hanging). One such option could be a hanging basket made of fabric, made in the form of a regular fabric bag. It can be mounted on the wall on hangers - this way you will save space on the closet shelves.
Self-production
- If desired, the hanging basket organizer can be made closed by sewing on a regular button or inserting a zipper.
We will also tell you how to do it yourself:
- New Year tree
- Mat made from corks for plastic bottles
- Removable sofa cover
- Broom-amulet
- Garlands for the New Year
Folding organizer for household items
There are things in every home that are a pity to throw away, but there is no way to store them separately. A special organizer is perfect for this.
DIY polymer clay jewelry: master classes with photosDIY decorative candles: master classes with photos
Decorating a vase: ideas and master classes on how to make a vase with your own hands (80+ photos)
To work you need the following things:
- thread and needle;
- a piece of any dense fabric and several scraps;
- pins;
- buttons.
Lay the fabric horizontally and fold over about 1/3 of its length. Use pins to mark where the pockets will be. We sew the workpiece according to the markings and attach 2 buttons to each side of the pocket. From the flaps we make valves that will close the pockets. We cut holes. We attach the valves to the pockets.
It turned out to be a great thing for storing small items. It can be folded into several parts and placed in a table or closet. You can get what you need at any time.
You can even use a terry towel as a basis for the organizer. Then you can fold the item and even take it with you on a trip - everything will be preserved perfectly!
A little imagination and free time is all you need to properly organize the space in your home. Organizers will definitely help with this!