How to make a wood splitter with your own hands: drawings, photos, instructions
We will send the material to you by e-mail.
Chopping wood with an ax is very hard work, so many owners of country houses who heat the stove with wood try to buy or make a wood splitter themselves. These devices allow you to avoid the tedious swinging of the cleaver, so you can split much more firewood in one day, because you don’t have to rest every now and then. From the article you will learn how to make a wood splitter with your own hands: drawings, photos, instructions will help you in making it.
Stage 2. Timber processing
Step 1. After the consumables have been delivered to you (or you have cut them and delivered them yourself), they need 25-30 days to rest.
Step 3. Then start processing. First, peel the bark from the logs (do this carefully so that they do not crack), leaving a little of it on the sides - about a 15-centimeter strip on each side.
Step 4. After processing, place the logs in storage approximately 25 cm from the surface of the ground. You can stack it however you like - in stacks, packs, etc., the main thing is that the distance between the logs is 7-10 cm.
Scheme for preparing logs for building a log house
Log storage
Video - Preparing logs
Types of wood splitters
There are three main types of wood splitters, which differ in the source of energy for influencing the log:
Electric rack splitter
Hydraulic type device
Hydraulic wood splitters
This device works on the principle of a hydraulic press. The hydraulic cylinder pushes the log onto a sharpened wedge, which splits the wood. These wood splitters are driven by an oil pump powered by a gasoline or diesel engine. Their main disadvantage is the high cost of high-quality hydraulic cylinders, control units and pumps.
Electric wood splitter
Electric (rack and pinion) wood splitters work on the same principle as hydraulic ones. Their basis is a rack and pinion gearbox, which pushes the log onto a sharp wedge. Their advantage is the availability of parts and their low price. Such gearboxes are installed on sliding gates and other similar equipment. Electric (cone) wood splitters operate on the self-tapping principle. The steel cone is threaded so it screws into the log and tears it apart.
Manual (inertial) wood splitter
The basis of this wood splitter is a metal pipe (crane), fixed to a metal support using a hinge. The pipe is equipped with a wood splitter blade, as well as various steel reinforcing elements. Sometimes a counterweight is installed to make lifting the pipe easier. To split the log, the pipe is sharply lowered. The blade, under the influence of the inertia of the pipe and reinforcing elements, splits the log. The advantage of such a device is that it can be made from any steel pipes, which can be sold for a few hundred rubles by an employee at the nearest ferrous metal collection point. The disadvantage of this wood splitter is that it uses muscular strength to operate it, so a person gets tired quickly.
Homemade wood splitter - what and how to do
If you have the necessary materials, then it’s easy to make a wood splitter with your own hands: drawings, photos, instructions are freely available on the Internet. For this you will need:
- various metal scraps;
- Bulgarian;
- welding inverter;
- ability to cook;
- ability to draw up and calculate diagrams;
- creative ingenuity.
Helpful advice! The design of each wood splitter must be developed individually, according to the available parts.
Rack splitter - diagram and manufacturing
The easiest way is to make a rack wood splitter with your own hands: drawings, photos, instructions for which are posted on the Internet. Its basis is a powerful steel frame, to which a wedge, motor and gearbox are attached. To make it, take an electric motor with a power of at least 2 kW and two pulleys with a diameter ratio of at least 1:4. You can also use gearboxes from various mechanisms with transmission ratios over 8:1. If you don't have an electric motor, but have a gas engine from a saw or trimmer, you can connect it. In this case, you will have to increase the transmission ratio of the gearbox even more due to the too high speed of such a motor. Make a knife for a wood splitter from sheet steel at least 1 cm thick, sharpening it at an angle of 90 degrees. To work with thick logs, it is necessary to make a compound knife so that its thickness is at least 5 cm, and reinforce it inside with a steel blank of a suitable shape.
Approximate diagram of a rack wood splitter
The gear of the rack and pinion mechanism should be 4–6 cm higher than the frame and located from the knife at a distance equal to twice the length of the log. In addition, it is necessary to make a carriage that will ride on the bed. The height of the carriage must correspond to the installation height of the rack and pinion gear. On the front (facing the knife) side of the carriage, install a transverse plate that will act as a pusher. For it, use sheet steel with a thickness of at least 7 mm. Install any hinge on the carriage that will allow you to raise and lower the rack, and also attach a spring to lift the rack above the gear. Install and secure the return spring, which will move the carriage towards the gearbox. Install a lever on the frame that will press the rack against the gear. With this lever you will control the operation of the wood splitter - when the lever is pressed, the rack comes into contact with the gear and moves forward. If necessary, cut the rail with a grinder - it should be slightly shorter than the distance from the feed plate to the knife.
Hydraulic wood splitter - materials and drawings
To make a hydraulic wood splitter with your own hands: drawings, photos, instructions for which you will find below, you will need:
- electric or gasoline motor with a power of over 2 kW;
- oil pump;
- oil tank;
- high pressure hydraulic hoses;
- control unit;
- hydraulic cylinder;
- I-beam or U-shaped metal beam;
- metal corner with a shelf size of 30–40 mm;
- sheet metal 0.5–2 cm thick (it is advisable to stock up on pieces of different thicknesses).
Stage 4. Waterproofing the base
Treat the surface of the foundation with molten bitumen and lay a layer of roofing material on top. After the bitumen has completely dried, repeat the procedure. As a result, you will have reliable two-layer waterproofing.
Waterproofing with mastic
Additional insulation with roofing felt
How to make a wood splitter mobile
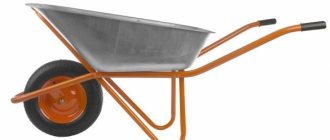
There are situations when the wood splitter needs to be transported to another location. But the weight of the structure often exceeds 100 kilograms, so it is very difficult to carry. To make your device more portable, attach wheels to it. To do this, you can use wheels from a garden or construction wheelbarrow. It is advisable to provide some kind of wheel locking system to prevent the wood splitter from rolling while the engine is running. But you can also make do with bricks, supporting the wheels with them while the device is operating.
Stage 9. Roof
As soon as the tree shrinks, you can begin building the roof. If you do this earlier, the roof will simply collapse.
Step 1. Place wooden beams on the wall framing (we have already talked about this).
Step 2. Fix the beams and attach the rafter legs to them in 1 m increments. In the ridge part, cut the rafters at the appropriate angle for the connection.
Step 3. Nail a solid board deck to the rafters (if you plan to use rolled roofing material) or make a sheathing (if you use slate, tiles, etc.).
Step 4. Install the roofing according to the instructions for the specific material.
Step 5. Cover the ridge with galvanized sheet steel to protect it from aggressive environmental influences.
Step 6. Cover the roof gables with siding or clapboard.
How to sew up a pediment
After this, proceed to further planned work - pouring a concrete screed or building a wooden floor (in the second case, the logs are cut into the logs of the second crown and fixed), install insulation, carry out interior finishing and arrangement of the steam room according to your project.
An example of a log house with a shingle roof
An example of a log house with a shingle roof
Cornice filing
Roof overhang trim
How to make a mechanized cleaver for chopping wood
Homeowners who heat their homes with a wood-burning boiler or stove have to prepare 4-12 cubic meters of logs annually. Sure, exercise is good for your health, but chopping with a hand ax takes too much time. There are 2 ways to speed up the cutting process: buy a mechanical splitter for firewood, or save money and make a wood splitter yourself. Let's consider options for homemade devices and the technology for their manufacture.
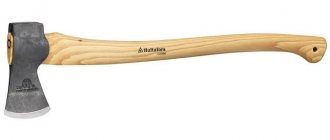
Choosing a wood splitter design
First, let us remind you what a firewood cleaver is. This is a modified ax with a long handle (about 0.8 m) and a heavy blade sharpened at a relatively obtuse angle - 30-35 degrees. The design is designed to split wood along the grain; this tool is not suitable for ordinary chopping and hewing.
Reference. The weight of the “head” of a traditional hand cleaver with a long ax lies in the range of 2-3 kg.
Mechanical wood splitters have inherited some of these characteristics, which we will discuss below. Nowadays, households use 3 types of factory-made devices and home-made analogues:
- spring with manual drive;
- electric – screw and rack and pinion;
- hydraulic.
We propose to consider the designs of mechanical cleavers and find out which device is best to make based on the volume of the cleavers and the cost of components. If you need to chop a lot of small branches, then it is better to make another machine - a wood chipper.
Spring device with lever
The wood splitter options shown in the photo consist of the following elements:
- frame made of metal profiles or pipes with horizontal supports;
- long boom - a lever mounted on a hinge;
- on the hinge side, the boom rests on a spring inserted between two cups;
- At the end of the lever there is a weight and a cleaver blade, plus a handle for a comfortable grip.
Note. The frame design is arbitrary. The main task is to prevent the mechanism from tipping over during the process of cutting decks. Sometimes the end of the arrow is embedded in the wall or attached to various adjacent structures.
The operating principle of the wood splitter is based on enhancing the impact due to the elasticity of a manually stretched spring. Under the blade, at a convenient height, there is a stand where sawn logs are placed. The operator swings the lever with one hand like a pendulum, with the other he moves the tree under the blows of an improvised ax.
The advantages of a spring cleaver made of metal with your own hands:
- simplicity and minimal price of materials for manufacturing the device;
- the operation of the mechanism does not depend on electricity;
- thanks to the frequent vibrations of the deck lever, it is easy to chop into firewood of any size - from splinters to logs, the main thing is dexterity.
The main disadvantage of the wood splitter is the danger of putting your fingers between the oscillating blade and the block during the rearrangement process. Well, the second point: the mechanism does not relieve the homeowner from hard physical labor - you need to swing the boom, quickly move the deck and remove the firewood.
Comment. It is much more difficult to chop knotty cuttings and “slingshots” - you have to apply several blows to one point.
Electric models
Mechanized cleavers - screw and rack-and-pinion, powered by an electric motor - greatly facilitate the work of the hewer. But the cost of these wood splitters increases due to the use of motors, drive parts and special splitting tools:
Master class on stone axes
to make stone axes more than 4 million years ago. Archaeologists very often find arrowheads, knives and axes that are made of stone. And if in those distant times it was an important part of everyday life. And the future of an individual family or even an entire tribe depended on how well the stone ax .
Different materials were used for handaxes, but most often they were made of silicon. Nowadays, this art has been almost completely forgotten and not many people can make stone axes. However, there are clubs and groups where like-minded people who are interested in archeology gather and try to restore this whole process, and there are even courses where, for a fee, they can teach how to make a stone handaxe. It's quite funny to watch a group of people sitting and grinding stones on their knees. They are so passionate and completely immersed in this activity that they can spend the whole day doing it, because without the proper skill it is quite difficult to make a stone ax. In words, it would seem that everything is quite simple. You just need to break off a piece of the required size with a strong blow of stone against stone and you’re done. But no, you have to, as they say, sweat and it takes a lot of time.
Assembling the screw and hydraulic apparatus
A suitable engine with a speed of 500 rpm and a power of 1.5-2 kW will greatly simplify the design of the cleaver. This electric motor connects directly to the cone; there is no need to install a belt drive. If a unit with these characteristics cannot be found, prepare the following set of materials:
- 2 single-groove pulleys of calculated diameter, reducing the shaft rotation speed to 500 rpm;
- V-belt;
- bearing blocks and driven shaft;
- screw splitting cone made according to the drawing;
- profile pipes or other rolled products for making a table;
- electric motor mounting plate made of sheet 8-10 mm thick;
- metal 2-3 mm on the tabletop;
- mounting bolts and nuts.
Recommendation. Do not order a screw “carrot” from a turner until you know the diameter of the driven shaft or the main shaft of the engine. The thread of the working cone is made with two starts, the steel grade is St35...St45 (high-carbon).
You need to weld a table from metal profiles and fasten a sheet of metal on top. The motor is mounted on a plate under the tabletop, the secondary shaft with a cone is on top. The pulleys are placed on keys or fixed with locking screws. When connecting the power cable, be sure to ground the unit.
Important point. When chopping wood with a screw device, you must correctly move the block towards the tool - strictly in a vertical position. If you lay it on its side, one log will get stuck between the cone and the countertop.
On the stationary version, the oil station is located separately
The assembly of a hydraulic splitter differs in the installation of equipment. Instead of an electric motor and a carrot, you need to install a blade, a pusher plate and a working cylinder. Please note that the remaining components can be placed separately by connecting high-pressure hoses from the hydraulic pump to the cylinder.
The manufacturing process of a hydraulic unit is shown in very detail and clearly in the video: