Structure for growing oyster mushrooms
FORUMHOUSE user with the nickname 111denis111 made a design that he called “Cradle for Oyster Mushroom”.
If Magomed does not go to the forest, then the forest goes to Magomed. So I had to come up with and design a cradle for growing oyster mushrooms.
The basis of the structure is a metal frame made of a 50x5 angle and round pipes with a diameter of 20 mm.
On top it is covered with a piece of galvanized corrugated sheet, which is tied to wood for strength. The “skeleton” is covered with an agrofibre curtain on ropes, which is secured with clothespins.
In order not to spread dirt in the Oyster Mushroom Cradle and to prevent weeds from entering it, a large sheet of linoleum was laid under the structure. And each leg of the frame is placed on a brick.
The Cradle for Oyster Mushrooms is equipped with a simple irrigation system made of PVC water pipes (20 mm), equipped with spray nozzles.
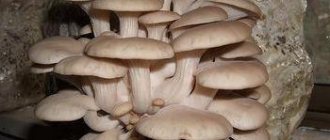
Mushroom blocks are hung on the suspension. When purchasing blocks, our user recommends being careful and looking closely to make sure there are no mold stains on them.
The only drawback that the users of our portal discovered in this design: it is seasonal, it will stand idle for most of the year, and they suggested thinking about a more capital and heated Cradle.
How to choose a substrate for oyster mushrooms
Experts consider the nutrient substrate to be of decisive importance when growing oyster mushrooms. To successfully grow oyster mushrooms, the nutrient substrate must have high nutritional value and contain proteins, fats, carbohydrates and fiber. The most important thing on this list is proteins, because they determine how quickly the mycelium grows and how well it takes root in the substrate.
Any substrate is made from cellulose-containing materials: first of all, these are the stalks and grains of cereals, corn cobs after threshing, husks from buckwheat grains and peels from sunflower seeds, etc. Champignons, unlike most other mushrooms, are grown in compost, which is rich in nitrogen.
My mother-in-law was pouring champignon peelings onto the meadow. Then cows began to graze there, and now champignons can be picked every morning!
The substrate for oyster mushrooms is made from various grain crops that have different properties.
Thus, millet contains less sugars than other grains, so mushroom blocks made from it are considered the best - oyster mushroom mycelia adapt most quickly to them. Millet also has the lightest grain: this indicator determines how evenly the block is overgrown with mycelium.
After millet in the ranking of substrate blocks suitable for growing oyster mushrooms (and other mushrooms) is rye , followed by barley wheat closes this row . It is not recommended to use oats for preparing mushroom substrates.
When purchasing substrate blocks, you should pay attention to the absence of yellow spots, which may indicate aging of the crop, and, as always when we are dealing with mushrooms, pay attention to odors. Good, high-quality substrate blocks with mycelium always have a pleasant mushroom smell.
It should be remembered that the mycelium grown on wheat blocks has the shortest viability period (the high rate of mycelial growth lasts about two months), for barley and rye blocks - three months, and for millet blocks - more than six months.
Thus, in all respects, the best raw material for growing mushrooms will be millet, followed by rye, followed by barley and wheat.
There are many examples on FORUMHOUSE when the crop was harvested from spent mushroom blocks purchased to fertilize the site.
You buy spent oyster mushroom blocks, put them on a pallet (white side up), cut off the polyethylene, water them three times a day, keep them in the shade, harvest them, and put the remaining blocks into the garden for fertilizer. This is the easiest way.
We asked for eight blocks (straw in polyethylene) with mycelium from a Tajik specialist. The blocks were lying on the street, awaiting removal for disposal. They interested me only as mulch for garden beds, and then the young Michurinist woke up in my soul. The photo shows a five-liter bucket.
Sounds
Java Edition:
| Sound | Subtitles | Source | Description | Identifier | Subtitle key | Volume | Height | Min. distance |
| https://minecraft.fandom.com/%D0%A4%D0%B0%D0%B9%D0%BB:Wood_dig1.ogghttps://minecraft.fandom.com/%D0%A4%D0%B0%D0% B9%D0%BB:Wood_dig2.ogghttps://minecraft.fandom.com/%D0%A4%D0%B0%D0%B9%D0%BB:Wood_dig3.ogghttps://minecraft.fandom.com/%D0% A4%D0%B0%D0%B9%D0%BB:Wood_dig4.ogg | Broken block | Blocks | Block destruction | block.wood.break | subtitles.block.generic.break | 1.0 | 0.8 | 16 |
| https://minecraft.fandom.com/%D0%A4%D0%B0%D0%B9%D0%BB:Wood_hit1.ogghttps://minecraft.fandom.com/%D0%A4%D0%B0%D0% B9%D0%BB:Wood_hit2.ogghttps://minecraft.fandom.com/%D0%A4%D0%B0%D0%B9%D0%BB:Wood_hit3.ogghttps://minecraft.fandom.com/%D0% A4%D0%B0%D0%B9%D0%BB:Wood_hit4.ogghttps://minecraft.fandom.com/%D0%A4%D0%B0%D0%B9%D0%BB:Wood_hit5.ogghttps://minecraft .fandom.com/%D0%A4%D0%B0%D0%B9%D0%BB:Wood_hit6.ogg | No | Blocks | Fall on a block with fall damage | block.wood.fall | No | 0.5 | 0.75 | 16 |
| https://minecraft.fandom.com/%D0%A4%D0%B0%D0%B9%D0%BB:Wood_hit1.ogghttps://minecraft.fandom.com/%D0%A4%D0%B0%D0% B9%D0%BB:Wood_hit2.ogghttps://minecraft.fandom.com/%D0%A4%D0%B0%D0%B9%D0%BB:Wood_hit3.ogghttps://minecraft.fandom.com/%D0% A4%D0%B0%D0%B9%D0%BB:Wood_hit4.ogghttps://minecraft.fandom.com/%D0%A4%D0%B0%D0%B9%D0%BB:Wood_hit5.ogghttps://minecraft .fandom.com/%D0%A4%D0%B0%D0%B9%D0%BB:Wood_hit6.ogg | Knocking on the block | Blocks | Mining a block | block.wood.hit | subtitles.block.generic.hit | 0.25 | 0.5 | 16 |
| https://minecraft.fandom.com/%D0%A4%D0%B0%D0%B9%D0%BB:Wood_dig1.ogghttps://minecraft.fandom.com/%D0%A4%D0%B0%D0% B9%D0%BB:Wood_dig2.ogghttps://minecraft.fandom.com/%D0%A4%D0%B0%D0%B9%D0%BB:Wood_dig3.ogghttps://minecraft.fandom.com/%D0% A4%D0%B0%D0%B9%D0%BB:Wood_dig4.ogg | Block placed | Blocks | Block placement | block.wood.place | subtitles.block.generic.place | 1.0 | 0.8 | 16 |
| https://minecraft.fandom.com/%D0%A4%D0%B0%D0%B9%D0%BB:Wood_hit1.ogghttps://minecraft.fandom.com/%D0%A4%D0%B0%D0% B9%D0%BB:Wood_hit2.ogghttps://minecraft.fandom.com/%D0%A4%D0%B0%D0%B9%D0%BB:Wood_hit3.ogghttps://minecraft.fandom.com/%D0% A4%D0%B0%D0%B9%D0%BB:Wood_hit4.ogghttps://minecraft.fandom.com/%D0%A4%D0%B0%D0%B9%D0%BB:Wood_hit5.ogghttps://minecraft .fandom.com/%D0%A4%D0%B0%D0%B9%D0%BB:Wood_hit6.ogg | Steps | Blocks | Walking on the block | block.wood.step | subtitles.block.generic.footsteps | 0.15 | 1.0 | 16 |
- MC-177082
Bedrock Edition:
| Sound | Description | Identifier | Volume | Height |
| ? | Block destruction | dig.wood | ? | 0.8 |
| ? | Fall on a block with fall damage | fall.wood | ? | ? |
| ? | Mining a block | hit.wood | ? | 0.5 |
| ? | Block jumping | jump.wood | ? | ? |
| ? | Fall on a block without falling damage | land.wood | ? | ? |
| ? | Walking on the block | step.wood | ? | ? |
| ? | Block placement | use.wood | ? | 0.8 |
How to make mushroom blocks
First of all, the raw materials for preparing the blocks must be as fresh as possible; century-old rotten hay or old gray sawdust will not be suitable - mold and other harmful microflora will develop on such raw materials.
If the blocks are made from sawdust and wood chips, then, again, they should have a healthy woody smell; Chemical odors of various varnishes and impregnations are unacceptable. In mushroom growing, only wood chips and sawdust are allowed: nothing will work with conifers.
Many amateur mushroom growers make substrates for growing oyster mushrooms from several different components, for example:
Such a substrate will contain a large amount of nitrogen, which will accelerate the appearance of the first oyster mushroom crop.
All ingredients of the substrate (except for the husk) must be small (each element no more than 3 cm). They are thoroughly mixed and, for disinfection, boiled for three hours in a metal container in hot water (about 70 degrees). The water is drained, the substrate is cooled to 20 degrees and infected with a fungal strain.
I recommend grain mycelium to everyone, it is real and alive. Almost nothing grows on sticks. It doesn’t matter where you buy it, it is important that it be grain-based and, even better, laboratory-produced.
Experience shows that flour and sugar bags (95x56 cm) are ideal for mushroom blocks. Clean bags (preferably even disinfected) are filled evenly, without voids, with the substrate and sprinkled with mycelium (with clean hands).
Types of mushroom farm
The structure of a mushroom farm depends on its purpose - it can be designed to grow products for one’s own needs or for sale. The second option can have an unlimited scale - it turns out to grow both several tens of kilograms and several tons per month.
Mushroom farm in general
A home farm can be organized in almost any available space. The main thing is that it is warm, there is ventilation and other conditions for favorable growth of mushrooms. The simplest home farm can be set up in a basement, greenhouse, or barn.
Regardless of the type of room, a mushroom grower will need the following equipment:
- climate system;
- racks;
- lighting;
- refrigeration equipment;
- steam generator.
A more accurate list is compiled depending on the type of mushroom chosen, the method and scale of cultivation, and other nuances.
Mini mushroom farm for home cultivation
A mushroom farm is a fairly simple set with which products are grown at home.
What does a mushroom farm consist of:
- cardboard box;
- mycelium (mycelium).
The size of the boxes can be different, there are larger ones - 20x13x6 cm or 8x10x4 cm. This is a very small volume, designed for growing mushrooms for home use. If we are talking about business, then such mini-farms will not bring much income, but they may well become a serious help for the family budget.
Manufacturers and suppliers of farms for growing mushrooms assure that they can be placed in any place convenient for the owner, and they can grow:
- Champignon;
- oyster mushrooms;
- White mushrooms;
- boletus and other types.
One box costs 150-200 rubles. The exact number of mushrooms grown in one box is not specified. Experience shows that from this it is possible to grow about 1 kg of product.
How to “start” a mushroom farm:
- Open the package. To do this, cut off its top along the cutting line. All instructions about this are right on the box.
- Regularly spray the mycelium with water - 2-3 times a day.
About a month after the start of watering, it will be possible to harvest.
Before ordering a large number of sets, buy 2-3 pieces with oyster mushrooms or champignons to experiment. This method of growing mushrooms, along with its advantages, also has several disadvantages.
Pros:
- you can grow mushrooms anywhere - at home, on the balcony, in the country house, in the barn, in the basement;
- your own mushrooms are cheaper;
- it is possible to obtain environmentally friendly products;
- you can make money by growing mushrooms by planting pieces of mycelium in different containers;
- Various types of mushrooms are grown.
Minuses:
- you need to water regularly (several times a day);
- small volumes of grown products;
- there is no guarantee that the mushrooms will grow.
You should not think about any business when buying such sets. Firstly, we are talking about small volumes. Secondly, even if agricultural practices are followed, the mycelium does not always grow. For sale, mushrooms are grown in spacious rooms where compost with mycelium is placed.
How to make an oyster mushroom block correctly
Oyster mushrooms are one of the most unpretentious mushrooms, so their cultivation has gained wide popularity among various types of home businesses. Here we will tell you in detail how to make an oyster mushroom block according to all the rules in order to get a good harvest and avoid possible problems with growing.
After all, a lot depends on the quality of the substrate blocks, and any novice mushroom grower needs to become familiar with all the intricacies of their creation.
What to do with the old block
Three crops can be harvested from one block, and each subsequent one will be significantly worse than the previous one. After the third wave of fruiting, the block can be dismembered into small parts and used to infect a new block. There is no need to buy new mycelium: you can use the leftovers to grow mushrooms of the same quality.
Some break the block after the first wave, and some take the 4th-5th harvest, but I would not call this meager amount of mushrooms a harvest. A block infected with the remains of an old block does not bear fruit as profusely as a block infected with fresh mycelium, but the harvest is still quite good. And most importantly, thanks to the use of waste blocks, you will have free and uninterrupted mushroom production.
- Sulfur-yellow tinder fungus, or “mushroom chicken” - you should definitely try this mushroom!
What to make mushroom blocks for oyster mushrooms from
The substrate block for growing oyster mushrooms is a plastic bag tightly stuffed with nutrient material. Even if you assemble and hang a block according to all the rules, but fill it with low-quality compost, you can’t count on a good harvest. Therefore, it is very important to pay attention to the content.
Substrate preparation
Various materials can be used as the base of the substrate:
To enrich the nutrient medium, the following is added to the raw materials:
It is advisable to grind all components until a homogeneous mass is obtained.
After mixing the components, they are sent for heat treatment. This is a prerequisite to prevent harmful microorganisms from appearing in the substrate.
Place the mixture in a tank of boiling water and cook for 2-3 hours. Then the water is drained, the substrate is cooled and the formation of mushroom blocks for oyster mushrooms begins.
When filling the blocks, the compost should be at room temperature.
What to make mushroom blocks for oyster mushrooms from
Mushrooms on stumps
You can grow oyster mushrooms on stumps by infecting them with filler from an old block. On stumps, the crop ripens in 3-4 months, but they will bear fruit for 4-5 years. If the stumps stand in the garden, the harvest will ripen mainly in the fall, and in the utility room they can bear fruit all year round.
There is no need to cook oyster mushrooms: after cooking they become rubbery. Better to fry it right away. In my opinion, oyster mushrooms are tastier and more aromatic than champignons.
By the way, champignons can also be grown, but this is a more expensive process. Champignons need a humus substrate, and it takes up a lot of space. Oyster mushrooms are much easier, and I recommend everyone to start growing them. If not for implementation, then for yourself.
All the best.
How to properly form mushroom blocks
For the blocks you will need thick plastic bags measuring approximately 400x800 mm. I also treat them in advance by soaking them in water with bleach. You can use steam treatment or dip them in any other antiseptic solution. It is not necessary to dry them, just shake off the liquid well.
You should also prepare the mycelium in advance. You can buy it in special stores or prepare it yourself.
Layers of substrate and mycelium are alternately placed in the bags. The first and last layers should be made of nutritious material. The mycelium is laid out in a thin layer, the compost in a thick layer.
Bags should not be filled to the very top. You need to leave some free space to tighten the bags well. They are tied tightly with nylon rope. Ordinary ropes will not work here; they will quickly rot from moisture.
Now that the oyster mushroom block is filled with substrate and sealed, cross-shaped cuts are made on it with a sharp knife or blade. The size of the cuts should not exceed 1 cm.
Next, the blocks are placed in a warm room. The first 2-3 weeks are the incubation period. At this stage, it is very important to maintain the correct temperature and humidity levels in the environment where the bags are located. Then the temperature is lowered and the forcing of oyster mushrooms begins. The first fruits begin to emerge from the slits, growing in size every day.
How to properly form mushroom blocks
These were the basic rules on how to make your own oyster mushroom block. There is nothing complicated about it. The main thing is high-quality mycelium and compliance with all conditions in the room. Then the harvest will be rich and of high quality.
Source
Cultivation of oyster mushrooms and the first harvest - how to care for mushrooms?
As soon as the incubation process is completed, the blocks with mycelium are transferred to a cooler room with an optimal temperature of 12-15 degrees. During cultivation, mushrooms need additional light. It is enough to install LED lamps with a power of 50-60 watts around the perimeter at the rate of 5-7 V per 1 sq. meter of area. The growth of oyster mushrooms in the basement is also well influenced by infrared lighting, but this method is more expensive from a financial point of view.
Periodic irrigation is also carried out with ordinary water at room temperature using sprayers, but not watering, since excess moisture in the bags will quickly provoke the appearance of fungal infections or mold on newly formed shoots.
In contrast to the incubation stage, during cultivation, ventilation must be constant and comprehensive: the more air circulates, the better the young mushrooms will feel. To prevent harmful flies from appearing, the mesh on the ventilation outlets and openings should be with a mesh of no more than 1 mm.
Oyster mushrooms are characterized by a high frequency of fruiting. If the required conditions are met, the first harvest can be expected within 30-35 days after the start of the second stage of cultivation. From one standard bag (5 kg), if high-quality vegetative material was used, you can get up to 3-3.5 kilograms of fresh mushrooms. Therefore, breeding this species can be considered as a promising business that can generate income.
The first wave is removed carefully, without tearing off the mushrooms, but cutting them off with a sharp knife under the stem, but you cannot remove all the fruits without exception; the smallest ones are left to prevent premature drying of the mycelium.
Next, the stem is removed, and the substrate is sorted and inspected for moldiness. If flies or ticks have multiplied, the traces of which are indicated by dark dimples similar to mini-bites, the entire block is removed and burned, it cannot be used in the future, the room is washed and additionally disinfected.
After harvesting the second and third waves of the crop, bags with substrate must be disposed of, as they are not suitable for re-growing. It will be possible to grow a new batch in the same place only 2-3 weeks after carrying out the necessary preventive and technical procedures.
Composition and properties of spent mushroom compost
The compost from the used block is natural, it includes mushroom mycelium (structures consisting of protein), which is processed during the process of decomposition, as well as peat, ash, straw, manure (usually horse) or droppings. It may also contain other components depending on the variety of mushrooms grown.
If we talk about the macroelements that make up compost from waste blocks, they include calcium and potassium, phosphorus, nitrogen, etc.
Compost reduces soil acidity, helps improve the substrate, and participates in moisture regulation. Widely used as top dressing in different areas of garden plots - from lawns to greenhouses and ordinary beds.
How to process the substrate at home?
On YouTube they say that everything is simple: pour boiling water over the components that are on hand, let them sit for 5-8-12 hours (recommendations vary greatly) and you can make mushroom bags.
Moreover, any raw material for oyster mushroom substrate is recommended: vegetable and not so much - leaves, cardboard, shavings, sawdust.
Mycelium will not grow at home on such mixtures.
Boiling the substrate, which is also called boiling straw or husks, also does not eliminate defects. Quite the contrary: if the raw material is boiled, then some of the spores not only survive, but also receive thermal activation - after cooling, they swell and grow faster and more aggressively than other spores.
You can take my word for it, or do everything as you read on the Internet, and see for yourself: in the first month, maximum two, the blocks will be overgrown. It may be bad, slow, with spots, but they will happen. Then the marriage will become 100%.
It is advisable to understand one simple thing: oyster mushrooms absolutely do not care how many kilograms of mushrooms you are going to grow per month.
Whether it’s 100 kg or 2 tons, the mycelium can develop well only if the blocks are prepared correctly.
What is the best substrate composition for oyster mushrooms?
Comparison of straw and sunflower husk substrate
At home, it is easiest to grow on the husk.
There are fewer mold spores and bacteria in it, the husks are easier to process - twice as fast in time, easier to pack into bags.
On sunflower husks, primordia appear 2-4 days earlier; the nutritional value in it is higher than in straw.
The straw needs to be chopped using a straw chopper and hay added to it, and the husk is immediately ready for use.
Hay is needed to increase nitrogen so that yields are higher.
Using spent mushroom blocks as fertilizer
Compost is very valuable in agriculture and has a low cost. Fertilizer has a beneficial effect on increasing the amount of ripened harvest of vegetables and fruits, improves the quality of the soil for flower beds and bushes, since it contains enough nitrogen.
Fertilizing the soil during sowing
In the autumn or spring, while the garden is being plowed, you need to distribute the spent mushroom compost throughout the site in places of future crops. This way you can prepare the foundation, making it more fertile. Plant crops need the components included in fertilizing to support the natural processes of growth and maturation, and immune resistance to diseases. The macroelements contained in compost are absorbed better than in other fertilizers. They enrich soil depleted by chemicals and constant sowing, influence the regulation of soil moisture, preventing it from drying out and making it suitable for abundant fruiting of garden crops.
To obtain the desired results, it is necessary to correctly calculate the required dose of fertilizers applied, depending on the type of soil and the plants planted in it.
Potatoes
Other vegetables
Compost can be used not only for potatoes, but for other crops: fertilizer will increase the fertility of soil structures and the amount of harvest subsequently collected.
The spent mushroom block as a fertilizer improves the process of growth and flowering of garden crops, promotes the accumulation of nutrients by fruits, and the subsequent ripening of berries, vegetables and fruits. The effect is achieved almost immediately: compost increases the yield already in the first year of use. The legume family, greens, and root vegetables (carrots, radishes, beets, etc.) provide increased yield only from the second year of fertilizing the soil with mushroom blocks.
Substrate preparation is the basis for a good harvest
Oyster mushrooms are unpretentious, but it is important to prepare a high-quality nutrient medium to get more yield.
Various combinations of substrate are suitable for growing oyster mushrooms, but the most fertile options are considered to be:
- dried straw from wheat or barley;
- dry sawdust from deciduous trees;
- corn stalks or cobs;
- husks of sunflower or buckwheat seeds.
The main requirement for a nutrient substrate for oyster mushrooms is its freshness and the absence of mold or mildew of any kind.
Before planting mushroom mycelium, the base must be subjected to additional processing, which includes several stages depending on the selected type of soil and method of storing mushrooms:
- Hydrothermal treatment. Soaking dry base in hot water.
- Pasteurization. Blowing hot steam onto a pre-moistened substrate.
- Xerothermia. Similar blowing only in dry form.
When carrying out hydroprocessing, when the substrate is poured with hot water and allowed to brew for 2-3 hours or boiled for 25-30 minutes, then squeezed out, it is important to ensure that the composition is not too wet. To do this, bags with the treated composition are hung in a dry place and left for several days.
During this time, excess moisture will drain, after which, to increase fertility, the soil is divided into smaller fractions and mixed. After the necessary procedures, the material for planting should be moderately loose and slightly moistened. If you squeeze it with your hand, it should spring back, and water should not appear on the surface.
Mushroom bed
Tree transplant
Choose the type of tree according to the preferences of the mushroom:
Birches get along well with porcini mushrooms, black milk mushrooms, and red boletuses. Before replanting a birch tree with porcini mushroom, you need to make sure that there are no oak trees growing nearby in the forest, otherwise the porcini mushroom will form mycorrhiza primarily with the oak. with pine . It works well to transfer a small pine tree into the garden with a grainy oil can.
How to make mushroom blocks without defects
1. Heat treatment of raw materials must be carried out using the hydrothermal method. Here* (link below) the technology is described in detail. It is important to follow all the recommendations from the article, as they are equally important. If you don’t have enough mycelium, or the bags run out, but the steamed husk is still left, you will have to throw it away. You can’t steam it again!
2. The time required for processing does not depend on the volume of the container.
3. The tank, barrel or bathtub in which the heat treatment is carried out must be completely covered (the lid of the tank as well) with foam plastic or foil-coated glass wool. If the container is not insulated, then near the walls the raw material will cool faster, some of it will not warm up, and the likelihood of defects will increase sharply.
So much substrate comes out of a two-hundred-liter barrel that it is enough for 5, maximum 6 mushroom blocks weighing 8.5-9 kg.
4. If you have just started working with oyster mushrooms, you can steam it by pouring hot water. In this case, it is necessary:
- the water must be at such a temperature that after pouring into the raw materials and mixing, the mass has a temperature of at least 80 degrees; - the container is insulated - this is necessary for high-quality heating of the entire husk and so that the temperature does not drop during heat treatment; - Keep sunflower husks at this temperature for at least 4 hours. I don’t recommend this method at all with straw. — after removing the steamed mass, the barrel (steaming tank) must be washed with clean water and treated with a bleach solution (100 g per 1 liter of water).
But this method is ONLY possible! if there is a special room for stuffing substrate mushroom blocks - a clean zone or also called a sowing room (driving room). It must be constantly treated to kill mold spores and bacteria.
And unfortunately, even a clean area does not guarantee that by simply pouring hot water over the raw materials you will be able to avoid green spots, spots of ungrowth, and bacterial contamination.
If this happens, you will have to switch to hydrothermal.
For more details on sowing, how to prepare mushroom blocks, knead the mycelium, stuff plastic bags, make cuts, read this article.
How to add lime
Mushroom growing technology
Each type of mushroom is grown using a specific technology that allows for maximum yields. The easiest to grow are oyster mushrooms and champignons - it’s not for nothing that they are leaders in industrial mushroom farming.
Champignon
The champignon farm is placed in any warm room - then they can be grown all year round. It is most convenient to grow these mushrooms in greenhouses. The mycelium is placed in bags or containers with substrate. Another option is pressed briquettes, in which mycelium is already seeded.
To grow champignons you need a basement, bags or shelves, substrate and mycelium. The room should be ventilated, but without drafts, not damp, with a minimum of light. With proper organization of business, from 1 sq. m collect up to 10 kg of mushrooms.
How to grow champignons:
- Disinfect the room before planting mushrooms. Whitewash the walls with lime to prevent the development of mold and vermin. Spray the basement with a solution of copper sulfate.
- Prepare the substrate. 80% should be manure (cow, horse). Bird droppings reduce yield by a quarter and are therefore not used. Add fresh straw, chernozem, superphosphate, and crushed chalk to the manure. Fermentation of the substrate lasts 3-4 weeks.
- When the mass reaches the active phase of decomposition, heat it to +90°C, and then cool sharply to +30°C. Once the substrate is sufficiently rotten, plant the mycelium. Buy it at specialized retail outlets. High-quality mycelium is grown in strict sterility. Plant mushrooms in boxes or bags. For 1 sq. m area, consume 400-500 g of mycelium. Place it in the ground, making shallow furrows (up to 5 cm). Sprinkle the substrate on top.
- Immediately water the planted mycelium with water. During its growth, maintain a humidity of 75-90%.
- Maintain the temperature after planting the mycelium at +22.....+24°C, during the fruiting period - +14...+17°C.
- When the mycelium threads appear on the surface, sprinkle them with a mixture of garden soil and peat, taken in equal proportions. Layer thickness - 3-4 cm. And pour.
- After the completion of the incubation period, the active phase of mushroom formation begins. Reduce the temperature and expect a harvest.
The first champignons can be harvested 2-3 months after planting - the exact period depends on the variety. Do not allow mushrooms to overripe, as this will spoil their taste. And besides, it has a bad effect on their growing environment. The readiness of the champignons can be judged by the color of the caps - as soon as they turn bright white, they can be cut off.
Active development of champignons lasts 1-2 weeks per season. The harvest consists of several waves - from 5 to 7. There are meadow varieties that produce even more harvest. It is possible to increase the yield by 200-300% using special chemistry (Dutch technology), but this is not advisable.
Do not cut the champignons, but twist them together with the legs, and sprinkle the places where they are torn off with fresh soil or compost. If you cut mushrooms with a knife, the cut areas have to be disinfected from mold and infection.
Despite compliance with growing technology and using only high-quality raw materials, champignons can get sick and be affected by pests.
What diseases and insects are there?
- Rot. It occurs due to excess moisture in the mycelium. Rotting rapidly spreads throughout all plantings. The affected mushrooms are removed, and the substrate is treated with a 0.3% formaldehyde solution.
- Mold. Appears due to poor ventilation. If slippery spots appear on the caps or stems of mushrooms, you need to immediately pull them out along with the roots. The places where diseased champignons grew are sprinkled with a mixture of Superphosphate and table salt (in equal dosage).
- Mite. This small insect can eat the stems of mushrooms. Treating the soil mixture with dry tobacco helps prevent the appearance of mites - 100 g per 50 kg of substrate.
- Mushroom flies. They eat the stalks and spoil the mycelium. If there is a fly, the affected areas are removed, and all the rest are spilled with 0.5-1% chlorophos.
Oyster mushrooms
These mushrooms are grown in bags with substrate or on stumps. Before planting mushrooms, premises are disinfected with a solution of lime and copper sulfate to prevent mold growth.
The ventilation holes are covered with a fine mesh to prevent fungus midges from flying in. The optimal temperature is +16...+18°C, humidity is 80-95%. The best place for oyster mushrooms is the cellar.
Growing order:
- Prepare the substrate. In addition to straw, you can use corn stalks and leaves, buckwheat husks or sunflower seeds, and sawdust. Clean the substrate and dry it. If it is rotten, boil it. Processing time - 40 minutes. And then steam for a few more hours.
- Drain the water and squeeze out the straw thoroughly. So that there is no moisture.
- Crumble the mycelium in a closed bag and pour it into 5-8 kg bags, alternating with the substrate. When the containers are full, tie them tightly and hang them from the ceiling. Or put it on racks.
The second planting option is to first pour the substrate, then cut holes (at intervals of 10 cm) and plant mycelium in them. Peculiarities;
- keep the room dark, do not ventilate - oyster mushrooms need carbon dioxide released by the substrate (turn on the fan to create air flow);
- incubation period - 15-25 days;
- when the first mushrooms appear, the bags are transferred to another room - there should be a temperature of +10 ... + 18 ° C, and humidity - 90-95%;
- Provide lighting for 8 hours;
- there is no need to water the substrate, otherwise it will rot;
- after the first harvest, the substrate is not thrown away;
- One bag can yield 5 harvests, the fruiting period is 4 months.
Store purchased oyster mushroom mycelium in the refrigerator for no more than 9 days at a temperature of +4°C.
When planting mycelium, there should be no drafts in the room. Gloves should be worn on the hands and a gauze bandage on the face.
Oyster mushrooms, like champignons, can be affected by mold, pathogenic microorganisms, mites, wood lice, fungus flies and mosquitoes. Disinfection and ventilation help fight diseases; glue traps are used against insects.
White mushrooms
Currently, large production facilities for the industrial cultivation of boletus mushrooms are being created in Russia. This mushroom has an excellent taste, so it can seriously outshine its competitors.
To grow porcini mushrooms en masse, it is advisable to have a room. Then it will be possible to get a harvest all year round. Before planting, purchase high-quality mycelium. Good planting material should not have an ammonia smell.
How to grow boletus indoors:
- ventilate and crush the bags with mycelium, but there is no need to tear the packaging;
- prepare the room by treating it with a disinfectant;
- Boil the substrate for an hour and cool;
- mix the substrate with mycelium - add 2.5-5% boletus mycelium to the mixture;
- put the mixture in bags and compact;
- Make cuts on one side of the bags - mushrooms will grow through them;
- place bags on the shelves (vertically);
- Water the substrate regularly and ventilate the room.
All work with mushrooms should be carried out with gloves. Boletus mushrooms rarely get sick, but if watering and temperature conditions are violated, they are affected by white rot (mycogonosis). Mushrooms with signs of disease grow underdeveloped and deformed. To combat, disinfection is carried out with 40% formaldehyde.
Here are the main factors:
— number of viable spores
They, as I wrote above, accumulate over time and will certainly cause defects if you do not carry out constant sanitation of the sowing room.
— pH of the substrate
With small production volumes, almost no one controls alkalinity. If there is no defect when the batch becomes overgrown, then most likely the pH is fine.
But when greens (trichoderma) appear in the bags, it is necessary to purchase a pH meter and measure the alkalinity of the finished substrate before stuffing. Alkalinity should be between 7.8 and 8.2. If it is lower, add lime or soda ash during processing. More details - link at the bottom of this article.
— composition of raw materials
The best results at home are obtained from sunflower husks.
There are much fewer competitors in it than in straw, so it takes less time to process the husk - 3 hours. And straw - at least 6 hours. And the yield of mushrooms is higher than on straw alone, to which it is necessary to add legume hay to increase the yield. Do not trust “experienced mushroom pickers” who claim that the mixture can be made from just about anything: sawdust, leaves, tops, paper are not suitable for production, especially at home! After all, you do not have equipment capable of qualitatively processing these materials, heating them to 120 degrees - this is only possible with sterilization, using autoclaves, or at least atmospheric.
Consumption of straw and husk for oyster mushroom substrate
Vegetable dry mixtures increase by 2.5 - 3 times when soaked. This depends on the hygroscopicity of the mass and its initial moisture content.
Soaking husks or straw should be carried out not only so that the raw material gains moisture, but also for the spores to swell and begin to grow. Therefore, simply adding water and sowing immediately, without heating, is not an option at all. The spores will be active and will germinate along with the mycelium, the bag will be covered with greenery within 3-4 days.
Soak before heat treatment for at least 8 and no more than 12 hours, for more details see the article* (link at the bottom of the page).
Fruiting of oyster mushrooms on blocks with substrate
Under optimal environmental conditions for fruiting on the oyster mushroom substrate, the rudiments of fruiting bodies appear in the slits on days 3-8.
In 5-6 days, small rudiments turn into mature mushrooms.
Harvest when the diameter of the caps reaches 6-13 centimeters and the edges of the caps are still curved down.
The fruiting bodies should not be allowed to become overripe when the edges of the caps straighten and begin to turn upward. The entire cluster of fruiting bodies is picked.
Overripe oyster mushrooms abundantly shed spores, which can cause allergic reactions in humans (dry cough, fever, swelling of the mucous membranes, etc.).
After harvesting oyster mushrooms grown in bags, you need to seal the slits with tape and let the block rest for 10-22 days. The temperature can be increased to 20 ºС, humidity reduced to 75-80%, lighting is not required during the dormant period of the mushrooms.