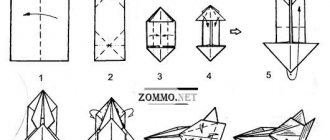
Do-it-yourself mini tractor from a walk-behind tractor - manufacturing procedure
Before you start manufacturing a mini tractor based on a walk-behind tractor, you will need to prepare the materials necessary for the work. Conversion kit includes:
- welding machine;
- screwdrivers and wrenches;
- electric drill and a set of various drills;
- grinder and a set of discs for working with metal;
- set of nuts and bolts.
Suitable drawings will help you assemble a tractor from a walk-behind tractor correctly. In them you will find information about the order in which to connect the parts and which fastening method is suitable for their reliable installation.
Converting a walk-behind tractor into a mini tractor is carried out in the following order:
- A mini tractor based on a walk-behind tractor must be equipped with a strong, reliable frame. It must withstand an additional pair of wheels, plus the load carried in the tractor will put pressure on the supporting structure. To make a durable frame, metal pipes or angles are best suited. Be sure to keep in mind that the heavier the frame, the better the grip of the minitractor with the road, and the better the quality of plowing. The thickness of the frame walls is also not very important - the main thing is that they do not bend under the pressure of the cargo being transported. You can cut the blanks for making the frame using a grinder. Then all the parts are connected to each other first with bolts, after which they are finally welded to each other. To make the frame stronger and more reliable, equip it with a cross beam;
- Immediately after manufacturing the frame, it can be equipped with a hinged mechanism, through which the small tractor will be equipped with additional accessories. The hitch can be installed both in the front and in the rear of the supporting structure. If in the future the manufactured minitractor is planned to be used in tandem with a trailer, then a tow bar should be welded to the back of its frame;
- At the next stage, the homemade product is equipped with front wheels. To do this, it is best to equip the mini-tractor being manufactured with two ready-made hubs with brakes provided on them. Next you need to secure the wheels themselves. To do this, take a piece of steel pipe whose diameter fits the front axle. Next, attach the wheel hubs to the pipe. Drill a hole in the central part of the pipe, which is necessary for mounting the product to the front of the frame. Then install the tie rods and adjust them to the frame using a worm gear. After installing the gearbox, install the steering column. The axle at the rear of the tractor being manufactured is mounted through pressed bearing bushings. The wheels used must be no more than 15 inches in diameter. Smaller parts will lead to the front part of the unit “burying”, and larger wheels will significantly impair the maneuverability of the mini tractor;
- At the next stage, it is necessary to equip the minitractor with an engine from a walk-behind tractor. It is best to install the motor at the front of the unit, as this will improve the balance of the agricultural machine when operating with a loaded trailer. To install the motor, arrange a reliable mounting system. When installing the motor, do not forget that the power take-off shaft must be secured coaxially to the pulley located on the rear axle of the mini-tractor. The force on the wheels must be carried out using a belt drive. The video will tell you more about converting a walk-behind tractor into a mini tractor.
A self-made tractor will remain equipped with a reliable brake system and a high-quality hydraulic distributor, which is necessary for the proper operation of the unit with attachments.
The process of manufacturing a mini tractor from oka will consist of the following stages:
- We make the frame. To do this, you can take channel No. 10 or sheet iron. As a result, you should get a standard rectangular structure welded from metal corners.
- You can use the UAZ fist as an inter-frame hinge.
- We solder the front and rear axles based on the components of the Oka car.
- Construction design with an engine from Oka. The half-motor from this passenger car is quite suitable for creating a mini tractor. But still, be sure to take into account a few nuances: for better cross-country ability, increase the wheel clearance; develop a scheme for attaching the mechanism for the coupling; strengthen the front and rear side members.
- If you decide to use the powerful engine from the UD2, you will additionally give your unit more power and thereby be able to not only process the site, but also transport loads.
- The clutch device consists of 2 V-belts that transmit rotation to the pulley. The pulley is located on the gearbox shaft.
- The gearbox can also be borrowed from OKA. When installed, it should be facing the driver.
- We mount the steering components.
- Finally, we install the fuel tank, brake system and electrical parts.
It is worth noting that such a home-made unit pays for itself in 1 season. Therefore, the popularity of breaking a mini tractor with an OKA internal combustion engine with your own hands is increasing every year. Use the drawings below to create a homemade mini tractor.
Main details
Frame
To make a tractor with your own hands, you need to start with a support. In this case it is the frame. It should be strong and light in weight. They are made from channels (metal products with a U-shaped cross-section, with a wall size of 5-14 millimeters) or from a profile using metal corners.
There is another type of frame - a breaking one. Made for 4x4 mini tractors - they have both front and rear axles driven. They make two half-frames, an assembly from the driveshaft of any car, for example, GAZ-52.
Engine
The only selection criteria are the purpose of use and the total weight. All-wheel drive vehicles will work better with 30-40 hp, single-wheel drive vehicles - 15-20 hp.
The most popular option is the internal combustion engine from the VAZ 2101-2107. The cost is low, does not require modification and fits any configuration, but fuel consumption is high (11 l/h).
Low-power models are equipped with ZID-4.5 engines. Simple service, low consumption (1.5 l/h), built-in gearbox. But at the same time the power is low – 4.5 hp.
Transmission
The ideal option is the GAZ-51, UAZ gearbox. For all-wheel drive models, the UAZ transfer case is suitable. To transfer power to the gearbox, it is necessary to use shorter driveshafts of the same type.
Helmsman
To create it, the front axle must be equipped with king pins. Trunnions are attached to them from below, turning levers from above, and a transverse rod is placed between them.
The transverse slope should be from 6 to 10 degrees, longitudinal - 1-3. This will ensure proper operation of the steering complex. After all, you need to connect the longitudinal rod to the steering gear. A rack is suitable for this.
Rear axle
Taken from any car, the length of the stockings and axle shafts is reduced to the required values. At relatively low speeds, you can only leave the handbrake on. You can make a pedal with locks for better controllability.
Wheels are chosen with a radius of 14-24. Tires are taken with lugs.
Stages of manufacturing a mini-unit from oka
A homemade mini tractor is assembled from key components:
- Frame. You need two spars (right, left) and two traverses (rear, front). To make the spars, you need channels No. 10, and traverses - No. 12 and No. 16. A metal beam is needed for the transverse beam;
- Motor. It is important to consider power and torque figures. The best option is a four-cylinder diesel engine with a power of 40 hp. With. and an air cooling system. For a 4*4 unit, the transmission gear ratio increases;
- Bridge. Does not need modernization. It is attached to the frame with four stepladders. You can use the driveshaft of almost any machine;
- Transmission. The gearbox is mounted on the frame. To synchronize its clutch with the motor, a new basket is made using a welding machine. The rear plane of the engine flywheel is shortened and a hole is made in the center;
- Steering. Hydraulics require an oil pump responsible for pressure. It should be located at the drive shaft. The optimal solution is that each wheel of the drive shaft is controlled by a gearbox. The steering system from Oka is fully suitable for the redesigned design;
- Wheels. The diameter of the wheels is determined depending on the purpose of the unit used. If the equipment will be used to transport goods, the radius of the wheels should be between 13-16 inches. To perform agricultural work, you need wheels with a radius of 18-24 inches.
A fracture with the Oka internal combustion engine is made according to a certain scheme:
- The frame is being made. A standard rectangular structure should be obtained from a channel or sheet iron. It is reinforced with metal corners welded vertically. You can take the UAZ fist by the inter-frame hinge;
- The front and rear axles are soldered to the key parts of the Oka car. A homemade mini-unit is often springless, so the shocks when moving are very noticeable;
- The motor is installed. The power of the half engine is enough to perform standard work with a mini tractor. Cross-country ability can be improved by increasing the wheel clearance. It is necessary to develop a scheme for fastening the mechanism for coupling with attachments. The front and rear side members are strengthened. More powerful engines, for example, from UD 2, allow you not only to process areas, but also to transport cargo;
- The clutch consists of double-V belts, from which rotation is transmitted to the pulley. The latter is fixed on the gearbox shaft. The gearbox also comes from Oka. When mounted, it is turned towards the operator;
- The steering system is installed;
- The fuel tank and brake system are installed;
- The unit is provided with lighting. Lighting fixtures include necessary electrical wiring and lights. If they are available, a small-sized tractor can be used at night;
- The operator's seat is installed. Vibration loads are reduced and operating time is increased thanks to the installation of soft springs under the chair.
Oka's old car can be used as a draft vehicle. The rear part of the body is trimmed to allow attachment of attachments. If the power of the equipment allows, then the list of canopies can be very wide, including one for a mini tractor.
You can make a mini tractor from the Oka in disrepair using the working components and systems of the car. In this case, a completely new mechanism is created. Its advantage is the ability to customize the tractor for yourself. A small-sized tractor from the manufacturer cannot boast of this feature.
The proposed video will simplify the process of manufacturing new equipment.
Safety precautions
Regardless of which mechanism was the main one when assembling the mini-tractor, you must understand that this is a rather dangerous device. There are no instructions for homemade equipment, and therefore the first safety measure is careful selection of the design. It is recommended to read the comments on the drawings and descriptions, and the reviews of those who have already tried to use them. The mini-tractor should be refueled only with the fuel for which the engine is designed. A similar rule applies to lubricating oils.
Important Design and operating rules of an air dryer for KamAZ
If the unit has a gasoline engine, do not allow oil to get into the fuel. It is also impossible to fill fuel to the very edge. If it spills out while moving, serious problems can occur. It is strictly forbidden to use open fire when refueling a mini-tractor, and ideally at any time when people are near it.
If the canister becomes leaky, it should be thrown away. There is no need to create fuel reserves in excess of the required volumes. The refueling and engine starting points must be at least 3 m apart from each other. To avoid a fire, do not start the engine in the immediate vicinity of trees, bushes, or dry grass. If the engine starts poorly or starts with strange sounds, it is better to postpone work and look for the problem.
You cannot drive a mini-tractor over garden equipment or allow it to collide with walls, branches and stones. Only people who understand it should operate the mechanism. Even if headlights are installed, it is advisable to work mainly during the day.
You can learn how to assemble the transmission and brakes on a mini-tractor by watching the video below.
KIT kits for converting a heavy walk-behind tractor into a mini tractor.
Kits for converting heavy walk-behind tractors are divided into 2 groups.
- KIT with natural gearbox position.
- KIT with deployed gearbox.
A kit kit for heavy walk-behind tractors, in which the gearbox is in a natural position; in fact, when converted into a motor-tractor, the gearbox is simply rolled into the frame. Our experts note the following advantages in this design: a flat plane under the seat, comfortable gearbox movement, the cutter is connected to the fastenings provided by the factory, as well as the possibility of reverse conversion into a walk-behind tractor. In our opinion, the disadvantage of this design is the low load-carrying capacity of the lifting mechanism, which is very important for a motor tractor.
READ How to Drain Oil from a Motoblock Gearbox
A kit kit and with the gearbox deployed, as an example, let’s look at the kit produced by ChP Kryuchkov; when altering, the gearbox rotates. The advantage of this design is the universal rear lift mechanism with high lifting capacity and the ergonomic position of the gear lever. The disadvantage of this design is the relatively complex drive mechanism of the cutter.
Despite the presence of various options, there is another important factor of choice, this is the quality of workmanship and the overall thoughtfulness of the design; when choosing a specific kit, this is the decisive factor when buying a kit for converting a walk-behind tractor into a motor-tractor. For those who do not quite understand the kits for converting a walk-behind tractor into a tractor, we suggest you watch the video; we would also be very interested to know your opinion about each type of kit kit. Share your opinions under the video, give recommendations if we have missed some type from our sight, and also ask your questions.
Chinese walk-behind tractors
Basically these are copies of Russian models. Their cost is lower, but it is achieved not only due to cheap labor, but also savings on materials for production and technological equipment. This negatively affects the quality of finished products.
Mini tractor made from Agro walk-behind tractor
As always, we prepare several basic parts in advance - the steering and braking system, additional wheels, and the hydraulic system. Hydraulics are needed for the system to work properly in conjunction with attachments. Extra wheels are easy to take from a regular car.
In the case of the Agro walk-behind tractor, additional steps will be needed to strengthen the drive axle shaft along with the wheel gearboxes. Let's assume that the engine of the device is located behind. Then the load will be distributed as evenly as possible.
Mini tractor based on MTZ walk-behind tractor
This walk-behind tractor has one difference from other standard models - it is equipped with a two-cylinder diesel engine. This causes the center to be heavier in the front when the device is actively operating. Because of this, the work process becomes noticeably more complicated. But you can fix the problem by doing the following:
- We use the mode of operation with mowers.
- The platform in front is completely dismantled.
- It is replaced by a wheel from the front of the motorcycle, for which we use bolts. At the same time, the steering wheel is installed.
- At the top of the frame there is a niche where the steering rod is installed. The adjusting rod must also be secured here, then the structure will receive an increase in strength and hardness.
- We use electric welding to connect the platform and the mount for the driver’s seat.
- The engine must have an additional platform where the hydraulic distributor with the battery is placed.
- The rear part is connected to an additional metal frame for the hydraulic system.
- The front motorcycle seat is ideal for handbrake placement.
Let's get a compact mini-tractor with three wheels.
The engine is the heart of the unit
It is the engine that is the main component of any equipment. Basically, craftsmen take classic engines from VAZ 2101 - 2107. And all because they are ideal in terms of parameters, the main ones being:
- availability;
- price;
- traction indicators;
- light weight;
- budget repairs and maintenance.
The motor is an important component of the tractor
Ideally, just one classic VAZ car will become a real donor for your homemade tractor, because the main part of the parts can be borrowed from there.
The motor, together with the gearbox and clutch, acts as a single unit; they are attached together. Such a pleasant nuance will facilitate the process of assembling a homemade product.
It is important to place the fan impeller on the pump shaft. This is a mandatory condition (regardless of the design), because the tractor will operate in the same mode as a car feels in a traffic jam - the speed is low, but the load is considerable
So the radiator will have to be forced to blow.
Homemade tractor from Zhiguli, from VAZ components
Nowadays, even a schoolchild can learn how to make a tractor from a Zhiguli. The vastness of the Internet, for everyone and about everything, will tell everyone thirsty for information. A homemade Zhiguli tractor will become a universal tool. What is so good about such a unit, made from VAZ components? Such a tractor can solve a lot of problems and be virtually a universal tool that is required in agricultural work.
Spare parts for it can be found in any corner of the vast country. There are disadvantages, which are that the fuel for such a device will be gasoline, which costs a lot of money. Then, like all factory tractors, they run exclusively on diesel. Most often, homemade tractors are made from Niva-2121 or VAZ. They also use engines from various modifications of Lada. Sometimes they buy engines from the latest modifications to reduce fuel consumption.
Design Features
What is a mini tractor? What is the definition of this useful unit? First of all, this is a multifunctional mechanism that can not only cultivate the land, but also transport all kinds of cargo.
A mini tractor in small areas can do:
- harrowing;
- cultivate crops;
- fertilize the area;
- remove snow;
- mow the grass;
- level the area;
- transport a variety of cargo.
The engine on such devices can be no more than 50 horsepower; if the power is greater, then such a vehicle must already be registered with the traffic police. It is enough to type a query in the Yandex search engine, for example: do-it-yourself tractor from a VAZ 2107, and a huge amount of material will appear before your eyes. All this suggests that this topic is very popular among the people. Every tractor is useless without auxiliary tools, which also need to be made and remade from existing ones. First of all, it is necessary to make the frame and chassis from the Zhiguli.
Beginning of work
First, the engine is removed and rebuilt. If you do everything wisely, then the VAZ engine even with two gearboxes will last a very long time. Then it’s the turn of the transmission and chassis. After all components have been cleaned and repaired, a detailed layout diagram of the future device with a VAZ engine should be prepared. The engine must be located in front of the driver, as is the case on factory tractors.
The casing can be “borrowed” from an old tractor, accordingly converting it to the required format. To reduce weight and size, you can trim the frame, then you may have to move the bridge. A very important issue is the layout of gasoline tanks.
Most often they are located behind the driver's seat. The front suspension must be strengthened, because it will bear a large load. The wheels are installed with a larger diameter, then it will be easier to move along arable land and country roads.
And of course, you should clean all spare parts from rust, then coat them with primer.
Assembly of main components
If you wish, making a homemade tractor from a VAZ 2106 will not be difficult. The main point is the assembly of the units. The frame is made to fit the intended format. Most often, it is cut off and additional metal ribs are welded to it, which strengthen the structure. If for some reason the frame from VAZ is not suitable, then you can make a frame yourself from channels.
Then the chassis is made, it can be taken from a Zhiguli, having first checked them for functionality and, where necessary, strengthened them. You cannot miss such an important component as the brakes. The subtlety is that standard brakes from Zhigulenka will not work, since the wheels will be larger in diameter.
It is quite possible that the axle will also have to be replaced, because the wheels will be heavier.
The engine should be open on the right and left sides, then there will be additional ventilation and it will not overheat. A separate cabin for the driver is made; materials such as plywood, stainless steel sheets and corners are suitable for this. The chair can be used from a Zhiguli; additionally, fastenings for specialized devices are mounted in the front and rear.
Final stage
Besides all the subtleties, the most important thing is, of course, the frame, which must withstand the load with a good margin. After creating the unit, it will need to be registered with government agencies and receive a license plate. It must be added that if you make a tractor from a VAZ 2109 with your own hands, then you will have less fuel consumption, because the engines on this model are more economical.
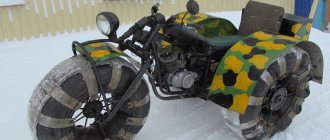
Homemade mini tractor with a breaking frame: photos, videos, drawings
A mini tractor with a breakable frame is a great helper for those who like to work on the land. This tractor is distinguished by a special frame design, consisting of two semi-frames (front and rear), connected by a flexible hinge joint
The tractor is turned not by the angle of the wheels, as with a conventional design, but by bending (breaking) the tractor twice, which allows the tractor to turn literally “on its heels,” which is especially important for agricultural machinery intended for processing small areas
Homemade mini tractor
This device is not difficult to purchase at any specialized retail outlet. However, this operation has a significant drawback - such a mini tractor is quite expensive.
This situation provokes many summer residents to engage in individual production of such equipment. This article will tell you how to create a mini tractor equipped with a breakable frame. (As in the existing photo.)
The first stage is the project
Before you begin directly creating the device, you need to sketch out the appropriate drawings. This equipment is a rather complex set of mechanisms and systems that are closely interconnected. It is the location of all these elements that should be taken into account when making drawings of a mini tractor with a breaking frame. Moreover, the specified scheme should also include a driver’s seat, as well as the placement of a gearbox.
Drawing
Stage two - installation of the main parts
After the drawings are ready, you can begin to assemble the device
It is important to remember here that a homemade mini tractor with a breakable frame must be equipped with the following parts, which must be taken from one source:
- engine;
- Transmission;
- chassis elements.
All of these units must be related to one vehicle; this will eliminate problems with their compatibility.
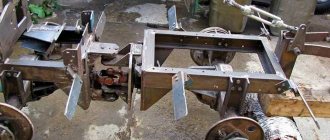
As for the breaking frame for a homemade mini tractor, it is done independently. In the manufacturing process of the breaking frame, a metal channel is used. In order to ensure reliable fastening of all these parts of the future mini tractor, you will need a welding machine.
The rear axle axle shafts need to be shortened somewhat. They must have a strictly defined length. To carry out such an operation, a conventional lathe is used.
Stage three - articulation
Often, 4x4 mini tractors with a breakable frame have a hinged connection to the semi-frames, which can be the driveshaft of a GAZ truck. The model of the car, in this case, does not matter much, since the required element is made in the same way.
The steering of a minitractor with a tipping frame should be equipped with hydraulic cylinders. In this case, a homemade mini tractor will be easier to control
This circumstance is especially important when plowing the land is carried out using a mini tractor equipped with a breakable frame.
Gear ratios
You should also select the gear ratio of the gearbox. This value is set in such a way that during an hour of plowing, performed at a speed of 2 thousand per minute, a homemade mini tractor with a turning frame moves at a speed of three, maximum three and a half kilometers per hour.
A few words directly about the frame
The frame of a homemade mini tractor is made of channel material, since it is this design that gives it sufficient rigidity. Thus, a mini tractor, which includes such a breakable frame, is capable of withstanding quite considerable loads.
Important Features of operation and modernization of KamAZ flatbed trucks
But it is worth noting that the use of the specified profile is not always a mandatory component when designing a mini tractor. Wings, seat frame and some other elements that do not require the use of particularly strong material can be freely made from other profiles.
Eventually
A tractor with a breakable frame is very convenient for installing a variety of attachments. These components will help to carry out all kinds of agricultural, municipal and even construction operations using such a device.
The video that complements this article will tell you more about the individual production of a mini tractor with a breaking frame.
The procedure for assembling a homemade tractor
The production of a mini tractor itself occurs as follows: according to the drawing, you weld steel profiles and sheets, forming the frame of the future tractor. This, in fact, is the body of the machine. Next, the equipment is installed with its “internal organs” – the engine, transmission, and chassis.
When installing and fastening these parts, it is extremely important to carry out all work correctly and in full accordance with the drawings. Once you have installed these important parts of the mini tractor, you should add the “cherry on the cake”: install the seat, steering wheel, as well as stops and turn signals if you are going to drive on the roads.
Usually the last point is unnecessary, but you may want to make your technique really perfect.
However, it is worth considering some features of walk-behind tractors that will manifest themselves when using a mini tractor made from it. Thus, Agro walk-behind tractors have such a disadvantage as weak super-arcs.
Layout
The relative arrangement of the units of any tractor has historically developed a long time ago. The classic layout of a self-propelled vehicle is as follows: the engine is located in front, longitudinally, above the front axle. A gearbox is connected to it through the clutch, followed by a transfer case and followed by a drive axle. The shafts of the units are connected to each other using cardans and (or) couplings.
Following this scheme will be the best option when creating a mini tractor, because... will allow you to use existing units without changing them. According to the experience of many creators of homemade tractors, it is better to assemble the units “in place”, without doing unnecessary drawings and calculations. The best option is to place all the main components and homemade mechanisms on the finished frame, installing them on temporary supports (conveniently, on wooden blocks), and, having found the best mutual position, make mounting brackets. But we must not forget that all components on self-assembled tractors must be mounted through supports that dampen vibrations (rubber cushions). It is best to borrow them from the same equipment from which the unit was taken. Another important factor needs to be taken into account. This is weight distribution, i.e. distribution of the total weight of the minitractor along the front and rear axles. The most acceptable option is that 60% of the weight falls on the drive wheels, 40% on the steering wheels.
How to choose a mini tractor base
Before you make mini equipment with your own hands, you need to select a model that will act as a basis. In this case, it is necessary to take into account the following technical characteristics:
- engine power, its torque indicator;
- weight of the future mini tractor;
- type of power unit - gasoline, diesel;
- plow dimensions;
- manufacturer and price.
The area of territory that can be processed with ready-made equipment depends on the power rating of the walk-behind tractor engine. It turns out that the larger the area, the stronger the unit should be. As for the weight of the device, it must correspond to the type of soil. For dense soil, you will need a heavy mini-tractor made by yourself from Neva special equipment. Likewise, and vice versa, with soft soil you need to use a light device so that it does not compact it.
The weight of the machine must correspond to the type of soil - on dense soil you need a heavy tractor, on light, sandy soil you need a lightweight one
When calculating dimensions, the processing depth and ease of use should be taken into account. The best option is a cultivator with adjustable width. There are models on the market equipped with a gasoline or diesel engine. The first option produces minimal noise during operation, has low compression and easy starting with a half turn. The diesel version is economical and highly productive when working over large areas or with difficult soil.
What you need
Before you begin, you should make sure that you have all the necessary parts, materials, and tools.
So, what is required for work:
- Motoblock. It must be selected taking into account the above recommendations. It is this that will serve as the basis for a homemade mini tractor.
Motoblock Neva - the best option for remodeling
- Additional wheelset with axle. It is necessary to purchase bearings for the wheels, as well as a steering unit.
- Metal sheets, pipes and corners. The material is needed to create the body and frame of the structure.
- Elements for fixing parts and mechanical components. In this case, washers, bolts, nuts, and welding are used.
To carry out the assembly, in addition to the parts, you still need to prepare a number of tools:
- welder;
- drill-driver;
- a set of wrenches of different sizes;
- pliers;
- Bulgarian.
A homemade unit has a number of advantages. First of all, this is the cost. Even if a home craftsman needs to buy a cultivator, he will in any case spend less money. In addition, you can create special equipment of the required size, degree of adhesion to the ground, and performance.
As for the disadvantages, they are that equipment made by hand is much inferior to factory models in terms of reliability. Also, such equipment often requires repair work.
VIDEO: Fracture from a Zubr walk-behind tractor
Instructions for assembling a mini tractor from a walk-behind tractor
Those who are interested in how to make a mini tractor from a Neva, Forte walk-behind tractor, or from Zubr equipment need to know that the manufacturer does not really matter; this does not affect the efficiency of the tractor. The main thing is to correctly develop the drawing and construction diagram. Also, the owner of the equipment can use ready-made solutions.
Drawing of a homemade tractor
Kinematic diagram of a mini tractor
Frame and body
To build the frame, it is allowed to use metal pipes and corners. Bolts must be used as fasteners, but welding will be required to create a strong connection.
Drawing 1 – structural frame
You can equip a mini tractor with a body with your own hands. This will give the equipment not only a presentable appearance, but also protect the components from dust, mechanical and climatic influences. In this case, stainless steel sheets are used.
Operator seat and steering unit
After completing the manufacture of the frame with the body for homemade equipment, the operator’s chair should be attached to the structure. Here you can use the driver's seat from any car. It must be installed in such a way that the driver can easily adjust himself to the position of the seat - height and angle of inclination. The steering wheel is created according to the principle of constructing a karting installation. But here you will need to strengthen and shorten the thrust.
Chassis
A wheel kit for converting special equipment into a mini tractor should consist of four wheels with a diameter of 12-14 inches.
Drawing 2 – chassis
If you install wheels with smaller dimensions, then the mini tractor will bury its front into the ground when driving, and otherwise it will become more difficult to control.
Equipment running-in
After finishing work on creating a mini tractor, you need to treat the body with an anti-corrosion agent and paint it. Next, the equipment needs to be run in, so the operator can make sure that all mechanical components are working.
When the equipment has already been tested, it can be supplemented with a head light, canopy, hydraulics and other devices.
What is included in the factory DIY kit
The kit for converting a walk-behind tractor into a mini tractor includes all the necessary parts required for this process.
Kit for converting a walk-behind tractor into a mini tractor
This set includes:
- standard steering setup;
- reinforced prefabricated frame;
- chair base;
- mechanical lift lever;
- brake cylinder;
- protective system;
- seat back;
- brake mixture tank;
- set of hardware;
- brake drum with support disc;
- belt.
KIT kit for converting a walk-behind tractor. “Version 4x2”
This is a standard kit included in the Kit. In addition, each such product contains assembly instructions. Thanks to this, the owner of the set will not have any questions regarding the installation of the unit. The cost of such kits for converting garden equipment into a mini tractor varies between 40,000 rubles.
VIDEO: How to make a four-wheel drive tractor with a 70 cm track
Manufacturing a three-point hitch
The hitch is used to connect additional equipment, such as a plow, to the tractor.
We suggest you familiarize yourself with How to sew a knitted hat with your own hands and patterns for it
The hitch must be movable both in the horizontal and vertical planes. In the first case, mobility helps to reduce the overhang of the nozzle when taxiing. Vertical movement of the suspension is required to lower the equipment into a working position or raise it into a transport position.
The hitch on a mini tractor is made from various parts removed from old agricultural machinery. It is quite difficult to describe how to make a three-point hitch at home. Therefore, it would be more correct to use the following video, which shows the dimensions of all parts of the device.
If you decide to make a mounted loader, then you can use T-25 and T-40 in tandem with this equipment. This option will be simpler compared to a front loader, which is true in matters of installation on a tractor and calculation of dimensions. At the first stage, you need to find or independently make a drawing, in which you should indicate the dimensions and proportions of the metal parts.
Preliminary design stage
The following parts are taken from the Oka car during construction:
- Motor;
- Transmission;
- Wheel axles;
- Steering.
If necessary, elements can be replaced with compatible ones and some connections can be modified.
A mini tractor from an Oka walk-behind tractor is constructed on the basis of a channel No. 6-8 or a corner 4x4 centimeters. The amount of necessary materials is determined according to prepared drawings with the exact dimensions of the elements.
You need to acquire the following tools and materials:
- Bulgarian;
- Welding machine;
- Screwdrivers and keys;
- Sheet metal;
- Tires and wheels with a diameter of 13-24 inches;
- Operator's seat. You can use not only a car seat, but an office chair. It is fixed to the frame of the unit.
Mini tractor equipment
As for the placement of mini-tractor units, this is a well-known fact. If we talk about the classic layout, it looks like this:
- the motor is located in front of the structure (above the front axle, in a longitudinal position);
- the gearbox is attached to the engine via the clutch;
- behind the transmission is a transfer case;
- the drive axle closes the sequence of units;
- the connection is achieved by installing couplings (cardans).
Diagram of tractor layout types
The masters say that you don’t need unnecessary calculations and drawings. It is best to make a frame and consistently bring everything to mind. For temporary supports, you can use ordinary wooden beams. When you find the ideal position and connection of all the structural components, then you can manufacture and assemble everything.
Also useful: How to make a hand cultivator.
The main thing is not to forget about rubber cushions that will dampen vibration. All components must be mounted on such supports. It is also necessary to properly distribute the total weight. The best division is: 60% (for driving wheels) by 40% (for steered wheels). This scheme will allow you to best control the equipment.
Standard layout of a homemade tractor
Preparation of drawings and details
You can’t start work without a ready-made plan. Converting the Oka into a mini-tractor will be successful if everything is done according to the drawings. For a frame structure, you need to stock up on two spars - right and left. You will need the same number of crossbars: 1 on each side. The first ones are made from channels No. 10, for the second, the profile of structural elements No. 12 and No. 16 is suitable. Elements made from a transverse beam are suitable.
The main part that needs to be removed from Oka's car is the engine. It must comply with the standards prescribed in the legislation of the Russian Federation. It is especially important to take this into account if the mini-tractor will be used on additional access. The power of the engine determines what licenses you will have to obtain for such special vehicles. It is best if the old car used a 4-cylinder engine.
Minitractor from the Zubr walk-behind tractor
Motoblocks of this brand have a reliable and fairly powerful motor, the presence of which allows you to convert the unit into an all-wheel drive mini tractor. Before work, be sure to study the detailed drawings, and also buy steel sheets, pipes and angles. The procedure for making a mini tractor is as follows:
- When arranging the frame, you will need to expand the existing frame of the walk-behind tractor. This is necessary in order to install additional wheels. Cut the corners and pipes into suitable pieces, then weld them to each other;
- The front beam is mounted on a mini tractor using a ready-made hub equipped with brakes. The wheels in the front part of the unit must correspond to the size of the rear wheels, or be slightly larger than the latter - this will prevent the mini-tractor from “burrowing” when driving over rough terrain;
- Then install the walk-behind tractor motor. It is best to install it in the front to achieve the best balance of the entire structure;
- Weld a tow bar to the back of the finished mini tractor - it will be needed for mounting the trailer.
A homemade mini tractor, made on the basis of the Zubr walk-behind tractor, will be able to cope with a number of the most complex economic tasks: plowing the soil, cutting grass, collecting and transporting crops.
Beam (bridge) for a mini tractor - do it yourself, drawing, video
A beam or bridge for a mini tractor serves as the basis to which the systems and elements of the machine are attached. The front beam on a motor tractor serves as a support for various components, and the wheels are also attached to it. Often, craftsmen encounter a beam during the conversion of a walk-behind tractor, when they have to make the front beam of a mini tractor with their own hands. The rear axle of a mini tractor is the same system to which the wheels and some elements of the overall system are attached. When designing a mini tractor, many people take the front and rear axles from old cars. As a result, the design is strong and reliable. If you have the necessary tools and materials, as well as knowledge on the subject of equipment, then you can make these parts yourself from what you have in your garage.
How to make a bridge for a mini tractor?
A mini tractor is a technique that helps a person in the process of cultivating land, transporting goods, planting plants, caring for them, and much more. Factory equipment today is quite expensive, not everyone is ready or has the opportunity to spend such money. But in villages you can often find old cars that are already out of order, but there is still hope to give them a second life. It is from them that craftsmen take various parts to construct a homemade mini tractor.
Creating a mini tractor includes designing the chassis. First of all, bridges need to be installed. It is better to make the rear axle for a mini tractor with your own hands the same as the front one. This will save you from selecting a subordinate number, which is impossible to do without the proper experience and knowledge.
The chassis can be taken from a Zhiguli, but it will need to be shortened. You do not have to additionally look for a gearbox that is already on the rear axle. How to make a beam for a mini tractor? The cross beam can be made from a square pipe or from metal corners.
A driven front axle differs from a non-driven one in that it transmits torque from the cardoon transmission to the wheels. With its help, the machine turns, the steered wheels are stabilized, and pushing forces are transmitted from the drive wheels to the tractor frame. How to make a driving front axle for a mini tractor? You will need:
- Beam;
- Main gear. Consists of bevel gears. Serves to increase torque and transmit it to the differential;
- Differential. Serves to transmit power;
- Wheel reducers. Necessary to increase torque, which is transmitted from the main gear to the wheels. They are also needed to make a turn.
All these elements can be taken from old cars or other equipment. If you don’t know how to calculate the front axle, then you can watch this formula with a detailed description and explanation in the video.
How to shorten the bridge from a VAZ?
Sometimes, in order to construct a homemade mini tractor, it is necessary to shorten the building bridge. Let's consider this process using the example of a rear axle from a VAZ. A shortened axle is necessary in order to reduce the width of the wheelbase, thereby making the car more compact and maneuverable.
First you need to carefully prepare for the process. You need the rear axle itself, as well as tools such as a welding machine, grinder, vice, screwdrivers, and more.
You need to trim the rear axle of a VAZ as follows:
- You need to cut off the cup for the spring;
- The end flange must be pulled out;
- The removed axle must be measured, compared with the drawing, and cut to size with a grinder;
- At the tip of the segment, place a notch, which will serve as a mark for the “male” groove;
- Drill a hole inside the cup;
- After this, the axle shaft is joined together and welded;
- The last stage - the finished axle shaft is inserted into the bridge. Welding is done on both sides.
pro-traktor.ru
Advantages and disadvantages of homemade structures
When transporting small loads or cultivating areas of up to 10 hectares, it is better to use a mini-tractor for household use. It can be made with your own hands without any problems, and the design is much cheaper than a purchased product.
Important Chainsaw carburetor partner 340s
Assemblies from waste structures are often used as parts. If you have a used walk-behind tractor, the task is simplified. A big plus is the ability to improve a homemade design with found parts. This cannot be done with a purchased product.
The disadvantages include the following:
the difficulty of producing drawings that cannot be avoided; the installed components are initially worn out; The ability to work with metal and engineering knowledge are important.
How to assemble a homemade tractor from a walk-behind tractor or a car: our point of view on the question
Many walk-behind tractor owners often think about upgrading their agricultural machinery. In fact, improving the existing unit and turning it into a full-fledged mini tractor will not be difficult. However, you will be required to study the recommendations and follow the procedure - this will give you the opportunity to get an effective homemade mini tractor that will be able to solve absolutely all the tasks assigned to it.
How to make a mini tractor from a Neva walk-behind tractor
First, we purchase the walk-behind tractor itself, on which a factory or homemade hitch is already pre-mounted. Then you can attach a plow, trailer with body, harrow or other attachment. Other additional details required:
- Frame.
- Gas and brake pedals.
- Additional wheels.
- Seat.
- Steering system from a car.
The volume of Neva walk-behind tractors is usually between 6-8 liters, so a mini-tractor with such a base requires a minimum amount of modifications.
Frame and body
To build the frame, it is allowed to use metal pipes and corners. Bolts must be used as fasteners, but welding will be required to create a strong connection.
Drawing 1 - structural frame
You can equip a mini tractor with a body with your own hands. This will give the equipment not only a presentable appearance, but also protect the components from dust, mechanical and climatic influences. In this case, stainless steel sheets are used.
How to make a homemade tractor with a walk-behind tractor engine. Advantages of a mini tractor
Among the main advantages of a homemade technical product, one should first of all note the lower cost in comparison with ready-made analogues. In addition, such a unit will not require much storage space. Now it’s clear why most owners of personal plots want to know how to make a mini tractor from a walk-behind tractor with their own hands.
At the same time, do not forget about the efficiency of a homemade device, because it does not require a lot of fuel
. The prices for spare parts are also quite attractive and they are easy to acquire
If you install tires with a deep tread on a homemade tractor from a walk-behind tractor, the unit will get good cross-country ability. An equally important characteristic of the device is its small dimensions.
To make a mini tractor with your own hands from a walk-behind tractor, you need to have some knowledge and be familiar with tools.
Before starting work on creating this technical tool, it is worth studying several drawings and reading the relevant literature. Units from various manufacturers have unique technical characteristics, which affects the list of necessary modernization work.
Today on the market you can find models equipped with adapters with a seat. As a result, the process of creating a homemade mini tractor from a walk-behind tractor will be even simpler. However, if the adapter is missing, then making it yourself will not be so difficult. Many owners of personal plots prefer Salyut, Neva and some Chinese models. To make a tractor from a walk-behind tractor with your own hands, in addition to the basic device you will need:
- 2 wheels;
- stainless steel sheet, as well as metal corners and pipes;
- welding machine;
- drill;
- chair; attachments.
Instructions
You can easily create a mini tractor from walk-behind tractors from a variety of manufacturers (for example, from a Foreman walk-behind tractor). So, if you have Agro equipment, then you should build the tractor according to the following instructions. To make it you will need:
- Motoblock Agro
- Steel sheets and profiles
- Car seat
- Steering wheel from a car of any model
- One or two pairs of wheels can be changed, all of them, or you can leave one “original” one.
Wheels
In general, this “formula” is suitable for walk-behind tractors from any manufacturer, because the parts for manufacturing are not much different.
Do-it-yourself mini tractor from a walk-behind tractor
In order to make a miniature tractor from a walk-behind tractor with your own hands, you will need:
- Bulgarian;
- fastening parts;
- channels and pipes;
- drilling device;
- electric welding;
- measuring instruments (angle, tape measure, caliper);
- small hand tools (screwdriver, wrenches, hammer, etc.).
You also need to purchase a ready-made kit for converting a walk-behind tractor into a mini tractor. This will be the main expense item, but you should not save on this equipment, so as not to question the quality of the future product.
You also need to choose a comfortable and high-quality steering wheel, seat, wheels and pedals. When all the necessary components have been selected, you can begin to create a drawing. Do not neglect this stage - with clear drawings and diagrams it will be much easier and faster for you to work. The photo below shows examples of the simplest drawings for independently converting a walk-behind tractor into a mini tractor.
A good homemade mini tractor with an engine from a walk-behind tractor can only be obtained when the original unit has good power and performance. Heavy diesel walk-behind tractors are ideal for conversion. They are quite economical, heavy, have considerable power, are productive and durable. All these parameters will allow you to turn the walk-behind tractor into a full-fledged mini tractor, capable of plowing heavy soils and working for a long time without interruptions.
The conversion process as a whole is carried out according to the same algorithm, with minor differences for different models. The general scheme for converting a walk-behind tractor into a mini tractor is as follows.
Frame preparation
Since the mini tractor will need another pair of wheels, the frame design will have to be improved and strengthened. A metal profile or metal pipe is used to make a new frame. The thickness and size of the workpieces should be selected based on individual preferences, taking into account the power of the future unit. The components of the future frame are cut out with a grinder and connected by welding. It is advisable to strengthen the structure with a transverse crossbar. Also take care of the attachment point and the towbar if you plan to use a trailer.
Chassis system
The front wheels are mounted on a piece of pipe of suitable diameter. In turn, ready-made wheel hubs with brake pads are attached to it. A hole is made in the center of the structure through which it will be attached to the frame. Next, steering rods are mounted to the frame through a worm gearbox. Finally, the steering wheel itself is installed.
To install the rear axle, bearings are pressed into the bushings. The torque will be transmitted to the axis itself by a pulley. The wheels can be left from the previous unit, or you can choose new ones with a stronger tread and wider width. It is recommended to select the wheel diameter for a future mini tractor from 12 inches.
Engine installation
It is recommended to mount the engine on the front frame beam. This will improve the balancing of the unit
It is important to ensure that the power take-off shaft is parallel to the rear axle pulley. This will protect the belt drive from wear.
Drawings and assembly
To make a mini-tractor from a walk-behind tractor with an engine with your own hands, you will need to prepare drawings and an assembly diagram in advance. You can work on this yourself, but the main condition must be met - there must be balance in order to avoid unpleasant “surprises” in the operation of the apparatus.
Creating a wireframe
To create a frame, you don't need a lot of material. At the same time, if something is missing, then analogues can be used. But the dimensions and properties should be similar. This is about:
- metal - you need to prepare corners, channels and a square-shaped tube. For cladding you will need steel with a thickness of at least 1.5 mm;
- rotating device;
- wheels and axles;
- bearings;
- tape measure, welding, drill, grinder.
Assembly is carried out only according to the scheme - you cannot deviate from it.
Once all the elements have been connected, you need to check whether the installation was performed correctly. To do this, you need to install the frame on the walk-behind tractor. If everything is as it should be, then you can continue to create a mini-tractor. if something went wrong, then the shortcomings need to be corrected.
How to make a walk-behind tractor with your own hands using a Lada box and a VAZ rear axle
Many people are interested in whether it is possible to make a walk-behind tractor with their own hands. A heavy walk-behind tractor or compact walk-behind tractors are indispensable assistants in agriculture, but not all farmers and summer residents have the opportunity to purchase such equipment. Therefore, if you have certain skills, knowledge and skills, you can assemble a walk-behind tractor with your own hands. In order for a self-assembled motor cultivator to serve for a long time, a project diagram is created. It is necessary to correctly measure the parts, purchase materials and tools, and complete technical drawings and dimensions of components. You can use one of the instructions from folk craftsmen who write on special forums on how to make a walk-behind tractor with your own hands.
Any recommendations on the Internet on how to make a walk-behind tractor yourself should be checked against reviews. It’s good if the users of such homemade walk-behind tractors are friends or acquaintances. Then their reviews can be trusted; in other cases, all advice on assembling and using homemade devices should be checked.
Stages of work on making homemade products
The next thing to do is to highlight the individual stages of work:
- The kinetic scheme is an important stage in creating a mini-tractor with a VAZ engine.
- Creating a tractor frame. It can be made from channels and corners. All frame joints are carefully welded. Now you should inspect the metal for rust and coat the frame in several layers with a metal primer.
- They are starting to finalize the project's chassis. It is imperative to check the brake system and, if necessary, replace its components.
- Wheel installation. If you are going to install large wheels in diameter, then you need to take care of the axles and brakes by altering their structure.
- After this, the engine is mounted on a previously prepared frame, which has already completely dried after painting with primer, the protective casing for the mini tractor from the VAZ is welded and mounted.
- They install the seat, steering and create platforms for mounting attachments.
But you don’t have to make platforms for hanging, but just make a snow dump. But you still need to attach a 50 kg counterweight at the front so that the unit does not tip over under heavy loads at the rear. You also need to attach headlights of your choice.
A hole for a trailer would also come in handy. With its help you can hitch a cart or other cargo. The next important element, without which the VAZ 2106 mini-tractor will not move, is the battery. You can use a regular car battery. For it, you need to weld or make a storage compartment out of plywood. It is better not to attach the battery tightly in place, but to make it removable so that it can be charged. After all, it is much more convenient to take the battery and bring it to the garage than to drive the car. Think through every detail to create a mini tractor with a VAZ gearbox with a Zhiguli engine.
A selection of drawings for a homemade mini tractor
We offer for consideration different options for drawings for assembling a mini-tractor manually. Having managed to choose a suitable scheme, you can begin to work. You can also refer to the drawing you choose to make changes to suit your needs.
People who work in agriculture and have a walk-behind tractor in their possession are thinking about how to purchase or make a mini tractor at home. You can work behind a mini tractor while sitting in a comfortable chair with a backrest, unlike a walk-behind tractor, which you need to literally follow on its heels and strain your arms a lot. Unfortunately, not everyone can afford to buy a factory mini-tractor, but after seeing the entire process of assembling a tractor with your own hands, you can come to the following conclusions.
Before you start assembling a homemade mini-tractor, you should pay attention to the purposes for which it will be used. In this case, it is important to start from the possibility of installing various attachments, for example, a milling cutter or a plow.
Components should be taken very seriously. You need to find parts that can be easily replaced with others in the future. Having collected the necessary tools and materials, drawn up a drawing of a mini-tractor, and also understood the basic principles of the little helper’s work, you can safely get down to business.
Or choose an option that is more expensive, but much simpler - this is buying a motor tractor manufactured at a factory. By choosing this option, you will not only relieve yourself of headaches, but also save your time, and also insure yourself with a warranty from the manufacturer.
Mini tractor
A mini tractor differs from a walk-behind tractor in that its power is higher, which means that the scope of application of equipment on the farm increases and changes. You can quite easily make a mini tractor from walk-behind tractors by connecting a suitable trailer. Here you can use both a factory model of a walk-behind tractor and its homemade analogue. You will get this kind of walk-behind tractor from a Zhiguli bridge and with a trailer. You should still choose a diesel engine, preferably a more powerful one. This assembly option also involves the use of a special drawing.
The Zhiguli will benefit from not only the rear axle, but also the gearbox. Some modifications will be needed:
- The top of the gearbox is cut off, and it is bolted to a homemade frame. The pulley ratio is maintained at 1:4.
- A chain drive is pulled from the gearbox to the axle, and adjusting sprockets are installed with an efficiency ratio of 1 to 3.8.
- The bridge itself is bolted to the walk-behind tractor frame.
- The wheels are made from Zhiguli wheels. You can disassemble the structure along the weld seams, and then narrow the disk itself by inserting a smaller part into a larger one and scalding the resulting part by welding.
The option involves the use of 2 ready-made units: a walk-behind tractor and a trailer.