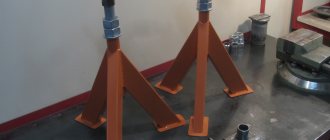
Rack
We make it from a 32 mm corner with a length of 1540 mm (you will need 4 pieces in total). You will also need 4 36 mm corners of the same length. We assemble the corner into a square using welding seams 30-40 mm long. When assembling we use clamps. After connecting the corners, you need to drill holes in the lower part of 26 mm in diameter, retreating 31 mm from the edge. This will leave you with 5mm left for welding the metal rod inside the structure. Next, drill 13mm holes:
- one at a distance of 100 mm;
- the next after 80 mm;
- the third and all subsequent ones after 190 mm.
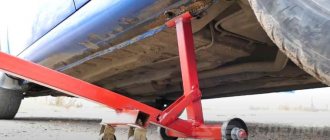
Tipper in action
The holes are needed for the metal pins that are needed to secure the shoe and the top beam. After assembling the square profile and drilling, it must be connected with pieces of corners, also assembled into a square profile.
When assembling, you need to insert spacers of the same size between the profiles, that is, 36 m each or a finished upper beam. After welding, you need to allow the part to cool without removing the spacers. Check that the top beam fits easily between the square profiles.
Description of design
A car tipper for a car, a drawing and photo of which are presented below, it works using a jack:
You can take any lift that is in the garage. The maximum possible angle for safely raising the side of the vehicle is 45 degrees.
The heel for the jack should have as many stiffening ribs as possible, which will give it additional strength. This is an important point, since during operation of the tipper the part moves along the rail, experiencing loads in the region of 2.5 tons. A heel is welded from sheet metal (5 - 7 mm).
We make a tipper for a car with our own hands: a drawing of the design described below
The same applies to the platform that will rest against the bottom of the car - we make more stiffeners, we use metal with a thickness of 5 - 7 mm. Additionally, you will need a metal corner and a square profile. The bottom platform, support corner and support beam are made from the same profile.
The lower platform is a stationary part made of one metal profile that will lie on the ground. The support angle consists of two elements connected to each other by short sections of metal profile and moves up and down along the guide rail. The latter has a number of holes for fixing the tipper at the desired angle.
Bottom platform and support angle assembly
The row of holes that you see on the sides of the support angle serves to fix the platform on which the bottom of the machine will rest. When raising/lowering the car, it moves along the part in one direction or another. At the highest point, when the rise is completed, the platform is fixed with a bolt. The platform and the support corner are fastened together with a bolt.
Important: to prevent the machine tipper from falling to the sides, a support beam is inserted into its part opposite the heel, which is two pieces of a square-section metal profile. The length of the part should be approximately 4 meters. For convenience, take two 2-meter segments, inserting their ends into each other.
Choosing a design
To make a vehicle lifting unit with your own hands, it is important to familiarize yourself with the designs on the market. The cost of finished equipment can be equal to the price of a car. In auto repair shops you can find the most common option - a screw two-post jack; the design can be made with a hydraulic or electric drive. The structure can be made using additional beams, depending on the expected loads. A scissor lift has a platform and is driven by a scissor-like mechanism. A homemade lift of this type is driven by mechanical force and is lifted by a hydraulic drive connected to an electric motor. Before making such structures, it is important not to forget about safety precautions. During operation, parts may spontaneously fall, which will lead to irreversible consequences. A homemade car lift must be made with a reserve of aggregate power; when using it, it is important to know the mass of the element being lifted.
What can you use to make a car stand with your own hands?
A do-it-yourself car stand is made from metal water pipes and other pipes. It is very reliable and allows you to adjust the height.
When repairing a car yourself, it is important that it does not roll away, because this can lead to serious injuries, damage to equipment or the vehicle itself. Therefore, supports are used for many repair work. And an inexpensive solution would be to make your own car stand.
How to properly prepare a garage
If you are planning to assemble a car tipper yourself, make sure that your garage will meet the necessary conditions. Otherwise, you won’t be able to use your structure indoors – there won’t be enough free space. Then you will have to work outdoors, which is not very pleasant in cold weather, and not always safe. But more on that later. In a word, if the height of the garage does not exceed the height of the car by one and a half, or better yet two meters, it is better not to build a serious tipper. And there must be free space around the perimeter of the lifting device so that there is an opportunity for normal maintenance of the machine. And if you are planning to make your work easier and create a tipper that runs on electric current, then the voltage in the garage should have three phases. So, site preparation should depend on the following factors:
- tipper designs;
- the size of the machine and its weight.
Top beam
Tippers
For this we will need:
- two 32 mm corners 171 cm long;
- sheet metal strip 64 mm wide;
- several bushings.
We assemble the corner into a U-shaped profile, that is, a channel. On one side in the middle we weld a metal insert 3-4 mm thick and 16 cm long, which is needed for using different jacks. We weld the plate on top with tacks, sew everything together and get a rectangular profile.
We weld the insert to the plate, and on the reverse side we jam the profile with a metal plate 4-5 mm thick, scalding around the perimeter and cleaning it. We weld a sleeve of the following dimensions to the end in the middle:
- length 35 mm;
- internal diameter 20 mm;
- external 35 mm.
In front of the upper beam we weld two guides for the jack with holes for the jack stopper. You need to insert an M8 bolt with a nut into them. We also weld a bushing with rollers and a safety pin on the top part.
Sopranoo0 › Blog › DIY hub tippers
The bottom of my Okushka was a little rotten in the area of the front right arch and it was necessary to somehow treat this place. It was wildly inconvenient to clean rust from the pit, much less cook it.
I couldn’t really find any drawings on the Internet, so I had to think for myself. I cut out a template for the installation platform for the hub from thick cardboard based on the dimensions of the central hole and drilling of the Oka disk and brackets for them.
Next, from the remains of the 40th 4mm corners, I welded a base 70cm long.
Using the template, I cut out 2 mounting platforms from 4mm sheet steel. The central hole was cut by welding.
And 4 brackets from the same 4mm sheet.
The brackets must be identical to each other, otherwise the platforms will bend poorly. After cutting the brackets, I welded them together and clamped them in a vice so that they would not move relative to each other, I trimmed them with a grinder and drilled 10mm holes.
Then I cut 4 mounting eyes for the brackets from a 4mm strip and drilled 10mm holes.
I welded the eyes to the corners of the base of the tippers at a distance of 10cm from the edge.
I welded the brackets with the mounting platforms and fastened them to the base with 10mm bolts. I placed a washer between the eye and the bracket for easy rotation of the latter so that the metal does not rub against each other.
Then I used 20 corners to fix the longitudinal corners at the base at a distance equal to the width of the installation platform. All tippers are ready.
They withstood the eye with ease. At the first capsize there was not much creaking, but then everything was fine.
I placed a wooden plank to limit the angle of the car's collapse. I marked marks on the corners; later I will weld metal plates there in place of the board. I didn’t weld it right away because I didn’t know the optimal angle at which the car would stand on its own on the tippers without additional supports.
I added the iron stops purely symbolically for additional insurance, but the car stands on its own on the tippers.
Source
Security measures
It is very important that when the tipper is operating, the site is protected on all sides from wind gusts. The fact is that an overturned car creates a lot of windage, and a moderate wind is enough to turn it over. Before starting work, do not forget to prepare the car - empty the interior and luggage compartment, remove the battery, and eliminate the possibility of leakage of fuel from the fuel tank, oil and brake fluid. An overturned vehicle must be secured with additional supports.
Front connection node
To assemble it you will need:
- two inch pipes 30 cm long;
- corner 32 mm, length about 33 cm;
- rod made of a rod with a diameter of 26 mm and a length of 42 cm.
On the corner we mark 6 cm from the center in both directions and keep the shelf at this distance. In the center of the corner we drill a hole with a diameter of 16 mm, which is needed to connect the lower beam, taking into account the size of the bolt head. After this, we bend the corner into a U-shape. It is better to connect the parts together with the stand.
Be careful that the pipe does not burn out when checking. The entire front connecting assembly is movable, that is, the U-shaped corner along the edges with pipes must rotate on a metal rod.
Area
To create it you need sheet metal 3-4 mm thick. It should be 350x150 mm in size with curved sides. You can also weld a 20 mm wide strip onto the tacks with drilled holes to secure the inserted board. We fix a rubber strip on the board. We weld stiffening ribs and guides under the lower part of the platform, not forgetting about the jumper. The dimensions of the site are not critical. It is necessary to adhere to the size between the guides, placing the platform on the upper beam, along which it can move freely.
How to make a car tipper with your own hands
During the operation of the vehicle, over time there will be a need to gain normal access to the underbody of the vehicle. To overturn a car, it is often necessary to involve several people at once, and this procedure is quite labor-intensive and complex. On the other hand, a special car tipper greatly simplifies this whole process, so you can handle everything even alone. The device not only makes the task easier, but also makes tipping the machine safer.
What can you use to make a car stand with your own hands?
A do-it-yourself car stand is made from metal water pipes and other pipes. It is very reliable and allows you to adjust the height.
When repairing a car yourself, it is important that it does not roll away, because this can lead to serious injuries, damage to equipment or the vehicle itself. Therefore, supports are used for many repair work. And an inexpensive solution would be to make your own car stand.
Front connection point
To make it, you will need two sections of an inch pipe 30 cm long, a 32 mm corner 33 cm long and a rod made of rod 26 mm in diameter and 42 cm long. Take the corner and mark 60 mm in each direction from the center. The shelf of the corner must be preserved at this distance, and cut off the shelves from the marks to the edges with a hacksaw or cutter. Make a hole 16 mm in diameter in the middle of the corner. It will be needed to fasten the lower beam, taking into account the size of the bolt head. After this, bend the corner into a U-shape. It is better to connect the prepared parts together with the stand. When welding, do not burn through the tube, and the entire front connecting assembly must be movable. Thus, the U-shaped corner with pipes at the edges should rotate on a metal rod.
Types of lifts, their cost
A screw electromechanical system made in China will cost from one hundred to one hundred and twenty thousand rubles. Self-assembly of such an analogue will require expenses for the engine, screws, gearbox and load-bearing frame, which in total will amount to no less. The effect of a self-assembled tipper is possible if we create a fairly simple structure from those materials that have not been used for a long time . All we have to do is develop the drawings according to which the assembly will be carried out.
Lifting devices are divided into the following types:
- fork screw;
- scissor;
- tipper;
- platform;
- plunger
For ordinary car enthusiasts with standard-sized garages, such systems are of little interest. They are too bulky and take up a lot of free space:
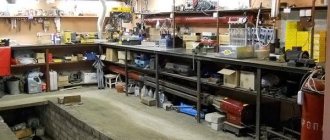
Tools and materials
When winter comes, two-wheelers and cars usually give way to snowmobiles. This type of vehicle jumps over large snowdrifts and makes it easier to travel through snow-covered areas. However, such equipment is expensive. This is why self-assembly of snowmobiles is extremely important.
The exact set of necessary materials and tools, the parameters of the device itself are determined by the drawing.
Will definitely come in handy when assembling a snowmobile:
- welding machine;
- pipe bender (if it is not possible to use a ready-made frame);
- hammer;
- a set of screwdrivers of various sizes.
For the tackles themselves you will need:
- steel pipes with a cross section of 6x6 mm;
- rollers;
- bearing system;
- wheels covered with rubber.
If the product is supplemented with skis, you will have to use:
- base;
- shock-absorbing block;
- link leg;
- kernel;
- fork;
- bipod.
Features of the engine stand design
Of course, you can do without any tilters and disassemble the Zhiguli engine on a box or on a workbench, if you have one. But there will always be a risk that the motor will slip out and fall on your feet or on the floor; you always need to call someone for help, it’s always inconvenient. Some of the drawings shown on the page are designed specifically for VAZ engines, and some are universal. But they all work for their owners and make engine repair easier.
The main thing that needs to be achieved is stability and rigidity. Not everyone graduated from a university with an “A” in strength of strength materials and technical mechanics, so we will give some main points as a basis for building with your own hands or changing the dimensions indicated in the drawings. There are also many options for tilters that attach the engine to only one console. This causes increased stress on one rack. This design also has the right to exist, but subject to certain conditions.
In any case, the stand will be made of profiles, it does not matter whether it will be a square pipe, a powerful angle or an I-beam. At the junction of two profiles, a certain amount of movement cannot be avoided. In this case, an ordinary triangle will come to the rescue, which is the most rigid and indestructible figure. Consequently, it is necessary to unload the central post as much as possible, and this can only be done with the help of slopes, so that the maximum load falls on the support triangle.
It is very important to correctly position the center of gravity and relieve the lower frame from bending loads. Here, too, several braces will have to be included in the design. The center of gravity must be located so that it is possible to rotate the engine without problems, but at the same time the entire structure remains stable. You need to take into account both the weight of one cylinder block and its weight together with the cylinder head, flywheel and crankshaft.
Tipper assembly
This design is considered not only simple, but also universal. With its use, you can perform a lot of work related to car repairs. The whole system is so simple that it does not require detailed comments. You just need to determine the dimensions of the profiles and their optimal length. For such systems, it is best to use square profiles with a cross-section of twenty by twenty. And if the car weighs about two tons, the profile size should be twice as large. For example, it shows what starting materials should be prepared:
The entire tipper system is placed on a rigid structure with a triangular shape. The main goal is to change the length of one of the sides of the triangle so that the car rises to the desired angle. You can work with a jack or a simple winch, lifting the car, as shown in the photo:
The adjustable rack has markings and drilled holes, with the help of which it is possible to fix the vehicle at the desired angle. But remember that such systems are made taking into account the size and weight of your machine:
Tags
the bottom of the car. the car tipper with its car tipper could Cars of a passenger car. Cars with your own hands with your own hands. with your own hands. with your own hands to us with your own hands. with your own hands with your own hands. with your own hands with your own hands auto with your own hands auto with your own hands. distinguished by its simplicity auto with your own hands. do-it-yourself tipper. in your own operation. do-it-yourself car with drawings and
heelplatformdevicetimefollowsphotorailothermaterialreadrestorationnew
Components of the tipper
A car tipper
consists of a winch, which is attached to the jib through a roller. Its parameters are 60x30 mm. A winch of the required size can be purchased at the store. To secure the mechanism, two bolts and a welded plate are required. Metal pipes can be obtained from a metal depot. For rigidity, it is recommended to reinforce the metal square structure with plates on both sides. The dimensions of the strips are 40x4 mm along the entire length. The steel strips are welded to the tipper to ensure a strong and reliable connection.
At the bottom of the jib there is a round pipe, to which additional steel elements are welded for reinforcement. This part ensures the stability of the structure when lifting the car.
For a car tipper with your own hands
You will need to install two racks. Their size is 50x25 mm. The structure is secured at the bottom using a large bolt and nut. Connection type: removable. The beams are easily detached, transported and assembled to lift the vehicle.
A cross member, which is a square pipe, is attached to the racks. There is also a square pipe running along the length of the tipper. Element size – 50x25 mm. Welding is used to connect metal elements.
A safety limiter is installed at the top in case of unforeseen situations. There are holes along the length of the stand. The distance between them does not require strict control. The main thing is that it is convenient to use the tipper.
It is recommended to take all elements of approximately the same length. So the parameters of the cross member are 2 m. The height of the jib is approximately 1.8 m. The length of the racks is 2 m. For the convenience of the pipe, it is allowed to shorten the elements slightly during the construction of the mechanism.
The final stage of how to make a tipper
– painting of the structure. To do this, you can use regular paint of any color. When creating a mechanism, it is important to start from the drawings. The result is a convenient and durable design that remains to be tested in practice.