In this article we will tell you how to make a tattoo machine with your own hands using available materials. This is an easy and convenient thing that people who are into tattoos do by the dozens. The design of a homemade tattoo machine is simple, we won’t tell you anything new, but we will describe the manufacturing process in as much detail as possible, tell you about some subtleties that you might not know about, and, of course, provide a few step-by-step instructions.
How to make a tattoo machine
What does a homemade tattoo machine consist of?
The most common among homemade tattooists is the rotary type of tattoo machine .
Homemade tattoo machines have a simple design
Having all the necessary components, such a device can be assembled in about 15 minutes. Let's consider what parts may be required.
Design of a simple rotary tattoo machine
The basis . Gel pen or automatic pencil (must be disassembled first). You need to remove the tip of the paste, drain the gel (if it is a gel pen), take a thin needle and press on the ball so that it falls out. The needle will “work” in the resulting hole.
The basis will be a pen or automatic pencil.jpg
Needle . This is usually a guitar string with a sharpened end. Often a spiral is wound around the strings, which must first be unwound. The good thing about the string is that it holds paint well and does not deform or rust. Under such conditions, other materials (such as nichrome, steel, etc.) cannot cope with the task.
Typically used guitar string
Flywheel . A kind of crankshaft. You can find such a flywheel on any electric motor from a tape recorder, but it is important that it be plastic (brass ones are also found). A hole is drilled on the flywheel; if this is not possible, the hole is made with a hot needle or thin nail. The hole should be 1.5-2 mm from the center of the circle, but remember that this distance is the stroke of the needle.
The flywheel plays the role of the crankshaft
Wires . They must be soft so that they do not “stand”, but hang freely. Even hard wires often break; if they break under the motor itself, it will have to be completely replaced.
Wires must be soft
On a note! The unsharpened tip of the string (approximately 5 mm) is bent 90°. This section will fit into the hole made on the flywheel. As a result, the needle will move vertically as the motor rotates. As for the length of the string itself, it depends on the type of handle, and therefore is selected experimentally.
The strings can be sharpened with a file or a sharpener, although a sharpening machine can also be used. To attach the motor to the handle, you can use glue, although it is better to make a stand from a sheet of aluminum, and then secure the stand in a suitable place with electrical tape or tape.
The string needs to be sharpened correctly
Well, we’ve sorted out the main points; as we see, it’s not difficult to make a tattoo machine with your own hands, because you can find all the necessary materials in the house. Now let's move from theory to practice and show several options for making a tattoo machine.
Another homemade tattoo machine
Articles on the topic
DIY medical mask
Assembling a rotary machine
The option of a small electric motor is just right for those who are not used to tinkering. Induction machines do not have a motor. Instead, they are equipped with a pair of coils that generate a magnetic field. Without knowledge of the basic mechanics and rules of handling metal, not everyone will be able to make them. This is why it is better to choose a rotary machine.
The list of items from which it is assembled is as follows:
- Electric motor.
- Charger.
- Button with 4 holes.
- Pen or pencil.
- Aluminum spoon.
- Guitar string.
- Insulating tape.
- Antibacterial drug.
Option #1. Tattoo machine made from a guitar string and a children's toy
Step 1. First, prepare everything you need - a guitar string, an electric motor from a children's toy and a few more simple parts.
What you need to make a tattoo machine
Step 2. The rod is removed from the pen and washed thoroughly.
The rod is removed from the handle
Step 3. The pen cap is cut off (about 2/3 of the length).
The cap is cut off
Step 4. The motor is carefully removed from the toy. It is worth noting that the final result depends on the type of toy itself. So, in our example, we will get a kind of prison tattoo machine: one person will hit the tattoo, and the other, holding the control panel, will constantly keep the button pressed. You can make another version of the device.
The motor is removed from the toy
Control panel with buttons
Step 5. The pen cap is connected to the motor using electrical tape.
The cap is connected to the motor
Electrical tape is used for fixation. What happened in the end?
Step 6. The body of the handle (together with the shaft) is cut to approximately 1/3 of the length. The body is then inserted into the cap, and the rod is placed into it (the body).
Trimming the handle body The rod is placed in the body
Step 7. Take a wine cork and cut a small piece from it. The resulting trim fits tightly onto the electric motor shaft.
A piece of cork is cut off
Step 8. Then the string is cut - about 1.5-2 cm longer than the length of the rod.
Cutting a guitar string
Step 9. The string is inserted into the rod. The rear edge of the string is bent and inserted into the plug as close as possible to the axis of the shaft. This is very important, because the range of vibrations of the needle, and therefore the accuracy of the pattern, will depend on this moment.
The string is inserted into the rod
Step 10. If everything was done correctly, then when the motor is turned on, the needle will begin to make translational movements.
Assembled tattoo machine
Step 11. It's time to check the functionality of the tattoo machine. To begin with, the needle is disinfected with a lighter and alcohol, and the skin is treated with a special antiseptic. Next, the motor turns on and the needle drops into the ink. That's it, you can start drawing!
Testing the tattoo machine
The needle must first be disinfected. Homemade tattoo machine in operation.
Basic mistakes that can be avoided
Initially, the author of the master class used a transforming bus with a complex design. The power supply of the toy was of impressive size, and therefore the tattoo machine turned out to be bulky and, obviously, not the most attractive. But when working, it flashed multi-colored lights and even played a simple melody.
At first, a transforming bus was used, but the tattoo machine turned out to be bulky
In the photo below you can see that a factory holder was used instead of a handle, and an ordinary spoon served as the frame. But all this in the end turned out to be a waste of time and effort, and the simplest design became the strongest.
It turned out to be a waste of effort
The attempt to fix the needle on the shaft with a plastic gear was not the most successful. The needle kept falling out of the wheel or getting stuck on it.
Plastic gear is not a good idea
Attaching a needle with an eraser is also a dubious idea. It fell apart and interfered with the movement of the needle.
Using an eraser
Despite all the misfortunes, this design was able to work for several hours, although the needle kept flying out.
The machine worked for several hours
The second version of the machine did not have such shortcomings, only the string “moved” in different directions by about 1 mm during operation. To solve this problem, a very thin tube (1 mm in diameter) was rolled out of paper, which was placed between the handle body and the string.
Second version of the tattoo machine
How to choose?
To understand which equipment is best to buy, you should first determine the basic selection criteria. These include:
- Purpose of the device;
- Specifications;
- Manufacturer;
- Personal preferences.
Purpose of the machine
According to their purpose, tattoo devices are divided into the following types:
- shading – used for working with large “areas” and large-scale drawings. Painting machines create conditions for the pigment to spread under the skin, which allows you to fill the drawing with color and form uniform color fields.
- contour - used to “clog” the paint as quickly as possible. This is necessary to prevent the pigment from spreading under the skin. It is the speed of penetration and removal of the needle that is most important for creating the outline of the future pattern. However, painting over the contour with a machine is strictly prohibited - this will irrevocably ruin not only the client’s skin, but also the drawing.
- universal - used both to create an outline and to fill with color and cast shadows. A universal machine (for example, a rotary machine) is good for making multi-color designs.
Main technical characteristics
| Number | Specifications | Recommendations |
| 1 | Operating principle | In rotary equipment, the driving force is transformed into rotational, and then into translational. The needles move due to the operation of the motor. It is the motor that ensures uniform contact of the needles with the skin. Rotary devices operate directly from the network. Induction devices are more complex - the needles are fed using electromagnetic coils, which in turn attract and repel a steel striker. An induction device requires a power supply and a pedal. Pneumatic devices operate by supplying compressed air. |
| 2 | Frame | The frame is the basis of the structure. All the main parts are assembled on it. It should be strong and rigid, but at the same time weigh little and not wear out. The material from which the frame is made is very important. Stainless steel and aluminum are most often used, less often bronze and polymers. |
| 3 | Device assembly | The correctness of the frame and turns on the coils, the quality of the contacts and springs play a big role. Everything must be securely connected into a single structure. |
| 4 | power unit | Good indicators for a power supply that will ensure uninterrupted comfortable use are voltage from 5 to 12 V, power from 2 to 3.5 A. |
| 5 | Noise level | Induction ones make a noticeable noise due to strong vibration and the speed of the needles. Rotary ones are much more comfortable in this regard. |
| 6 | Weight | Rotary devices are characterized by low weight, induction ones are heavier. In this regard, when working with rotary equipment, the master’s hand experiences less stress, which increases the duration of the session and minimizes the risk of making a careless movement. |
| 7 | What is the price | In terms of price, induction devices differ from induction devices - they are inexpensive. Rotary ones are more expensive - their price varies from 1,500 to 20,000 thousand. The most expensive due to their rarity are pneumatic devices. |
Manufacturers
When deciding which company’s equipment is better, you should first of all pay attention to proven brands. The best manufacturers of tattoo equipment are such well-known brands as:
- "EGO";
- Stigma Rotary;
- "Ink Machines"
- "Cheyenne";
- "FK Irons";
- Swiss Tattoo Machines.
The good thing about a branded machine is that service centers from well-known manufacturers are more widespread, and it is easier to select consumables for such equipment.
Popular models are produced by Chinese companies, and therefore they should not be ignored either. Manufacturers from the Middle Kingdom are actively developing and working to improve the quality of their equipment. Chinese cars are budget-friendly, but you need to treat such a purchase very responsibly, carefully study the description of the product, so as not to later regret the thoughtless purchase.
Personal preferences
A tattoo machine is purchased once and for a long time. It should be comfortable and easy to work with, and therefore, when purchasing, you should take care of “trying it on.” The equipment should lie comfortably in the hand, not constrain the wrist, evoke a pleasant sensation from tactile contact with the material of the device, and generally evoke only positive emotions.
Option #2. Tattoo machine made of string, spoon and pen
Another budget machine design, for the manufacture of which you need to prepare:
- motor;
- electrical tape;
- automatic pencil or old ballpoint pen;
- guitar string
Tattoo machine made from string, spoon and pen
Step 1. Work begins with the motor. As in the previous version, any electronic children's toy will do. This is what these motors look like.
Motors from electronic toys
This is the motor we will use
Any electric motor will do
Step 2. Next, take an old automatic pencil.
Take an old car pencil
All the insides of the pencil are thrown out.
A ballpoint pen will also work
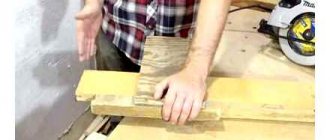
Step 3. To secure the motor, you will need something strong. This example uses a spoon. For a tattoo machine, you only need a handle that bends in the shape of the letter “G” (as shown in the photo).
Spoon for attaching the motor The handle is bent in the shape of the letter “L”
Step 4. Now take the pencil body. The handle of a spoon is attached to it with electrical tape, as securely and firmly as possible.
Pencil body A pen is attached to the body
Step 5. Any motor from a children's toy always has a small plastic gear on the shaft. This gear cannot be removed; on the contrary, a button is glued to it with superglue.
Button glued to gear
Step 6. Take a string and insert it inside the body. One end of the string is bent and placed in a button.
The string is inserted inside the body The end of the string is bent
The curved end is inserted into the button
Step 7. The machine is almost ready, all that remains is to supply power to the motor. For these purposes, you can use a power supply (voltage adjustment should be in the range of 3-12 W) or batteries. To make it more convenient, you can install a power button or put a switch.
All that remains is to supply power to the motor Switch
Actually, that's all. A homemade tattoo machine is ready to create masterpieces!
DIY ready-made tattoo machine
Option #3. Syringe tattoo machine (without string)
We offer you another option for making a tattoo machine - this time not from a guitar string, but from a medical syringe.
Syringe tattoo machine
Step 1. First, take a small medical syringe and disassemble it. Use pliers to remove the syringe needle (as in the photo).
The syringe needs to be disassembled. The needle is removed with pliers. The needle is removed.
Step 2. Take a gel pen refill (previously thoroughly washed). The tip of the rod is ground down with a file so that the needle can fit freely into the hole.
The tip of the rod is ground down with a file. The needle should fit freely into the hole.
Step 3. Using superglue, glue the tip of the pen to the bottom of the syringe to make the following.
The tip of the pen is glued
It should look like this
Step 4. On one side, the upper part of the syringe is cut off (it is better to use a stationery knife).
Trimming the top of the syringe
Step 5. Take a metal corner (as noted earlier, it can be made from a spoon handle) and, using the same superglue, glue it to the syringe (from the cut side).
Metal corner Gluing the corner
Step 6. The corner is additionally wrapped with strong thread (nylon). Then the thread is poured with superglue.
The corner is wrapped with thread
The thread is poured with superglue
Step 7. An electric motor from a children's toy is glued to the free part of the corner.
The electric motor is glued
Step 8. Take a large syringe and cut off its tip.
The tip of the syringe is cut off
The battery is inserted inside, then the piston is put in place. A line is marked approximately 1 cm above the battery.
Marked line
The syringe is trimmed along the intended line.
The syringe is cut along the line
Step 9. The stripped (and pre-bent) end of the wire is inserted into the syringe through the bottom hole and glued.
The end of the wire is inserted into the syringe
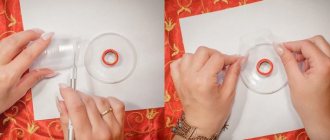
Step 10. A small hole is drilled in the center of the piston from a large syringe (as in the photo).
A hole is drilled in the piston
A screw is screwed into the resulting hole (not to the very end).
A screw is screwed into the hole
A cut is made in the lower part of the syringe (the one that pushes out the liquid).
A cutout is made
Step 11. The end of the second wire, also stripped, is put on the screw leg. Then the screw is tightened until it stops.
The end of the second wire is put on
Step 12. The piston is inserted into the syringe, its (piston) protruding part is marked. Then, according to the mark, the piston is cut with a knife.
The protruding part of the piston is marked
Piston trimming
Step 13. This design is assembled.
This design is assembled
Using the same superglue, the structure should be glued to the top of the motor.
The structure is glued to the motor
Step 14. Additionally, the syringe with the battery is attached to the motor. Then the thread is soaked in glue.
The syringe is wound with thread. The thread is impregnated with glue.
Step 15. Take a small button (from the same toy). The ends of the wires are soldered to it: one wire leads from the syringe with the battery to the motor, the second from the motor to the button, the third from the button to the other side of the large syringe (plus and minus). This is what should happen in the end.
The ends of the wires are soldered to the button
Step 16. The button is glued to the bottom of the tattoo machine handle. The wires are also glued so that they do not interfere with work. A heat gun is used.
The button is glued
The wires are also glued
Step 17. Take a regular button and put it on the motor shaft. Sticks.
Button glued
Step 18. The rod from the pen is inserted into a small syringe, and a line for trimming the excess part is marked at the top. The rod is cut.
Rod cutting line The rod is being cut
Then the rod is inserted again, and a point is marked on it opposite the free hole of the button. A through hole is drilled with a thin drill.
A point is marked on the rod A through hole is drilled
Step 19. Cut a thin strip of paper (about 0.5 cm wide). The end of the strip is glued to the needle (from above), after which it is wound around it.
The strip is glued to the needle
The strip is wound
Step 20. A needle with paper is inserted into the lower hole of the rod and glued.
The needle is inserted into the rod
Step 21. Take a metal part like this (as in the photo), you can make it yourself.
You can make this part yourself
The part is inserted into the hole on the rod, after which it is secured with a strip of tape.
The part is inserted into the hole. Tape is used for fixation.
Step 22. The rod with the needle is inserted into the syringe, the free end of the metal part is inserted into the hole on the button.
The end of the part is inserted into the hole on the button
Basically, that's it. All that remains is to check the functionality of the tattoo machine. Click on the button. Everything is working? That is great!
Tattoo machine made from a syringe is ready
The machine is tested on lemon. Everything works perfectly!
Video - How to make a tattoo machine without a string
Types of paper machines
There are a considerable number of options for creating beautiful paper cars. Let's look at the most common of them.
Assembly according to instructions. There are special instructions on how to make a paper machine, which can be easily found on the Internet. In order to make such a machine, you will need to download the diagram, print it on a printer, then you just have to cut it out and glue it together.
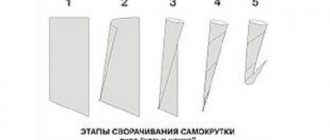
Sports option
To create, you will need a rectangular sheet of paper.
It is important that its sides have a ratio of 1:7. The top right corner is bent first and the bottom left corner in a similar manner.
After fixing, the corners return. As a result, we get outlines.
After this, you need to bend the top element, tucking it inside at the same time. Next, bend the triangles again towards the central part of the sheet. The side parts of the sheet are folded, and the bottom part is folded.
Simple option
The part located on top bends down, while obscuring the lower part. The upper right corner must be bent, thereby we will get a windshield. Finally, it is recommended to unfold the figure.
Racing car
You will need a sheet that needs to be folded in half along the long side. Connect the corner to the opposite side. Carry out a similar operation with all corners. This will create two squares with intersecting lines. Triangles belonging to the long side are bent inward.
Next, the long parts are combined using the middle line. One triangle will be needed to create the hood of the car; for this you will need to bend the sides towards each other.
The triangle, located on the other side, is tucked into the folds formed on the hood. All that remains is to bend the fragment that will represent the spoiler.
Fire engine
When creating such a model, paper alone will not be enough, so you should prepare glue and scissors in advance. To create it you will need a special blank made of dense material.
How to process the string of a homemade tattoo machine?
On the Internet it is unlikely that you will be able to find an intelligible description of how to process a guitar string. But this stage is one of the most important! If this is done incorrectly, the string will hit worse, cause more pain, and spoil the clarity of fine lines. Therefore, we will tell you about string processing in as much detail as possible.
The string must be pre-treated
So, take the string and mark approximately how long you need. For example, grab one end of the string with pliers, and lightly pull the other end with your hand. Where the string will have a sharp tip (try to choose a place closer to the pliers to save consumables), bring a lighter and heat it up (this will require another hand, so you can’t do it without an assistant). The string must be taut. In a heated place, the string will first become red-hot, then become thinner and burst.
Initially, all the strings are elastic, and therefore do not hold a straight shape. To “persuade” her, heat it red hot once. Having measured the required length, bite the string using pliers. Bend the end that will be attached to the motor with the letter “G” (do not overdo it with the length, otherwise it will cling when the machine is running).
The end of the string is attached to the motor
In harsh prison (or army) tattoo machines, the string is sharpened on everything that is at hand: first on a “zero”, then on a matchbox, and finally on glass (if something is missing, you can cross it off the list, but it will take longer to work). A much better option is a sharpening stone for knives (when sharpening, you need to press the tip of the needle with your finger). In this case, the shape can be any - cone-shaped, like a sewing needle, or flat, like a “spatula”, striking a thin line in one plane, and a wider one perpendicularly.
Another important point! The tip of the needle should be slightly bent so that it springs and hits one point. If you don’t bend the tip, but leave it straight, then when it comes out of the machine it will start hitting anywhere, and therefore straight lines will be much more difficult to draw.
DIY tattoo machine
After preparing the string, we recommend washing it with soap. Why not alcohol? The fact is that soap dissolves various biological substances, and alcohol “burns” them to the metal surface . Although it is better to combine both methods. If you cannot have several strings at once, then heat the tip with a lighter. But note that the properties of the metal deteriorate over time because of this, it becomes completely brittle.
Where to buy tattoo paint
The most popular colors are black, red, yellow and white, you need to buy them more than others. It is better to take two shades of each color: dark and light, to make a smooth transition or mix colors. I do not recommend mixing fluorescent pigments. You should not take something too cheap or expensive; it is better to consider options in the region of 8-15 dollars. Do not buy used paints without labels or seals; they may be diluted or used. What quality paint should be?
- Microgranules of surgical plastic are popular with professionals. They are expensive, but bright and rich, and have a long lifespan.
- Mineral ones are a little cheaper, but not inferior in quality. The paint does not react with cells, does not blur, and is economical due to its thick consistency.
- The fluorescent pigment does not cause allergic reactions, does not spread and looks impressive in the dark.
I am completely against organic and plant pigments. They can cause allergies, do not hold the contour well, and fade quickly.
Distilled water, ethyl alcohol, glycerin are used as diluents, but I prefer sorbitol most of all.
Pay attention to the composition of the paint; the presence of denatured alcohols, aldehydes or surfactants is dangerous to the health of your customers! Red paint may contain red mercury, cadmium or ocher, which can cause allergic reactions.
Some of the best paints:
- Eternal provides 100 beautiful vibrant shades. During the painting process, the structure of the paint is preserved, it is easy to apply and is suitable for most tattoo styles.
- Intenze paints are less susceptible to fading. For dense painting of a large area I recommend Suluape Black Samoan, for other works - Zuper Black.
- Most craftsmen work with Dynamic paint. It is thick and easy to work in, great for dense coloring. Black color is ideal for contouring.
To the question “Where can I buy tattoo paint?” usually the answer is the same - in specialized online stores. Many craftsmen with good client flows order from Europe in bulk, which is not particularly more expensive than in Moscow or any other city, although you still have to wait much longer for delivery.
New Incredible ideas for a rose tattoo
Debugging the tattoo machine
Making a tattoo machine with your own hands is not enough - its mechanisms should be adjusted in such a way that the device works without failures. Practice shows that there are some patterns that should be remembered. If you eliminate minor inconsistencies, you will make your work easier.
String flyout is one of the biggest problems. The string may stick to the nose of the pen (or whatever you used instead) and pop out of the fastener. Adjust it so that when the string on the roller is in its rearmost position, its sharpened end protrudes from the body by only 0.5 mm.
Debugging work
The mounting height of the motor is also important. Here you can use a piece of tube from a regular ball rod, which will bend the string closer to the roller. It looks like a nipple system, but thanks to this, the number of flights due to weak string fastening will be significantly reduced.
Also, when you first dip the spout into the paint, all the air may not come out. This may cause a drop of foam to appear on the nose - it would seem that there is a supply of paint, but nothing remains on the skin. Solution to the problem: blot the hole on the spout with a rag (an air bubble has formed there) and dip it into the paint again.
This tattoo machine is 3D printed
Permanent marker "Sharpie"
A temporary design made with a permanent Sharpie marker will last about a month. You can make a drawing in any color. But black looks the most believable.
The marker has a fairly thick rod, so it is better to choose a simple design. The image is applied by hand or through a stencil.
First you need to undergo a preliminary test for an allergic reaction. To do this, apply a small strip to the skin with a marker. If after an hour the skin has not turned red and no other undesirable reactions have appeared, you can apply a tattoo.
An image is applied to the prepared skin and generously sprinkled with talcum powder. The remaining powder is blown off the skin. To fix it, spray the tattoo with strong-hold varnish and dry the design. There is no need to apply a lot of varnish, this will dry out the skin. Excess varnish is carefully washed off with a cotton swab dipped in water.
To sum it up. Rules for tattooing
We figured out how to make a tattoo machine at home, and therefore all that remains is to familiarize yourself with the basic rules that must be followed when applying tattoos.
- The person receiving the tattoo must first eat a hearty meal . This way the blood will go to the stomach and, accordingly, the bleeding will be reduced - it will become easier to hit, since the paint will not be washed out of the skin.
- The person must be sober . After drinking alcohol, blood pressure increases, blood vessels dilate, and therefore bleeding increases.
- To wipe the skin, you need to use a clean cloth (cotton, bandage) soaked in boiling water (this way the tattoo will heal faster, the crust on it will be much smaller), and not alcohol. The fact is that alcohol, which leads to burns, interferes with the healing process. They can only additionally sterilize already clean equipment.
- After application, the skin should be washed with clean water and soap , then apply a healing cream (Rescuer, Bepanten are often used) and apply a bandage for 24 hours so that the wound does not rub against the skin.
Tips for healing
And in conclusion, a little advice for beginner tattoo artists: if you did a bad tattoo, you can cover it with another one after healing. And not even just once. And even after several years.
Temporary tatoos
For a period not exceeding 40 days:
- henna (Mehndi) with and without oil
- airbrush up to 10 days
- decals
For a period of 1-5 years. Cosmetic (permanent makeup)