Walk-behind tractors are reliable assistants in agricultural and land work, and their productivity is significantly increased thanks to specialized types of additional equipment. Seeders for walk-behind tractors help to carry out the procedure of sowing a variety of crops evenly, achieving the desired density of grain placement.
Today, many companies offer completely different types of these devices for purchase, so it is important to familiarize yourself with the types and choose the most profitable option for your device. Moreover, you should not exclude the possibility of creating a seeder with your own hands, which, oddly enough, with the right approach, the availability of parts and drawings, is an easy task.
Homemade seeder
Homemade seeder
A seeder for a walk-behind tractor is one of those attachments that is simply necessary for full-fledged agricultural work. Agree, I want to delegate the most complex and time-consuming processes and work on the field to specialized machines. The walk-behind seeder has been very popular for decades. We suggest you make a homemade seeder .
Planting a crop is a very complex and routine process that is difficult to carry out, even with a small plot. What can we say about working in the fields and large farming areas. This is why seeders for walk-behind tractors are very popular all over the world, including in our country. The seeder itself has a fairly simple operating principle. Its main components are the rear wheel and chain drive, which represent a single, smoothly working mechanism. By driving the rear wheel, the chain drive allows the seeds to fall into the prepared soil.
The speed of sowing planting material is pre-regulated. You can also set in advance the expected sizes of the bulbs and seeds to be sown.
Quite stringent agrotechnical requirements are put forward for modern seeders. The device must be designed in such a way that it takes exactly one seed from the hopper and delivers it to the soil without damaging it. Today there is a huge variety of seeders for walk-behind tractors: from single-row to eight-row. However, let's talk about how to design a homemade seeder .
Let's look at how to make a two-row homemade seeder.
Such a device should consist of two independent sections, each of which will have:
— seed hopper;
— a mechanism regulating the seed sowing rate;
The reinforcement on the frame of the sections must be movable so that it is possible to control the row spacing and vary it from 15 to 70 cm. The running wheel of a homemade seeder will drive the working parts of the reel-type sowing apparatus. In order to orient the crops, a double-sided marker should be installed.
The frame of a homemade seeder is made of 40*40*700 mm corners, and the bunker for planting material is made of boards. Its optimal dimensions are 240*210*700 mm. From an old grain seeder it will be convenient to use a bobbin-type sowing unit. And for support wheels, old combine sprockets are perfect. The hanger extension can be easily made from 6*30 strip steel with a length of 800 mm. It is necessary to note that the mounting stand for the seed hopper, the mounting stand for the seeding shaft, roller brackets, coulters, fastening chains, a square and various other necessary parts should be made in the workshop. It won't take much time or effort. Perhaps some of these parts can be found on your farm. Below is a diagram for making a homemade seeder.
Making a seeder with your own hands is a simple and quite exciting process. Here it is only important to maintain proportions and fulfill the basic requirements for the size of materials and their comparison with each other.
Remember that by making a homemade seeder, you will receive an excellent tool, however, you will not have any guarantees regarding the correctness of its operation and durability. If you want to buy a high-quality branded product, contact the My Motoblock online store to purchase a seeder.
On our website you can also read about the homemade production of other attachments for walk-behind tractors, for example, lugs, creepers, mowers, potato diggers, potato planters, plows, etc.
Generally speaking, making tools for a walk-behind tractor with your own hands is a very interesting process. Using all sorts of old, outdated components, components, tools and devices, you can create new useful units that will help you in housekeeping. Drawings, which we often attach to our articles, will help you make your work easier and save time and effort. Have fun creating.
Manufacturers and their models
We list some manufacturers of this equipment that deserve respect:
- Zirka.
- "Centaur".
- "BELINSKSELMASH"
- Premium.
- BOZKURT.
- JSC “Red Star”.
- Becker Aeromat.
- Amazone.
- Yarilo, etc.
The most popular models are:
Vacuum walk-behind seeder SVTV 4-8
- Seeder operating speed 2.5 km/h
- Seeding drum speed up to 21 rpm.
- Number of rows of seeds sown per sowing drum 2 rows
- The permissible number of installed seeding drums is from 1 to 4
- The size of the sown seeds is from 1 to 10 mm.
- The distance between the sowing rows is adjustable no more than 70 cm.
- The distance between the sown seeds in the row is adjusted depending on the type of seeds
- The depth of seed placement in the soil is 100 mm.
Precision seeder STV-4
Precision seed drill STV-2
- Types of drums:
- 3 mm - carrots, onions, radishes
- 6 mm beets, tomatoes, peppers, eggplant
- 8 mm - cucumber, soy, zucchini
- 10 mm - peas, green beans
- 16 mm – onion sets, watermelon
- 18 mm - corn
- Hopper capacity 3l
- Row spacing 16-50cm
- Sowing depth 1-6 mm
- Track width 110mm
- Weight 40 kg
Features of seeders
Like any unit intended for agricultural work, devices for walk-behind tractors have their own characteristics, both structural and operational. The design of each of them has elements common to other types. The whole difference is related to the seeds that are sown - for each type of seed they use their own design for a walk-behind tractor.
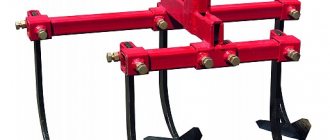
The main structural elements of this mechanism:
- openers;
- containers for storing seeds;
- closing wheels;
- mechanisms for sowing.
All of them are present in every mechanism, regardless of what exactly it is intended for. Thus, sowing devices direct seeds to the outlet holes, and wheels embed them into the ground in each model. The only difference is the diameter of the holes mentioned. The task of the coulters is to prepare the soil.
The connection between the walk-behind tractor and the sowing unit occurs using the hitch supplied with the latter.
As for the features of the mechanism, everything is quite simple. It always works according to the same scheme:
- First, the coulters lay out the beds by furrowing the soil.
- At the same time, a dosed amount of grains (mixed with fertilizers) is supplied from the storage to the holes.
- Seeds fall out through the holes.
- The wheels cover the furrows and compact them.
Attention! The design of individual models adds virtually nothing to the above scheme.
A simple model of a disc hiller for a walk-behind tractor
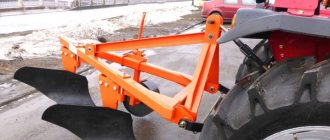
To make a tool, you need to select the type of wings. Disks, or plowshares, are steel sheets 1.5-2 mm thick, with bent lower edges.
An important condition: the disks must be strictly symmetrical. Otherwise, the structure will “lead” to the side, which will significantly complicate the work.
When arranging the structure, you can use shares removed from an old seeder.
The plowshares are installed at an angle, maintaining a distance between the lower points corresponding to the width of the wheel track, equal to the row spacing
The elements are connected to each other using a bolted connection or by welding. The disks themselves are connected using adjustable adapters. In addition to the discs, the main elements of the tool are: a T-shaped leader, screw lanyards and stands. Turnbuckles are necessary for adjustment along the vertical axis of rotation of the disks. The tool is attached to the walk-behind tractor using a beam with wings.
When manufacturing and assembling parts based on a drawing, it is important to consider the dimensional ratio and fastening design. There are two options for making the tool: with a fixed or variable wing width. With the second arrangement method, the distance between the disks can be changed by symmetrically rearranging the racks.
Main assembly elements: 1 – row to be processed, 2 – disk, 3 – fist, 4 – T-shaped bracket, 5 – stand, 6 – steel scraper, 7 – bridge beam, 8 – locking bolt, 9 – beam handle
To make working with the tool easier, it is necessary to provide sliding bearings. By installing bearings rather than sliding bushings, the reliability of the product can be increased.
During the assembly process, a hitch bracket without a beam is used to attach the tool to the walk-behind tractor. To do this, attach the hiller leash to the bracket using a stopper and bolts with flat washers. The stopper is inserted inside the square pipe and pressed tightly against its outer surface.
The hitch bracket itself is rotated using bolts, and the leash is placed along the longitudinal axis of the walk-behind tractor
The unit is ready for operation. Working in first gear, by reducing the forward speed, you can increase the traction of the walk-behind tractor. If the wheels slip during the hilling process, they must be paired.
Seeders for walk-behind tractors: types and how to make them yourself
Walk-behind tractors are reliable assistants in agricultural and land work, and their productivity is significantly increased thanks to specialized types of additional equipment.
Seeders for walk-behind tractors help to carry out the procedure of sowing a variety of crops evenly, achieving the desired density of grain placement.
Today, many companies offer completely different types of these devices for purchase, so it is important to familiarize yourself with the types and choose the most profitable option for your device. Moreover, you should not exclude the possibility of creating a seeder with your own hands, which, oddly enough, with the right approach, the availability of parts and drawings, is an easy task.
How to install correctly?
First you need to put on the earring. It will be necessary to attach the working part to it. Attach it using cotter pins and bushings. Important: fasteners should be inserted into the second hole from the bottom. This allows you to adjust the depth of the cutters in an optimal way for complete cultivation of the land.
It happens that the standard depth (20 cm) is not enough. To set the opener to go deeper, it is lowered and attached to the shank through the upper holes. On the contrary, if it is necessary to process only the top layer of soil, before using the tool it is attached through the lower hole. Experts recommend initially organizing a test run of the walk-behind tractor. Only he will show whether everything was done correctly.
Seeders for walk-behind tractor: typology
The features of the device depend on economic needs, so today we can distinguish 5 types of seed application:
- Nesting. During the sowing process, the device places the seeds in a nesting manner;
- Scattered. Seed material is evenly scattered over the entire area;
- Privates. There is a combination of row sowing and seed placement;
- Square-nested. Thanks to such walk-behind tractors, sowing occurs along previously designated rectangles;
- Precision seeding (dotted). Seed bulbs are placed at a certain distance in a wide row.
According to the designation of crops, the following types of seeders are distinguished:
- Universal. They are suitable for grains, legumes, oilseeds and bast crops, that is, they can plant any plant with high quality;
- Special. Such devices are designed to work with certain crops. There are corn, flax, cotton, vegetable, beet and other options;
- Combined. The devices place not only seeds, but also fertilizers into the soil.
It is worth noting that precision seeders for walk-behind tractors are considered the most common and popular.
Moreover, we are talking specifically about devices with a disk coulter, because thanks to them, the point of falling of the seeds and the point of determining the sowing depth are located almost on the same line.
This helps to maximize the copying of relief features and planting seeds at the same depth.
To perform a variety of work on their plots, people prefer universal options, while professional farmers use highly targeted units. Moreover, many craftsmen are trying to create a corn seeder for a walk-behind tractor (or a grain seeder) with their own hands, which performs the task no worse than factory models.
Types of seeders according to the type of crops sown
Manufacturers of attachments have created many sowing units, which are universal and special. In addition, there are also combined ones, equipped with a loading hopper for seeds and a hopper for fertilizers.
Universal seeders work with both vegetables and grain crops; they can be adjusted to different seeding materials using a calibrator. Specialized sowing equipment may be intended for the following crops:
- cereals;
- herbs;
- bulbous (onion, garlic);
- vegetable;
- strawberries, etc.
Grain seeder
For sowing grain crops in small and medium-sized areas, grain seeders for dotted-type walk-behind tractors, as well as scattered models, are mainly used. They can be universal and special, mechanical, pneumatic and vacuum.
Homemade seeder for walk-behind tractor: manufacturing features
In order to obtain a truly practical device after completing all the necessary procedures, you must:
- Two running wheels;
- Seed box;
- Screws and nails;
- Steel sheets;
- Rubber plates;
- Seeding roller;
- Self-tapping screws, tenons, steel angles;
- Two bearings and bracket.
The process itself is simple, but requires maximum concentration, so you need to pay attention to the following features:
- The seed box can be created from boards (wood) (thickness no more than 15 mm);
- To close them from the bottom, you can use steel overhead bottoms (1 mm thick);
- The walls themselves are connected using self-tapping screws, iron corners and spikes;
- Using nails, wooden linings (15 mm thick) are mounted on the bottom of the box walls;
- The process of placing the seeding roller in the walls and linings is accompanied by the creation of cutouts (semicircle shape). The fastening brackets are carefully screwed to the linings using screws;
- Special rubber plates, which are placed in inclined bottoms, help seeds fall out of the cells;
- The wheels of the created grain seeder for a walk-behind tractor (or corn) have 60 mm hubs;
- Special holes are created in the hubs (the diameter is similar to the seeding roller);
- The opener can be made from a sheet of iron and then attached to the brackets;
- You can adjust the depth at which the seeds will be placed by re-fastening the opener in special holes;
- A bracket is attached to the back wall of the seed box, serving as a “connecting link” between the device and the walk-behind tractor.
If a person has really set himself the goal of creating an excellent “helper” with his own hands, then the described features, steps, drawings and videos posted on our website will help achieve the desired result!
An example of self-made lister hiller
As you can see, hillers are fairly simple designs. There is nothing complicated about making a hiller with your own hands for a walk-behind tractor.
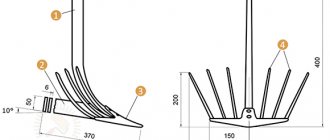
To create a traditional non-adjustable hiller, you need to cut out halves of the product using a template from metal 2 mm thick
These halves should be bent until the radii match, and then welded in 2-3 passes. Weld seams should be processed with a grinder and, if necessary, selectively welded and re-cleaned. The result should be a perfect, even layer of metal.
The wings of the instrument are also cut from metal 2 mm thick and connected according to the same principle
The result should be a design like this. For clarity, the thickness of the elements and all dimensions of the tool base are indicated.
DIY seeder for walk-behind tractor
Nowadays, seeders occupy a worthy place among the equipment used by farmers. Using seeders, row planting of grain crops is carried out: oats, rye, barley, wheat. Grain seeders are also used for sowing leguminous crops: peas, soybeans, beans, lupine, lentils and chickpeas. In addition, sowing equipment is used to plant crops similar to grain in size and seeding characteristics: sorghum, buckwheat and millet.
It will be appropriate to use a manual seeder in small areas. If the area is quite large, then a seeder for a walk-behind tractor (made with your own hands) is used. But any of them will help speed up the process of sowing seeds and increase uniformity in the placement of plants as they grow.
Grain seeders are divided into three groups, depending on the crops being sown: Combined seeders are equipped with special devices that add mineral fertilizers to the soil along with the seeds.
- Universal seeders are used for sowing almost any crop.
- Special seeders are needed to sow certain types of crops.
- Each grain seeder can be purchased, or you can make it yourself.
Let's consider several options for making a seeder for a walk-behind tractor with your own hands
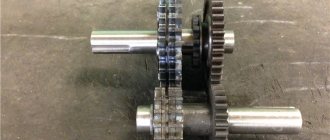
Vertical identical disks (3 pcs) are mounted on the axle at equal distances. Seed nests are drilled in the rim of any of them, in the amount of 12 pieces. When the seeder moves, the disk with seed nests falls into the hopper installed on top, where the seed grain is located. There the grain is captured and transferred to the furrows, which are mounted in front of the seeder discs. A horizontal drag bar is installed to the frame of the implement to plant seeds. The diameter of the rims and wheels and the distance between them is determined by the manufacturer.
A homemade seeder is placed on three wheels. The front wheel is taken from a baby stroller, the rear wheel is from a children's bicycle. The frame, bent in the shape of the letter P, is made of strip iron, 11.5 cm wide and 52.5 cm long. A seed hopper is installed on it, which is a box made of multi-layer plywood.
After which the bunker is tightened with bolts. A sowing unit is installed inside, on two plain bearings. It itself is a shaft made of birch and covered with varnish, the shape of which vaguely resembles a spool of thread.
When a home-made seeder moves across a plowed area, the sowing apparatus coil rotates thanks to a tensioned bicycle chain. The tape cell captures the seeds in the hopper and drops them into a specially attached funnel of the seed tube.
A more modern version of a homemade seeder for a walk-behind tractor
A homemade seeder for a walk-behind tractor consists of three main parts: two running wheels, a sowing roller, a seed box, two bearings, two brackets for attaching the coulter and handles with a bracket.
The seed box is made using wooden boards 15 mm thick. To close them from below, use two steel overhead bottoms, 1 mm thick. The transverse and longitudinal walls are connected with self-tapping screws, tenons and steel angles. At the bottom of the walls of the box, wooden plates, 15 mm thick, are installed on screws or nails.
To install the seeding roller, semicircular cutouts are made in the linings and walls. For the same purpose, fastening brackets are screwed to the linings with screws. In order for the seeds to be dropped from the cells, rubber plates are installed in the inclined bottoms.
The seeder wheels have a diameter of 200 mm and hubs of 60 mm. The hubs have holes that are the same as the diameter of the seeding roller. The coulter is attached to brackets and is made of 1.5 mm steel sheet. Several holes are made on the bracket. You can adjust the depth at which the seeds will be planted by re-attaching the opener in the holes. A bracket is attached to the back wall of the seed box, through which there is a connection to the walk-behind tractor.
vote
Article rating
Various models of hillers
The hiller is the second most important tool after the plow and winch. With its help, you can first cut furrows for planting, and subsequently fill them with planting material.
When moving the hiller along the row-spacings of evenly planted rows of potatoes, you can observe how the wings of the tool quite quickly pour soil into the holes with tubers
On sale you can find several variants of models of this instrument.
Option #1 – lister hiller
This is the simplest type of tool that has a fixed working width. The design consists of two fixed wings connected and slightly extended. Since the wings of the tool are stationary, it is impossible to adjust the working width by adjusting the hiller to the row spacing. Therefore, when working with such a tool, the row spacing is adjusted to the capabilities of the hiller, and not vice versa. Traditionally, manufacturers produce products with a working width of 25-30 cm, which is also far from the most convenient option, because the technology for growing potatoes provides for a row spacing of 50-60 cm.
Such tools are designed to work with motor cultivators whose power does not exceed 3.5 hp, and the total weight of the unit is 25-30 kg
A design feature of lister hillers is also the presence of thin racks that prevent the motor cultivator from being overloaded when the hiller is buried in layers of dense soil.
Some models of lister hillers have a streamlined shape, which is more preferable, since when working with such a tool, the soil is less turned out and dried out.
Option #2 – products with variable working width
Such tools are more convenient to use because they are equipped with an adjustment mechanism with which you can change the position of the wings. This allows you to adjust the tool to different row spacings.
Such hillers are designed to work with more powerful walk-behind tractors with an engine of 4.0 hp or more. or more, whose weight exceeds 30 kg
A significant disadvantage of such structures is their high energy consumption. The reason for this is that during operation, the wings of the tool push the soil to the side, part of which, after its passage, still crumbles back into the furrow. As a result, your back and arms get tired faster, and part of the engine power is wasted on useless work. But despite this, they are one of the most popular models among most gardeners.
Option #3 – disk models
Disc hillers are an order of magnitude more expensive than their traditional counterparts, but the efficiency of working with such tools is many times greater
The main advantages of disc hillers are:
- A successful combination of a walk-behind tractor with the tool itself. Using a disk hiller, when the speed of the motor cultivator decreases, its power increases. This not only increases the efficiency of cultivation, but also has a positive effect on the operation of the unit itself.
- Ease of use. To work with such a tool you need to put in a minimum of effort: it propels itself forward without requiring additional pushing from behind.
- Versatility of use. Using this tool, hilling can be done both after planting tubers and during the period of active growth of the above-ground part of the crop.
When choosing among the variety of assortments, it is advisable to give preference to models made of alloy steel, equipped with rolling bearings (rather than sliding bushings), with a large diameter and thickness of discs.
Option #4 – propeller-type hillers
The principle of operation of the tool is the operation of special propellers, under the influence of which the soil is first crushed and weeds are combed out, and only then the beds are hilled with loose soil
Such hillers are designed for equipping walk-behind tractors and cultivators that have two forward gears. This is necessary so that in second gear, with the power increased to 180 rpm, using the tool you can not only loosen, but also transfer the soil into the beds from between the rows.
Details and nuances
It is important to understand that the coulter installed on walk-behind tractors and motor-cultivators is not capable of performing the same work as similar devices on “large” tractors. It makes no sense to expect them to:
There are only two functions available: adjusting the depth and pace of tillage, as well as an additional support point for storage. That is why there may be different names for this part:
plowing depth regulator;
spur (in the lines of a number of European companies).
Coulters installed on certain models of walk-behind tractors (cultivators) can have only 2 adjustment positions. There are even those in which the depth of the sharp end is not adjustable. An example is the branded Caiman Eco Max 50S C2 coulter. But it is possible to change the speed of movement of the cultivator by manipulating the handles. Please note: on powerful cultivators and walk-behind tractors, the coulter must move freely to the right and left.
The correct organization of work when using a coulter is as follows:
waiting until the soil around the cutters is loosened;
repeat on the next section.
When it is planned to plow virgin soil, the depth of the cutters is usually made relatively small in order to evaluate the result. Only after processing a trial portion of the area can we say whether the depth needs to be changed or not. If the motor starts to accelerate when reducing the processing depth, you have to deepen the coulter a little more. On walk-behind tractors of the "Neva" type, the regulator is initially installed in the middle position. Then, focusing on the density of the earth and the ease of overcoming it, the final adjustment is made.
To learn what coulters for a walk-behind tractor are and how to install them correctly, see the video below.
How does a walk-behind seeder work?
The chain drive of the seeder, paired with the rear wheel provided in its design, is the most important working mechanism of the equipment. The seeder's pre-hopper is designed for simultaneous sowing on a plot with a width of two to five rows made. In larger seeders or prefabricated devices, a separate hopper is provided for each row. When sowing, small seeds, for example carrot seeds, should be mixed with fillers in the form of bran or boiled cereal. However, seeds should not be mixed with sand, as it will only damage the structure of the delicate seeds.
Each vegetable seeder is pre-equipped with a brush designed to loosen the planted seeds. During the rotation of the support-drive wheels, a brush is activated, which stirs up the seeds. Thanks to this, the seeds pour out more evenly into the hole provided in the rear part of the existing hopper of the seeder. The outlet hole in the hopper is closed with a special rotary disk, which can have different diameters. The size of the outlet hole can also be different - this allows you to sow seeds of different cultivated plants, as well as plant several seeds at a time.
The design of the seeder allows you to pre-set the depth and speed of sowing, as well as the number of seeds planted. Another big advantage is that the seeder can be used to work with any walk-behind tractor, regardless of its class.