Making enamel mini buckets
Dear craftswomen! I suggest you make these tiny enamel buckets. I did it according to Elena Nikitina’s MK. Here is MK - https:///post340829642/
We will need any cardboard, white and other colors of paint, wire, wooden beads, glue, a napkin with a small pattern, a compass and a simple pencil.
So let's get started. Using a compass, we draw a circle with a radius of 11 cm. Inside it, from the same point, we draw a second circle with a radius of 8 cm. It is not necessary to draw full circles - a semicircle is enough. Next, in the inner circle we draw a chord 7.5 cm long. From the center through the extreme points of the chord we draw two lines until they touch the outer circle. So as shown in the picture
The part circled with a red felt-tip pen will be our future bucket. We also cut out two arches, as shown in the picture.
We cut out our blanks.
To ensure that there are no kinks on the cardboard when folding the bucket, we roll it over our blank with a felt-tip pen. Our workpiece will curl up a little and when gluing it will be even.
We glue our workpiece.
Then we need to make the bottom. We take a piece of cardboard, thickly coat the bottom edge of our bucket with glue, and also apply glue to the cardboard in the place where we will glue the bucket. Press it down and let it dry thoroughly.
Then carefully cut along the contour.
Then we glue our arms against each other, having first made holes with an awl or a needle. Then we glue either twine or any knitting threads (not fleecy ones) to the top and bottom of the bucket. I glued two rows of threads, but you can do it in one row.
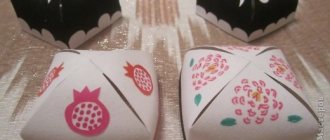
This is how it should work out for us.
Next, prime with white acrylic paint in 2-3 layers. Let it dry.
Then we paint with any other colors. We paint black paint along the edge of the bucket, as well as at the bottom and along the arms. We also use black paint to imitate chips. Use brown paint to imitate a little rust. Like this.
Then we cut out small motifs, such as flowers, and glue them onto our buckets.
And finally, pens. Take a piece of wire measuring 7.5 cm. My advice: take a regular colored paper clip instead of regular wire, bend it and straighten it. Insert a wooden bead (handle) and secure with glue.
Insert into the arms and bend the ends with pliers.
Our enamel mini buckets are ready! Use for decoration or “gift” to dolls.
Pictures from plastic caps
You need to wash and dry well, and degrease the plastic cover. Next, you should draw a sketch of the design on paper and place the lid on it with the outer side.
Along the line of the sketch, carefully filling it in, spread a thin layer of plasticine. Using a thin marker on the outside of the lid, you need to trace the contours of the picture, and then glue the side of the lid to the cardboard. You can make a hole in the top of the lid, insert a rope and hang the image. If you open it with varnish, it will not be afraid of water. The application is ready.
Applications
Working on a postcard develops fine motor skills in children. Making applications is not only interesting for them, but also useful. Working with a child means making him happy by playing together; children love to do something together with their parents.
The appliqué design made from colored paper is presented as follows:
- Prepare a sheet of cardboard, colored or white paper, pencils and a marker in advance.
- You can draw all the details on colored or white paper by hand, without using templates.
- Use a marker to trace the lines of the parts so that it is convenient for your child to cut them out.
- Carefully cut out all the details.
- Glue them onto a sheet of cardboard, assembling a snowman, arranging the Christmas trees, moon and snowflakes in the correct order.
Thus, applications can be made from paper and even felt. Often cotton pads are used.
Video master class
It is recommended to watch the video, which explains in detail how to make your own snowman applique.
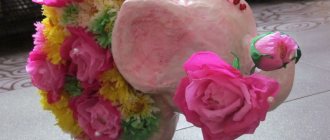
Easter baskets from mayonnaise bucket
For production you will need the following materials:
- Plastic bucket for mayonnaise.
- Solvent.
- Super glue or hot glue.
- A piece of white thick fabric.
- White lace fabric for decoration.
- Wooden clothespins of the same size.
- Scissors.
- Threads.
- Twine rope.
Such crafts for the garden from mayonnaise buckets on a bright holiday will be especially interesting for children if treats are hidden in them.
The bucket needs to be removed from the sales sticker and wiped with solvent. Divide the clothespins into two parts and glue the flat side to the bucket. They should fit snugly against each other. Sew a bag from thick white fabric to the inner size of the bucket. To do this, cut a circle slightly larger than the size of the bottom of the bucket, and a strip the size of its wall. We sewed the two together. Sew lace to the top of the bag. Wrap the handle of the bucket tightly with twine. And tie it around the bucket with clothespins and tie it with a bow.
Garden crafts made from mayonnaise buckets will be a wonderful and unique decoration. This inventive and creative activity will appeal to both children and adults. And now, before getting rid of the empty container, you need to think about whether it might turn into, for example, a border of mayonnaise buckets. You can make a lot of great garden decorations this way.
2How to build a bucket for a snowman costume - assembling the structure
- Roll up the previously cut trapezoidal bucket base. Glue the edges of the cut, making an overlap of one side to the other of about 1 cm.
- Next, take the cut out circle and slightly bend its edge - 0.5-0.7 cm. If the paper is difficult to deform, you can make small cuts.
- Apply glue to the folded edge on the outside.
- Install the bottom of the bucket.
When the design is ready, you can start decorating. You can decorate the bucket with paints or wrap it in corrugated paper, attach rain or sequins in a circle, wrap the bucket with ribbon or tie a bow - everything is “in the hands” of your imagination.
An interesting option comes from making a fabric bucket. The same pattern will work as when working with paper. But it will take a little more skill.
- Choose a dense material that can hold its shape. If there is none, an alternative could be several layers of thinner fabric, between which an adhesive interlining will be placed. This design will be both at the side wall of the bucket and at its base.
- Cut out the bottom (or assemble it if it consists of several layers).
- Sew the edges of the trapezoid, forming a central seam. Iron it.
- Without turning the resulting truncated cone inside out, insert and sew in the bottom.
- Turn the bucket inside out and decorate it.
Three easy ways to turn ordinary construction buckets into beautiful planters
Now, when the time for garden planting is approaching in the yard, having a large number of flowerpots and flower boxes is most important. And very usefully, ideas for creating them from any containers available in the house appear. For example, from old buckets or construction plastic containers left over after renovation.
We will now be happy to tell you three options for making them.
For it we will need:
- wide lace ribbon;
- alcohol and cotton wool, scissors;
- PVA glue, instant glue;
- acrylic varnish, colorless;
- long nail, pliers;
- paint bucket;
- brushes, foam sponge;
- acrylic paints – black, gold, white.
First, remove the handle, then make drainage holes in the bottom of the bucket using a hot nail and pliers.
Degrease the surface with alcohol.
Cut the lace to a length equal to the circumference of the bucket. Cover them with PVA glue and glue them exactly in the center.
From the remaining lace we cut out individual fragments in the form of leaves or flowers, which we place on both sides of the braid at the same distance from each other.
Paint everything with black paint. Leave to dry for some time.
Then the guipure elements are lightly painted over with white. Using a sponge moistened with golden color, we barely blot the entire surface. We fix the result with acrylic varnish. After drying, fill it with soil and plant the seedlings.
Volumetric paper snowmen
To decorate the Christmas tree, you can make a three-dimensional snowman out of paper. There are several options. For children, it is better to choose one that is simple in technique and does not take much time, so that they do not lose interest in the work.
How to make a three-dimensional paper snowman is presented with step-by-step instructions:
- Prepare sheets of white paper, compasses, scissors, pencil, glue, thread, felt-tip pens.
- On a piece of paper, draw two circles of different sizes, the small one is placed above the large one. Make this snowman silhouette in two copies.
- Make 16 parts of the lower circle (circles inscribed in the lower part of the body).
- Fold the rope in half and glue it to the top circle so that the ends extend beyond the bottom of the snowman. These will be his legs. Their ends can be decorated with beads.
- The top part is folded in half, the threads should come out of the loops beyond the top of the snowman. This is a DIY pendant.
- 8 circles need to be folded in half and glued to each other to form a hemisphere that is glued to one half of the silhouette. Do the same with the remaining circles.
- Using felt-tip pens, add eyes, nose, smile and cheeks to the snowman. Draw a paper bucket for the snowman, cut it out and stick it on his head. Also, draw and cut out a scarf for your neck from paper (you can take a piece of fabric or knit a scarf from yarn), you can design it individually - perhaps yours will turn out more beautiful.
A beautiful decoration for the Christmas tree is ready. You can make several copies in different colors.
Video master class
If you have any questions about making three-dimensional crafts, we recommend watching the video master class.
To watch online, click on the video ⤵
Old CARDBOARD is a treasure! YOU WON'T GUESS WHAT I MADE. Crafts. Paper trash can for dolls. Read more
DIY Origami Trash Can. Origami Box Paper Trash BinRead More
Cardboard trash can.More details
Postcards with surprises
It’s very easy to make unusual cards with surprises from plastic caps.
Make a base for a postcard from thick, strong cardboard. To do this, fold the cardboard into a book. The card itself should be wider than the plastic cover. For a round lid, you need to cut off the edge that covers the bucket, keeping only the flat strip. This strip is needed to attach the lid to the card. In the front part of the cardboard blank, cut a round hole 2 millimeters larger than the diameter of the lid. On the back of the card, mark a place that will be visible through the cover. Glue the cover itself to the hole in the front of the card.
Cut a piece of corrugated cardboard into thin strips. Make their width less than the height of the mayonnaise lid. On the back wall of the postcard, in the place marked in advance, lay out a random labyrinth from strips of corrugated cardboard and glue it. When the glue is completely dry, put any round thing in the maze and glue both halves of the postcard together.
Such products from plastic lids can be made with various fillings. You can pour colored chips inside the lid, which will look like sand. You can glue a photo or drawing to the back wall, make an applique or paint it with paints.
Container for solid waste made from plastic bottles
PET containers will serve as lightweight and free material for a garbage container. The advantage of this method is the arbitrary choice of size and shape.
To make an outdoor trash can from plastic containers, you will need:
- Pliers or pliers.
- Nail or drill.
- Knife.
- Metal rods 6-10 mm, wire 2-4 mm.
- Identical plastic bottles.
Stickers are removed from bottles, and containers are washed if necessary. A hole the size of a neck is cut in the bottom, and the lid is pierced or drilled to the diameter of a thin wire.
The frame is assembled from metal rods so that the structure retains its shape and is durable. To do this, three rings are bent, the ends of which are twisted with pliers or connected by resistance welding. The diameter of the circles is selected according to the required volume of the urn. For the vertical part of the frame, four pieces of rods are cut with a margin of 20-25 cm. The rings are wound at equal distances with thin wire using twists with pliers.
The bottles are assembled by threading a thin wire through the holes in the ends. The neck of the bottom bottle should fit into the cutout of the previous assembly element. The length of the sides of the bottles is selected according to the required volume.
Bundles of bottles are attached to a frame of rods of rings with wire. Twisting is performed with tension. Sections can be additionally secured with hot glue. By alternating the colors of the bottles you can give the urn an attractive look.
The bottom is made by weaving with wire or strips cut from PET containers to form a mesh base. If you do not plan to insert waste collection bags, the bottom is braided tightly.
If you need a solid base, you will need to cut a circle from polycarbonate, sheet metal or plywood with hydrophobic impregnation. To secure the bottom, holes are drilled around the perimeter into which wire is threaded to be screwed to the bottom end of the trash can.
The resulting container is suitable for collecting household waste. Do not throw cigarette butts or objects that could ignite into a plastic bin. To protect from rain, the garbage disposal should be placed under a canopy or roof canopy.
How to make an unusual cardboard trash can with a lid opening mechanism
Good day to all, dear friends! In today's article I would like to show you a very interesting idea about homemade crafts. Namely, in this article we will look at how to make a trash can with an opening mechanism when pressed. Children may like this homemade product as it will be executed in a cartoonish and unusual style. The homemade product will consist of as simple parts as possible. When making this homemade product, no difficulties should arise, as the design will be very simple and primitive, and therefore anyone who liked this idea, even a child, can repeat it. This trash can can be placed in your workplace, for example in a garage or workshop, and it can also be placed in a child’s room. Well, okay, enough of the long prefaces, let's go! And so, for this homemade product we will need: From the tools we will also need:
Trash can - origami
To create a container for paper waste, you need to get a double sheet of newspaper and follow these instructions:
- We fold two sheets of newspaper together, from the fold we bend the corners towards the center as if we want to make an airplane.
- We bend the lower edge of the upper newspaper towards the formed triangle, after which we bend it towards the middle.
- We unfold the newspaper and bend the protruding edges towards the center on one side and on the other.
- We bend the bottom edge of the newspaper in half, after which we return it to its original position and tuck it inside.
- We bend the upper corner, forming an envelope, and then unbend it.
- Press the upper right corner to the center and straighten it. We fold the bend line to form the bottom of the future bucket.
Finally, it is worth smoothing out the curves of the structure and forming a bucket. It will turn out to be small, but it will be quite suitable for temporary storage of unnecessary papers.