If you decide to decorate your space, but don’t know how to make a picture with your own hands, where to go and what to grab, this article was created just for you.
First, you need to decide in which room and on which wall you want to see this decorative element. Enter the room, look around, note for yourself what colors, shades and textures predominate? Is the light warm or cold, how does it fall? What is the mood of this room, how do you feel it?
Already at this moment, some individual ideas, images or color palettes will begin to pop up in your head. At this stage, you can close your eyes and try to imagine a sketch of what you want to see, in as much detail as possible.
The first and most important step has been taken, inspiration has already crept up, all that remains is to call it even closer, and for this you can use various Internet resources, magazines, as well as the works of other authors. Perhaps it is at the moment of looking through the pages or looking at the pictures that the same idea will come to mind.
What to do with the chosen idea?
Suppose the finished picture in the brightest colors has already been drawn in your imagination, but what to do next? And then you should soberly assess your capabilities and abilities, are they enough to accomplish your plans?
If the answer is “Yes,” then you can safely move on to the next point, and if not, then you should think a little and either simplify the idea you came up with, or strive through the thorns to the stars to that very ideal. In any case, everything will definitely work out.
When you are absolutely sure that you can make that very picture with your own hands, you should think about the materials. What should it be made of, what texture?
Think carefully, do not let go of the image from your fantasy and try to touch it and understand what it feels like. Smooth, rough, embossed, soft...
When you have a clear idea of the materials, you can safely purchase everything you need.
Procedure for creating an application
Regardless of the materials used, the process consists of the following steps:
- select a sketch;
- determine the size and shape of the application;
- selecting materials for work;
- we cut out the details;
- select the background, if this is not determined in advance;
- add details to the background;
- attach the details;
- If necessary, dry it.
How to sew or glue an applique
Possible options:
- hand stitches;
- machine stitch: select the desired type of stitch (most often it is a zigzag), pitch, stitch height and sew the stitch on a machine;
- use of stigis fabric: this is a special fabric for appliqué with a hot-melt adhesive layer. Stygis fabric does not require glue, threads or needles. Therefore, when children perform appliqué, there is simply no alternative for Stygis - it is convenient and safe. Especially if collective application is performed by children, because in this case the explanation of the process is greatly simplified. For stigis fabric, a general presentation for the lesson with step-by-step photos can be prepared. An example of a completed application - see photo;
- gluing on film: you will need cling film and two pieces of foil. On the ironing board we assemble a sandwich - foil (its dimensions should be several cm larger than the glued motif), the basis for applique faces. side up, cling film (we cut it along the contour of the motif with a margin of 5 mm), applique (this part of the sandwich can be pinned together with a pin to secure it), foil. Iron on low heat and leave until cool. This method is great for cotton fabrics. The finished item can be washed by hand without twisting.
Execution options
The execution option directly depends on the materials you choose, because there are a great many ways to create paintings with your own hands.
The picture can be drawn in oils, pastels, pencils, watercolors, gouache or even children's markers. The painted pictures will easily fit into any interior, the main thing is to choose the right color scheme.
Pictures are created from beads and satin ribbons, sewing all this to canvas or any other fabric.
Glass, old disks and eggshells make very beautiful objects for playing with light, which reflects from the “mosaic” particles and casts beautiful reflections on other walls of the room.
You can create paintings with your children from beans, peas and even pasta. Then it will not only be a decorative element, but also an opportunity to develop fine motor skills.
Fabric paintings can be called a separate art form, rich in its textures and execution options.
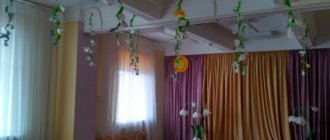
Dried plants, flowers and leaves make beautiful wall bouquets that will delight the eye at any time of the year.
- Bathroom tiles. What is it like?
- Angorka. What it is?
- Flowers as gifts.
From salt dough, clay, plaster or modeling paste, you can make a real fresco or panel; these will be wonderful three-dimensional paintings with your own hands, which in the future can be painted with paints.
The picture can be felted from special wool. Felted paintings are now in great demand due to the fact that their execution is quite simple, and the result is spectacular.
Knitted or hand-embroidered paintings will add a feeling of incredible comfort and warmth. Moreover, the process of creating them will help calm your nerves very well.
And this list can be continued indefinitely, as long as there is enough imagination, time and clean walls in the house.
Recommendations from experts
When assembling paintings or scenes that will participate in exhibitions, you can avoid noticeable seams on the workpieces. To do this, experienced craftsmen often use a hot glue gun; thanks to such a practical tool, they can create neat and attractive crafts.
But when working with children, you need to follow safety precautions; it is better not to let your child touch the metal parts of the device.
Among the most suitable fabrics it is worth highlighting:
- Felt.
- Cotton.
- Wool.
- Leather.
When performing manipulations, it will not be superfluous to pay attention to the advice of experts, because people with experience can share useful skills and real-life cases that will help to avoid mistakes.
If the craft contains many small components, before major fixation they should first be distributed on the base and pinned with pins, evaluate the appearance or make adjustments.
To make the seams less noticeable, you can purchase the thinnest needles and buy cotton threads, then the masterpiece will be worthy of prizes at the exhibition. The allowance is very important; if you forget to leave it, then some problems will arise with fastening.
What if you have no drawing ability?
Still, this seems more like an excuse used by those who are afraid to experiment and try something new, so think again about whether your hands are really placed so out of place.
- Dream Island - a place for a family holiday
- Gas burners for heating metal: where to buy on the most favorable terms?
- Gazelle. Why is she so popular?
But if you are still convinced that you have absolutely no creative abilities, don’t give up, there are wonderful options for you too, we will look at them in more detail.
Blot
One way to create an abstract painting is to step back from the work as much as possible and let the paint do everything for you. For example, pour a large blot and then tilt the canvas so that the paint flows picturesquely down it. You can make such a picture together with your child; you don’t even need a brush for this.
Photo: CelineZiangArt / etsy.com
Abstractionism
This style of painting will be very simple and advantageous. To create an abstract painting you will need: canvas, paints and brushes. The most important thing is that the colors of the chosen paints combine well with each other.
Next, we give freedom to imagination, pick up paint on a brush and randomly apply it to the canvas in spots, stripes or any fancy patterns. We do this with all the colors, filling the voids and mixing the colors in front of us.
The beauty of this style is that your goal is not to draw something real. You can draw what you like without looking at anything, and if you have any doubts about the beauty of what you draw, remember Malevich’s square and they will disappear.
Basic auxiliary materials
In order to make a handmade decorative painting, you need to prepare a frame, stretcher and material, paints, glue with which the image will be created.
There are many ways to create an artistic and unusual work from simple objects. Several proven creative techniques are offered, but the world of human imagination may turn out to be much wider than these examples.
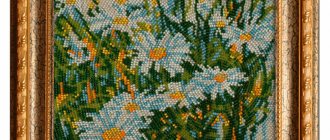
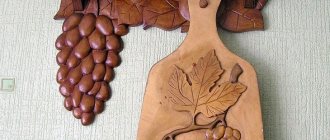
Herbarium painting
Not only will such a homemade painting of flowers be absolutely environmentally friendly, it will also add an atmosphere of light antiquity and autumn comfort.
To create it you will need scissors, a base, glue, various dried leaves, flowers, branches, acorns and pine cones, as well as aged paper, sheet music, scraps from newspapers or books.
We glue notes or scraps of books onto a cardboard base, and glue flowers and leaves on top, leaving small gaps so that the paper can be seen. The paper can be pre-aged in coffee or black tea.
Patchwork applique
Such a simple fabric applique can decorate an interior pillow with a completely minimal investment of time and money. For appliqué, you can use the scraps left over from sewing.
We prepare:
- cardboard of a suitable size;
- scraps of fabric;
- threads, needles, scissors.
Description
We prepare patterns, deciding on the sizes. We cut out all the details with seam allowances from the scraps.
We bend the allowances and iron them. We try on the blanks for the pillowcase, placing them inside out. We baste for fixation or pin with pins.
Sew using the selected seam. For tulip details, it is better to use a blind stitch.
Below we offer several more templates for applications. Floral patterns are one of the most versatile and diverse.
DIY picture frame
Every self-respecting painting should have a frame. This will make this element of decor completely complete, add even more of the desired mood and become a good bright accent. For example, you can buy ready-made picture frames here.
Making a picture frame with your own hands is quite easy; for this you can use wood, fabric, plastic, foam plastic, plaster, cardboard. The frame can be made from the same materials as the picture, or from contrasting ones, in any case, the result will surprise you.
About stabilized moss
Moss can be found in every corner of the Earth. In total there are about 10,000 species of this plant. However, not every variety is suitable for stabilization. During production, only certain breeds are used, which in their characteristics best correspond to the tasks assigned to them.
Stabilization is a kind of conservation of natural moss. In simple terms, a living plant is soaked in a certain solution in order to stop its development and adapt it for decoration.
To produce a stabilized product, various types of moss are used:
- moss is the most accessible in our latitudes;
- sphagnum;
- oak – resembles algae;
- with stems and leaves;
- dicranum – in the form of panicles;
- forest;
- fern.
To compose compositions, reindeer moss, which has an attractive bright green color, is often used. In addition, it is easier to obtain in our geographical latitudes. It has proven itself remarkably well as a finishing material for framed outdoor and interior sculptures and panels.
The material is available for sale as follows:
- layers;
- hummock;
- balls.
People learned to stabilize moss already in the 40s of the twentieth century. One of the first patents for its production was issued in the USA in 1949. Early technologies were based on the use of salt solutions and coloring with various color pigments. Stabilized material was used as a complement to flower buds, which were the main characters of most compositions. Nowadays, designers are increasingly giving preference to panels and paintings made of moss.
Some moss stabilization technologies are being replaced by others. One of the latest trends is glycerinization. According to it, the plant is placed in a special solution of glycerin and water with the addition of dye. During the soaking process, glycerin penetrates into its structure. This is the most effective way to preserve it. Thanks to it, the durability of moss and its ability to withstand various mechanical influences is significantly increased compared to solanization.
Photos of paintings with your own hands
From felt and on felt
It’s not often that we see paintings and panels made of felt. In general, in recent years it has become a curiosity, as have products made from it. We perceive hats and some other small things normally, but felt paintings are definitely rare. So, when describing paintings made from unusual materials, let’s start with felt. To begin with, you can make a landscape, flowers. They are easier to implement. With experience you can make more and more interesting panels.
These unusual paintings can be made from wool using the felting technique
Special wool is used for felting. When creating paintings, it is laid out in layers on a base (non-woven fabric), forming the desired pattern. When creating paintings from wool, the process takes place in several stages. First, the background and relief are laid out, then smaller and smaller details.
Making the background
To begin with, take those shades of wool that create the background. We lay them out on non-woven fabric, trying not to leave any voids. It is advisable to make two thin layers. We transfer the resulting background onto a foam rubber backing (5 cm thick or more). Then we take a special needle (for felting). Holding it vertically, we often pierce the laid wool. This way we ensure that it connects to the base. If you look at the back of the non-woven fabric, the threads that have come out should be visible.
Let's start by creating the background
Then the workpiece is laid on polyethylene (it is larger in size than the picture itself), the wool is moistened with a soap solution (one tablespoon of grated baby soap per 1 liter of hot water) and the felting process itself begins. To begin with, knead the wet wool with your hands (press down, gradually increasing the pressure). Wet wool threads adhere to each other with pile, forming a single surface - this is the process of wet felting. The result is felt. Only for paintings we do not need to achieve high density. We stop when the base is dense enough. We blot off excess moisture with a terry towel.
Adding finer details
Adding details
Now you need to add details of the picture to the background: trees, flowers, stones, etc. With dry hands (wool sticks to wet hands) we lay out tree trunks, bushes, and stones. We go over the new parts well with a needle, wet them, and knead them with our hands. Then they use harsher means - a wooden rolling pin. We carefully pass the wet picture back and forth with a wooden rolling pin.
The last step is to lay out the small components from the wool.
Last we lay out voluminous small details: flowers, clouds, stones, thin branches, stems, leaves... To make them voluminous, we use up to eight layers of wool, we make petals from balls, stems from twisted strands. The procedure is the same: laid it out, folded it (poked with a needle), wet it, felted it, removed any remaining liquid. If the part is not voluminous enough, you can repeat the process.
Photos of works: paintings made of wool (felt)
Vase with sunflowers made of wool - paintings from unusual materials. Landscapes are also very good using the felting technique. These are the options: Volumetric tulips. More complex technique, many details and multi-directional threads Like living things
Felted wool paintings for the interior As your skill grows, you can take on such projects A piece of summer on the wall