Greetings, dear defenders and their ladies. Spring is on the doorstep, and I really want fresh flowers at home. But bouquets... What is the joy of bouquets of flowers that already wither after one or two days?
Florists are constantly trying to extend the life of their pets: solutions, capsules, long-lasting varieties. And the crown of their work is a floral arrangement of fresh flowers in boxes and baskets. Today I will tell you how to make compositions from fresh flowers, how to combine colors and other interesting points.
Materials for creating a bouquet
For many, a bouquet is a collection of flowers. If these are cut buds to be kept in a vase with water, then yes. Otherwise, flowers or their imitation can be made from anything.
Most often, when thinking about how to make a craft autumn bouquet, they remember fallen leaves of different shades. She is incredibly beautiful, capable of realistically imitating any flowers.
Additionally, you can add any dried flowers, small fruits, grass, or tree branches to the bouquet. The result may have a limited shelf life or be used forever.
Why are they more durable?
Let's imagine that we are buying a bouquet, or receiving it as a gift. What are we doing? We take it and put it in water, often from the tap. And we wait for the flowers to wither. What should we have done?
- Trim the ends of the flowers;
- Take filtered or boiled water, at room temperature;
- Pour a little table salt into the water. Plants receive minerals from the ground, and without roots - from water, depriving them of salts, we shorten their lifespan;
- Pour a spoonful of vinegar. The acid does not harm plants, but kills bacteria that shorten the life of plants.
- Instead of salt and vinegar, there may be a special powder with more professional ingredients for nourishing and disinfecting water. It is sold in florist shops;
- It is important to change the water daily. Place the bouquet out of direct sunlight, away from drafts and sudden temperature changes.
Just 5 points (if without a floral preservative) and your bouquet will last 7-10 days. But who follows all these recommendations? Yes, only a few. And in the basket, the florist takes all this into account, adding the necessary ingredients to the solution, which he soaks the sponge with. Convenient, the same bouquet, but without any care for it. True, they also charge additional payment for additional work. But you can do it yourself!
Types of crafts “autumn bouquet”
Looking through photos of autumn bouquet crafts, it becomes clear that there are different variations of products on this theme. This is not necessarily a classic selection for a vase. A bouquet in autumn style can be made in the form
- Panel,
- Applications.
The craft is not necessarily created from natural materials. You can make an autumn composition from colored paper or plastic. The main thing in the product: the ability to convey the atmosphere of the season.
Photo frame as a gift
To make such a craft, you need to cover the entire frame around the edges with a special sponge containing moisture, which helps preserve the freshness of the flowers. Next, flowers selected by color and size are stuck into it. Unfortunately, such a frame is short-lived, but if you wish, you can make a craft from dried flowers. In the same way, you can frame a picture made of autumn flowers and leaves.
Related article: Making a book sofa with your own hands
Various versions
You can come up with any ideas for crafting an autumn bouquet. If you don’t have the time or desire to think for a long time, you can use ready-made examples.
You can collect both simple collections and intricate compositions.
Combinations of vegetables and fruits
Next, we will look at several unusual options for how to collect and decorate an autumn bouquet with your own hands. Ripe fruits and vegetables look no less presentable than exquisite flowering branches or skillfully dried crops. This combination pleases with its freshness for a long time and can surprise the most sophisticated nature with its variety of colors.
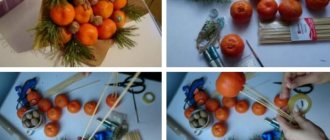
For example, you can combine orange tangerines and scarlet rowan clusters in beautiful paper, supplementing them with sprigs of luxurious fragrant mimosa or gypsophila. Citrus fruits are attached to skewers, which are attached to the other elements with tape or special floral tape.
It is interesting to play with the combination of white apples with viburnum, coniferous branches and bright buds: blackbirds, asters, dahlias.
A basket filled with red apples, scarlet flowers or small berries surrounded by bright green foliage looks festive.
Any idea can be realized to order. Corn, lemons, plums, peaches, pears, nectarines, fruit branches, decorative sunflowers and rowan berries can easily coexist in floral paper. Florists went even further. Silver or golden colored apples with red leaves and berries look fabulous. Decorating with cones, spikelets, chestnuts and even straw would be appropriate, and the composition, instead of the usual vase or basket, can be placed in a trimmed pumpkin or zucchini.
An autumn-themed bouquet of vegetables will appeal to a lady who is often busy in the kitchen. The simplest, most contrasting option is bitter red pepper pods, snow-white heads of garlic and fresh parsley collected together.
A set of small vegetables evokes genuine joy - thin carrots, a head of cabbage, beets and plum-sized onions, wrapped in colorful leaves of autumn trees and shrubs.
If you want a modern present, use craft paper. Wrap bell peppers of several shades, yellow zucchini, red and white onions, and garlic in it. And fill the gaps with small bunches of rowan or physalis.
A delicate, light emerald-lilac set is obtained by a combination of succulents and young cabbage.
Consider options with a pumpkin instead of a vase. Red chrysanthemums and creamy-orange roses look especially authentic in it. When you don’t have the imagination to create a masterpiece yourself, but you want to please your friends with a similar craft, you can use the help of the online store “Tsvetochnyray.rf”. In our catalog you will find a variety of compositions for any occasion.
Elementary ideas
The simplest compositions can be made from what is lying under your feet. These are foliage, branches, cones and other natural material.
It's free and doesn't require much effort to create beauty. Most often, the spectacular appearance of the material is given by nature. All that remains is to assemble the composition in the desired form.
Paper flower with pointed petals
1. We repeat all the same steps until the petal formation stage.
2. At the stage of petal formation, we do not round the edge, but make it sharp.
3. We make sharp edges on both sides.
4. Now open the flower and see what happens.
This is what a miracle turns out to be like in the end!
The simplest bouquet
To create the simplest version of a bouquet in the “autumn” style, you will need to collect fallen leaves. You can make a composition in a specific color or make a varied selection.
- The leaves must have long petioles.
- This will provide the bouquet with the desired height.
- Maple leaves are best suited.
- You can diversify the composition with sprigs of rosehip, rowan, and viburnum.
- The presence of not only foliage, but also berries is acceptable.
- Additionally, you can add dried flowers to the bouquet.
- All contents are folded in the required order; you can fix the condition by tying the legs with thread.
Why do we need baskets of flowers?
What was the original idea? I think it's in another dropped birthday vase. Imagine, you can place a bouquet directly on your holiday table that is safe from falling, does not need to be watered and will delight you for more than a week. Isn't that great?
The compositions were originally prepared for weddings and celebrations; they serve as beautiful and unusual decor, decorating even winter holidays. They do not fall, the flowers do not get confused and do not change the design of the bouquet.
But housewives also saw how convenient it is to do without a vase, and at the same time the flowers last longer. Boxes began to appear in mass flower markets, and men happily bought them for their ladies.
Roses from leaves
If a simple bouquet seems banal, then you can twist imitation roses from foliage. You don't need step-by-step instructions to understand the process. The task is extremely simple.
- A beautiful leaf is rolled into a tube, and other specimens are collected around it in a similar manner.
- As the volume increases, the product becomes like a beautiful rose.
- Upon completion of the flower set, the lower part is fixed, preventing the constituent elements from scattering.
- In this way, the required number of false roses is created.
- You can insert a twig into each flower to imitate a stem.
- The composition can be supplemented with any other components if desired.
Ideas for compositions made of corrugated paper and candies
Corrugated paper inflorescences look realistic and presentable. For any holiday, you can come up with an interesting ensemble with sweets, which will become not only a pleasant, but also a tasty surprise. In addition to the paper base, craftsmen often use real yellow tree leaves in which to wrap sweet gifts. If you don’t have any sweets on hand, no problem, make flowers from leaves and cellulose.
To make the set as festive as possible, include elements of dried flowers, real cedar or pine cones. Place all this in a beautiful wicker basket. Combine a variety of colors: deep red, bright yellow, green, orange, brown and others.
Autumn flowers from pine cones
To create an autumn bouquet, you can use pine and other cones. Each specimen is painted in bright shades of the chosen season.
- The elements are individually placed on twigs or large skewers.
- This bouquet will be stored for a long time.
- You can additionally add foliage and other components to the composition.
- This bouquet will be an excellent regular decoration.
Spectacular cannas for a school bouquet
Large perennial cannas are not so often found in summer cottages. And on school lines these flowers are quite a curiosity. Therefore, if you want something original and festive, Cannes is your option. Just don’t make such a bouquet for a junior high school student, because... It will be difficult for him to hold the thick stems of the plant in his hands for several hours. Cut cannas when the flowers are half open. Flowers will last in water for up to 8 days.
ok.ru
Large canna leaves and flowers will look luxurious without any additions. Or you can use, for example, only leaves or several flowers on thick stems. Cannes will be a wonderful gift for a physical education teacher, labor teacher or male director.
Such a bouquet does not need any special design and does not require decorations. But you can supplement the composition with dry or fresh twigs.
Foliage Topiary
To create a stylish tree, it is not necessary to study a master class on creating crafts of this type. Everything is elementary simple.
- The leaves form a lush spherical bouquet.
- It is better to take maple foliage.
- The resulting workpiece is attached to the barrel.
- This detail can be a specially selected stick.
- They make both straight and intricately curved variations.
- You can additionally add some dried flowers, berries, and reeds to the composition.
From pumpkin seeds
Do not rush to throw away the seeds from a sunny vegetable. If you wash and dry them, you will have something to do in the fall. Even a baby can handle these flowers. There are two options here.
On paper
- Cut out a circle from thick cardboard.
- Using hot glue, attach each seed in a circle in several rows.
- We cover the middle with a piece of cotton wool, paint it or add small grains to the glue: millet, rice. You can use sugar.
- We paint the petals.
- Place on wooden sticks.
On plasticine
Option for the little ones. The flowers look like daisies or lotus.
- Roll into a ball. You choose the diameter yourself.
- Insert seeds in rows. You can arrange it any way you like. It depends on this whether it will be a bud or an open flower.
- We attach it to the base.
- We form a bouquet.
Beautiful bouquet in a pumpkin vase
You will get a spectacular bouquet if you use a pumpkin as a vase for collecting leaves and other autumn beauties.
- The top part of the vegetable is cut off, the pulp inside must be removed.
- The resulting container is dried. After such preparation, the product is ready for use.
- There is no need to pour water inside. The vase is suitable for dry bouquets.
- The composition placed here will remind you of autumn even more.
- A vase can be made from pine cones.
- To do this, the natural material is glued together, giving the product the shape of a vase.
- By analogy, you can do with chestnuts or acorns.
- A beautiful vase can be assembled from branches.
"Edible" vase
Fruit and vegetable compositions are quite massive, so that they last longer and look complete in appearance, you can put them in a homemade vase. Pumpkin or large zucchini will do. You need to choose a beautiful, dense and suitable-sized fruit.
Next we follow the instructions:
- Cut off the top, like on a watermelon.
- We clean the inside of seeds and pulp.
- Remove excess liquid and dry.
- We place a floral sponge inside; you can also use a regular kitchen sponge. Any container suitable in diameter will also work: a glass or tin jar, a glass, the base cut off from a plastic bottle.
- Pour water there and place the composition. We check that the legs reach the water.
The second option without water is suitable for the bouquets described above. In this case, cut off the top of the pumpkin, where the tail is, and turn this place down. Check the stability of the stand and cut until the pumpkin is level. We take skewers with vegetables and fruits and stick them into the peel. The pumpkin pulp is dense, this will help to hold even large specimens. For beauty, the pumpkin can be decorated with ribbons, lace, and foil. From natural remedies: rowan and rosehip berries, acorns, pine cones, straw.
Bouquet on paper
A good option for crafts with an autumn mood would be an applique or panel.
- For work, use colored paper, the same leaves, or a combination of materials.
- Elements that match the style can be assembled in a chaotic manner.
- The materials are also used to make vases and classic bouquets.
- The parts are glued, sewn or secured in any other suitable way to the base.
- The base can be either a piece of paper or cardboard, or fabric or a board.
- The resulting picture can be supplemented with beads and sparkles.
- It wouldn’t hurt to frame the product beautifully.
Crafts in the form of autumn bouquets are easy to make. They can be a good gift for any holiday or decorate a room. Both an adult and a child can make an interesting bouquet.
Original compositions - flowers in a hat box: master classes on creating chic masterpieces
A beautiful arrangement of roses in a hat box can be given as a gift for a wedding, birthday, or as a gift for any occasion.
There is no need to run to the store and buy expensive compositions. You can show your imagination, buy all the necessary materials and create your own unique bouquet of fresh flowers.
Bouquet in a hat box: “Snow-white scattering of flowers”
An interesting composition option that can decorate the interior of a bedroom or living room. The presented design option is classic, it will be appropriate in any interior.
The snow-white beauty of flowers can be compared to a beautiful bride's outfit.
To make the composition you need to prepare:
- A small gift box, maybe a hat box. If you don’t have any, you can take an ordinary shoe box and decorate it with gift paper.
- Cellophane, floral foam, sharp scissors.
- Water, knife.
- Natural flowers.
The presented composition uses eucalyptus, phlox, St. John's wort, and daffodils. The composition will be elegantly complemented by 2 types of roses, decorative greenery and phlox.
Step-by-step instructions for performing the composition “Snow-white scattering of flowers”
The creation of the composition begins with soaking the floral foam. It must be completely saturated with water, otherwise the plants will die.
The foam should be left in a container with water for several minutes so that it becomes saturated with moisture and sinks to the bottom.
The size of the floral foam is determined by the size of the bottom of the box.
To make the bouquet beautiful and voluminous, when placing the foam in the box, you need to make sure that it protrudes a few millimeters above it.
The excess edges will still have to be cut off, otherwise the bouquet will lose its symmetry.
This is interesting: How to make a bouquet step by step? Bouquets of flowers, sweets, fruits + 100 PHOTOS
To prevent the hat box from becoming saturated with moisture and falling apart, the bottom and walls must be wrapped in cellophane.
The next step will be preparing the greens. The stems of all flowers should have the same length; during the process of assembling the bouquet, the length of the stems will be adjusted, since the middle buds in the composition are the tallest, and then the length of the stems of each plant decreases slightly. Cuts must be made with scissors. During preparation, it is recommended to remove all excess petals, as well as dried and damaged ones, so as not to create chaos in the composition.
In the photo, the flowers are arranged by type, the stems are cut to the same length.
The first step in creating an arrangement is to evenly place the greenery on the floral sponge.
To keep living plants fresh longer, the stems should be immersed at least 5 cm in the sponge.
First the greens, then the flowers.
Sequence of color placement:
- roses;
- lilac;
- phlox;
- daffodils;
- St. John's wort.
Lilac adds splendor to the bouquet, and proper placement will allow you to get a beautiful composition.
If, when purchasing flowers for a bouquet, florists offer a soft cuff, you should not refuse, because an ornamental plant will add lightness and romance to the composition.
After completing the design work, you need to twist the box again and see if there is any free space between the colors. If there is one, it needs to be filled with the remaining buds or greenery, because a visible sponge will spoil the whole look.
Bouquet in a hat box: “Spring mood”
The creation of such a beautiful composition was inspired by spring: the bright sun, warm rays, blue clouds, swelling buds on the trees. A box of flowers will be an excellent gift, because even after the flowers fade, it can be used for perfume.
The ideal solution for a spring gift: fragrant roses in a hat box with greenery, gypsophila and live grass for decoration.
To make the composition you need to prepare:
- A hat box, gift box or shoe box measuring 15x15 cm.
- You can include several types of flowers in the composition: roses, peonies, gypsophila. A miniature hydrangea will look beautiful. In combination with roses, you need decorative greenery, complemented by white carnations. If it is difficult to figure out which flowers are in harmony with each other, you can consult a florist, he will help you choose a flower arrangement.
- Tape, water, pieces of paper, sharp knife.
The flower shop sells small paper pots, so they will help protect the cardboard box from moisture.
Step-by-step instructions for performing the composition “Spring Mood”
You should not look for the same stencil to form foam that would fit in the pot. Instead of a stencil, you can use the pot itself. After cutting the foam, it is recommended to cut off the excess part so that it fits well on the bottom of the pot.
Preparation of materials and tools for making a composition.
After the foam pieces are cut, they are moistened with water, under the tap, without dipping. The foam should absorb the maximum amount of water, so you need to hold it under the stream for several minutes or lower the foam into a container of water.
To understand that the foam is well wetted, you need to look where it is: if it does not float on the surface, but sank to the bottom of the container, it means that it is completely saturated with water and has become heavy.
You should not try to squeeze the foam so that it absorbs water faster - such an experiment can lead to disastrous results. As a result, the foam will not be completely saturated, dry areas will remain that cannot provide the flowers with moisture, and they will die.
The next step is to prepare the plants themselves. When pruning stems, you need to make sure that they are all the same length. At the same time as trimming the stems, you need to remove faded flowers and dry leaves. If you leave them, the appearance of the bouquet will be ruined.
Prepared flowers for composition.
Trimming flower stems to maintain stem length.
We continue to work
The bottom of the cardboard pots will need to be covered with small pieces of paper. It will absorb excess moisture and will not wet the gift wrapping.
There should be moistened floral foam in each paper pot.
Cutting the foam into a stencil, placing paper pieces at the bottom of the pot and placing the moistened foam in cardboard boxes.
Before placing the pots in a hat box, the bottom should be covered with paper from glossy magazines. If there are none, you can use a newspaper. This preparation will protect the box from getting wet.
Now it's time to start working on the flowers. They need to be beautifully placed in floral foam. You can choose the accommodation option according to your taste. The photo shows 2 options:
- arrangement of flowers in a chaotic order;
- creating a composition of straight lines and symmetrical rows.
Let's consider options for creating compositions.
The chaotic composition is closer to the heart, since its appearance resembles the bouquet we are familiar with.
Arranging in parallel rows makes the bouquet more formal. This arrangement is considered fashionable and looks beautiful.
When composing a bouquet, you need to make sure that there is no gap between the flowers. Excess space will make the composition look sloppy. Floral foam will be visible in the gap, which will spoil the entire bouquet with its appearance.
A box of flowers can be tied with a ribbon, and it is recommended to use a flower bud and a green twig as decoration.
A photo of the finished composition with fresh flowers is an ideal gift for your beloved woman, sister or mother.
Floral gift with sweets in a hat box
Many people think that giving flowers in a box is very banal. There is an exit. Seekers of the unusual can be offered to make a floral gift with macaroons - delicious cookies.
Why is it recommended to use macarons to decorate a flower arrangement? The fact is that this delicacy is not only a very tasty and popular product, but also various food dyes are used in its production, which allows you to match the livers by color to any floral gift. A box with flowers and macaroons made in the same color scheme looks beautiful. This gift will definitely not be banal.
This is a gift you can give to a girl on a first date. The presented composition will symbolize the beginning of the candy-bouquet period.
VIDEO: Master class on making a box of flowers with macarons
DIY Flowers in a box with pasta
DIY Flowers in a box with pasta by Master Class Marina DIY Guloyan France Paris
To avoid the classics, it is recommended to use only flowers that bloom in season to create a composition. This way you can avoid buying store-bought flowers that have been cut for a long time. Seasonal flowers will help maintain freshness longer and will delight the recipient for more than a week, or even 2-3, and will not fade in one day.
Photos of crafts autumn bouquet
Useful tips
In order for the display of delicate plants to go perfectly, it is important to take care of two things: what bouquets and compositions to make, and what to name the flower craft.
An attractive and interesting name should be created depending on the style of the exhibition, and undoubtedly evoke positive emotions. If the vernissage is dedicated to maternal love, the words describing the crafts should be filled with love and tenderness.
An exhibition in honor of love and union should carry a romantic style, imbued with passionate feelings, flirtation and passionate notes.
The display of flowers, signaling the arrival of spring, recalls the revival of feelings and hope, renewal and the expectation of happiness.
Paintings from plants
Having mastered the petal appliqué technique, you can move on to making paintings. This painstaking work will require time and a lot of carefully collected and dried plants. But what a great result awaits you!
Painting with flowers is called "mistake". It turns out that this is a fairly popular direction of creativity.
Wreaths for a celebration or for interior decoration
Making a wreath of flowers with your own hands is easy, the main thing is to have a little patience and be careful. In addition to flowers, you will need, for example, a wreath made of grapevine, dry of course, wire for fastening, scissors or wire cutters.
This wreath is created from both artificial and natural flowers. Modern artificial flowers are no longer distinguishable from natural ones. Only up close, after a good look, will an attentive eye determine that they are not real. The bouquet creation scheme is the same for both types. Let's say we create a wreath of peonies. The number of pieces to create is 30-40.
Let's take the base. Trim the stems of the peonies, leaving 7-8 centimeters. Let's start attaching the flowers to the base: first we place and attach 4 flowers symmetrically in a circle. We fasten the next 4 between them approximately in the middle of the segment, but at a different angle to the center. We fasten the next 4 in the remaining gaps. Each four according to your idea may differ in shade or even color. Finally, attach the wreath a short distance from you, for example, on a door, to see the symmetry and possible imperfections. Having straightened the flowers, add some green twigs of the same length between the buds. Greenery will enliven the wreath and make it complete.
Floral wedding table decoration
The proper decoration of the wedding table of the bride and groom, as well as the decoration of the wedding guests’ table, requires special attention. Of course, this design is also quite accessible for your own assembly. Everything your hand touches will be filled with care and love - all guests will feel it.
The decoration of the table also applies to the chairs on which the newlyweds and their guests sit. Flowers, previously collected in bouquets, are attached to the upper part of the back of the chairs. To decorate the table, make an elegant garland and, as an option, attach it to the table itself, or above the table so as not to block guests from each other.
How to make a garland:
- take a lot of flowers
- trim the stems
- take a base: fern leaves or laurel branches
- attach the flowers to the base using floral fishing line or tape; if you only have a stapler, then it will also play its role in fastening the elements
Choose a selection of flowers in soft, subtle shades, such as lilies or calla lilies. And also, preferably, odorless. This is in case one of the guests may have an allergic reaction to it.
How to dry flowers?
For example, dry a rose. The moment of drying begins from the moment when the flower still looks presentable. That is, the bud is intact, and it holds itself up with the petals facing up. At this stage we hang the flower with the bud down, perpendicular to the floor, this is important. If there are leaves on the stem, they will also dry beautifully. If you put a flower down, it will dry with one side flattened.
Let's list what you need:
- frame
- flower (or flowers), sticks, leaves, pieces of fabric, other elements
- glue
Before you start gluing the elements, it is recommended to create a panel next to it on the table. It also wouldn’t hurt to draw a model of the future masterpiece. It will serve as a guide during the gluing process. If you're not afraid to improvise as you go, then go ahead! And let inspiration guide your mind and hands!
After gluing all the layers and elements, let the picture rest a little and let some elements stick. And then attach the piece of art to the wall or surface for which it was created.