Often the handles on women's handbags become worn and lose their beautiful appearance. When the item remains beautiful, but the handles do not look like the rest of the product, you should think about repairs. After all, it’s a pity to throw away a good thing, but with a small defect, especially if it was only recently purchased. You can make high-quality and quick repairs to your product at home; it will be several times cheaper and faster than taking it to a specialist. To do this, you need to stock up on a little patience, time and imagination. Let's look at the most relevant and effective options for replacing and repairing bag handles.
How to update bag handles with your own hands in a step-by-step master class
This option is the most popular, because it can be used to reconstruct handles of any model, regardless of the shape and style of the bag itself.
If the handles of your bag are cracked and peeling from the frost, or they were chewed by a dog, or something else happened to them that thoroughly ruined the appearance of the item, this option is for you. To work you will need:
- two suede ribbons of suitable length and color matching the color of the bag.
- tools that will help you detach the handles of the bag.
- Glue. It is best to use a transparent quick-drying glue, for example, Moment “Crystal” or “Gel”.
- Scissors, a large stationery clip, a utility knife and an awl - if the handles have holes for the tongue.
It’s also worth taking care of your workspace - covering it with newspapers to make it easier to tidy it up later, because small crumbs and remnants of the top layer of pens are quite difficult to sweep away.
The separated handles must be cleaned of remnants of the original material, otherwise the new material may not stick tightly, or come off along with remnants of leather or leatherette. One end of the handle can be fixed with a large office clip on the edge of the table - this will be much more convenient. You need to paste the handles with new material from one end, overlapping the tape slightly, by about a third, covering the previous turn. Thus, wrap the handles along the entire length, and as they dry completely, attach the handles back.
This method allows you to paste over not only soft fabric materials, but also more rigid and dense materials, for example, a thin strap, as shown in the photo.
If the handle mounts are designed in such a way that you cannot remove them - or you doubt that you can put them back properly, it is better not to experiment. In this situation, you can get by with silk cord or soutache. The latter is used in the creation of costume jewelry, and in handicraft stores there is a fairly wide range of shades, so it will be easier to choose the right one. If you cover the handles of a bag with cord, then this is not done overlapping, but on the contrary, the turns should go end to end. The lower parts of the fastenings themselves are also covered with cord; it is quite plastic, and it is not difficult to give it the desired shape.
Bends and creases.
If the material of the bag is quite hard, but leaves much to be desired in terms of quality, creases may form on the handles in the most visible places - near the handle fastenings and on the fastenings themselves, on pocket flaps, and other places that are subject to wear and tear more than others. In this case, a rather creative option can help out - beading. Of course, this solution cannot be applied to every bag, but there is a chance to revive your favorite item in this way. The color of the beads can be contrasting, or it can be tone-on-tone or to match the decorative stitching, which often differs from the main color of the bag.
Replacement.
Sometimes, when you look at an object, you understand that the patient is more dead than alive. And it’s easier to completely replace the handles than to try to somehow update them. The easiest way to do this is if the handles of the bag are attached to the rings. Then there are several options for replacing handles.
The first, and simplest, is to replace textile or leatherette, or even leather handles with more wear-resistant chains. To prevent them from looking like a foreign object, you can pass a piece of fabric between the links to match the bag - if the style of the item allows it. Technically, this is not difficult to do - the chain links are unbent with pliers and threaded into the fastening ring.
The second option is to use thin women's waist belts. Their edges need to be stitched so that they can be threaded into the ring, and equipped with rivets of the appropriate type and size - for greater compliance.
The third option is to modify the bag with new handles.
What you need for work
To repair a failed accessory, you will need to prepare the following things:
- a skein of durable thread, dyed to match the color of the fabric;
- a piece of leather, the length of which should exceed the size of the handles by 15 centimeters, and the width - 2 times;
- 4 metal rings, the diameter of which varies from 2 to 3 centimeters;
- a piece of tarpaulin;
- special tape for working with leather products.
Note! The number of additional materials and tools may vary depending on the chosen restoration method.
A few more simple ways
- Slightly scratched handles can be refinished with a can of black paint; just spray it evenly at a distance of 30 cm. Let it dry - and voila! To consolidate the effect, it is best to process it twice, after letting the paint dry the first time.
- Glycerin is ideal for old, dull skin, making it new and attractive. It is enough to lubricate the cotton wool with glycerin and wipe the worn areas.
- Barely noticeable scratches can be masked using a regular stationery marker, matching it to the tone of the material. Perfectly camouflages black.
- Scratches on a white bag are masked point by point using a clerical touch. For durability, the procedure is performed twice and dried for several minutes.
So, there are at least several good ways, the main thing here is to choose the one that is most suitable. Using the tips given above, you can easily save thousands of rubles and keep your favorite item in order.
Replace with chain
If the handles of the bag are very cracked, it is better to completely replace them using chains. And then you will receive a new accessory design. You can select chain links that match the color, size and shape in special departments of accessories for clothing and shoe repair.
To replace, you will need pliers to bend the lower links of the chain and thread them into the rings where the old handles were attached. Next, secure the links again with pliers. Additionally, you can weave a leather or fabric strap into the chain to match the bag. It looks original.
Latest posts How to sew a medical mask yourself Don’t rush to part with your old jacket, it will still serve you Old towels no longer take up space: tips on where you can put them
Cover with a new piece of skin
A popular way to update cracked handles on a bag is to replace the necessary parts with new pieces of leather or leatherette. At your request, the same color is selected or a different shade is taken to match the color of the accessory.
Leather material can be taken from an old jacket or purchased at the store the required piece. Cut out rectangular pieces from it, glue pieces of cotton fabric to them on the wrong side and let them dry. Next, you need to wrap the straps with them, sew or glue the edges.
In these simple ways you can give your favorite bag a new, original and neat look.
Homemade knapsack
With such a handbag you can go outdoors or go to the store. It is very roomy; when needed, you can unfasten the buttons on both sides, increasing the size of the bag.
To sew a fabric bag, take 2 contrasting materials. In this case, gray and white were used. In addition, you will need:
- edging tape;
- matching threads;
- scissors.
Let's start cutting out. Cut 2 large blanks from dark fabric. You can make a fabric bag with a rounded bottom or make it rectangular. In addition to the two canvases, cut out from the main fabric:
Simple repair of your favorite bag
If the handles of the accessory are intact, and the corners are fairly worn, then use leatherette patches. You can cut out not just patches from the material, but entire appliqués, for example, circles or rings. To hide a flaw on a bag, you don't even need a sewing machine.
To extend the life of your favorite bag, use the following materials and tools:
- Leatherette.
- Glue.
- Scissors.
- Needle and thread to match the material.
Use the prepared materials as follows:
- Cut out a stencil from paper. The size of the circle should cover the worn area of the product.
- Prepare 4 parts from the material for the lower corners (circles) and 4 for the upper corners (semicircles). Add 0.5 cm to the hem.
- Make cuts around the entire circumference of the pieces to neatly fold the edges of the patches.
- Fold the edges and sew.
- Glue the patches to the corners of the accessory.
An easy way to update your handbag
This option is perfect for items that have small cracks or abrasions.
For work you will need the following materials:
- Napkins for decoupage.
- Glue for decoupage.
- Varnish.
- Thick soft brush.
The process of updating an accessory is quite simple. Proceed as follows:
- Clean the surface of the bag from dust and dirt. You can use wet wipes for this purpose.
- Cut out the decorative elements necessary to hide defects in the accessory from decoupage napkins.
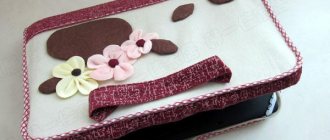
Important! Roses or other plants will look beautiful. The cut out elements will perform two functions: to decorate the product and hide existing scuffs and cracks.
- Carefully glue the cut out parts onto the surface of the bag using special decoupage glue and a soft brush.
- Leave the accessory for 5 hours so that all decorative elements are completely dry and fixed.
- Apply varnish over the entire surface of the updated accessory. Use a special polish designed for leather or other materials, depending on what the handbag is made of.
- Leave the accessory for 8 hours until the varnish is completely dry.
- Repeat the varnishing procedure.
- Decorate the other side of the bag in the same way.
If none of the methods worked for you, maybe it’s not a breakdown at all, but you just want to update your wardrobe? Then you will definitely find our reviews useful, which you can read right now:
- How to choose a bag for every day?
- The best brands of women's bags.
Additional tips and tricks
During the restoration process, consider the following nuances:
- Leather parts should be thoroughly rinsed with water and then dried thoroughly. This way you will get rid of dirt and dust that will interfere with work or corrode the material during further use;
- worn leather handles can be treated with glycerin. He will return them to their former shine and freshness;
- For the restoration of white and red leather, it is allowed to use special paint. Such repairs will be cosmetic in nature, but with their help it is easy to disguise minor defects in the material.
Often the handles on women's handbags become worn and lose their beautiful appearance. When the item remains beautiful, but the handles do not look like the rest of the product, you should think about repairs. After all, it’s a pity to throw away a good thing, but with a small defect, especially if it was only recently purchased. You can make high-quality and quick repairs to your product at home; it will be several times cheaper and faster than taking it to a specialist. To do this, you need to stock up on a little patience, time and imagination. Let's look at the most relevant and effective options for replacing and repairing bag handles.
Methods for restoring your leather and leatherette handbags
Let's learn how to restore your bag with your own hands, without spending a lot of money and without much difficulty. You can apply this simple method using the following devices:
- moisturizing wipes and decoupage wipes;
- glue;
- decoupage varnish;
- thick soft brush.
This option is perfect for your luggage, which has minor cracks or abrasions.
Therefore, it is necessary to carry out simple steps to update a leatherette bag with your own hands:
- clean the surface of your item with wet wipes;
- You can restore an excellent look with the help of varnish if the bag is cleaned of any dirt;
- take napkins to decorate your luggage, cut out the decorative elements to the required size in order to hide visible abrasions;
- carefully glue it with a special glue for decoupage, applying it to a separate side using a brush, and then distribute it over the entire surface and compress selected places;
- let things sit for 6 hours so that all parts are thoroughly glued and fixed without residue;
- After the specified time has passed, apply a varnish intended for the restoration of leather or other materials to the surface of your luggage. The product dries for at least 8 hours, after which the treatment process must be repeated. Next, you need to process the other side of your leatherette bag in a similar way.
Attention! Beautiful flowers look great on leatherette items. We must not forget that the elements should not only decorate the product, refreshing it, but also hide the presence of cracks and abrasions.
How to fix the handles of a bag with your own hands?
If a part of the bag has worn out over time, you can replace it using available materials. For repair use:
- Waist belts.
- Neckerchief.
- Pieces of fabric or leather.
- Chain.
- Wooden or plastic beads.
- Braid or satin ribbon.
We suggest you use the following ideas for repairing handles.
Idea No. 1. Pen case
You can sew a case from genuine leather so that the accessory lasts as long as possible.
Step-by-step instruction:
- Buy a piece of thin leather (matching the color of the handles or a contrasting shade).
- Open and cut out the blanks. The width of the workpiece should be 2 times larger than desired, plus seam allowances. The length of the cover can be chosen arbitrarily, for example, only for a worn (worn out) area.
- Glue the blanks with thick cotton cloth. Use regular all-purpose glue for this operation.
- Glue the ends of the blanks and turn them inside out.
- Fold the pieces in half and machine stitch them. Use a special leather needle.
- Turn the covers right side out.
- Put covers on your handles.
- Use an awl to make holes on the sides of the handle and sew on the covers.
- Wear your favorite accessory for many years to come.
Idea No. 2. Wrapping the handles with braid, satin ribbon or strips of leather
Handles can be finished to match gloves, shoes or other accessories. The idea itself lies in the ancient method of wrapping parts with satin ribbon (braid) or pieces of leather.
To work, you will need a ribbon of a suitable color or lace.
Step-by-step instruction:
- Determine the center of the handle and the length of the restoration.
- Wrap the tape tightly around the handle. To prevent it from moving along the handle, secure it with a few stitches.
- Fasten the thread and cut it.
- Wrap the tape tightly around the top of the handle, hiding the seam. Leave a distance between turns of approximately 3 mm. Make sure that the tape not only fits against the handle, but also does not twist as a result of strong tightening.
- When finished, secure the tape on the inside of the handle with a needle and thick thread.
Idea No. 3. Waist belts
If the handles are thoroughly worn, replace them with waist straps, measuring and cutting them to size. The good idea is that you can adjust the length of the new handles.
If the accessory has one long handle, then use one belt, sewing it with a thick needle and strong thread.
Idea No. 4. Leather handles and chains
For work you will need the following materials:
- Pieces of leather.
- Large chain.
- Scissors.
- Thick needle and strong thread.
- 4 or 2 rings (depending on the number of handles).
Step-by-step instruction:
- Cut the skin into strips of equal width.
- Sew the strips together by hand or by machine.
- Lubricate the strips from the inside with glue.
- Fold the strips in half.
- Wait for the glue to dry and start designing.
- Wrap the strips around one side and then the other side of the chain.
- In the same way, make a second handle from leather and chain.
- Thread the two loose ends of the leather band through the ring.
- Fold and sew the ends of the ribbon.
- Take a wide leather strip and thread it through the ring until it is in the center of the strip.
- Sew a wide strip with a ring to the bag.
Idea No. 5. Silk scarf for pen repair
An interesting designer item can be made from a silk scarf instead of a pen. Here are just a few recommendations on how to repair bag handles with your own hands using this method:
- You can wrap old parts with a scarf, thus hiding scuffs and flaws.
- If the handles are too worn, open them and attach 2 scarves in their place. Tie a corner on an old pen ring. Do the same with the opposite corner, securing it to the ring on the other side. Create the second part in the same way.
- If the handles are not very worn, then wrap them with a scarf in turns at a short distance from each other so that the material of the bag can be seen between them.
And on our portal you will find many interesting ideas for adding practical accessories to your wardrobe. Click on the link and follow the master classes to:
- Sew a fabric bag with your own hands.
- Decorate the bag in an original way.
Idea No. 6. Beads instead of a pen
If you have old wooden or plastic beads that have the same round fragments, then use them to change the appearance of the accessory.
Proceed as follows:
- Take a strip of fabric that matches the color.
- Wrap the fabric around the beads.
- Trim excess fabric, leaving seam allowances.
- Sew the 2 edges of the fabric together.
- Thread the beads inside the finished roll.
- Separate each bead from the next, marking the spaces between them with threads.
- Sew new handles to the bag.
We looked at several ideas on how to repair the handles of a bag, and now we’ll tell you how to update the accessory without spending a lot of time and money.
Bags and purses made from old jeans
Well, of course, a reticule, a simple pattern will help with this. You can create a new item from trouser tops. After spreading them out, cut out a rectangle with sides 28 and 42 cm. Then set aside 7 cm from the larger side down, and 2 cm on the left and right. Cut out a semicircular “tongue”. Fold the larger side 2 times to create a small denim handbag. One and the second canvas have dimensions of 28 x 17.5 cm. Close the clutch by fastening it with a button with an eyelet.
You can sew one long handle to the bag, and cut it not from the trouser leg, but from the back with pockets. The result is a comfortable and original thing.
But such a bag can be made from jeans, very worn from time to time, or from several trousers. Strips are cut out of whole pieces and intertwined with each other. If the ribbons are small, connect them when weaving on the reverse side by stitching.
For such a bag made of jeans, created using checkerboard weaving, the fabric is folded in half and sewn on the sides. Then you need to sew on the handles, and another fashion accessory is ready.
Denim bags can be made not only from trousers, but also from a vest or shirt. In the latter case, the sleeves of this item must be cut off.
Cut the vest to the desired length, sew the front and back together at the bottom, as well as the armholes together. You will make such an original long handle for the bag from a piece of wire. Beads are strung on it, and metal rings are fixed at the ends, which are secured to the bag in the holes. They can be framed with wide rings in a metal repair shop.
If you do this part of the work yourself, then sew on the handles using two strips of strong braid or leather. They are pushed through the rings of the handles and then sewn to the bag.
Check out some other ideas for inspiration, maybe you'll want to make the same denim bags right away.
DIY bag handles: some options
Bags for women and girls are a very important attribute for every day. Without them, not a single representative of the fair sex even leaves the house. Quite often, this accessory may have problems that relate to the strength of the product. In this article we will look at handles for a bag; they are easy to create with your own hands.
Wicker and more
Handles, which are produced by weaving, have a very beautiful appearance. Let's look at this option first. As a rule, DIY bag handles of this type are made from a material identical to the accessory itself. In addition, in this case you can choose the length that is optimal for you. When you determine your suitable option, add a third part in order to weave and attach.
Some people use store-bought products of this type. These are not really handles, but, for example, a leash for a dog. It often has a rather attractive appearance. And, most importantly, it fits perfectly into pens.
You can also purchase various chains in such stores. They also use additional laces to decorate your handbag as handles. In addition, you can purchase a variety of fabrics from which it is easy to make the part that interests us. Very often, bags treated with interesting materials are even confused with well-known brand accessories.
A little about the renovation
As you know, every bag has a weak point, and it is the handle. After all, it is this detail that, before the product itself, loses its original appearance over time. Also, the handles come off and break. The repair process is quite difficult, because you can’t glue them with glue. In this article we will tell you in more detail about how to repair bag handles with your own hands. What materials should be used?
To make handles for a bag with your own hands, you can use a rope or, as a last resort, a piece of hose. In this case, you will be able to get the necessary detail and quality at the same time. You just need to sew this piece into the bag. In order to make this process easier, you need to take the length of the material slightly shorter than in the previous case. We recommend using special rivets when attaching the hose to pierce the skin or fabric.
If the model of your bag is suitable, then you can make a pattern-type handle. This type of it is suitable for you only if you do not use the accessory under heavy loads.
Strengthening
How to make handles for a bag with your own hands? The process is quite difficult, but interesting. Absolutely any type of handle must be strengthened inside. The reinforcement must be significantly denser than the fabric from which the part itself is made. You also need to consider both the size of your palm and the width of the product. This is necessary in order not to make a mistake with the size.
Beads on your pen will look great as decoration. In this case, you can purchase this decoration or take one that is available. The material of these beads can be completely different, it does not matter. It is worth noting that this type of handle should not be used as a long option, as the bag will slide off the shoulder. It is better to use beads with short handles that are carried in the hands.
The details made from buttons also look interesting. It is quite easy to find such fasteners at home, so choosing the material will not be difficult.
A denser option
If your bag will play a huge role in the household, that is, it is needed to carry heavy things, the material for the handle should be of the highest level. As a rule, its length in this case depends solely on your height and the weight that will be carried.
Do-it-yourself bag handles are best made from very high-quality and durable material. That is, certain cords, as well as belts, are perfect. You need to know that ropes are also used as handles, but they must be specially prepared in a certain solution, and then washed in a washing machine.
LiveInternetLiveInternet
–Categories
- video (85)
- apartment design (47)
- furniture design (8)
- painting (178)
- animals (479)
- cats-cats humor (168)
- cats (129)
- life (2844)
- getting ready for the holiday (330)
- for children and about children (143)
- for yourself beloved (520)
- house (292)
- spiritual (86)
- life abroad (46)
- health (754)
- interior/design (53)
- life stories (60)
- wisdom (63)
- man and woman (94)
- a little fashion (154)
- unknown (43)
- useful tips for the home (127)
- politics (145)
- weight loss (210)
- work on the Internet (3)
- work and career (1)
- do it yourself (1)
- family (4)
- tourism and recreation (8)
- cozy home (2)
- man and law (7)
- etiquette (8)
- humor (36)
- miscellaneous art (222)
- movies/actors (4)
- photo/art (124)
- history (136)
- riddles and secrets (11)
- people and destinies (31)
- computer (31)
- Internet/online learning (4)
- online TV/cinema, etc. (1)
- cosmetology (209)
- perfumery/about perfumery (8)
- makeup secrets (11)
- cooking (3729)
- cereal/grain/porridge dishes (76)
- vegetable dishes (348)
- dishes made from cottage cheese/eggs/milk (113)
- vegetarian and vegan cuisine (26)
- main courses (245)
- baked goods (910)
- mushrooms (143)
- desserts (952)
- winter preparations (22)
- snacks (326)
- healthy eating (338)
- cookbooks/magazines (38)
- culinary tricks (118)
- world cuisines (153)
- seafood (113)
- meat (400)
- drinks (141)
- lean cuisine (67)
- seasonings and spices (29)
- bird (278)
- fish (249)
- salads (608)
- pickles/marinades (21)
- sauces (25)
- offal, cooking recipes (20)
- soups (106)
- dough recipes (132)
- economical/weekend cooking (5)
- erotic cuisine/romantic recipes (3)
- landscape design (482)
- literature (119)
- poetry (108)
- prose (5)
- magic (173)
- magic of gems (21)
- medical genetics (0)
- mysticism (21)
- music (113)
- science (26)
- alternative medicine (177)
- non-traditional business (3)
- holidays (348)
- March 8 (8)
- May 9 Victory Day (2)
- baptism (6)
- Maslenitsa (6)
- new year (143)
- Easter (132)
- Christmas (27)
- nature (110)
- psychology (157)
- meditation (4)
- repair (7)
- handicrafts (6545)
- papermaking (59)
- felting (12)
- bead embroidery (42)
- satin stitch embroidery (120)
- carpet embroidery (11)
- cross stitch (831)
- ribbon embroidery (128)
- embroidery/other techniques (211)
- knitting (2421)
- crochet (2319)
- decor (89)
- decoupage (18)
- curtain design (14)
- books/magazines on needlework (199)
- carpet weaving (9)
- Modeling (12)
- patchwork (190)
- soap making/bombs (3)
- rework/recycling (102)
- weaving (118)
- thread (14)
- painting, stained glass, drawing, (42)
- weaving (9)
- sewing (305)
- Garden (1099)
- vegetable garden (230)
- vegetable garden on the windowsill (4)
- useful tips for gardeners (239)
- diary tutorial (191)
- animation pictures for inserts (95)
- photoshop (18)
- phytodesign (493)
- floristry (18)
- floriculture (515)
- ecology (3)
Useful tips
Caring for leather accessories will help restore the attractiveness of your handbag. Experts advise:
- Before repairs, clean the surface from dirt using a soap solution with ammonia.
- If there is a greasy stain on the product, chalk poured onto it and left overnight will help. In the morning, just empty the bag.
- Suede parts are cleaned using a special brush.
- For shiny skin, use glycerin.
- Lacquered bags are wiped with a dry soft cloth.
- Worn fittings can be replaced to update the accessory.
- Sew a new lining to replace the old one.
- Minor external defects can be eliminated with the help of beads or other decorative elements that harmoniously match the tone of the bag.
Repairing your bag yourself is easy if you use these recommendations. An updated accessory after restoration will last longer and will allow you to save money to buy other things.
https://youtube.com/watch?v=k_lX0XMk-x4
Restoration of the kitchen table is carried out using self-adhesive film, decorative tiles, artistic painting technologies, single-color tinting,…
Most natural minerals have a shapeless appearance. Processing natural stone will produce a beautiful structure that emphasizes…
A properly formed arch of the foot is the key to the full development of a child, the prevention of diseases of the musculoskeletal system (deformation of the feet,…
A bag is a convenient and beautiful accessory that makes a person’s daily activities easier. A properly selected bag will allow you to carry a lot of useful things with you, while emphasizing the sense of style of its owner. Bags, like any other thing, are subject to wear and tear. Handles suffer especially badly due to constant contact with the owner’s hands. Let's figure out how to quickly repair bag handles at home and what you will need for this.
Stage one: product preparation
Before you start doing anything with the product, it must be cleaned of dirt. It is best to wipe leather and leatherette with soapy water with the addition of ammonia, then blot the moisture several times with a dry rag. Grease stains are removed with crushed chalk, leaving it on for several hours, and then removed completely. The suede is cleaned with a brush dipped in a solution of soap and water, and then dried. After cleaning, the leatherette is lubricated with glycerin to update the appearance of the product and make it more attractive. After this, you can proceed to the next stage.
Read also: Itchy tip of tongue
How to repair bag handles with your own hands
To quickly and efficiently repair handles we will need:
- Metal rings 2.5 - 3 cm (4 pieces).
- Scotch tape for medium thickness leather.
- Leather fabric (15 cm longer than the handles themselves, and twice as wide as the handles).
- A small piece of tarpaulin.
- Durable threads for leather in the color of the fabric.
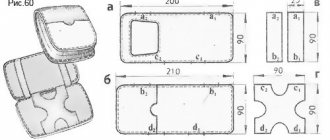
The algorithm of actions is as follows:
Leather fabric must be cut into two identical strips. We fold them joint to joint widthwise. And glue it with tape. You need to glue it firmly so that the part does not come apart. We trim the edges with medium fabric scissors and sew the product at a distance of 3-4 cm from the front side. We bend the rounded ends inward and glue them with tape. We thread rings into the resulting product from four sides, and then bend the ends inside out. Use a pen to mark where the edges end. Glue tape to the mark (it should be in the center, but not along the seam). We place the tarpaulin fabric on the tape and press it tightly to the skin. Make sure that the sticky layer does not come out of the fabric. Glue a small piece of glue to the second side of the material. We bend the leather product in the middle and glue it together. Start gluing the skin from the middle, pressing the product well on both sides
It is important that the fabric is evenly glued over the entire surface and that there is no air inside. Using a sewing machine, we make a securing stitch, so that it is at least one and a half centimeters along the tip inserted inside. From above we make another line according to the one already made
At the other end of the part we perform similar actions. Do not forget to make sure that the needle fits neatly into the punctures of the previous seam.
Now all that remains is to attach the hand-made handles to the bag, and the new version of the product is ready. If everything is done carefully, then the new pens will be indistinguishable from the factory ones. In the case when we are talking about a model made of fabric or jeans, new parts should be made from the appropriate material.
How to eliminate creases, straighten and smooth
A bag is an element of a modern female image. Therefore, it is so important that not only clothes, but also every accessory of a woman looks neat and beautiful. If the item has been lying for a long time, creases may appear on it. They look very untidy, so it is better to put the accessory in proper shape before going out in public with it.
natural
- You can straighten a leather bag or handbag made of leatherette using steam
. To do this, the steam generator or iron with the corresponding function must be set to a minimum temperature. And then, hanging the bag on a hanger, apply steam at a distance of 10-15 cm. If moisture appears on the material, remove it immediately with a soft cloth. - Vaseline or oil
will also help remove creases and also return the original shine to the leather bag. But under no circumstances rub the product in. Just apply a good layer and leave until completely absorbed. And then wipe with a dry soft cloth. - Glycerin and warm water
will help refresh and revive expensive bags made of thin leather and light-colored leather. Make a solution and put it in a spray bottle, and then spread it over the surface of the bag. Place a weight inside the bag and leave it on the hanger for a day so that the item dangles and the creases straighten out. - If you don’t have a steam generator, you can try giving your bag a steam bath
right in the bathroom. To do this, fill it with boiling water and hang the accessory with something heavy inside over the water. Avoid direct contact with water. After half an hour, remove the bag and dry thoroughly with a soft cloth so that no moisture remains in it. - If the skin on your bag swells after rain, do not dry the product with a hairdryer under any circumstances. Remove all moisture with a soft cloth and let dry naturally. Then apply a special leather wax or cream in the color of the bag/colorless.
This way you can repair a leatherette bag or a genuine leather bag yourself without resorting to the help of a paid technician.
| Passo Avanti bag | Passo Avanti bag | Passo Avanti bag | David Jones bag |
How to update a leather bag at home with your own hands
How to update a leather bag is a question that interests many women, because such accessories made of genuine leather are always expensive. In the photo, how to update a bag with your own hands, this process goes through several stages:
1. Cleaning the surface of the material. Before doing anything with an old product, you should thoroughly clean its surface from various contaminants. The skin should be wiped with soapy water in which a small amount of ammonia is diluted. Then traces of moisture must be removed by wiping the bag with a towel. If there are greasy stains on your handbag, try removing them in the following way: sprinkle crushed chalk on the dirty areas, leave it overnight, and remove any remaining chalk in the morning. It is better to clean a suede bag using a special brush designed for caring for such material.
2. Treatment with glycerin. An effective way to renew the leather on a bag is to treat the surface with glycerin. You can buy it at the pharmacy; you should soak a swab in this product and thoroughly wipe the entire surface. Your old but favorite product will immediately take on a new look, become shiny and attractive. If your bag is made of genuine patent leather, you do not need to treat it with glycerin, just wipe it with a dry, clean cloth.
3. Replace the fittings. The fact that a bag is already old is often indicated not by the leather, but by worn-out fittings. You can get rid of it yourself and replace it with new elements.
4. Get rid of the old lining. A worn lining makes the bag uncomfortable to use, because often many things fall into holes and it is not so easy to get them out. Making a new lining yourself is not difficult, but if difficulties arise, you can take the product to a sewing workshop.
5. Conceal defects. To hide minor defects that appear on your favorite product, you can use many decorative elements. However, not all women like flowers, beads, rhinestones and other decorations; in this case, it is better to use liquid skin to disguise defects
When choosing such products, pay attention to the matching shades so that the treated areas do not stand out on the bag
Sometimes the skin peels off only on the handles, but the entire product remains attractive. In this case, you should find out how to update the handles of your bag so that the accessory can be used for several more seasons. The easiest way is to wrap them with braid, matching it to the color of the product.
Knowing how to update a leather bag at home, there is no need to spend money and time buying a new accessory.
How to restore leatherette
If the material itself is damaged, it can be restored in several different ways. And here it all depends on the degree of damage:
- Minor scratches and cracks. They don’t even need special repairs, but just need to be masked with special aerosols or paints. Even shoe polishes will work if the color of the substitute is comparable;
- Large cuts are repaired with a special compound called “liquid skin.” However, it will not help if the gap is very large. Here you will need professional help.
By the way, when starting to restore the material, do not forget to prepare the necessary things in advance - paints, spray cans, etc. Study their instructions and learn how to use them correctly. If necessary, practice on a small area of the product or damaged item.
Let’s say the leatherette on your gloves, business card holder or wallet is damaged. If the shine has been lost or the colors are not so saturated, then an ordinary orange peel can help. You need to wipe these places with it. But this method is short-lived - the material will fade in a few days, but it works.
Need to remove grease stains from a surface? A damp sponge and dish soap will do the job just fine. The main thing to remember is that we are working with eco-leather, so there should be little product, as well as water. And then the cleaned area will need to be rinsed and dried. If the stain is old, the product can be left on the material for several hours. Or use turpentine.
How to restore a leatherette bag
Is your bag damaged? This problem happens often, because it is this accessory that is subject to the greatest loads. In this case, dermantine can be restored using the same means as any other product made from this material. It is beneficial to paint over small abrasions with special paints for leather (moreover, it is worth choosing options for natural leather); they are able to penetrate deep into the material and renew it.
Scratches are sealed with “liquid skin”. If it is deep and has reached the lining, you need to place a piece of identical material at the cut site (inside) and “glue” the front part of your handbag onto it. Naturally, the bag will not be able to be used for several days after this. But the damaged area will still need to be painted.
By the way, since the color palette of paints is very rich, you can easily choose the appropriate shade. And do not forget to then open the restored area with protective varnish. Be sure to be transparent. If you find abrasion, you can go over it with an aerosol. But apply it in a very thin layer.
Video material
https://youtube.com/watch?v=k_lX0XMk-x4
The question of how to update your favorite handbag interests every woman. We hope that our ideas will inspire you to the creative process, as a result of which your favorite accessory will delight you with its beauty and creativity for many years to come. And the most important thing is that you were able to change the appearance of the handbag with your own hands. So, there is a reason to praise yourself, beloved!