Home House and cottage Do it yourself
Recycling plastic grocery bags and plastic shopping bags is nothing new. If you just return the bags for recycling, they will melt them down to make new bags. This releases more pollutants into the air. The fusion of plastic bags with iron causes harmful odors. Scissors come to the rescue.
Creating something beautiful and useful with your own hands brings a sense of pride and achievement. Especially when this new item is built from "garbage" that would otherwise be thrown away. People made rugs from woven strips of fabric and then twisted the braid outward. Plus, in a time of inflated prices, it's a real revelation to find useful material that doesn't cost a lot. Finally, it’s always nice to find a way, no matter how small, to solve your waste disposal problems. You can combine a fun home craft with a little attack on both inflation and today's pollution problem by upcycling polyethylene into knitted rugs. Pre-finished flooring is ideal for protecting the floor of a bathroom or under a sink and is just as good for other uses, both inside and outside the home.
You'll need another 150 bags to make a rug like this, so don't take on this project if you only have a few. Also, if you want multiple colors, you should have bags of different colors. There is nothing difficult about preparing crochet wrappers. Start at the open end of each empty bag and cut a continuous spiral - about an inch wide and around the bag until you reach the part that is glued at the other end. The beginning and end of each stripe should taper to a point. One tool—a single metal hook used for carpet yarn—is the only equipment you'll need to turn even the largest stack of spiral wraps into durable, colorful flooring. Making yarn from woven plastic bags is an upcycled craft. Not only can you turn empty bags into yarn, but you can use the plastic grocery bags that accumulate with every trip to the supermarket to make a round rug.
You can still make a crocheted rug if you don't have weaving equipment (which you probably don't). The result is actually pretty cool, and a great way to use up those bags that would otherwise end up as trash. However, if you don't need a rug, you can also make a napkin, a bag, or even a pair of sandals. Who doesn't have a bin cupboard drawer full of plastic bags just ready to be recycled? Why not combine your package with a utility project to benefit local shelters and the homeless in your area? This is a wonderful project where children and adults of all ages can combine their creativity, talents and hard work to provide sleeping mats for people and organizations that need to brave the elements using plastic yarn from plastic bags.
How and from what can you make a rug with your own hands?
The rug serves not just as an interior decoration. This is a practical and useful thing in the house. Many argue that the fashion for rugs has long passed, and this is no longer very relevant. We are ready to prove the opposite. This article will not talk about large and bulky rugs, but about cozy little rugs.
Important: Small-sized floor mats are again at the peak of popularity. The reason for this popularity is their practicality and convenience.
The small floor mat can be easily washed and cleaned. It will keep your bare feet from getting cold if you place it next to your bed. Thanks to this mat, no one will slip on a slippery floor, and you can always wipe off dirty shoes at the front door. In addition, rugs create a cozy home environment.
In addition to practicality and comfort, such products can provide health benefits. Foot massage mats are useful for both adults and children. By massaging the feet, there is a positive effect on the active zones of the feet. You can relieve fatigue and tension. For children, such rugs serve as a preventive measure against flat feet.
You can buy a rug, there is a very large selection. However, we suggest doing it yourself. It's simple, beautiful and inexpensive. You can save money, spend time profitably, and also make a unique, beautiful and useful thing for your home.
A rug can be made from a variety of available materials. Even the most unexpected things can come into play.
Here are some materials that can be useful when creating rugs with your own hands:
- Old clothes (T-shirts, jeans, wool sweaters);
- Plastic bags;
- Threads, yarn;
- Leather belts;
- Wine corks;
- River pebbles;
- Fabric of different densities and colors.
If you know how to sew, crochet or knit, then your skill gives you more opportunities to create beautiful handmade rugs. We have previously told you how to make knitted rugs, as well as rugs from pompoms. Just because you don't know how to crochet doesn't mean you can't make a handmade rug. There are a lot of ideas, and among them there are very simple, accessible and at the same time original.
DIY rugs
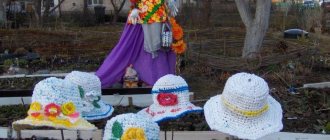
Door wreath
This decor is one of the New Year's crafts made from bags that will wonderfully transform the front door.
A step-by-step description will help you create such a product with ease.
- Crafts for Mother's Day - how to make simple and beautiful original decorations and toys with your own hands (130 photos + video)
- Craft flag - how to make it with your own hands correctly? Master class on making for holidays and parades (105 photos)
- Eyes for crafts: how to make templates and a master class on making eyes from various materials (100 photos)
You will need materials in the form of:
- white bags;
- scissors;
- clothes hangers or thick wire;
- glue gun.
Performance
We roll the hangers or wire into a circle for the base. If hangers were used as it, then it is better to use a hook to attach the wreath.
We cut strips of polyethylene.
We begin to wrap the circle in strips so that the free ends stick out. There should be no gaps between the strips. So we close all the gaps on the circle to the end.
When the wreath is ready, decorate the product with small Christmas tree decorations using a glue gun. After the glue has dried, the decoration is ready.
- Craft angel - 105 photo ideas on how to make your own angel quickly and easily from scrap materials
- Crafts from matches - 125 photos of original ideas for professionals and simple crafts for beginners
- Crafts with children: a review of interesting and exciting ideas for creating toys and decorations (115 photos)
Floor rugs made from old T-shirts, for chairs, stools: photo, description, step-by-step production
Instead of throwing away old cotton T-shirts, you can give them a second life. In skillful hands, wardrobe items that have already served their purpose will turn into a cozy, cute rug. Several decades ago, similar rugs could be found in almost every home. Such carpets are called “grandmother’s rug.”
The advantage of rugs made from old T-shirts is their light weight, durability, and easy care. If rugs of this type do not fit into your interior, you can find a place for them on the balcony or cottage.
To make rugs, you can use not only T-shirts, but also other old cotton items (sheets, bathrobes, children's colored tights, etc.). Before making, select the color scheme:
- Lots of bright colors will create a cheerful mood, but may look too pretentious and tacky, especially if you have a subdued interior color scheme.
- Two colors that combine with each other will look laconic and discreet.
- A solid color scheme is also possible if the color matches other items in the room.
To make a rug from old T-shirts, prepare the following materials:
- Old T-shirts - 5-10 pcs.
- Scissors
- Threads and large needle
- Sewing machine (if available)
Materials for creating a rug from T-shirts
Step-by-step production :
- Cut off the bottom seams of each T-shirt.
- Then cut the T-shirt into strips about 5 cm wide, not reaching the edge.
- Turn the T-shirt over and continue cutting strips diagonally. This should create a long continuous ribbon.
- Roll it up into a ball.
- Do this with each T-shirt.
- Then take three ribbons of different colors and start braiding them into a regular braid.
- When the ribbon ends, tie another one to it in a knot and continue braiding.
- When all the starting material is gone, you will have a very long multi-colored braid, roll it into a tight circle.
- Secure the rug with threads on the wrong side to prevent it from unraveling. If the rug is thin, you can sew it using a sewing machine.
Now the rug is ready to decorate your home. It is done simply and quickly enough. Depending on the number of T-shirts, you can make small and large diameter mats. These rugs are suitable for chairs and stools. Since they are soft and comfortable, they are very comfortable to sit on.
Step-by-step making of a T-shirt rug
Bright rug made from old T-shirts
Rug made of T-shirts in green colors
How to make a rug from jeans?
Old jeans are also a good material for making a rug. The denim fabric is dense, so the mat will be reliable and will last you a long time.
A medium-sized denim rug can easily fit into the washing machine. And it's very easy to make. You will need:
- Several jeans;
- Base for the rug (sintepon, foam rubber, batting);
- Needle, thread;
- Iron.
Step-by-step production:
- First, iron your jeans.
- Cut them into squares of the same or different sizes.
- There should be enough squares to fill the base you have chosen.
- Sew the squares onto the base by hand or using a sewing machine.
Rug made of jeans in patchwork style
How to make a rug with your own hands from threads without a hook, without knitting needles?
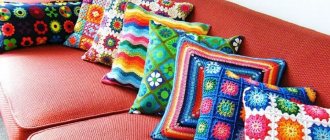
Knitted rugs look cute. You can knit square, round or oval rugs. Options in the form of owls or the faces of various animals are also possible. These rugs are suitable for a child's room, the baby should like them. Some people like delicate openwork rugs.
However, if you do not know how to knit, you can make a rug from threads without a hook and without knitting needles. To do this you will need:
- Yarn of various colors and thicknesses
- Scissors
- Large sheet of cardboard
- Scissors
- Felt pen
- Ruler
Thread rug master class:
- Draw a circle of any diameter on cardboard. In the future, your mat will be the same size as this circle.
- Using a long ruler and marker, break the circle into sections. There should be 60 sections in total.
- Make a 2cm cut on each line.
- Fix the thread in the center of the circle. Then pull the thread through and insert it into the cut.
- The next time you pull the thread on the opposite side. So stretch the thread along the entire marking.
- At the end, secure the thread.
- Then start cross weaving according to the 2x2 pattern; in the photo you can see how to pull the thread. There should be a thin yarn in the center, since the carcass threads are placed very tightly here.
- Continue weaving until the end. In the middle of the weave, switch to a 2x1 pattern, at the end of the weave - 1x1. Since the distance between the frame lines will expand, you can use thick yarn.
How to make a thread rug without a hook: step 1-4
How to make a thread rug without a hook: step 5
How to make a thread rug without a hook: step 6-9
How to make a rug with your own hands from threads without a hook and without knitting needles
Crochet
The second stitch you need to know how to do (and is just as easy to learn as the first) is to assemble the rug using a method known as slip stitch. This is done by passing the hook through the previously formed stitch (while maintaining the loop that is already on the needle) before hooking a new section of ribbon and pulling it through both old loops to form one new one. You'll use this scroll stitch to do something like joining the two ends of a section of chain stitch together.
The only other stitch you need to master to make a rug is called single hook. For the first half of this you will hold the loop on the needle until it is out of the way. You will then take the formed stitch before hooking the new tape grip, which is pulled only through the formed stitch and not through the loop supported on the needle axis. Then one crochet stitch is wrapped by pulling a fresh section of ribbon through both loops on the needle. When you add row upon row to your rugs, you will find that this stitch is almost as important as the main chain stitch.
To start a round rug, line up the quintuple stitch, making sure you don't pull the stitches too tight, and twist the ends of the chain together to form a ring. Now, working through the center of the circle (instead of any of the five individual stitches) for the first half of each and working outside the circle for the second half of each, form enough single crochet stitches—usually about ten—to completely enclose the ring.
Do not stop forming single crochet stitches after completing the cycle. Make the next bottom-up slip stitch used to connect to the ring and continue around the circle, catching - the new row of crochet stitches you just laid down. You'll have to increase the number of single hooks by placing two in every other stitch or so inside. Continue around the developing mat for a few more lines and then lay the piece of work down on a flat surface.
How to make a rug with your own hands using a hoop: master class
If you have a hula hoop or hula hoop, you can easily make a round mat. The hoop will act as a base. It is very convenient to work with it because of its stability.
Bright T-shirts will be the main material, as faded and gray ones will look boring. Be sure to wash your T-shirts before work.
Step-by-step making of a rug using a hoop:
- Cut the t-shirts into strips parallel to the bottom edge. You should have closed rings.
- Place one strip on the hoop, then pull the second strip perpendicularly.
- Continue stretching the T-shirt strips onto the hoop until the hoop ends up looking like a bicycle wheel. There should be an odd number of stripes on the base.
- Start weaving the rug from the center, as in the previous method. Snake the thread above and below the warp lines. Make sure the weave is tight and even.
- In the middle of the weave, divide the warp threads into two parts so that the weave doubles and is dense.
- At the end of weaving, tie all the free edges of the threads into strong knots.
- Cut the threads from the hoop and also tie them into knots.
Making a mat on a hoop
How to weave a carpet on a hoop: master class
Start
Your first step in creating a wrapping mat of any size will be to fold one of the inch-wide strips right down the middle so that it is only half an inch wide. Then lay the hook down and pass the end of the strip under and around the widest part of the handle or shaft of the hook and tie the strip securely with a double knot.
The tape is not actually tied to the shaft, but instead the handle is used as a "spacer" around which the carpet start stitch loop is formed and tied.
Once you have knitted the first loop at the end of your first plastic ribbon, lift the hook in your right hand, hold the broken plastic ribbon to the left and slide the newly formed loop down the tail of the tool until the ring is about an inch from the hook end of your tool . Catch the plastic strip using the winder tool and pull the strip through the knotted ring (thereby forming a second loop). Slide the hook forward for another ribbon bite and pull it back to form a loop. The ongoing series of interlocking stitches you make is called chain stitch, and you can extend the procession indefinitely.
When you have snagged within a few cm of the end of your "yarn", open the folded plastic flat, lay the end of the new strip on it (with about three cm of overlap), fold the two strips together and continue with chain stitch. This way there will be no knots in your finished work. This is the yarn, also called plastic thread, that you will use to knit or knit a plastic mat. The plan is constructed from plastic bags and will be used in the same way as using yarn in crochet.
How to make a massage mat with your own hands from pebbles, chestnuts, or buttons?
Foot massage has a relaxing effect, relieves fatigue, and helps improve sleep. In addition, it has a general strengthening effect on the entire body. Since a large number of biologically active points are concentrated in the feet.
You can easily make massage mats with your own hands using available materials.
One of the available materials is sea or river pebbles. While walking along the river or seashore, collect several dozen small stones of approximately the same size.
Important: Choose rounded stones without sharp corners so as not to injure your limbs in the future.
When the stones are collected, wash them with water and laundry soap. It is also advisable to soak the stones for a couple of hours in a solution of water with potassium permanganate or in a soap solution.
Prepare a base for the mat: it can be a tarpaulin or other thick fabric. You will also need glue. Immediately take a good reliable glue, for example, moment. Hot silicone glue is not suitable for this purpose.
When the stones are dry, start gluing them onto the base. You can lay them out randomly or make some kind of pattern. There are two ways to glue stones:
- First apply glue to the base and then stick the stones on it.
- Apply glue to each individual stone and attach it to the base.
The second method will take longer, but it is more reliable. The stones will be firmly glued and will not fall off after a while. When all the stones are glued to the base, the rug should sit for about 24 hours. This way the glue will dry completely and the mat will be reliable and durable.
A rug made of stones can be placed in the bathroom or used only for massage. It is useful for adults and children to walk on stones. And if you preheat the stones, there will be double benefits for the body.
Massage mat made of stones
You can also make a rug from buttons of various sizes and shapes. It is very easy to do: sew many different buttons onto a fabric base. Any size rug is possible, but it is better to make it small. It can be easily rolled up and put away; after all, such a rug is not intended for constant walking on it. It is enough to walk on a massage mat for 5 to 15 minutes a day to engage active points.
DIY massage mat made from buttons
Another way to make a massage mat is to sew caps from felt-tip pens, plastic plugs onto a thick fabric base, stick chestnuts and other improvised materials of various shapes and textures. The result is a budget-friendly, and most importantly, useful massage mat.
DIY chestnut massage mat
DIY rug made from wine corks: step-by-step production
Cork corks are an affordable material and very suitable for making floor mats. Cork bark absorbs moisture poorly, so various bacteria will not multiply there over time. It is for this reason that such rugs will fit well into the interior of the bathroom. Also, thanks to the texture of wine corks, it has a massage effect on the feet.
In order to make a small rug from wine corks, you should prepare at least 200 wine corks. If you don't have that many cork stoppers, you can buy them at home improvement stores and craft stores. The price of cork plugs is low, so making a rug will cost you less than buying a ready-made one.
In addition to cork plugs, you will need other tools:
- Rubber or silicone mat;
- Sharp knife;
- Glue;
- Sandpaper.
Step-by-step production:
- Cut each cork into two pieces.
- Sand the part of the cork that will be adjacent to the base with sandpaper.
- Place all the corks as they will be placed on the mat. This way you can determine the required dimensions of the base.
- If necessary, cut the rubber or silicone mat to the desired size.
- Start gluing the corks to the base from the outer edges of the rug to the center.
- If drops of glue protrude, immediately remove them with a napkin. This way your rug will be finished neatly.
- When all the plugs are glued, leave the mat to dry completely.
Important: To make the mat waterproof, treat it with additional sealant. In the future, you will need to periodically dry the rug in the sun if you place it in the bathroom.
In the process of gluing the corks, you can lay out a checkerboard, transverse pattern or stick the corks in the same position.
Do-it-yourself rug made from wine corks: step-by-step production
DIY bathroom rug
If you don't want to waste time gluing each cork, there is an easier way. To implement it, you will need a container or box with the height of the sides similar to the height of the cork. This container must be filled with plugs, placing them vertically. The plugs must be placed very tightly to each other, only in this way will the rug be functional. The number of plugs is difficult to unambiguously calculate; it depends on the size of the container.
How to quickly and easily make a rug from wine corks
How to make a wicker rug with your own hands?
There are many patterns for weaving rugs. We will tell you about some of them so that you can choose the method that suits you best. Let's start with the simplest.
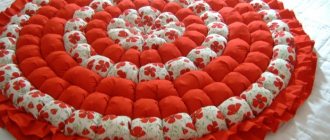
Braided rope rug
You will need: a rope about 70 m long, twine of a similar color.
Step-by-step production:
- Divide the rope into 3 equal parts, tie the resulting three ends into a knot.
- Braid your hair.
- Start twisting the braid in a spiral, try to do it tightly.
- Every 5 cm, secure the edges of the mat with twine on different sides so that the mat does not fall apart.
Weaving a rug from a rope
Weaving a rug from braids
A rug from shreds
You will need:
- Wooden frame measuring approximately 1x1 m
- Nails
- Hammer
- Ruler
- Knitted fabric in different colors
Step-by-step production:
- Drive nails into two opposite sides of the wooden frame at an equal distance of about 2-3 cm parallel to each other.
- Secure the fabric strips vertically to these nails. This will be the base of your rug.
- Now start braiding your hair horizontally, weave ribbons above and below the vertical ribbons.
- Pull the braids close to each other.
- At the end, secure the weaving with a knot so that the mat is durable.
- When everything is ready, remove the mat from the structure.
Weaving rugs with your own hands
You can not weave braids from strips of fabric, but pass a wide ribbon through the vertical stripes of the base. The main thing in such a rug is the contrast of colors. A one-color rug made in this way will not look original. In turn, a multi-colored rug can highlight the interesting weaving and skill of the designer.
The process of weaving a rug
Handmade braided rug
From ropes woven in a circle, you can make both ordinary round rugs and weave circles of different sizes into an interesting composition. Several circles of different sizes combined in one rug look very unusual.
Beautiful DIY rug
If desired, you can make an intricate binding of the rug, which will ultimately emphasize the elegance of your interior.
Braided rug
A stylish woven rug can be made from two thick ropes. First, twist the two ropes into a bundle. Then twist them in a spiral. You can glue a warm fleece base to the inside using super glue. The result is a laconic and fashionable rug that will suit almost any interior and room style.
How to make a rope rug
Tools and materials
To cut bags and prepare strips, take:
- stationery knife;
- wooden ruler;
- large and functional scissors;
- a suitable hook for weaving a carpet (numbers: 3, 5 or 7) for products without pom-poms;
- cellophane bags of different colors or one color.
The packages need to be leveled and stacked. This makes it easier to cut them. When twisted, these strips become threads of approximately identical size.
This way of using bags is a small individual contribution to the issue of recycling materials.
Entrance door mat made of plastic bags: description, photo, diagram
The mat located at the front door should be made of washable materials. Every time you or your guests will wipe their feet on this rug, so you will have to wash it very often.
It is logical that the material for such a rug should be selected for practical reasons. Knitted or fabric rugs certainly look very beautiful, but they are completely unsuitable for these purposes.
One of the most suitable materials for making a door mat is plastic bags. This material has a number of advantages:
- A rug made from plastic bags is easy to care for. It is enough to rinse it in running water, after washing it with a brush and powder or soap.
- Plastic bags are inexpensive.
- In almost all houses there is an abundance of such material, and housewives simply do not know how to get rid of the accumulated bags.
- By making a rug, you will still save the environment, at least a little. After all, we know about the problem of environmental pollution with bags.
You can make a rug from plastic bags using a hook. First you need to make ribbons from plastic bags and wind them into balls. To do this, cut the plastic bags along the seams, roll them into ribbons about 1-1.5 cm wide. Then, using a thick hook, knit the rug according to the pattern you will see below.
Rug knitting pattern
Options for rugs made from crocheted bags can be seen below. In essence, these rugs are the same as those made from yarn. However, they are better suited for placement at the front door and are more wear-resistant.
DIY rug made from bags
Rugs made from plastic bags
If you don't know how to crochet, you can make pom poms from plastic bags. This rug will be less practical than the previous one. But it will look beautiful. If you take bags of different colors, you can make a rug with patterns.
make a pompom like this:
- Cut the bags into long strips of the same size and width.
- Wrap many strips onto a paper base.
- Use scissors to cut from opposite edges.
- Tie the strips in the center with strong thread.
- Fluff the pompom.
Then glue the pompoms onto the base. Polyethylene pompoms can be used to form flowers and other designs.
Rug made from garbage bags
We invite you to watch a master class on making a rug from plastic bags.
Why are plastic carpets needed?
Plastic bags are one of the worst offenders of wasteful products that pollute the Earth's oceans and take up limited space. This isn't new information, but Australians still produce around four billion recyclable plastic bags each year. The equivalent of 429,000 plastic bags are dumped into landfills every day; or 7250 are ejected every minute.
Opting for eco-friendly canvas bags for grocery shopping is an effective option, but many people still have excess plastic bags lying around. Instead of throwing them away, you can reuse them by investing them in multi-purpose mats.
In particular, plastic carpet can be used as sleeping mats for people who do not have access to shelter. As sleeping mats they are more hygienic, waterproof, easy to carry and provide protection against concrete. Several charities in Australia have taken up this initiative and have enthusiastically agreed to accept donations of plastic mats that will be redistributed to the homeless. So crocheting improves your quality of life.
Beautiful DIY rugs: photos, original ideas
Labels from old jeans can also be used to make a creative design rug. There is one thing: you will have to collect a lot of labels. To do this, you can go to a second-hand store or ask your friends. Almost everyone has several pairs of jeans at home that need to be recycled. Pre-prepared jeans labels will need to be ironed if they are uneven in shape. To do this, they should be ironed with steam through the fabric. Then stick the labels onto the base. It turns out very unusual.
Original rug made from labels
Rugs made from leather belts look no less original . It is assumed that such a rug will be small in size and will serve for decorative purposes. First you need to cut off all the plaques from the belts. On one side, the belts should be tamed so that they are all approximately the same length. There is no need to cut the straps on the opposite side. The highlight of the rug will be its unusual shape. Glue the straps onto a thin rubber base. Wait for the mat to dry. Now it is ready to decorate your home.
Rug made of belts
Bath towels don't last forever. After some time after use, they become less soft and fluffy and do not absorb moisture so well. Some people throw these towels away, others use them for washing floors or cleaning. We suggest making a soft mat. This rug will be warm and pleasant; you can lay it next to your bed. It’s very simple to do: cut old towels into strips and then braid them into braids. Roll the braids in a circle and secure with threads. The warm mat is ready.
Rug made of towels
A soft fluffy rug made of pompoms will be a great addition to a child's room. You can buy pompoms at a craft store. You can choose the same size. A combination of pompoms of different colors and sizes will look original. On such a rug, a child can calmly play on the floor, because the rug is warm, and explore the world around him. However, the rug itself is interesting for a small child to study tactile sensations and colors. Adults themselves will not refuse to admire and warm their feet on such a pleasant fluffy rug.
Soft mat
If you have leftover yarn and don't know how to put it to good use, try making a handmade floor rug. The weaving technique can be the same, use different colors. First, make many circles of different diameters, colors, and decorate their edges to your liking. Connect the circles into one, and a unique, beautiful rug is ready. Such a rug can be placed in the most prominent place in the house; it will undoubtedly become an asset to your interior.
Bright woven rug
Homemade rugs have many advantages. They are light, functional, beautiful. And now you know how to make them yourself without spending a lot of money. Show your imagination, don’t limit yourself to ready-made ideas, add creativity to your unique handmade rugs.