In this article I would like to talk about such a type of needlework as a foamiran doll. Such a doll will be a great gift not only for a child, but also for an adult, because it is truly unique.
- Have you heard anything about foamiran? It is no longer new to Russia, but if anyone doesn’t know, we’ll explain - this is a material that is a porous colored rubber, which is great for handicrafts
- Supplied from Turkey, Iran and China. Fofucha (the so-called foamiran dolls) are especially popular in Portuguese-speaking countries, but this beauty is also in good demand here
- Let's see how to make such unique toys yourself
Do-it-yourself foamiran dolls: master class
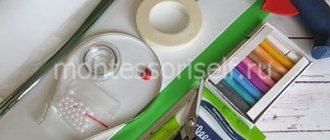
So, what will you need to make a doll?
- First of all, of course, foamiran . It is easier to buy Chinese and Iranian. The first one is distinguished by rich, bright colors. But Iranian sheets are more muted in color, but at the same time they are preferred by craftsmen - smooth shade transitions are ensured
IMPORTANT: As for the thickness of the sheets, Chinese ones are thicker than Iranian ones, but the latter is noticeably more pliable when working. But in any case, choose thicker sheets, since thin sheets are more suitable for making flowers.
Foamiran dolls will be made from such colorful sheets
- Scissors. There is no need to worry - they cut foamiran perfectly, even folded in several layers. It is recommended, if possible, to stock up on several types of scissors: in addition to regular ones, you may need curly ones to create the effect of torn edges and openwork, as well as manicure ones for miniature details
For foamiran dolls, curly scissors can be useful.
- Skewer or toothpick . It can also be useful for transferring the pattern to foamiran. The fact is that it is not recommended to do this with a pen, pencil or felt-tip pen, since the traces will then be impossible to remove
- Glue . The one that is marked that it is suitable for processing rubber products is suitable. PVA and any other product containing water are not suitable. It is ideal to purchase a glue gun
A glue gun is very useful for making foamiran dolls
- Paints. It is recommended to give preference to oil and dry pastels, gouache, oil and acrylic paint. All this is necessary for additional coloring of the dolls and their decoration.
- Iron . Without it, there is no way to heat foamiran, and the plasticity of this material is achieved only when heated. In principle, you can heat it with your hands, but using an iron set to medium temperature will work better
- Felt for sewing doll clothes. But, in principle, if felt is not found, you can use another material
- Powder
- Wire
- Foam blanks
- Marker
A foamiran doll will be colorful along with markers.
So, we have everything prepared - now we can get started!
IMPORTANT: Whatever kind of doll you want to make, keep in mind that all parts are made separately.
Let's start with the head.
- Take a foam ball and foamiran in a shade that is closest to flesh-colored
- Heat the foamiran in your hands or by holding it on the sole of the iron for no more than 2-3 seconds.
- Holding for too long leads to loss of plasticity.
- After heating the foamiran, stretch it onto the foam, trying to make sure that the attachment points are nearby
- Then these fastenings can be disguised with the doll’s hair.
To make a doll's body from foamiran, it is better to use not a bright pink material, but a flesh-colored sheet.
Now let's move on to the hair .
- Cut a circle from foamiran, warm it up and attach it to your head. It is preferable to treat the joints with glue
- Take the same sheet of foamiran that you used in the previous step and cut a long strip from it
- Make cuts and heat the material with an iron. It is advisable to twist the stripes onto a skewer or toothpick - this will give you the doll’s curls.
- Glue the resulting hair to the side . Separate them and transfer part to the other side, not forgetting to treat the junction with the head with glue
- If you want your hair to be the same length, cut it. If desired, decorate your curls with bows or flowers
This is the kind of hair a foamiran doll can get
- Now let's start drawing the face . To do this, you can use markers, paints or even blush - at your discretion
Faces of foamiran dolls can be very diverse
- Well, now let's make the body. As a base, you can use either polystyrene foam or some suitable shaped object - for example, a jar or deodorant cap.
- Now cut out the hands . Glue the arms to the body
IMPORTANT: If you want your arms to not bend, make them from thicker material.
- Choose your favorite clothing template. Transfer this template to fabric and then sew the outfit.
A foamiran doll can be dressed in the brightest and most unusual outfits
- To make legs, sticks can be covered with foamiran. The legs are attached to the body either with glue or wire
- And the final stage is shoes . But we'll talk about it separately
- By the way, you can also make all sorts of additional things that will surround the doll
A foamiran doll can be surrounded by some things. Here is a foamiran swimmer doll
Ballerinas made from napkins
You will need wire and napkins of different colors. Also water, PVA glue and scissors. Take the wire and bend it into the shape of a man. Form a small loop for the head, long arms and even longer legs.
Next, mix PVA glue and water 1:1 and dip pieces of napkin in the solution and cover the entire frame of the doll. Next, we fold the napkin in several layers, as indicated in the picture, and make a dress, with a hole in the center for the legs and body of the doll. We make the dress itself in layers from formed napkins.
We put the dress on the ballerina and shape the waist using thread in the color of the napkin. Afterwards, the dress can be painted in any color and decorated with any decor.
Foamiran dolls: patterns
It is more convenient to make dolls from foamiran using patterns. Especially at the initial stage. And even if you cut out the details of the dolls themselves without patterns, you will probably need them for the dresses.
Pattern of a dress for a doll from foamiran
And here is the pattern of the doll itself from foamiran
Another dress pattern for a doll made from foamiran
Body and dress
For the body, you need to cut out a cone-shaped blank from polystyrene foam and cover it with plastic suede of a light, flesh-colored shade. Using the pattern, we cut out a petticoat from this piece and glue it to the workpiece. Now we take the skirt pattern and cut out two or three parts from foamiran of the desired color. We make a hole in the middle and stretch the blanks onto the doll’s body. We fix it in place with glue. You can apply a design with acrylic paint along the edge of the skirt. We cut out the top part of the dress according to the template and glue it to the body. We make a belt from plastic suede in a contrasting color.
Shoes for dolls made of foamiran
Foamiran dolls are distinguished by two large details - the head and shoes. Plastic rubber, which has a suede-like feel, makes for great, bright shoes that will add personality to the toy. So, shoes are made as follows:
- Take two foam balls that are approximately the same size
- Cut the balls in half. Then you will need to cut a piece from each half, but this time vertically
IMPORTANT: Cut off approximately 1/6 of the diameter of half the foam piece.
- Now glue the halves together so that they form a pair. Basically, this step is optional if you don't want the boots to fit together
- Place the resulting blank - this will make it more convenient to bring it to final design. It is advisable to make sure that the edges of the foam hang from the stand - this will make it more convenient to cover them with foamiran
- Actually, now we can take on the foamiran itself - we will need rectangular pieces of flesh-colored and several pieces of material of the color that the shoes should be. Heat flesh-colored pieces with an iron
This is how you need to warm up foamiran to make a doll from foamiran
- Now place them with the heated side to the foam blanks . Apply glue to the edges and cut off the excess
- We also need to attach a track . Thick cardboard or thick foamiran are suitable for this. It is advisable to choose white color
- Well, now warm up with an iron those colored pieces from which you plan to make shoes. Pull them onto the workpiece
- Cut out several strips of foamiran , then glue them to the perimeter of the shoe
- Then it’s all up to you - decorate the shoes as you want . You can use beads, sequins, ribbons
These are the beautiful shoes a doll can get from foamiran
The soles of the foamiran doll's shoes are sometimes very similar to real soles
A foamiran doll may also have such interesting lace-up shoes
Or maybe a doll made of foamiran also has simple shoes. These are the shoes a doll made of foamiran has with bows. A doll made of foamiran can even have boots. A doll made of foamiran has bright shoes decorated with patterns. Sometimes the boots are almost half the size of a doll made of foamiran.
Sandals for dolls made of foamiran
You can even make high-heeled shoes for a doll from foamiran.
Doll on a frame
You'll need:
- Steel wire;
- Pliers;
- Scissors;
- Plasticine;
- Newspapers;
- PVA glue;
- Sanding paper;
- Super glue;
- Toilet paper;
- Filler;
- Threads;
- Thin and dense fabric;
- Needle;
- Acrylic paints;
- Thin brush;
- Clear nail polish;
- Fabric for dress;
- Satin ribbon;
- Velvet cardboard;
- Lace;
- False eyelashes;
- Simple pencil;
- Stacks;
- Toothpicks.
Manufacturing process:
First you need to make a wire frame. To do this, determine for yourself the optimal size of the doll and begin twisting the wire frame. On the wire itself you need to mark the places of the elbows and knees.
Next, we sculpt the head from ordinary plasticine. The head needs to be covered with pieces of newspaper, which are soaked in PVA glue. Each layer must have time to dry before applying the next. Using the same technique we glue the doll’s legs.
When the head is dry, you need to cut it in half and take out the plasticine, and glue the halves back together. Take a pumice stone and gently sand the doll's legs and head until they are smooth.
Next, mix 1/1 toilet paper with glue and add a little water. We use glue to form the face of our doll and glue it in place on the head. When everything is dry, we sand again.
Next, we wrap the entire frame with filler, as indicated in the figure, and secure it with ordinary threads. Make 5 small pieces of wire - these will be your fingers and palm. They need to be covered with light fabric. Then we screw the base to the arm, and make the second arm in the same way.
We paint the head with acrylic paint, draw the face, and cover the body itself with thin fabric. Next, we sew a dress and put it on the doll. We color the doll's legs and draw stockings. We cover the entire face with colorless varnish, and put a fluffy satin ribbon on the head, like hair. The tape must be glued using superglue.
Don't miss: How to sew a vest
Then we make shoes from velvet cardboard and put them on the doll. The final touch is gluing the eyelashes.
Tatyana Shmeleva dolls from foamiran
Yes, fofuchi is mainly common in Brazil and Portugal. But we also have our own masters. For example, Tatyana Shmeleva.
This creative person is a teacher. Tatyana loves not only to create dolls based on her imagination, but also to copy cartoon characters.
Angel doll from foamiran by Tatyana Shmelyova Dolls from foamiran by Tatyana Shmelyova girl doll from foamiran by Tatyana Shmelyova
Here's a princess doll from Tatyana Shmeleva's foamiran
Hands and wings
We cut out the hands according to a template from flesh-colored material; they will require two rectangular pieces of foamiran to match the dress and wire:
- Take the inner part of the sleeve, place the wire in the center and seal it. Insert a flesh-colored palm blank.
- We wrap the second part of the sleeves on top and form them in the form of a bell. Glue it together.
- Repeat for the second hand.
- Glue it to the doll's body.
You can turn an ordinary doll into a fairy. To do this, we cut out the wings according to the template and paint them with acrylic. We tint the edges with pastels and fix them to the body with glue.
Evgeniya Romanova dolls from foamiran
Another fairly popular master in the field of making dolls from foamiran is Evgenia Romanova. However, this mother also does painting, glass painting. As for crafts made from foamiran, for Evgenia they are the materialization of positive energy using simple technologies.
Red-haired beauty doll made from foamiran from Evgenia Romanova Boy and girl - dolls from foamiran from Evgenia Romanova
Foamiran angel doll from Evgenia Romanova
The princess and the mouse - foamiran dolls from Evgenia Romanova. A doll in a green dress made of foamiran from Evgenia Romanova. A set of foamiran dolls from Evgenia Romanova.
A foamiran doll is an excellent gift not only for a child, but also for an adult. The thing is that each doll is individual, it has its own character. It’s not for nothing that “fofucha” is translated as “sweetheart.”
Foamiran: what kind of miracle material?
Foamiran, or fom, is not quite the correct name for a durable, plastic material that is pleasant to the touch and eye. In fact, its chemical name is ethyl vinyl acetate. This elastic polymer has a porous structure and feels tactilely like suede, which is why it is also called:
- foam rubber
- plastic or artificial suede
IMPORTANT: The material acquired the popular name “foamiran” thanks to the Iranian company for its production - Foam Iran Company
Foamiran is a thin, durable, plastic material for crafts.
In addition to Iran, fom is produced by:
- China
- Poland
- Thailand
- Türkiye
- Ukraine
- South Korea
Plastic rubber has a huge number of advantages:
- Foamiran is very plate-like. By slightly warming it up with an iron, you can do whatever you want with it - pull, squeeze, squeeze, twist, etc.
- To cut the fom, you need the most ordinary stationery scissors. Needlewomen also recommend purchasing children's scissors with figured fabrics and special cutters
- It is easy to punch artificial suede with a hole punch, including a figured one, for crafts
- Foamiran is a water-repellent material, it is used to make children's bathing toys and decorations for swimwear
- At the same time, it is easy to clean and is very hygienic.
- It is very easy to apply a design to the surface of the fom sheet. An engraving on it can be made with a toothpick, a plasticine stack, or similar objects. Manufacturers of artificial flowers use special molds to give leaves and petals a texture similar to natural ones.
- You can purchase foamiran sheets of absolutely any color and shade, and if necessary, paint the material with acrylic or oil paint
- Faux suede is non-toxic. Children can play with dolls made from it. But! They will not be poisoned by foamiran, but they may well choke on a poorly glued small part. It is better not to give crafts from it to children under three years of age.
- A glue gun with silicone glue is the best tool for collecting foamiran doll parts
Children's carnival mask made of foamiran.
Video: foamiran dolls
- How to sew a doll yourself: patterns, master class.
- Do-it-yourself amulets made of fabric and threads: step-by-step instructions, master class.
- How to sew a beautiful textile, interior, big-legged, Waldorf doll with your own hands: patterns, instructions, photos, videos.
- Amulet dolls - Herbalist, Podorozhnitsa, for health, Krupenichka, for family, Angel, Successful, for marriage, Well-being, for pregnancy
- Amulet dolls - for a child, Bereginya, Lovebirds, for luck, Bell, for the home, Desire
- How to make a Voodoo doll from paper, branches, felt
- Crocheted Lalalupsi dolls: master class, diagrams and description
- Do-it-yourself brownie amulet doll made from tights, burlap, thread and cardboard
- How to make a Barbie, Tilda, Motanka doll with your own hands?
- How to make a doll with clothes from cardboard with your own hands: diagrams, stencils, photos.
Pattern modeling
To make shoes for a large doll, you will need an individual pattern. Regular patterns look like this:
Looking at the picture, you will see a diagram in which only one leg appears. Unfortunately, such boots are not suitable for every toy. Very often, when making handmade dolls, craftswomen are faced with this problem - there are right and left legs, but there is only one shoe. Such shoes will look ugly on the model. In order to avoid mistakes and dress up the toy properly, craftswomen take measurements and design patterns themselves. You will learn how to do this further.
A bear is taken as a model for making a pattern in this master class; there is no fundamental difference in the construction of shoe parts between it and the doll.
Take the toy and trace the legs on a piece of white paper.
For legs measuring 2-6 cm, increases are required. The length will increase by 3 mm and the width by 1.5 mm. During the process of creating boots, they will help correct minor inaccuracies. The next step in creating a pattern will be to draw up a sketch of the sole. To make an insole, you need to reduce all parameters of the sole by 1 mm.
Read this: DIY tutu: making a Chopin skirt
For the convenience of further work, you should immediately make the sole. Transfer the pattern to polyurethane, making two mirror parts. Separately cut out the heels and glue them in place with Moment. After complete drying, sand the surface with sandpaper.
The insoles need to be covered with lining fabric.
For further work you will need a notebook sheet. It bends well without creases, which allows you to take measurements correctly. Wrap the doll's leg around the sock and gently crimp the paper. Think over the design of the shoe, draw the toe directly on top of the paper.
Wrap the back in the same way. Make a sketch on the foot, taking into account the height of the boot and the location of the eyelets for lacing.
Next, you should carefully remove the paper from the model, straighten it and finish the sketch.
Transfer the resulting parts onto thick paper or cardboard. The resulting pattern does not take into account seam allowances; be sure to add them when cutting.
LiveInternetLiveInternet
Materials and tools:
- foamiran (abbr. - fom) red 2 mm thick and white (for finishing) 0.6 mm thick;
- thick cardboard (I have beer cardboard, a piece of 5 x 6 cm);
— superglue (second glue);
— straight manicure scissors and curly scissors (if available);
- toothpicks;
— a breadboard knife (or razor blade);
- sandpaper (medium grit);
- shoe lasts;
- patterns.
I made the shoe lasts myself from self-hardening plastic according to the size I needed. The length of the shoe last is 3.7 cm, and my shoes come out with a sole length of 4.4 cm. You can make shoe lasts from your doll’s feet (there are master classes on sewing doll shoes on the Internet) or make a blank from very tightly crumpled foil. You can probably do without pads entirely, but that will be a different master class.
How to make your own patterns? For the inner insole/sole, outline the foot of the last with a pencil. From the many examples of doll shoes, I chose one simple option. First make the main pattern “with a reserve” and, applying it to the block, adjust it to the size you need, cutting off the excess paper.
Using a craft knife, cut out the inner insole/sole of the shoes from beer cardboard. The edge must be sanded with sandpaper so that the edge is not rounded, but straight (am I clear?). We cut out boot blanks and outer soles from red foamiran. We make an allowance for the main pattern of 4-5 mm, trace it and cut it out. We draw a toothpick not along the edges of the pattern, but along the allowance lines!
Try on the main blank on the block. Decide on the degree of openness of the toe of the future shoe. If necessary, cut off the excess along the back middle seam very carefully in a straight line - this gluing area on the workpiece should be even.
Apply super glue to the edge of one half of the backdrop with a toothpick and carefully connect. Make sure that the glue has dried well and the seam does not come apart (if necessary, glue it).
Place the workpiece on the block and, tightly grasping and holding it with your left hand, give the shoe the required shape, tightening the form in the right places. Don't be afraid: the 2 mm thick foamiran will not tear from your efforts, it stretches well and takes the shape of the block. At this stage, it was possible to apply the form to a heated iron and pull the already softened form onto the toe of the block, but I could easily do without the iron. Where the blank will connect to the sole, the heel will be flat, and a “frill” of fom will be formed in the toe.
First, distribute the folds evenly over the sock, and then try to carefully pull the workpiece to remove the folds as much as possible. The toe of the boot should be smooth. If small folds remain, don’t worry, we will hide them under the decor later.
Continuing to firmly grasp the last with the workpiece, insert the beer cardboard insole inside (with the white side inside the shoe) and try it on. Make sure the back seam of the piece is in the middle of the heel and vertical. If everything suits you, without releasing your left hand, take out the insole, apply super glue (using a toothpick) to the edge of the insole in the back and up to half of the sides. Insert the insole into place. Press with the fingers of your right hand and wait until the glue hardens. Now the insole will not fly out and you can remove the shoe from your left hand and inspect it. We continue to glue only with the help of a toothpick! Apply glue to 2-3mm ribs of the insole in the very center of the sock and press it with the form. Next, evenly distribute the folds of the foam on the two remaining areas and, a little at a time, carefully smearing the edge of the insole with glue, glue the entire foam.
But this is where I messed up! She did not spare the glue and lubricated not only the edge of the insole, but also the foamiran at the gluing site... As a result, the superglue tightly grabbed both the insole and the foamiran to the shoe last!
I admit that later I had to literally rip the block out of the shoe, and the foamiran broke and had to be repaired. But I will show you this further. Hmmm... We learn from mistakes, but it’s better from others’ mistakes. And you learn from my mistakes and don’t repeat them.
Now I need to carefully remove the shoe last from the shoe (this is where my torment began!) and insert it back. If you find that the fom is stuck to the block, then use a blunt metal stick (I used a needle for knitwear) to carefully peel off the gluing area. Do not use sharp objects - the foamiran will definitely tear!
Then I carefully butt-glued the gap in the foamiran. The seam is still visible. We will mask the seam.
Now, using a sharp breadboard knife (or a razor blade), you need to carefully cut off all the mold protruding above the glued insole. It is necessary to cut in the same plane as the insole; this is important so that the future joint with the sole is level. The photo clearly shows how the glue on one shoe has run and how rough the cut turned out to be. But all this is smoothed out with sandpaper.
Examine the shoe. If somewhere the fom is not stuck to the insole, be sure to use a toothpick to glue all the gaps.
Next, glue the red sole to the shoe (do not remove the shoe last!). Let me remind you that the sole is now wider than the shoe itself and its edges protrude by 2-3mm. Now you need to coat the edge of the main workpiece especially well so that the joint is neat. Lubricate the surface of the sole and (with strokes) the insoles. We press and wait until the glue “seizes”. Now the shoe last can be completely removed.
The main work is done. Now comes the fun part: decorating.
A narrow strip is cut out of white foamiran 0.6 mm thick using curly scissors (determine the length based on your shoe, but mine turned out to be about 15 cm). For those who don’t have curly scissors, cut an even strip. It will be beautiful too.
We start gluing from the middle of the inside of the shoe. Using a toothpick, apply superglue around the perimeter of the junction of the shoe and the sole (and sometimes we touch the sole with glue) and carefully glue the white finishing strip. We cut off the excess. Then carefully cut off the protruding edges of the red sole. Be careful not to touch the white trim strip.
We make the back seam (joint at the heel). We slightly thin a narrow strip of foamiran in our hands (crumple, stretch, crush). First, we glue it on the outside of the seam, make a small “loop” and bend it inside the shoe (we cut off the excess), and then glue it along the seam.
Now let's make the shoe ties. Trim the wide “ears” a little and glue a narrow piece of foamiran in front. You can glue a bow or a flower here, or you can connect the “ears” with a cord made of thread or a narrow strip of foamiran.
And the torn scar from the foamiran rupture had to be masked with a flower.
This shoe is good on its own, but you can find other uses for it. Make these boots for your dolls and your daughter's dolls. You can use it as the main part of a funny brooch or keychain for a handbag or children's backpack, decorate your colleagues' workplace or your own with a cute souvenir... Create with love and everything will work out!
source
Craft options for kids
Looking at photographs of crafts made from foam plastic, which can be found in large quantities on the Internet, you are amazed at how many original gizmos are made by craftsmen from packaging material!
By connecting small foam balls you can make figures of various animals, fairy-tale characters, and insects.
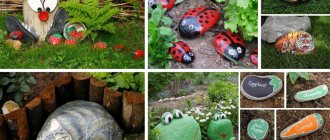
Mushroom clearing
Mushroom figurines are especially popular among owners of country estates. This is not least due to the ease of manufacture.
There is no question of which foam plastic to use for such a craft. Any packaging material will do!
The first step is to cut out the large and voluminous stem of the mushroom. Then the eyes, smiling mouth and nose are drawn with markers.
The hat must be made separately. You can fix the “headdress” using putty or thin wooden rods.
Depending on what type of mushroom you want to have on your site, the cap is painted that color.
You can fix the leg in the ground using cement or plaster.
The painted mushroom should be coated with several layers of varnish, this will extend the “life” of the figurine in the open air.