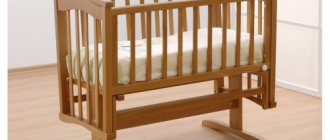
How to make a circle skirt from a dress
What should you do first? Choose a dress that best suits the style of the skirt. Select the necessary tools: sewing machine, ruler, scissors and thread.
How to properly rip a product
The first thing you need to do when choosing a dress for the future product is to measure the appropriate length.
- After these measurements, we simply cut off everything unnecessary with scissors. If the dress is longer and measures 75 centimeters, and according to the plan the skirt is no more than 50 cm, then here you need to trim 25 centimeters.
- After that, using scissors, we cut off the upper part of the dress. As a result of these actions, you will get a rectangular blank.
- Using a sewing machine in long stitch mode, sew the skirt in two lines, leaving longer threads.
- At the end of the work, we pull the skirt into folds using pre-prepared threads.
Making a belt for a skirt with your own hands
To make a belt you will need an elastic band at least 5 centimeters wide.
- Measure the length at the waist plus 3 centimeters seam allowance. Fold the piece in half and sew, stepping back half a centimeter from the edge.
- Afterwards, the belt and skirt need to be connected together, pinned evenly in length.
- Using a sewing machine, sew the belt to the garment using a zigzag stitch. Remove all the pins and the product is ready.
Processing the skirt along the bottom edge
You can process the bottom of the product in two ways:
- Fold the cut of the bottom of the skirt and sew using a carpet stitch or a regular sewing machine. When working on a simple machine, stretch the fabric a little, because the skirt is narrow, which may leave no room for a free step.
- You can finish the bottom the same way you did the waistband. Just make the insert exactly the same size as the bottom of the skirt, no smaller.
Your DIY pencil skirt is ready. As you can see, this is very easy to do.
How to sew a denim skirt from a dress
Before you begin, you must decide how long the skirt will be.
- Separate the top of your dress using scissors.
- Next you need to cut the resulting rectangle with scissors and divide it into two equal parts.
- Measure your hips. If the hips are 50 cm in volume, then each part should be 25 cm wide plus a 3 cm seam allowance. Taking this into account, we take measurements on each part and cut off the excess fabric.
- Now let's measure the waist. If the hips are 50 cm in volume and the waist is 40 cm, then we get a difference of 10 cm and divide this difference by 2 for each part of the product. On the upper edge of the workpiece we measure 2.5 cm. On one side and the other we do the same with the second workpiece.
- Now we draw a smooth oblique from the hip along the marks made earlier.
- We put both parts together, leaving space for the zipper in the upper part, and carefully sew them together (if desired, you can leave a slit at the bottom of the skirt).
- We sew in a zipper, then make a small even lapel at the waist and stitch it using a sewing machine.
- Cut a strip of denim 10 cm wide along the length of your waist.
- We fold the strip in half its length and sew it into the upper part of the skirt. We also fold and stitch the bottom edge.
With a little imagination, you can always decorate your product to your liking.
Before altering an old mink hat, check the inside: tips
Important: Be sure to inspect the interior and the fur itself before starting work! The pile should not crumble, and the core should be dense and moderately hard, but not over-dried by time! If the product is already crumbling at the disassembly stage, then during sewing the core may even crack.
- To remake an old mink hat, you need to completely or partially disassemble it. In any case, even if the changes are minor, we will definitely change the lining! To do this, carefully evaporate the old base and peel it off from the fur.
- If you used a lot of gelatin when gluing, then wet the inside of the cap well. Don't get the fur wet! And lightly tear the flesh from the base.
- When you have taken the hat apart, be sure to inspect the leather part! Old flesh can deteriorate, especially if it was poorly repaired. In this case, acid begins to accumulate, which literally eats away the flesh.
- To do this, wet the flesh and pull it a little. It should become plastic and not tear.
- If you are working with pieces, then trim off all the irregularities. You can just test them for strength - lower the fur trimmings into water for 10-15 minutes. Bad fur will literally begin to fall apart in your hands. You can't work with such fur! If the product is not sewn, then it will fall apart when worn.
- Ideally, strengthen any punctured or worn areas. You can use special glue and thin fabric. Moment glue and spunbond (used in furniture production) proved to be the most durable We cut strips 1 cm wide, grease them with glue, and apply glue to the leather base.
Strengthen the fur around the perimeter and in weak spots!
DIY pencil skirt from an old dress
To make a pencil skirt, follow these instructions:
- We select a dress with the expectation that the length from the waist to the bottom should be at least 65 centimeters. By separating the top of the dress from the bottom using scissors, you should get an even rectangle.
- Then we cut our workpiece into two halves. Place the resulting rectangular pieces together, right sides together, and stitch together.
- We put the resulting blank on ourselves and, using pins, fix it so that our fabric fits tightly to the figure.
- Then we draw a line with chalk along the pins. Then we cut it out of our fabric so that there is an allowance of 1.5 centimeters.
- Sew both parts along the marked line, leaving space for a zipper on one side.
- To attach a zipper to the product, you need to attach the zipper in the open position to the back part, combining the upper teeth and the top of the skirt and stitch it.
- Close the zipper, adjust the front part, align the top and bottom.
- We measure a strip of fabric 10 cm wide along the length of your waist.
- Fold the strip in half along its length and attach it to the top of the product to the wrong side. We also fold and stitch the bottom edge.
The pencil skirt is ready.
How to transform an old mink hat into a fashionable and modern headdress: complete restoration of earflaps
Now we offer you a master class on how to alter an old mink hat, which at first glance cannot be restored at all. But we assure you that the result will give you the opportunity to believe that nothing is impossible! Especially in the fur business.
Initial view
- Let's start cutting out the lining. At the same time, we do not rip, but rather cut off the fur, since the appearance at the seams can no longer be restored.
We cut off everything unnecessary without regret
Rip out all the seams
Cutting the insulation from the ears
- Now we need to check each skin! To do this, simply sprinkle it with water in some places.
Checking
- We wait 10-15 minutes. Gently stretch the flesh.
As you can see, the result is not always positive
- Now we need to refresh the color. To do this, take regular hair dye. Ideally, take chocolate and mix it with 1 part dark brown or half black.
Dye
- Carefully dye the pile and comb it with a pet comb in different directions.
We paint
- Rinse well until the water becomes clear. It doesn't hurt to use the balm that comes with the paint. We also rinse well. Dip with a towel to remove excess moisture.
Let's dry
- Now we will stretch the skins. To do this, we nail it onto a wooden surface with small nails or staples from a furniture stapler along the perimeter. If we talk about the right side - do as you feel comfortable. If you place the fur on top, you can brush it periodically, which will speed up drying.
Stretch
What do we have after painting?
- We trim off any uneven edges or damaged fur.
Trimming
- We cut strips of approximately 0.8-1 cm. Please note that this must be done by weight. And for convenience, so as not to get confused in the stripes, do not literally cut 0.5-1 cm to the edge.
Making stripes
Front and back view
- You can use another model at your discretion. We begin to wrap the front lines on the hat. Please note that we trim off bald patches or damaged fur. We don’t sew it yet, but we hide the ends inside, on the wrong side. We will sew them together at the end, not only with each other, but also sew them directly to the base of the hat.
We wrap around the entire perimeter.
A detailed master class on creating a hat from strips of fur is in our article “How to make a fur hat from stripes?”
- We will make the top of the head from another fur. We also cut it into strips. In this example, a silver fox will be used. If you have beautiful whole fur, you can simply sew on a piece of the desired size. You need to insert a hat elastic at the bottom. Just pull it through the knitted base, and not just through the fur.
Result
How to remake an old mink hat: ideas, before and after photos
We bring to your attention several ideas on how to remake an old mink hat.
From two hats
Beret
Knitting method
With ears
Option
Idea
Different colors
Having altered
Changing the style