Among the symbols of the New Year and Christmas, the star can be called the most popular. It often decorates the top of the New Year tree, the Magi saw it as a sign of the coming of Jesus to earth, snowflakes softly falling outside the window on a winter evening resemble it, and even the flowers of the Christmas poinsettia resemble the outlines of this geometric figure. Therefore, a paper star stencil can be used to create winter decor and themed room decorations with your own hands.
Classics of the genre
It's very easy to make a five-pointed star out of paper without even using glue. This is possible with simple origami skills.
For such work you will need a square sheet of paper, and the work flow will be as follows:
- the sheet is folded in half and placed with the folded side facing the person working;
- both layers of paper in the upper right corner are folded inward and a fold line is slightly outlined. A similar operation is performed with the lower right corner;
- the lower left corner is folded towards the center and the bend is ironed, and then turned back;
- the lower right corner is bent to the triangle on the left side of the workpiece;
- the resulting figure looks like a bag with a narrow lower part and paper of different heights at the top;
- the upper part of the “bag” is cut off obliquely.
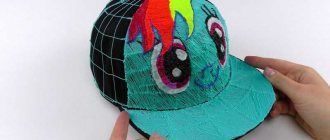
All that remains is to unfold the piece of paper and straighten the rays of the star. The craft is convex on one side, and this shape is suitable for decorative wall decorations.
How to make a starfish from plasticine.
In the water column of the vast ocean there live many creatures that we cannot specifically attribute to either animals or plants. These include the starfish. In fact, scientists say that they are invertebrate animals that eat, breathe and reproduce like all living things. Very often such products, especially artificially created imitations or images, are used to decorate the interior, for example, bathrooms or flower pots; the image of a starfish is in demand.
In this modeling lesson, we also invite you to create your own copy of a little starfish with your children, speculate and fantasize about this amazingly interesting topic.
Star with eight rays
Consider a master class on making a star out of paper. This will be a voluminous product on both sides that can be hung on a Christmas tree, shelf, chandelier or from the ceiling.
Step-by-step production will look like this:
- a square piece of paper is folded in half - from bottom to top, and then back;
- the same is done from the side and the bent part is also turned away;
- on the lines bent inward, the middle is marked, a total of 4 points are placed;
- cuts are made from the edges to the points. The cut edges are bent towards the rib;
- glue is applied to any of the halves and then glued to the other bent edges;
- another blank is made in a similar way;
- the centers of the workpieces are lubricated and glued together so that the rays do not coincide with each other.
This way we get a three-dimensional eight-pointed star.
New Year's star made of cardboard
Make the top of your Christmas tree out of cardboard. Cardboard is no less versatile than paper. But thanks to its increased density, it is more convenient and durable in the process of making crafts.
A simple Christmas star made of cardboard for decorating a Christmas tree top + template
Shapes are cut out of cardboard of the desired shade, and folds are made on them in accordance with the template.
Christmas tree star made of cardboard and sparkles – MK + template
A star shape is cut out of white cardboard and lined. The edge of the scissors is carefully drawn along the lines through one, without cutting through them, and in places of “defects” the cardboard is bent. The top of the craft is covered with a thin layer of glue and sprinkled with glitter. A cone is made from another sheet of cardboard, also coated with glue and sprinkled with glitter. All that remains is to connect the cone with the star and put it on the tree.
New Year's star made of cardboard and thread step by step
A star with an empty core is cut out of cardboard. The cardboard is wrapped with rope along the contour, periodically coated with glue. The star's image is complemented by any decor.
DIY simple 3D cardboard star
Two star templates are cut out of colored cardboard and a cut is made on each: on one at the top, on the other at the bottom. In accordance with the diagram, the stars are fixed on top of each other into a single craft.
Lamp
In addition to the main celestial body and the Moon, stars also emit light. How to ensure that a three-dimensional star made of paper also glows from the inside? Following the suggested instructions, this will not be difficult to do.
- A line is drawn in the center of the sheet, the length of which depends on the size of the beam you want to make.
- On both sides of the line, at an angle of about 30º, two lines are drawn, slightly longer than the main one.
- Then two more lines are drawn (but at an angle of 60º), coinciding in length with the first line.
- We cut along the lines and combine the segments into a shape that resembles a heart.
- The middle is marked between the edges of the rays and the fold lines.
- The workpiece is cut out and a hole is made in it.
- The right strip is glued to the left side. This is how the first ray appears.
- The remaining rays are formed in the same way.
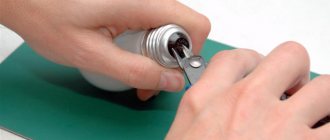
- LED bulbs are inserted into the star through the holes.
How to make a five-pointed three-dimensional star
The five-pointed star is one of the symbols of Victory Day. And it is still often used in creativity on the eve of this holiday. Therefore, I offer several options for creating it.
Idea 1. We will make a double-sided star. It can have different edge colors or the same ones. It's up to you. Below, the edges are shown in shades of yellow and blue so you don't get confused when putting it together.
You need two pieces cut from this template.
You will get something like this. Next, using a ruler and your finger, bend the lines from the center of the rays to the middle and short lines. They are highlighted in contrasting colors in the figure.
Glue the seam allowances and the craft is ready.
Idea 2. Now I will show you a detailed assembly diagram for such a craft. It can be made from A4 sheets.
You cut out a lot of blanks according to the diagram (it will be slightly lower). You need five pieces in this case. Fold the parts along the required lines and glue them together.
And here is the diagram itself.
Idea 3. Suggests that you need to recreate the shape of the star yourself.
To do this, use a protractor and paper. Take a sheet of paper and draw a circle with a compass. Find its diameter and mark it with a line.
Then take a protractor and, starting from the marked line, mark 72 degrees. And so repeat the procedure 4 more times.
Connect all the points with straight lines. you have a sketch of a five-pointed star.
Then you cut it in and bend it along the lines marked with a dotted line and along the lines of the center of the rays.
You can even create a postcard based on such a five-pointed symbol.
To do this, we take the template that is indicated at the end of the article in the section of the same name. We need to cut out 2 gray base pieces. Then a lining, which will be 2 mm smaller at the edges and serve as a liner for the wishes.
We glue the bases together using one beam.
Now you need to take the decor. To do this, we need to cut out parts from plastic and thick cardboard. They are the same size.
From the wrong side we glue the plastic and cardboard parts together. We often distribute bulky double-sided tape around the perimeter. It is sold in craft stores, as well as in household departments.
Pour stars and sequins inside.
We tear off the protective layer of tape and paste the front side of our postcard on top. It turns out like this.
The St. George ribbon will complete the gift well.
On May 9th you can create such a cute present. On it, the base is also a star, but in the center there is a tank made of paper using the quilling technique.
Repeat and create.
A star with a surprise
There is one way to make a star out of paper with your own hands, without bothering yourself with any complex diagrams and drawings. You just need to put several blanks on cardboard or paper.
The work steps will be as follows:
Note!
- DIY paper crafts the most interesting: simple origami instructions + master class on creating creative crafts with your own hands (130 photos)
Paper sword - TOP-120 photos of creative solutions for creating a paper sword + simple instructions and diagrams for children
- DIY paper crafts - simple patterns for creating paper crafts step by step + original ideas for beginners with photo reviews
- Several identical stars are cut out. If you are going to hide some trinket inside, then you need to cut a round hole in each piece of paper;
- glue two blanks to each other. A few more stars should be left to decorate the lid;
- glue on several cardboard circles the same size as the recesses. This is necessary so that the lid closes tightly.
All that remains is to decorate the product beautifully. This can be done using ribbons, sequins, beads or beads.
Making a stencil
The stencil must be dense with a rigid frame. Therefore, for its manufacture it is preferable to use cardboard or very thick paper.
To create a stencil you need:
- thick cardboard;
- paper cutter or sharp scissors;
- a backing that will protect the tabletop from cuts (you can use a cutting board made of wood or plastic);
- ruler;
- a sheet of plain paper or a printout of a star design;
- a well-sharpened simple pencil.
The work is performed in the following sequence:
- determine the size and shape of the future model;
- draw a model on a sheet of paper or use a ready-made drawing. Internet resources will provide invaluable assistance - you can select and print any suitable option;
- the model should be carefully cut out;
- place the blank on the cardboard and trace it with a simple pencil;
- Place the cardboard on the backing and cut out the stencil. The work is done with a cutter. To ensure that the cutting lines are smooth, without creases or burrs, you can use a ruler.
Once the stencil is cut out, you can begin the creative process and create amazing and beautiful stars for holiday decorations and to decorate the interior of your rooms.
Advice. If you create the template yourself, then you need to cut a square from a sheet of plain paper. Two diagonals are drawn in the square.
Their intersection will become the center of the star. Then the rays are drawn relative to the center.
Traditional star
Let's look at another paper star diagram. To work, you need to take a sheet of A 4 format and scissors. The work progress will consist of several actions:
- bend a rectangular sheet of paper into a square and cut off (tear off) the excess part;
- from the square we make a smaller rectangle, fix the fold line;
- re-design the square (smaller size);
- we turn away the bend - we have a vertical line in the center of the workpiece;
- bend the upper left corner of the workpiece towards the center and immediately turn it back;
- We perform a similar procedure with the lower part of the future star and get two criss-cross lines;
- the most crucial moment is that the upper right corner is bent towards the center of the cross;
- turn the corner to the right so that the contact lines coincide;
- the entire left side of the workpiece is bent to the right, and the upper left corner to the center. It is necessary to ensure that the lines touch;
- the workpiece is turned inside out, then folded in the center in the opposite direction;
- turn the top corner up;
- cut the resulting figure in half along the fold line;
- carefully unfold the small triangle and get a five-pointed star.
Five pointed star
Five-pointed ones are a kind of standard. When drawing stars, in most cases they draw five-pointed ones. The reason is simple and clear. The drawing itself is easily remembered and is associated by people as some kind of beautiful phenomenon.
For this we need:
- White cardboard
- Ruler
- Simple pencil
- Glue gun
- Thread (for color)
- A thing with which to decorate (for example, felt)
Instructions for beginners:
- Prepare a template for cutting. It can be found in this article and printed on a printer;
- Place the template on the cardboard and trace it with a simple pencil. Then it’s worth cutting out the workpiece;
- We need to sketch another one inside our sketch. Then cut.
On Victory Day
A red star decorated with a guards ribbon would be an expensive gift for a veteran of the Great Patriotic War. Let's consider one of the options for making a paper star for this national holiday.
Necessary materials
To work you will need:
- two sheets of paper;
- Printer;
- glue and scissors.
Making a holiday decoration is quite simple. If you use paper of different colors, the craft will be more colorful.
Progress
Note!
- Paper craft templates - TOP 100 photos of the best templates. Master class with simple diagrams and drawings for creating with your own hands
How to make a paper swan: simple instructions with step-by-step guide for beginners. Secrets of craftswomen + photos of finished works
- Paper shuriken: TOP-140 photos of the best DIY origami ideas. Instructions for children step by step with simple diagrams
- Two halves of the future product are cut out.
- We use a paper star template and bend the parts along the dotted lines indicated on it.
- Bends are carried out according to the following principle - from an acute angle we bend outwards, and from an obtuse angle - inwards.
- Lubricate the elements of the figurine for gluing with glue and connect both parts of the future star.
- Don't be surprised - as the glue dries, air will begin to fill the star, and in a few minutes it will take on a three-dimensional shape!
How to fold a three-dimensional star step by step using the origami technique
Origami is a very popular technique. It involves creating crafts without glue and practically without the use of scissors.
Below I will show you how to make a six-pointed star.
Take a compass and draw a circle of any diameter you need. Then save the radius and mark it along the entire line of the circle, fixing the segments with dots.
Connect these points through one line using a ruler. Cut out the workpiece and bend it along the indicated lines.
For the next star you need to take a pentagon and find all its diagonals and bisectors. Next, fold it as shown in the photo.
Since it is quite difficult to roll such a star, I am attaching a detailed video.
I liked the craft with congratulations to men on February 23rd. The frame is also made using this technique.
Ten blanks are needed. We put them according to the diagram.
Then we connect it into a circle, and glue a congratulation on the inside.
You can use absolutely any colors.
Star with sparkles
We offer another scheme for cutting out a star from paper in order to obtain a three-dimensional figure. The tools and materials you will need for the craft are as follows:
- paper;
- multi-colored ribbons;
- glue and scissors;
- colored sparkles (glitter).
Necessary actions
To make one night beauty you will need 8 paper squares. Then:
- we turn the square into a triangle, form a fold and unfold the sheet;
- We turn the lower left corner of the sheet onto the fold line, and do the same with the lower right corner;
- then, to the center fold line, we turn first one, and then the second upper corner;
- the following steps - the lower parts of the workpiece are wrapped on both sides, you get something similar to a double triangle;
- triangles are glued together to form a star;
- All that remains is to glue multi-colored decorative sparkles onto the figures.
Having made crafts of different sizes and colors, you can connect them (using ribbons) into a garland and post on your website photographs of paper stars made from basic improvised means.
Stars for interior decoration
To decorate the premises, you will need to make several templates of different sizes and different shapes. For the New Year's holiday you will need light openwork options. If the design of the room is associated with a marine theme, then jellyfish stars are appropriate.
The templates for this option will be more complex. It is better to use ready-made drawings and transfer them to cardboard. They are more difficult to cut out. The work requires precision because the templates have cavities inside.
For models, you can use colored paper or foil. Complex star stencils for cutting out of paper, openwork shaped templates should be cut out very carefully. Small scissors with sharp ends will work here.
An interesting design option is to decorate the glass with stars. These could be windows and glass doors. Templates of different shapes are suitable. You can use a soap solution to glue paper stars.
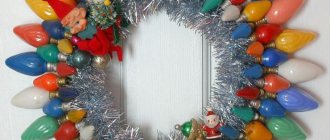
On New Year's holidays, garlands of twinkling stars cut from colored thin foil will become a magnificent decoration. Using a stencil, models are made, strung on threads and hung in the room or decorated with them on a Christmas tree.
Truly, Christmas tree decorations in the shape of stars will be a classic option. They can be painted in different colors, decorated with sparkles or tinsel.
Making crafts with your own hands, the creative process is a fascinating activity. You can have a wonderful time with your child. Preparing a stencil is not difficult.
The child will be happy to help and come up with different options for templates. And transferring the template onto paper, cutting it out, coloring and decorating is a real pleasure for children.
A holiday card with a star decoration will be pleasant because it is made with pleasure and soul.
The house, decorated through the process of joint creativity, will be transformed. The soft and pleasant twinkling of stars made by yourself will bring warmth and comfort to it.
For lovers of Japanese art
For admirers of ancient oriental art, we offer an option for making an origami star from paper:
- the square is folded in half, and then again, but in different directions, and a rectangle is obtained;
- connect corner to corner - form a triangle;
- fold the triangle in half, straighten it and get bends;
- we wrap the side bends inward, getting a double triangle;
- We align one of the side bends and get an “airplane” on the triangle;
- We perform the same operation on the other side, resulting in two triangles;
- a fold is made in the right corner;
- the left corner bends down and to the right, aligned; immediately goes in the opposite direction;
- the blank is turned over and the origami star is ready!
Beautiful star in 3D technique
Well, I think in conclusion we can give a couple more ideas on how to make a star three-dimensional. To do this, turn on the view button and remember.
In fact, there are a lot of ideas:
Or take these instructions with templates and stencils:
Christmas decoration
The Christmas tree, the main guest of the house for the New Year, cannot be left without its main decoration - the star. Among the necessary materials we will need the following things:
Note!
- How to make paper claws - detailed instructions with simple origami diagrams. Creative creation ideas + photo and video reviews for children
- Cardboard crafts - TOP 130 best photo instructions for children. Master class with a clear description of the stages of work + reviews of creative cardboard products
- Paper applique: TOP 100 photos and detailed diagrams of simple crafts for children. Options for unusual DIY paper applications
- Ruler and pencil;
- glue and colored paper;
- beads, tinsel, sparkles;
- scissors.
Getting started involves applying a star stencil to paper. It's simple - a star of the required size is manually drawn on paper. You will need two templates in total. The next steps will be:
- turn over and fold the blanks along the marked lines;
- star blanks are cut out;
- glue the halves together;
- glue multi-colored tinsel onto the finished star.
All that remains is to place the star on the top of the Christmas tree.
What types of stars are there?
The “Star” stencil for cutting out of paper can have a five-pointed or multi-pointed shape. The star can be openwork or contour.
Fantasy has no boundaries. The rays can be sharp or rounded, long or short. You can even make stencils with beams of different sizes.
To decorate for the New Year or birthday, stars can be of different sizes and the most unusual shapes. For holidays such as Victory Day or February 23, strict five-pointed models are appropriate.
"Striped" star
You can make multi-colored New Year's decorations with your children. To work you will need:
- stapler;
- rope or thread;
- strips of multi-colored paper and glue.
You can cut strips of the required length and width yourself (recommended size is 2 cm by 30 cm), and then start making the star.
Making stars for coloring
Children are creative people. Using stencils you can create models for coloring books.
To do this you will need plain white paper and model templates. The stencil is made together with the child. He can do the rest of the work himself.
The template is placed on paper and traced with a pencil. Then the child carefully cuts out the blanks. The rest is the creative process. You can color with pencils, felt-tip pens or watercolors.
This process is not only creative, but also developmental. The child selects a combination of colors, develops fine motor skills, and learns accuracy.
Stages of work
Step No. 1. Take the required number of strips (depending on what size star you are going to make).
Step No. 2. All strips in the middle are fastened with a stapler.
Step No. 3. Glue is applied to the fastening points, the strip is folded and the free tip of the paper tape is glued.
Step No. 4. A similar procedure is carried out with all tapes.
Step No. 5. You can glue multi-colored circles to the middle of the stars.
All that remains is to string or attach the resulting stars to the rope. The length of the twine depends on where you are going to place the New Year's garland.
How to correctly cut a star with your own hands from paper or cardboard
We recommend carefully making a cut in the middle and continuing to cut off the excess from the center, thereby removing the inner part.
Now a glue gun will help us. Lubricate a tiny piece of the product and begin tying it with thread. The glue serves as a retainer for a strong and neat connection.After you wrap it, you will have to decorate it. These can be beads, Christmas figures and much more.