A circular hand saw is a convenient and functional tool for cutting wood blanks. With its help you can cut sheets of plywood, saw boards, trim timber, baseboards, trim, etc.
d. But when there is a large volume of work, for example, when building a house, it is more convenient to use a stationary version of the device. How to make a circular saw with your own hands from a hand tool?
Diagram of a homemade circular saw.
Construction and materials for a stationary saw
A homemade DIY circular saw can be made by securing a hand tool to a stable base. In the simplest version, the device is installed on wooden trestles or on a table mounted from plywood and boards. The tool is secured to the bottom of the plywood sheet, and a cut is made in the tabletop for the toothed disk.
The design parameters of the machine depend on the size of the material being processed. In accordance with it, the power of the hand tool is selected (800-1200 W or more). To perform a clean cut, it is better to install a model with a rotation speed of 3000-4000 rpm.
To manufacture the machine, you will need wood materials, fasteners and tools:
Tools for making a homemade circular saw.
- plywood with a thickness of 20 mm; board for stiffeners and legs (50×100 mm); sandpaper, wood glue and varnish; bolts, screws, clamps; tape measure, pencil, ruler; jigsaw, drill, screwdriver.
The height of the table is selected according to the height of the master and is usually about 1 m; the length of the tabletop depends on the size of the materials that are planned to be processed.
Manual circular as the basis of a homemade design
One of the most popular tools on the basis of which homemade saw structures are created at home is a circular saw (hand-held circular saw). This electric mechanism, using a round disk, makes straight cuts on wood materials, as well as on soft and thin metal. The tool is quite simple, it has all the basic elements that allow you to make a circular saw from a circular saw with your own hands.
The circular saw consists of the following parts:
- electric motor;
- one or two handles;
- protective casing;
A manual circular saw makes straight cuts on wood materials, as well as on soft and thin metal.
- holding platform (to allow disc alignment);
- riving knife (prevents the saw blade from getting stuck in the wood).
Manual circular saws stand out from other similar tools due to some technical features. For example, the depth and angle of cutting can be changed directly during work. Plunge-cut saws provide special capabilities. They can make isolated fragmentary cuts of the required size.
The accuracy and quality of sawing with a manual circular saw depend on the number of teeth on the disk and the angle of their sharpening. With a large number of teeth, the quality is higher, but productivity is slightly reduced.
When making a circular saw with your own hands from a hand-held circular saw, you need to pay special attention to the engine power. This is very important if you intend to perform significant amounts of work. The total weight of the saw also matters. Lightweight models are suitable for occasional sawing.
It is permissible to change the depth and angle of the cut directly during operation of the circular saw.
Making a countertop
The working surface is cut out of plywood using a jigsaw according to the accepted dimensions. The workpiece is processed with sandpaper or a sander. The edges of the table top are milled.
On the bottom side of the sheet, markings are made for attaching a hand saw. A sector is outlined for the hole for the disk.
If you plan to cut workpieces at different angles, the slot should have a trapezoidal contour with a downward expansion. The groove is cut with a hand-held circular saw; holes ø10 mm are first drilled at the ends of the intended sector. Holes must also be made in the tool frame and tabletop for bolt-on mounting.
Next, the stiffening frame is marked for the horizontal surface of the table. The edges along the perimeter should deviate from the edge of the tabletop by 5-10 cm. The boards cut to size are applied end-to-end to the markings on the bottom surface of the sheet, and their contours are outlined with a pencil.
Tabletop diagram for a circular saw.
A center line is drawn in the middle of the marked outline of the frame.
It marks places for screws for attaching the ribs. Through holes are drilled for fasteners with a chamfer on top to recess the caps. Self-tapping screws should be screwed in every 10-20 cm, from the corners of the frame - at a distance of 5 cm.
The boards are placed on wood glue along the intended perimeter and clamped with clamps.
After the glue has dried, without removing the clamping devices, screw in the self-tapping screws and screw the heads into the countersunk hole. In the corners, 2 self-tapping screws are screwed into the end of the frame. Then you need to attach stable legs to the finished tabletop.
Assembling a table for a circular saw
The boards prepared for the legs are cut to length at a slight angle, tapering downward.
The upper ends are also beveled so that the structure stands with a slight expansion. The legs are attached to the tabletop frame with bolts through drilled holes. For better connection strength, you can include square bars glued into the inner corners of the frame into the screed.
It remains to install the working mechanism in the circular saw. The hand-held circular saw is mounted to the machine tabletop from below. The disk is inserted into the cut-out slot, the device is secured with screws, the heads of which must be flush with the top of the plywood sheet.
As a protective layer for the material and to improve the sliding of workpieces, the tabletop and other wooden parts of the machine are coated with several layers of varnish. Markings can be applied to the surface of the tabletop to trim the ends of the baseboards or trim, which are prepared for miter jointing.
Assembly diagram for a table for a circular saw.
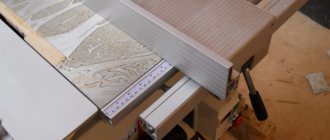
In another embodiment, the working plane of the machine is made of two metal plates.
They are attached to the frame with bolts leaving a gap for the disc. The holes for the bolts are countersunk from above to deepen the heads. The bar for controlling the size of the material being cut can be attached with clamps.
A more convenient stop for the part to be cut is made of a steel angle with shelves of 60 and 80 mm. Its length should be greater than the length of the table.
The ends of the narrow shelf are cut off, and the wide one is bent onto the tabletop. Holes are drilled in the ears and threads are cut for the clamping bolts. The guide strip from the corner is installed according to the workpiece template and fixed with bolts to the end of the tabletop.
If you constantly use the machine, it is better to make the table from steel corners by welding.
The power button can be mounted on the tabletop frame or mounted on the workshop wall using an extended cable to connect the machine. The power key on the saw body can be bypassed or simply secured with a clamp. Access to the machine shutdown device must be safe.
To cut small parts, you can make a mini-machine without a work table.
An old drill can serve as an electric drive for the sawing mechanism. A special shaft for insertion into the drill chuck will have to be ordered from a turner. The toothed disk and 2 bearings must fit firmly onto it.
The frame for installing the shaft is made of two parallel sections of hardwood boards with holes for pressing bearings. The working surface can be made of hardboard or plexiglass. The drill and frame of the device are attached to a board 30-40 mm thick.
The tool, mounted with the handle up, must be securely fastened with a clamp to the base in the cylindrical part of the body near the chuck. The board that serves as the base of the mini-circular is pulled to a regular table with clamps. The body of the inverted drill and the base plate should be at the same level.
The guide bar for a mini-circular saw can be made from a 50x50 mm block.
At one end of it, a stop cut from a board is rigidly fixed. It should be adjacent to the end of the work surface. A threaded pin is attached to the other end of the guide bar.
A second thrust element (bar) is put on it through a hole drilled in it. The stops are tightened by tightening the wing nut on the stud. The guide stop is installed at the required distance from the disk and secured like a clamp.
A homemade mini circular saw allows you to saw off parts of fairly small thickness.
At your discretion, you can improve a homemade circular saw in a simple design by installing additional elements and using other materials. The functionality of the machine can be improved by equipping it with a carriage for feeding material, changing the fastening of the working mechanism, and installing other additional devices for controlling the saw.
A circular hand saw is a convenient and functional tool for cutting wood blanks. With its help you can cut sheets of plywood, saw boards, trim timber, baseboards, trim, etc.
d. But when there is a large volume of work, for example, when building a house, it is more convenient to use a stationary version of the device. How to make a circular saw with your own hands from a hand tool?
Diagram of a homemade circular saw.
Features of assembling a circular saw with your own hands from a grinder
Not every home workshop has a circular saw, but almost any owner who does certain household work with his own hands has a grinder. To create a stationary saw installation, you will also need a workbench or a special table; the tool will be attached from below, like a circular saw.
Attaching to the angle grinder is done using bolts.
But then the assembly process is somewhat more complicated. To make a circular grinder with your own hands, as practice shows, you need to think carefully about the option of attaching a hand tool to the frame.
This could be the following way:
- A metal band clamp is pulled on the grinder, the tie of which should be at the bottom.
- A strip of metal folded in half is attached to the holes for the sliding stop.
- Holes are made in the gearbox of the power tool. The body is first disassembled and drilling locations are marked.
- Using the holes made, an additionally manufactured axial handle is attached.
The handle can be made from a metal tube or rod. The workpiece needs to be shaped like a staple. In those places with which it will be attached to the gearbox, it is also necessary to make holes. Great and serious help for making a circular grinder with your own hands - drawings. They will allow you to correctly calculate the dimensions and number of elements, and prevent errors when calculating fastening locations. If it is difficult to complete the diagram of the future unit yourself, you can use ready-made drawings offered on the Internet.
To make a circular grinder from a grinder, you need to think carefully about the option of attaching the tool to the frame.
Construction and materials for a stationary saw
A homemade DIY circular saw can be made by securing a hand tool to a stable base. In the simplest version, the device is installed on wooden trestles or on a table mounted from plywood and boards. The tool is secured to the bottom of the plywood sheet, and a cut is made in the tabletop for the toothed disk.
The design parameters of the machine depend on the size of the material being processed. In accordance with it, the power of the hand tool is selected (800-1200 W or more). To perform a clean cut, it is better to install a model with a rotation speed of 3000-4000 rpm.
To manufacture the machine, you will need wood materials, fasteners and tools:
Tools for making a homemade circular saw.
- plywood with a thickness of 20 mm; board for stiffeners and legs (50×100 mm); sandpaper, wood glue and varnish; bolts, screws, clamps; tape measure, pencil, ruler; jigsaw, drill, screwdriver.
The height of the table is selected according to the height of the master and is usually about 1 m; the length of the tabletop depends on the size of the materials that are planned to be processed.
What discs should you use for circular saws?
The productivity and quality of work largely depends on the correctly selected disk for a hand-made circular saw made from an angle grinder, a hand saw, or one assembled from separate mechanisms. It should be remembered that there are differences between discs for wood and metal. Even if thin, soft aluminum will be sawed, the appropriate blade must be installed. Metal cutting wheels have finer teeth. There are universal disc options that are suitable for working with both wood and metal.
There are also differences between the discs intended for longitudinal and transverse sawing of wood. Longitudinal sawing is carried out with a cutting attachment with sparse large teeth. But cross-cutting will be of better quality if discs with fine, frequent teeth are used.
As for the material and method of manufacturing disks, they can be monolithic or carbide. Monolithic ones are made from a single piece of high-carbon steel. Such bits are inexpensive, but have a significant drawback: they quickly become dull and require sharpening and re-wiring.
Circular discs can be made for wood or metal.
Carbide discs are made of tool steel with cobalt and tungsten brazing. They are more wear-resistant, but the price of such products is much higher.
The outer diameter of the disks for a homemade circular saw is limited by the dimensions of the protective casing. The standard disc thickness is 3.2 mm. There are thinner and thicker saw wheels. Thin ones are used when working with wood of valuable tree species to make a clean cut. For rougher work, thick discs are recommended.
Making a countertop
The working surface is cut out of plywood using a jigsaw according to the accepted dimensions. The workpiece is processed with sandpaper or a sander. The edges of the table top are milled.
On the bottom side of the sheet, markings are made for attaching a hand saw. A sector is outlined for the hole for the disk.
If you plan to cut workpieces at different angles, the slot should have a trapezoidal contour with a downward expansion. The groove is cut with a hand-held circular saw; holes ø10 mm are first drilled at the ends of the intended sector. Holes must also be made in the tool frame and tabletop for bolt-on mounting.
Next, the stiffening frame is marked for the horizontal surface of the table. The edges along the perimeter should deviate from the edge of the tabletop by 5-10 cm. The boards cut to size are applied end-to-end to the markings on the bottom surface of the sheet, and their contours are outlined with a pencil.
Tabletop diagram for a circular saw.
A center line is drawn in the middle of the marked outline of the frame.
It marks places for screws for attaching the ribs. Through holes are drilled for fasteners with a chamfer on top to recess the caps. Self-tapping screws should be screwed in every 10-20 cm, from the corners of the frame - at a distance of 5 cm.
The boards are placed on wood glue along the intended perimeter and clamped with clamps.
After the glue has dried, without removing the clamping devices, screw in the self-tapping screws and screw the heads into the countersunk hole. In the corners, 2 self-tapping screws are screwed into the end of the frame. Then you need to attach stable legs to the finished tabletop.
Assembling a table for a circular saw
The boards prepared for the legs are cut to length at a slight angle, tapering downward.
The upper ends are also beveled so that the structure stands with a slight expansion. The legs are attached to the tabletop frame with bolts through drilled holes. For better connection strength, you can include square bars glued into the inner corners of the frame into the screed.
It remains to install the working mechanism in the circular saw. The hand-held circular saw is mounted to the machine tabletop from below. The disk is inserted into the cut-out slot, the device is secured with screws, the heads of which must be flush with the top of the plywood sheet.
As a protective layer for the material and to improve the sliding of workpieces, the tabletop and other wooden parts of the machine are coated with several layers of varnish. Markings can be applied to the surface of the tabletop to trim the ends of the baseboards or trim, which are prepared for miter jointing.
Assembly diagram for a table for a circular saw.
In another embodiment, the working plane of the machine is made of two metal plates.
They are attached to the frame with bolts leaving a gap for the disc. The holes for the bolts are countersunk from above to deepen the heads. The bar for controlling the size of the material being cut can be attached with clamps.
A more convenient stop for the part to be cut is made of a steel angle with shelves of 60 and 80 mm. Its length should be greater than the length of the table.
The ends of the narrow shelf are cut off, and the wide one is bent onto the tabletop. Holes are drilled in the ears and threads are cut for the clamping bolts. The guide strip from the corner is installed according to the workpiece template and fixed with bolts to the end of the tabletop.
If you constantly use the machine, it is better to make the table from steel corners by welding.
The power button can be mounted on the tabletop frame or mounted on the workshop wall using an extended cable to connect the machine. The power key on the saw body can be bypassed or simply secured with a clamp. Access to the machine shutdown device must be safe.
DIY mini circular saw
To cut small parts, you can make a mini-machine without a work table.
An old drill can serve as an electric drive for the sawing mechanism. A special shaft for insertion into the drill chuck will have to be ordered from a turner. The toothed disk and 2 bearings must fit firmly onto it.
The frame for installing the shaft is made of two parallel sections of hardwood boards with holes for pressing bearings. The working surface can be made of hardboard or plexiglass. The drill and frame of the device are attached to a board 30-40 mm thick.
The tool, mounted with the handle up, must be securely fastened with a clamp to the base in the cylindrical part of the body near the chuck. The board that serves as the base of the mini-circular is pulled to a regular table with clamps. The body of the inverted drill and the base plate should be at the same level.
The guide bar for a mini-circular saw can be made from a 50x50 mm block.
At one end of it, a stop cut from a board is rigidly fixed. It should be adjacent to the end of the work surface. A threaded pin is attached to the other end of the guide bar.
A second thrust element (bar) is put on it through a hole drilled in it. The stops are tightened by tightening the wing nut on the stud. The guide stop is installed at the required distance from the disk and secured like a clamp.
A homemade mini circular saw allows you to saw off parts of fairly small thickness.
At your discretion, you can improve a homemade circular saw in a simple design by installing additional elements and using other materials. The functionality of the machine can be improved by equipping it with a carriage for feeding material, changing the fastening of the working mechanism, and installing other additional devices for controlling the saw.
The presence in the household of the necessary minimum tools for simple work fully justifies the need to have a small box with the simplest tools in everyday use.
But when the need arises to carry out simple repairs or realize a long-standing dream of a small hobby, then the need arises to purchase or independently manufacture a simple but very necessary carpentry tool - a stationary circular saw.
The practical use of this kind of tools varies from one craftsman to another, but one thing everyone agrees on is that such a machine is simply necessary in a household tool park.
In practical terms, a stationary circular saw is needed:
- for longitudinal dissection of wood; for trimming the edges of unedged boards to obtain smooth sides; for obtaining planks, slats, boards of the same size; for removing part of a board (quarter) to create a tight connection of boards in a panel. In purely economic terms, a circular saw is simply necessary for cutting firewood from wood processing waste.
At the same time, if you approach the issue of machine equipment creatively and put in a little more effort, the result can be a machine with a whole set of universal functions:
- sawing; grinding; planing; drilling; tool sharpening.
Circular machine design
ordinary lumber
Before you think about the design of the upcoming machine, you need to calculate the load to which it will be subjected. The main thing in the frame is reliability and stability. For powerful production saws, the base is a welded reinforced metal structure. But you don’t need such a unit to use it yourself.
If you have just decided to make your own woodworking machine, then you need to take into account the basic parameters of the equipment. Since saws can be different, naturally, the design of the bed can also be different.
First of all, you need to determine the power of the tool. As a rule, for home use, equipment is chosen whose power parameters do not exceed 850 Watts. But, for example, when building a summer house or country house, it is often necessary to cut a very large amount of wood.
That is, more circular power is required. But experienced craftsmen do not advise buying saws where this figure is more than 1250 watts. Installing this equipment in a home workshop is absolutely not justified. And working on it will only increase electricity costs.
The greater the productivity of the machine, the more stable the base is needed. For professional circular saws, as a rule, a base is installed, welded from a steel profile. Sometimes these frames are even concreted into the floor. Because vibration of the device can cause danger to life.
Technical features of circular machines
Depth of the proposed cut. The thickness of the material that will be processed on your machine depends on this parameter. This figure in semi-professional and professional machines ranges from 5 to 8 cm. For cutting boards and thick plywood, this is quite enough.
But working with logs on this machine will be inconvenient. In addition, you need to take into account that this characteristic is reduced in a homemade saw. The depth of the cut will be approximately 1 cm less. But this can be avoided if you provide in the table frame the ability to lower or raise the disk.
When making a tool with your own hands, you need to take into account the frequency of its rotation. If you need a circular saw to prepare building materials, then this figure may be less. If a clean and even cut is needed, then the rotation speed is needed quite high. This is needed, for example, for making furniture.
But even in this case, there are certain nuances. This saw is not suitable for cutting plastic materials. Due to the very high speed of the tool, the disk heats up and the plastic begins to melt.
Therefore, it is better to choose a device where the rotation speed is no more than 4500 rpm; in this case, the frame for the circular saw can be made of wood. The vibration of this machine is low and additional reinforcement of the table is not required.
Well, in the end, what needs to be considered is the location of the buttons and other controls on your machine. When assembling the saw with your own hands, do not forget that access to the control panel must be safe
This rule is even more important when the open part of the saw is located below the tabletop
In this design, it is best to place the panel with switches on the outside of the machine or make a rising tabletop. This design is also convenient for servicing the device. Then, when you have taken into account all the nuances and little things, you can begin directly assembling the table.
How can you make a circular?
As with reinventing the wheel, there is no definite answer; each individual case has its own path of search and discovery.
But, basically, when asked how to make a circular saw, craftsmen make attempts in several directions:
- improvement of existing hand tools, adapting them as main parts - an electric motor and a circular saw; improvement of an industrially manufactured tool for the specific application; assembly of a machine from individual elements - shaft, motor, bed; independent production of all parts of the structure, well, except for the electric motor .
Design elements of a self-made wood sawing machine
To make a stationary machine for sawing materials at home, you first need to know what structural elements it consists of. Whether it’s a homemade machine made from a manual circular saw, a grinder, or a tool assembled from disparate elements, the set of basic parts is the same.
The surface of the table must be made smooth for a higher quality product at the output.
The main elements of stationary circular installations are:
- Table for connecting and securing mechanisms. If the circular saw is powerful and massive, it is better to use a metal table. Options made from chipboard, wood, plywood are suitable, the main thing is that the surface is smooth.
- Shaft. The most important detail. When making it, a lathe is used separately. The dimensions should be calculated accurately to avoid runouts.
- Casing. This element ensures safe use of the circular saw.
- Engine. When using a grinder or circular saw, it is part of the power tool.
On a note! If the design is supposed to be prefabricated, then when creating a circular machine with your own hands, the engine from a washing machine will be the most successful option.
The design of the circular must necessarily have moving parts of the drives, and a button must be built into the power supply circuit to stop the engine in emergency situations.
Circulars of any fixed type consist of main parts.
Manual circular design
The simplest and relatively inexpensive way to make a stationary machine for cutting wood using a circular saw is to convert a manual mounting circular saw into a stationary one. The essence of the modification is to create a standard model of a stationary bed and work table for an industrially manufactured sample.
This modification will allow you to attach the saw upwards with the tool frame, secure it to the work table, and thus use it as a small circular saw. The guide for cutting planks is made from a steel angle 25x25 mm, it is attached to the work table.
The frame itself is welded from 25x25 mm corners, taking into account that the largest standard size of a circular saw is 230 mm, then such a frame is sufficient to create a lightweight, portable but stationary saw, the main use of which is small work that does not require long-term electric motor voltage.
This use case is implemented in some models of domestic and foreign manufacturers of power tools, in which any hard surface is used as the base of the machine, and the mounting saw itself is attached to the base using clamps.
Design Features
Structurally, a homemade sawing table looks quite simple. The machine consists of a supporting frame for mounting the motor, a transmission unit and a work table with a slot for the cutting disk. The design is equipped with stops for guiding the workpiece and a protective screen that prevents chips from entering and also increases work safety.
Mandatory requirements for a sawing table:
- rigid, stable design;
- smooth surface of the tabletop;
- secure disk mounting;
- fencing protecting the operator of the machine (table);
- easy access to the control device (start and stop buttons).
The equipment must be installed on a frame supported not on solid sheets, but on legs. This improves ease of use, although it makes the saw table less stable. To increase durability, the frame can be made of metal or reinforced with metal elements. Safety is ensured not only by the protective screen, but also by securing the disk from the bottom (inner) side. Additional requirements depend on the specifics of the work - auxiliary elements help to process parts more accurately, saw longer boards, as well as thick logs.
By making a saw table with your own hands, you can get a number of advantages - from reduced costs to the ability to change the design as the master needs it. If desired, you can replace some of the parts with more economical ones, or use materials left over from repairs or construction. The only disadvantage of a circular saw independently fixed to the machine is a decrease in the accuracy of workpiece positioning. But this moment still largely depends on the skill of the performer himself.
Rigid, stable construction
Smooth worktop surface Safe disk mounting
Guard protecting the operator of the machine (table)
Tabletop small circular
This option involves making the machine body from wood or an iron angle or profile pipe, taking into account the fact that the placement of the tool will be in a desktop version.
Since the base will be small, the use of such a tool opens up new possibilities. Such a woodworking machine allows you to carry out work in any convenient place. The principle of creating such a machine is similar to how a hand-held circular saw is created - a body, a top plate, a device for fixing a mounting saw or an angle grinder, in the case of using an angle grinder as an engine, are made for the base. Separately, To maintain maximum safety, you need to provide a button to turn the power supply on and off for the tool, and a mechanism for locking the power buttons on the saw or grinder itself. For ease of operation, it is recommended to make the guide bar with guides for fixing the stop into the base body, thereby increasing the reliability of fastening. For clamping here, it is recommended to use bolts with wing nuts, thus further creating ease of operation.
Larger saw
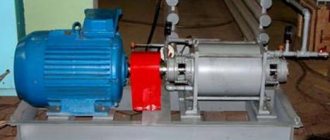
Figure 2. Connection diagram between the motor and the electrical network.
You can build a more powerful machine based on any electric motor:
- The frame is welded from pieces of profile pipe with a cross-section of 30x30 mm. The design option can be either tabletop or floor-standing. You can also purchase a shaft for installing knives, then the circular saw can be used as an electric jointer for planing small workpieces.
- A sheet of metal 3-4 mm thick is attached to the top of the frame with countersunk screws. You can replace it with a sheet of textolite or thick plywood covered with thin sheet metal on top.
- The engine and the shaft on which the cutting disc is mounted are connected by a belt drive.
- The connection diagram between the motor and the electrical network is shown in Fig. 2.
- A switch and a capacitor block are installed in a convenient place. Externally, a mini circular saw may look like in Fig. 3.
To construct the saw body, you can use wooden blocks with a cross-section of approximately 80x60 mm. The frame, if desired, is sheathed with sheet material. The assembly of a wooden structure is carried out using self-tapping screws or bolts and nuts. The main mechanism is located under the tabletop. It consists of an electric motor, a working spindle and a disk.
The spindle can be assembled from a bicycle pedal assembly. The disc is selected with a diameter of 12-13 cm. This is quite enough for everyday needs. The engine must be constantly blown with air during operation. General layout of the machine: Fig. 3. Individual components and parts may differ significantly from those shown in the diagram.
Making the stop and preparing the necessary holes
For a stationary saw intended for longer operating hours, the presence of a reliable stop for fixing the thickness of standard opening boards is an important and necessary condition.
The emphasis itself is made of metal or using a metal base and individual wooden parts.
The most acceptable option is to create a stop from a 100x100 mm corner, with metal plates of at least 5 mm thick welded to it with slots along the length. The length of the stop must be no less than the length of the working plate of the circular saw. The length of the plates must correspond to the width of the working surface of the stove.
Holes are drilled in the body through the work plate:
- on the edge through the machine frame; in the middle of the work plate.
The holes should form a regular rectangle with the vertices in the center of the holes.
The holes are necessary so that on the inside of the machine in these places, on strips reinforced with a strip of metal 5-6 mm thick, nuts are welded to fix the clamping bolts of the stop.
When making a stop and drilling holes, you need to take into account that the stop must be parallel to the plane of the saw.
Making the adjustment rod handle
Adjustment of the cutting depth or the height of the saw exit above the working plate is adjusted on the frame in two ways:
- creating a lifting mechanism for the working plate; creating an adjusting mechanism for raising and lowering the axis of the circular saw and the motor with a belt drive.
The plate lifting mechanism can be constructed by fixing the metal plate to the machine frame using long bolts. Lifting will be carried out by tightening the locking and fixing nuts on each bolt.
The second type of lifting mechanism can be represented as:
- guides along which the carriage with the shaft and motor moves; an adjusting rod with fixing nuts; handles with an applied adjustment scale.
The adjustment rod itself can be replaced with a standard metal threaded stud. This option is even more profitable than inventing new methods.
The adjustment handle can be made by welding a metal plate to the end of the stud. At a distance of 4-5 mm from the center of the plate, aligned with the center of the stud, holes are drilled for self-tapping screws.
For ease of operation, a rod is welded to the end of the plate in such a way that the entire structure can be rotated using it.
As a scale, you can use a round washer made of multilayer plywood or plastic - it is put on a pin and fixed, on the one hand, with self-tapping screws, on the other hand, it is pressed with a nut.
Having assembled the entire lifting mechanism, a scale corresponding to a certain lifting height of the working plate is applied experimentally to the plywood.
Making a benchtop tool
For comfortable work with machines, it is necessary to provide, in addition to the elements already mentioned, other tools and devices necessary for normal operation:
- on the working plate, for convenience, it is recommended to apply a centimeter jackal, “0” of which corresponds to the side of the saw blade; to protect against accidental chips and splinters, it is recommended to install a protective screen made of transparent plastic above the disk; to facilitate cutting, when additional force is needed to press the board, it is recommended to consider installation of a pressure roller or wooden pressure plates; to facilitate the work and prevent the board from falling back, it is necessary to install thrust plates.
Required tools and materials
To correctly and reliably connect parts and create a rigid structure capable of withstanding heavy loads, you will need:
- tools: grinder with cutting wheels; welding machine; hammer; drill with a set of drills; marking tools - tape measure, meter, square, scriber, core; consumables - electrodes, metal brushes; clamps, vice materials: metal corners or profile pipe; metal sheet for the work plate; bolts, washers, nuts, studs; metal strip; hardwood boards;
Selection of materials and parts
When creating a homemade circular saw, it is necessary to maintain an optimal balance between its functionality, safety during operation and manufacturing costs. To achieve this, you should select materials and parts with the desired characteristics. To reduce costs, you need to start from old or unused equipment that is available.
Materials for making a bed with a table
To make a bed (frame), you can use a channel or metal corners (sizes from 25×25 mm to 50×50 mm are sufficient). If these materials are not available, then the most economical option is to purchase them at a scrap metal collection point. The legs of the machine will use water pipes or profile metal pipes.
Advice! Frame elements must be connected to each other using electric welding, because bolted connections unwind under the influence of vibrations.
When assembling the frame, it is also necessary to weld spacers at the corners to impart rigidity to the structure. To make it easier to move the machine, you can equip it with durable wheels (with a metal rim) equipped with locks. It should be borne in mind that the more massive the unit being created, the more stable it must be in order to avoid injury.
Metal pipe frame
The main requirements for a table for a circular saw: resistance to mechanical influences (vibration, shock), the ability to withstand workpieces weighing more than 50 kg without deflection, and surface smoothness . These properties characterize sheets of the following materials:
- become;
- duralumin;
- silumin;
- PCB;
- moisture-resistant plywood;
- organic glass.
If you use moisture-resistant plywood, then it should first be covered with zinc-coated sheet metal. The use of chipboard or OSB is not recommended due to the instability of these sheet materials to vibration influences.
Important! The strength of the table is of great practical importance. If it cracks or becomes distorted due to deflection, the disk may jam. This can lead not only to damage to the workpiece, but also to injury.
To carry out various work (for example, cutting logs into boards), you need to equip the table with a side support. It performs the same function as a guide bar for a hand-held circular saw: it ensures even sawing of lumber. Moreover, its use makes it possible to obtain workpieces of different sizes.
The guide stop must be strictly parallel to the disk to avoid jamming of the latter. It can be made from a wooden block or a metal corner. In the first case, only hardwood should be used. To be able to adjust the working gap, the stop must be removable. It can be fixed using clamps or in special grooves (bolts) made parallel to each other on the working surface of the tabletop.
Selection of engine and starting equipment
It is easiest to use a single-phase electric motor as a drive for the considered version of a homemade circular machine. Its power must be selected taking into account the upcoming load. Indirectly, you can navigate by the diameter of the installed disk:
- if it is 350 mm, then for normal operation of the unit you need an electric motor with a power of 1000 W;
- for a disk with a diameter of 170 mm, a 500 W motor is sufficient.
In the latter case, you can make a drive mechanism from an engine from an automatic washing machine. It is able to work for a long time at an average load level. For disks with a diameter of 350 mm, an electric motor from an industrial ventilation unit is suitable. It should be secured firmly to ensure proper engagement of the belt drive. For this reason, it will not be possible to reduce the level of vibration by installing the motor on shock absorbers: it will constantly oscillate.
You can also equip homemade equipment with a three-phase electric motor (380 V) of suitable power. To start it from a 220 V network, you will need to additionally install working (phase-shifting) and starting capacitors into the electrical circuit. It should also be taken into account that the engine power will be less than the nominal value indicated on its plate or in the passport.
Starting equipment should be selected based on the power of the motor, on which the maximum current in the circuit will depend. A good option is to use a start button in conjunction with thermal protection - this will protect the electric motor from burning out the windings if the current increases when the disk jams . It is better to install the protection in a separate electrical panel attached to the side panel of the machine on the convenient side.
All connections must be well insulated so that the wires do not short-circuit to the frame of a homemade circular electric saw. The on and off buttons should be pressed without any effort. Due to the frequent storage of equipment outdoors, it is necessary to protect the electrical part well from getting wet. The simplest thing is to cover the installation with oilcloth or similar waterproof material.
Gear, shaft and disc
To transmit rotation from the electric motor to the disk, the best option is to use a V-belt in conjunction with pulleys from the car engine. The use of gears is not recommended for safety reasons. This is due to the fact that if the disk jams, the belt will simply slip, and the gear drive, due to its rigidity, can cause failure of the entire drive unit.
Advice! If you use pulleys of different diameters, you can change the speed of the disk and install different types on the machine. This is true if there is no motor speed controller.
It is better to entrust the manufacture of the shaft to a specialist by ordering it from a professional turner. Moreover, when you plan to make a circular electric saw more functional by equipping it, for example, with a plane. But the simplest option is to buy a ready-made factory-produced part. A sample of it is shown in the photo below.
It is recommended to use self-aligning ball-type bearings together with the shaft. The mounts for them will fit from the car hub kit. In this case, the bearings should be well protected from dust.
It is easier to buy a disk for a circular machine ready-made than to make it from a sheet of tool steel. The problem is one of balancing. An imbalance of the saw during operation of the equipment leads to its rapid failure and reduces the level of safety of the work process. If you have a circular saw for wood, you can remove the saw blade from it.
It is necessary that the diameter of the disk corresponds to the corresponding parameter of the sawn timber: for example, for 100 mm logs you will need to use a saw measuring approximately 350 mm. This is due to the fact that the disk should not protrude more than a third of its diameter above the working surface of the table.
Ignoring this requirement not only leads to a deterioration in the quality of sawing workpieces, but also increases the possibility of injury.