What materials and tools are needed to make a saw?
The set of tools and consumables for creating a band saw with your own hands at home may vary depending on the features of the chosen design. But, as a rule, the construction of a machine requires the following:
- boards or sheets of plywood for the frame;
- bearings;
- motor - electric or gasoline;
- metal corners;
- metal cutting blade - homemade or purchased;
- self-tapping screws and bolts with nuts;
- rubber from a bicycle inner tube;
- wooden blocks and slats, they are needed for the supporting frame of the structure;
- bushings;
- belt for transmitting torque;
- a steel rod that will serve as a shaft for the pulleys;
- steel sheet or piece of PCB;
- varnish or paint, they are needed at the final stage of creating the machine.
Also, when making a band saw with your own hands, you will need to use the following tools:
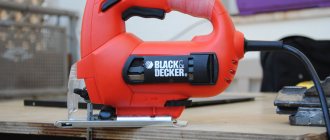
- grinder;
- screwdriver;
- pliers;
- wrenches - sizes are selected in accordance with the bolts;
- jigsaw;
- screwdrivers;
- hammer.
Advice! When choosing boards for the table and band saw frame, it is better to choose hardwood blanks with a thickness of at least 2 cm.
Selection of tape material
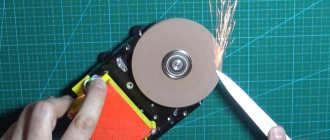
If you wish, you can make a saw blade for a band saw with your own hands from U8 or U10 tool steel. The material should be strong but flexible, with a thickness of 0.4-0.8 mm for cutting hardwood. When creating a blade yourself, you will need to use a grinder to cut out the teeth in the metal, spread them apart and sharpen them, and then solder the tape into a solid ring with a gas torch and sand the seam.
Small hatchet made from a saw blade
Hello crafts lovers, today we will look at how to make a small convenient hatchet from a saw blade. You can take such an ax with you outdoors, hunting, fishing, hiking, and so on. A distinctive feature of the ax is the handle; it is combined, made of wood and epoxy resin, and looks quite interesting. The handle pads are held on with screws, so they can be easily replaced if necessary. The ax has been hardened, it is sharpened to the point of a razor, and the author uses it to cut paper. If the homemade product interests you, I suggest you study the project in more detail!
List of materials:
- saw blade or other source of carbon steel; - wood for the covers; - epoxy resin and blue dye; - thin G10 or other similar material; - decorative screws with nuts for attaching the covers; - polishing paste; - leather for the cover; - oil for wood.
The process of making a hatchet:
Step one. Main profile of the hatchet
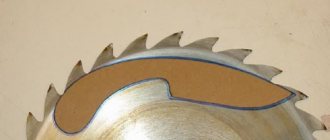
Draw the main profile of the hatchet on the saw blade with a marker. It is better to use an old disk; the metal in modern disks may be bad. If you want to make a high-quality axe, it is better to try cutting a piece of metal from the disk and try to harden it. Now the profile can be cut, arm yourself with a grinder and get to work. We cut out bends and other problem areas with a grinder in pieces.
Step three. Hole
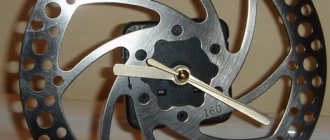
The ax has an oblong hole, it serves as decoration, and thanks to it you can open beer and other drinks. The hatchet can be hung from the same hole.
Our hole is oblong and has a fairly large diameter; to solve this problem, we will need a drilling machine with crowns. You will need crowns with carbide tips, since steel cannot be drilled with a regular drill. We mark everything and drill holes along the edges of the future window.
Next, we combine these holes by cutting out a piece of metal with a grinder. That's all, now you need to finish the hole with a metal file. Don't forget to also drill holes in the handle for the pins before hardening.
Step four. Bevels
We make bevels on the hatchet; they can also be done by eye, since our blade is small. We carry out the work using a belt sander; we need to ensure that the bevels are symmetrical.
Step five. Hardening
If the saw blade is made of steel rather than iron, it can be hardened. Heat the hatchet until it glows red; at the right temperature, the magnet should stop reacting to the steel. Next, immerse the ax in oil and check whether the steel has been hardened. The metal should start to ring and should not be taken with a file.
After hardening, the steel must be released, otherwise it will become brittle. This is usually done in the oven, the temperature should be about 200 degrees Celsius. We heat the ax for about an hour or two, the metal should become straw-colored. If everything is done correctly, the ax handle should begin to spring back when you hold the ax in a vice and pull the handle to the side.
Step seven. Pen
We make linings for the handle; we have them combined, made of wood and epoxy. We trace the outline of the handle on the tree and cut out the future handle. The thickness of the workpiece should be such that it can then be cut lengthwise into two halves and get two workpieces.
We cut out the workpiece on a band cutting machine; this task can be handled with any other specialized tool, including a hand jigsaw.
You need to cut channels in the workpiece for pouring epoxy resin. We glue the resulting handle parts with tape and place them in the formwork for pouring. Acrylic, plywood and other materials are suitable as formwork. Make sure that the resin does not leak anywhere, it is much more fluid than water. Mix the resin, add blue dye and pour it in, wait until it hardens completely.
Next, we disassemble the formwork and cut the workpiece; we also need to cut the handle lengthwise into two halves. Between the overlays and the metal part of the handle there are also inserts from G10, we cut out the necessary parts.
Then we place the blanks on the knife and form the desired profile with files and sandpaper. To make the resin transparent, the handle must be polished with polishing paste.
Step nine. Case and tests
We are assembling a case for the axe, with it the ax will be comfortable to carry, and it will look better. The case is made of leather and closes with a button.
Receive a selection of new homemade products by email. No spam, only useful ideas!
Please note: Diagram of a simple battery charger with auto shutdown
*By filling out the form you agree to the processing of personal data
DIY ax made from a circular saw blade
There will be no difficulties during the manufacturing process. It is enough to have some experience in cutting and processing metal and wood. If you follow the recommendations, the expected result will be achieved.
What you need
The availability of sufficient quantities of certain materials and tools must be checked in advance.
Making a hatchet from a disk.
Materials:
- saw blade;
- materials for handle linings;
- cover material;
- impregnation for wood.
Tools:
- Bulgarian;
- jigsaw or band cutting machine;
- grinding machines - belt and orbital;
- oil and furnace for hardening;
- oven;
- files;
- marker;
- sandpaper.
Ax making process
Before starting work, you need to check the quality of the metal. To do this, a small piece of the disk is cut off and hardened. If the quality after hardening is normal, you can start working:
- The outline of the future hatchet is drawn with a marker on the disk.
- Using a grinder we cut off the excess. A rough profile is made, which will then be processed. If there are difficult areas, they need to be cut out in pieces. Be sure to leave a drawn outline.
- It is necessary to bring the workpiece to the desired shape. The rough profile is processed using a belt sander. To do this, you can use a grinder with a grinding disc. There may be a situation when a power tool cannot help because the profile is complex or there is not enough space. In such cases, a file is used.
- Sometimes, an oblong round hole of large diameter is made in the head of such hatchets. It is used to hang an ax or open bottles. It also gives the instrument an original look. To do this, holes are drilled along the edges of the future window using crowns with special carbide tips. The metal between the holes is cut out with a grinder and processed with files. Holes for attaching the handle are immediately drilled into the handle. This step must be done before hardening.
- The bevels are made on a belt sander. Ideally, they should have the same angle. Since the blade is small and relatively thin, they can be done by eye.
- Quenching occurs with oil. The metal becomes red hot and is immersed in oil. If after hardening it cannot be taken with a file and rings, everything is done correctly. The correct heating of the metal can be checked with a magnet. The temperature is right when it stops reacting to the steel.
- After hardening, the metal must be released. For this, you will need an oven that can heat the hatchet to 200 degrees Celsius. Heating takes about 2 hours. The metal should become the color of straw. If the process is performed correctly, the handle of the product will spring back.
- Grinding occurs in two stages. Coarse sanding is done using a grinding machine, and the blade is polished with sandpaper and water. After sanding, it is advisable to seal the head of the hatchet with masking tape.
- When making handle linings, everything depends on imagination and taste. More often the overlays are made of wood. A blank is cut out along the contour of the handle and cut lengthwise into two parts. You can cut each piece like a puzzle and fill the mold with epoxy glue. If you add a coloring agent to the glue, it will turn out more interesting.
- The pads are sanded, impregnated, put in place and secured. Overlays for metal can also be made from fiberglass. It has many color options and does not deform under the influence of the environment.
If desired, you can make a leather case. This way it is more convenient to carry the hatchet and the person will not get hurt. However, in this case, it is enough to make a cover only for the blade and secure it in the hole in the head of the ax with a button.
Rules for working with metal
In order for the blade to be strong and elastic, during its manufacture it is necessary to follow the rules of working with metal. They are as follows:
- The workpieces must not have visible or hidden damage. Before making a knife, the workpieces must be inspected and tapped. A solid part sounds loud, but a defective part sounds dull.
- When designing the shape of the blade, angles must be avoided. In such places the steel can break. All transitions must be smooth, without kinks. The cuts of the butt, handle and fuse must be ground at right angles.
- When sawing and sharpening, do not overheat the steel. This leads to a decrease in its strength. An overheated blade becomes brittle or soft. During processing, the workpiece must be constantly cooled by completely immersing it in a bucket of cold water.
- When making a knife from a saw blade, you need to remember that this product has already gone through a hardening cycle. Factory saws are designed to work with the hardest alloys. If you do not overheat the canvas during the turning and finishing process, then you will not have to harden it.
The blade shank should not be made too thin. It is this part of the product that will bear the heaviest load.
see also
Comments 27
I made three knives from saw blades, the first one was clumsy due to inexperience, the second one was made from a piece of a thick disk 5mm thick, the metal is a bit soft (although the disk was without soldering) it lies in the form of a blank waiting for its use, the third one was more or less a success, but it also seems a little soft, hardening yet I haven’t mastered it... By the way, I wanted to make the same cleaver, but the disk ran out))) Then, if I succeed, I’ll post pictures of the knives. Another spring from ZIL 131 is lying, waiting for its turn...
Bones for broth are definitely good!
The first photo is valid...
the knife is garbage but the main thing is the process (((
Was he boiling something out of her ass? :))))
Wrap it up so it doesn't rust.
What about the strength of steel? On which bone will the first nicks appear and will it become dull?
I sharpened it at 30 degrees, but to chop bones you would need 45-50 degrees then it’s normal, but to chop meat the knife still needs to be heavier, with a blade thickness of about 4-6 mm, but here it’s 2 mm, that’s why I sharpened it by 30 degrees, but during the sharpening process I will reduce the angle
What about the strength of steel? On which bone will the first nicks appear and will it become dull?
Greetings to those who like to craft, today we will look at how to make an unusual ax knife, which can easily be used for both chopping and slicing. The peculiarity of the product is that the knife has three blades. The starting material for making the homemade product was an old circular saw blade. In general, these wheels can be an excellent source of carbon steel, but the metal found in modern wheels is bad. So it is better to choose old disks for such purposes and check in advance whether the steel is hardened. Making a hatchet is not difficult, although you will have to do a lot of grinding work, so it is useful to have a belt sander for such purposes. If the project interests you, I suggest you study it in more detail!
Materials and tools used by the author:
List of materials:
– a circular saw blade; - epoxy adhesive; – board (for overlays); – brass rods (for pins); – oil for impregnating wood.
Homemade manufacturing process:
Step one. Cutting out the hatchet profile
First, we make a hatchet template so that we don’t have to improvise in the process. We cut it out of paper and transfer the design to the workpiece, in our case it is a piece of a circular saw blade. After this, you can start cutting, the author works with a grinder. We cut out bends and other similar places where the grinder disc cannot reach it in pieces. Then the profile can be trimmed with a thick sharpening disc. And where working with a grinder is not possible at all, we refine these areas with files or a drill, if available. At this point we must complete the profile manufacturing process.
Step three. Hardening
If the ax is completely ready, you can harden it so that the steel becomes strong and the ax does not become dull for a long time. Before hardening, do not forget to drill holes in the handle for the pins. Heat the product and lower it into oil. If you don't know what grade of steel is being used or how to harden it, it's best to do some experimenting with small pieces of the steel first.
After hardening, the steel must be released, since the metal will be brittle, and the hatchet may shatter into pieces at the first blow. Here we need an oven, the temperature should be around 200 degrees Celsius. Such a massive knife needs to be heated for at least 2 hours; the metal should be evenly covered with a straw or yellowish patina.
Making a knife from canvas
If the blade is large and does not have much wear, then several blades for different purposes can be made from it. The effort and time spent are worth it.
A knife is made from a circular saw with your own hands in the following sequence:
- A pattern is applied to the canvas, and the contours of the blade are outlined. Scratches or dotted lines are applied over the marker with a core. This way, the design will not be erased when cutting out the workpiece and adjusting it to the desired shape.
- Workpieces are cut from a circular saw blade. To do this, it is better to use a grinder with a metal disc. You should leave a margin of 2 mm from the contour. This is necessary in order to remove the material burned by the grinder. If you don’t have a grinder at hand, you can sharpen the workpiece using a vice, a hammer and a chisel or a hacksaw.
- Any excess is ground off on the grinding machine. You will have to spend a lot of time on this process so as not to overheat the steel. To prevent this, the workpiece must be regularly immersed in water until it cools completely.
- The blade is outlined. Here you need to be careful to maintain the contour of the knife, not burn it and maintain an angle of 20º.
- All straight sections are leveled. This is conveniently done by placing the workpiece on the side of the grinding wheel. The transitions are given a rounded shape.
- The part is cleared of burrs. The blade is ground and polished. To do this, several interchangeable wheels are used on a grinding machine.
Separately, we should dwell on how the handle is made. If wood is used, then a monolithic fragment is taken, in which a longitudinal cut and through holes are made. After this, the blank is placed on the blade, and holes for fastening are marked in it. The handle is fixed to the blade using rivets or bolts with nuts. In the case of a bolted connection, the heads of the hardware are recessed into the wood and filled with epoxy glue.
When the handle is assembled from plastic, 2 overlays are used, which must be symmetrical. To give the knife originality, the plastic linings are painted on the inside. You can make cavities in the overlays that can be filled with jewelry, items made of non-ferrous and precious metals, small compasses and photographs.
After fastening to the blade, the handles are ground until they acquire the required shape and smoothness.
see also
Comments 27
I made three knives from saw blades, the first one was clumsy due to inexperience, the second one was made from a piece of a thick disk 5mm thick, the metal is a bit soft (although the disk was without soldering) it lies in the form of a blank waiting for its use, the third one was more or less a success, but it also seems a little soft, hardening yet I haven’t mastered it... By the way, I wanted to make the same cleaver, but the disk ran out))) Then, if I succeed, I’ll post pictures of the knives. Another spring from ZIL 131 is lying, waiting for its turn...
Bones for broth are definitely good!
The first photo is valid...
the knife is garbage but the main thing is the process (((
Was he boiling something out of her ass? :))))
Wrap it up so it doesn't rust.
What about the strength of steel? On which bone will the first nicks appear and will it become dull?
I sharpened it at 30 degrees, but to chop bones you would need 45-50 degrees then it’s normal, but to chop meat the knife still needs to be heavier, with a blade thickness of about 4-6 mm, but here it’s 2 mm, that’s why I sharpened it by 30 degrees, but during the sharpening process I will reduce the angle
What about the strength of steel? On which bone will the first nicks appear and will it become dull?
Greetings to those who like to craft, today we will look at how to make an unusual ax knife, which can easily be used for both chopping and slicing. The peculiarity of the product is that the knife has three blades. The starting material for making the homemade product was an old circular saw blade. In general, these wheels can be an excellent source of carbon steel, but the metal found in modern wheels is bad. So it is better to choose old disks for such purposes and check in advance whether the steel is hardened. Making a hatchet is not difficult, although you will have to do a lot of grinding work, so it is useful to have a belt sander for such purposes. If the project interests you, I suggest you study it in more detail!
Materials and tools used by the author:
List of materials:
– a circular saw blade; - epoxy adhesive; – board (for overlays); – brass rods (for pins); – oil for impregnating wood.
Homemade manufacturing process:
Step one. Cutting out the hatchet profile
First, we make a hatchet template so that we don’t have to improvise in the process. We cut it out of paper and transfer the design to the workpiece, in our case it is a piece of a circular saw blade. After this, you can start cutting, the author works with a grinder. We cut out bends and other similar places where the grinder disc cannot reach it in pieces. Then the profile can be trimmed with a thick sharpening disc. And where working with a grinder is not possible at all, we refine these areas with files or a drill, if available. At this point we must complete the profile manufacturing process.
Required materials and tools
First of all, you will need to get the canvas itself to make the blade.
Old circular saw blades are made of high quality steel. You can find them in abundance at swap meets and garage sales. The big advantage of using an old saw is the lack of complex metallurgical work. If you make a blade from a disc on concrete, it will immediately have the necessary hardness to maintain an edge and other characteristics of a high-quality knife.
To create a bladed weapon, you will need the following list of tools (we will use improvised means available in any garage, if you have an alternative to some items, use it):
- marker;
- scissors;
- Bulgarian;
- hacksaw for metal;
- protective equipment (glasses, gloves);
- Grinder;
- vice;
- clamps;
- wood hacksaw;
- files;
- sandpaper;
- pliers;
- drill and bit;
- gas oven and blowtorch;
- lighter.
Materials:
- saw blade;
- paper or cardboard for a sketch;
- towels (rags);
- stewing oil;
- wooden blanks for making a handle;
- rivets;
- epoxy resin;
- abrasives for sharpening.
Kitchen hatchet made from a saw blade
Hello everyone, today we will make such a useful thing for the kitchen as a kitchen hatchet. Using this homemade product, you can chop or cut vegetables, meat, bones and other products. The author used an old saw blade made of thick steel as the material. As a result, the hatchet became weighty, which makes it convenient. The product was also quenched and tempered, which made the steel durable. The handle covers are made of wood, which is impregnated with epoxy resin; as a result, such a handle will not be afraid of water. The only drawback of the chosen steel is that it rusts, but if the ax is used often, over time the steel will become covered with a patina. You can make the patina yourself, using etching and so on. If the homemade product interests you, I suggest you study the project in more detail!
Materials and tools used by the author:
List of materials:
- old saw blade (made of good steel); - wood for linings; — brass rods for pins; — epoxy resin and dye; - wood oil.
List of tools:
— belt grinder; - drilling machine; - Bulgarian; - files; - sandpaper; - stove, oil, oven (for heat treatment); - marker; — orbital sander.
The process of making a hatchet:
Step one. Ax profile
Before cutting an axe, it is advisable to check the steel for hardening.
Otherwise, it can be very disappointing later when the product suddenly refuses to harden. To save steel, some modern saw blades are made from poor metal; such “steel” cannot be hardened. The author uses an old thick saw blade as the starting material. First, draw the desired profile of the hatchet on it with a pencil, and then draw it with a marker. That's all, you can start cutting, the author works with a grinder. Our metal is quite thick, so cutting will take quite a long time. As for problem areas that cannot be cut out with a grinder, we cut them out in pieces. As a result, we will get a primary ax profile with uneven edges after cutting with a grinder. We eliminate all these sins by grinding, here we need a belt sander. The workpiece will heat up quite strongly, cool it periodically in water. The author makes the final modification of the profile manually, using files.
Step two. Descents
We draw out the slopes on the axe; there will be quite a lot of grinding required here, so we again turn to the help of a belt sander. To make the bevels symmetrical, draw a centering line along the blade. When grinding, steel should not be overheated; under no circumstances should it turn blue.
We also drill all the necessary holes in the axe, since hardening is required next.
Step three. Heat treatment
Let's start hardening the axe; to do this, the steel needs to be heated to a temperature of just over 800 degrees. The ax should warm up evenly; it will glow in all places with the same red hue. Next, immerse the ax in oil and check whether the hardening was successful. If everything is done correctly and the ax is made of quality steel, it should not be scratched by a file.
Then be sure to temper, otherwise the steel will be very brittle and the blade may chip. For holidays we use the oven, the temperature is classically set at around 200 degrees Celsius. If the steel has been pre-ground, it will turn straw-colored after tempering.
Step four. Grinding
After hardening, the steel will be covered in soot and scale; the whole thing needs to be cleaned off. We arm ourselves with an orbital sander and polish the hatchet well until it shines.
As for the slopes, the author decided to polish them by hand. We use fine sandpaper and WD-40. If desired, the slopes can also be polished.
Step five. Overlays
We make linings for the handle, here we need wood, a block or a thick board will do. As a decoration, we drill holes in the workpiece and fill it with epoxy resin and dye. The author used a silicone mold to pour the resin.
When the epoxy resin dries, we need to cut the workpiece lengthwise to create two halves, which will become the overlays. For cutting, the author uses a band saw, but you can also do it with a hacksaw. We grind the workpieces well and you can cut out the primary profile.
Step six. Installation of overlays and completion
We cut brass rods that will be pins, and also mix epoxy glue. We glue the handle, not forgetting to thoroughly coat the pins with glue. We tighten everything well with clamps and let the glue dry.
Well, when the glue dries, we set the desired handle profile; the author carries out this work manually, so as not to remove excess. First we work with files, and then we switch to sandpaper and grind the handle until it is perfectly smooth. Finally, we coat the handle with oil or varnish, this will return the epoxy resin to its former transparency, and the handle will look like a masterpiece.
The hatchet is ready, all that remains is to sharpen it and, if desired, polish it. The author's ax is so sharp that it easily cuts thin paper. At this point the project can be considered successfully completed, I hope you liked it. Good luck and creative inspiration if you decide to do this again. Don't forget to share your ideas and crafts with us!
This post may contain affiliate links. This means I earn a small commission from links used at no additional cost to you. See my privacy policy for more information.
hatchet, disc
How does a band saw work?
Band saws may vary in design depending on the model. However, for a home workshop, a machine with a vertical blade is usually chosen, which consists of the following main parts:
- frame, or frame;
- sawing table;
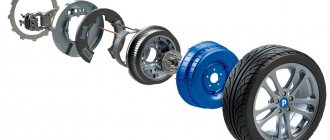
- drive, or electric motor;
- pulleys;
- saw blade.
The design is activated when the electric motor is turned on, and the cutting belt begins to move along a closed circular path at high speed.
Important! People most often assemble wood saws for the home with their own hands. Theoretically, the machines can work with metal, but it is difficult to build a structure with the appropriate characteristics from scrap materials
Ax design
The design of this ax consists of three parts.
Ax blade
The shape of the blade was borrowed from the tomahawk, an ax used by Native Americans and European colonists. But you can change its shape by adding some spikes or a hammer on the butt. The ax blade will be glued to the handle and secured with rivets.
Opener
First, as an opener, I wanted to make a suitable hole in the blade. As a result of test drilling, it was discovered that it was impossible to make a hole with a conventional drill, so I changed the type of opener. Both options can be seen in the image. The new type will be made in the form of a specially shaped hook.
Please note: DIY mousetraps: effective homemade traps, how to make at home
Saw
I wanted the ax to come with a saw and thought it would be nice if it could be hidden like a jackknife. From the handle and it can be unfolded using the finger groove. The saw will be hidden between two pads. The shape of the metal part of the handle will allow the saw to be locked in both open and folded positions. Once the design was chosen, I tried it on a circular saw blade to get the dimensions to fit.
Types of axes
Humanity has been using axes of various shapes and sizes for several tens of thousands of years. Today, store shelves are filled with hundreds of types of beautiful axes for repairs, industrial wood harvesting, and participation in medieval reconstructions.
If desired, you can chop wood and cut down trees with any ax. But only a specialized tool will help you complete the task quickly, using a minimum amount of energy. Before starting work, determine the type of ax you have.
Felling ax
A huge felling ax is the first item that comes to mind when thinking about lumberjacks. The length of its ax reaches 1 meter. The massive butt and wide blade increase the impact force. This tool will be useful for owners who prepare firewood with their own hands.
Cleaver
The cleaver is a classic ax for chopping wood. Without it, this activity turns into a long, exhausting routine. The heavy blade with a dull sharpening is ideal for cutting firewood for future use.
Army hatchet
An army hatchet is a small, versatile, easy to transport and maintain, a tool that is familiar to any military personnel. It can be used both for preparing branches for lighting a fire, and as a hammer for driving in pegs or bladed weapons during battle.
Carpenter's ax
A carpenter's ax is a universal tool for working with wood. Its lightness and sharpness make it an indispensable assistant in the countryside and garden. The weight of such an ax can vary from 0.8 to 1.2 kg, depending on the materials and dimensions. It should fit easily in the hand. The notch (notch above the blade) serves to lighten the blade and improve its cutting properties. Our step-by-step guide will show you how to make this type of ax at home.
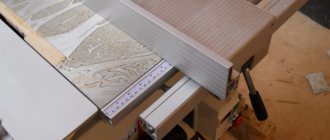
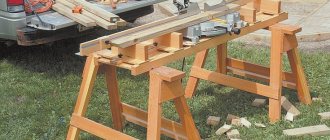
DIY: Custom Sawing Table for Circular Saw
If you study the section on FORUMHOUSE “Homemade machines, tools and mechanisms”, you can find “1000 and 1 option” of devices for the self-builder that you cannot buy in the store. This could be a stand for a grinder, for precise and quick cutting of a metal profile, a mini-lathe, as well as all kinds of reinforcement and pipe benders and planes for aerated concrete. An interesting multifunctional and inexpensive sawing table was created by a portal member with the nickname id215711128.
I am building a house from “cylinders”. Because When building a log house, I want to save money and get a high-quality result, I try to do most of the work myself, without hiring hired workers. Somehow I started making casings for windows and doors and realized that an ordinary wood circular saw couldn’t do the job. We need something more accurate and convenient. So I made a circular saw table and would like to share its design with FORUMHOUSE users.
- How to make a saw table for a circular saw.
- What materials and parts are needed for this.
Review of homemade ax models
In addition to restoring old axes, blades are made from other available materials. The type and purpose of such a tool is limited only by your imagination and skills. Springs, reinforcement, a circular saw blade, and stones can be used. A homemade ax may turn out to be better and more beautiful than one bought in a store.
Spring ax
The spring of a regular car is made from light, elastic, durable alloys. One 100x400 mm plate made from a spring is enough for a small decorative or throwing hatchet. To create a full-size blade, several springs must be welded into a small sheet of metal.
Draw the blade of your future ax and cut it out with a grinder. Keep in mind that the handle will wrap around it on both sides, much like a knife design. To make it, you can use a shovel handle or parts of old wooden furniture. Legs and slats will do.
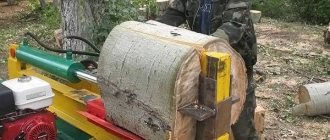
Reinforcement cleaver
Unnecessary pieces of construction reinforcement can be turned into a convenient splitter for firewood. To begin, weld two identical squares from the reinforcement so that they are diagonally sized so that the logs can pass through them freely.
Then weld the letter “H” from the same reinforcement, and weld a blade with an obtuse sharpening angle onto the jumper. Connect the ends of the resulting structure with squares. The cleaver is ready.
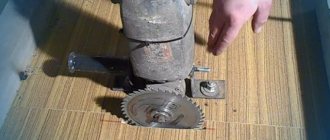
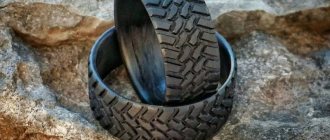
Circular saw ax
A circular saw is an excellent material for a beautiful kitchen hatchet. Simply use a grinder to cut out a blade along with a handle from a circular saw blade, drill a couple of holes, and screw on the wooden trims.
Don't be afraid to experiment in your workshop. Skillful hands can breathe life into seemingly unnecessary, rusty garbage.
Tools and materials
The ease of use of an ax largely depends on the correct manufacturing of its handle. One of the following types of wood is ideal for this part:
You definitely need to know what steel the piercing component of the future tool is made of. Acceptable materials are marked 8ХФ, 9ХФ, 9ХС, ХВГ, У7А and many others. You just need to avoid markings MRTU, OST and TU on these parts.
Tools that may be useful:
- abrasive sharpener;
- file;
- marker for marking;
- chisel;
- magnetic corner;
- clamp;
- sandpaper;
- sharpening disc for sharpening the blade;
- Bulgarian;
- Some jobs may require a welding machine.