When looking for an idea for starting their own business, many consider the possibility of providing tire fitting services. To provide such work, special equipment is required that you can make yourself. A manual tire changing machine can significantly simplify work and reduce costs. There are quite a large number of different drawings according to which such equipment can be made. They all differ in manufacturing complexity and costs.
Reasons for self-assembly
A homemade tire changing machine in most cases is assembled for the following reasons:
- Financial savings. The cost of service stations provided is constantly growing. In addition, a homemade structure can be used to perform work and make a profit.
- Protection against defects due to the tire mechanic’s dishonest attitude towards his work. Today it is quite difficult to find a service station that provides quality services. Craftsmen quite often make mistakes, which causes rapid wear of tires.
- Quick replacement, no need to wait in line. During the tire change period, literally at every service station there is a large queue of people wanting to change tires. At the same time, the cost of the services provided increases significantly.
- There is an opportunity to earn money with minimal investment. When creating your own car service center, you can save on purchasing a tire changing machine.
You can make your own tire changing machine from scrap materials. At the same time, it will be practically not inferior in performance to the industrial version.
How to check whether tire installation was done correctly or not?
Tire workshops are a sight to behold. And each of us faces the following question: which tire service to choose and how to check whether the work was done correctly? After all, our safety directly depends on how correctly and efficiently the tires are replaced.
I present to your attention 10 signs of proper tire fitting.
1. The car is lifted from strictly defined places. (their location can be found in the car manual). The fact is that these places are much tougher and are designed for load. Otherwise, there is a risk of bent sills, cracked sill trims, or even holes in the car interior.
2. Before beading, be sure to wash the wheel. This is necessary for subsequent high-quality wheel balancing.
If the wheel is not washed, forget about quality balancing.
3. Before dismantling, the old weights must be removed. Otherwise, it may happen (applies to steel disks) that the disk will simply be scratched during beading.
4. Pay attention to whether the flattening machine has plastic and silicone pads. If they are not there, then you should be wary, since these pads were invented for a reason; they protect your precious discs from scratches. See photo below.
If there are no linings, you can only rely on the skill of the tire fitter.
5. Tire pressure is pumped in accordance with the specified recommendations in your car’s passport. I advise you to know these numbers, since they may vary for each car (depending on the weight of the car, the profile and size of the tires, etc.)
Usually you are asked what pressure to put in your tires. Be aware that “two” is not suitable for all cars.
Important! I tighten the wheel only by hand, using a torque wrench. To save time, tire fitters often tighten bolts with a wrench; this is a serious violation. There is a high probability of breaking the thread.
Design Features
You can create your own tire fitting by taking into account the design features of the machine. The classic version is represented by the following main components:
- Frame. The basis of the structure is represented by a frame, which is made of rectangular profile metal pipes. It is recommended to place them parallel to each other. The connection is made using a welding machine; the structure can be strengthened with metal corners. In order to ensure long service life of the device, stainless steel should be used, as high humidity can cause corrosion.
- Pipe. It serves as a base for attaching the handle. The pipe used must be strong enough, as it will serve as a lever when carrying out the work of removing the tire from the rim.
- The riser is mounted on the frame. It is designed for installing a wheel rim. It is worth considering that a large load will be placed on this structural element.
All elements used must have high strength, since a strong load occurs when the tire is removed. It is recommended to strengthen the connection with screw fasteners.
Stages of tire fitting
Equipment design drawing
It may seem to novice motorists that changing the wheels of a car is a matter of just a few minutes. It's worth removing old or summer (winter) tires and then putting other tires in their place.
In practice, everything looks much more complicated.
- You can also remove the rubber using a pry bar. But one mount will not solve all tire fitting problems;
- The most difficult stage is installing new tires on the rim;
- To install the rubber you will need to make an impressive physical effort;
- Using force from the pry bar can damage the wheel. As a result, you will have to buy a new one. And these are impressive financial losses for operating the car;
- A set of tools for unscheduled road tire fitting can partially help out. This kit includes mounts of different shapes and special wedges;
- A set of tools makes the tire fitting process a little easier, but you shouldn’t rely on it as a permanent way to change tires yourself. There is still a high risk of accidental deformation of the tire if the mount suddenly slips or the wedges break.
Based on the above, we can confidently say that a homemade tire mounting kit is one of the best solutions that you can make with your own hands and use for a long time. You will have time to change more than one car, and this fairly simple machine will continue to serve you faithfully. The main thing is to do it efficiently, conscientiously.
Direct assembly process
You can assemble a tire changing machine as follows:
- To make the frame you will need durable profile pipes. They will serve as an excellent basis for the machine.
- A distance of at least 700 millimeters must be maintained between pipes. This ensures the stability of the structure during operation.
- The parallel arrangement of pipes is ensured by using an angle. In addition, they are used to strengthen the structure.
- If desired, you can complement the design with adjustable legs. You can make the device mobile by installing wheels or rollers; in working condition, fixation is carried out using stoppers.
- After creating the base, the metal pipe is fastened. It is recommended to choose a version with a diameter of 20-30 millimeters. A flange is installed at a height of 40–60 centimeters before welding work.
- The next step is to attach the fastening element, which is represented by a steel plate. It will be used as a base when attaching the lever.
- The lever is represented by a design consisting of a shoulder and a paw. The paw is used for direct tire removal.
It is practically impossible to assemble a structure without a welding machine. In addition, the metal should be protected from environmental influences by painting the surface.
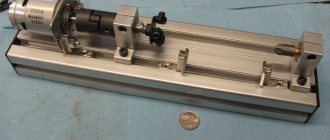
Do-it-yourself tire changer. The bearings are loaded smoothly. step by step manufacturing process.
Step-by-step process for making a tire changer for a garage. the design is original. Bearings are used to fill the tire. Figured it out myself. At the end of the article there is a video of work and production. First what it looks like closer
and a more general view
The basis was taken from a long-broken chair with a swivel seat. in the yard I propped up the door to the barn for about 30 years.
I decided to saw off only two of its legs. I decided to leave the third as a handle for twisting and was right.
I chose the plate as the basis where the wheel will be screwed on
I cut a circle from the high chair so that the base of the wheel disk would not lie on this circle, but directly on the plate
I weld the rod to the plate
When welding, the rod necessarily pulls towards the welding site. check with a corner.
if necessary, use a hammer to put it in place
For the lower base, I pulled out three structures from the corner from behind the shed. I think it's called a traverse
I weld it together. there will be a lower base
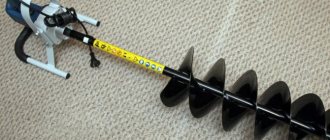
Now I weld a pipe approximately 800mm long to the plate with the rod
and I weld everything together to the bottom base
We will work like this. You need to mark two holes for mounting the 5x112 hole disc from Octavia Tour
and 4x100 holes from VAZ we got this system of holes
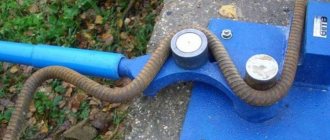
Let's start making the filling device itself, cut off the pipe that will go in a circle
I weld the same pipe to two parallel pipes welded together, inside which the pipes will run as guides
You need to weld firmly and very evenly at 90 degrees.
There will be guides inside for changing to the wheel diameter. We also weld nuts to secure the internal guides with bolts.
Now we weld a 50x50 square pipe for mounting the tire mounting head
I decided to make a tire mounting head from bearings, although first I made a head like they sell on the Internet. But I didn't like it. I took 605 bearings because I had these bearings hanging on the window in the garage for as long as I can remember. I don't know where they come from. I think you can take others.
I found fingers with a diameter of 25 mm in a basin in the garage. just fit into these bearings.
I decided that two together would be just right for pushing out the rubber.
I came up with a design for mounting on the machine. I took two corners from both sides of the shaft. just fits into the 40x40 profile.
I grabbed it on the spot and then boiled it separately for reliability.
We assemble the structure. this is for pushing the rubber beyond the diameter of the disc
I decided to use a similar design to lower the rubber inside the disc. the same bearing and the same pin with a diameter of 25 mm. I just used a grinder to cut it down to the middle of the finger so that the bearing would sit even lower
I secure the horizontal finger with two strips
This is how the design turned out
video of the wheel assembly process on the youtube channel,
a detailed video of the manufacturing of the machine on the youtube channel, and here is a cheap balancing device for static wheel balancing on the youtube channel. How to straighten (align) a wheel disk after an impact yourself at home. Easy repairs on the youtube channel or more than 200 videos on the same channel
Using a homemade machine
Without a special tire changing machine, it is almost impossible to remove or install tires. If you have it, the work is greatly simplified:
- The wheel is placed on the support frame under the lever. It must remain motionless while performing work.
- The paw is guided to butt the tire with the disc.
- In order to remove the tire, strong pressure is applied to the lever. Under pressure, the tire deforms, causing it to move away from the edge of the disc. This procedure is repeated along the entire rim.
After the tire has partially come off the rim, you can use a regular pry bar. It is best to use a long tool .
Solving the problem yourself
A broken tire does not cause serious problems if you have a spare wheel. If there is no such option, special blades will help solve the problem, allowing you to rip the tire off the rim. The procedure can be significantly simplified by a regular tow rope and a car jack.
Did your tire break on the road?
Having prepared the specified tools, we sequentially perform the following steps.
- We dismantle the wheel and clean it of dirt.
- Stir it with the nipple up and release the air.
- Place the jack as close to the wheel rim as possible.
- We pass the cable through the hole in the disk.
- Throwing the cable over the jack bracket, we connect its ends.
- We rotate the jack handle, making sure that the seat ring moves down and the cable pulls up.
- We take out the tube by lifting the sidewall of the tire.
- We change the camera and place it in its place by inserting the fitting into the corresponding hole from the inside.
- We carry out the edging, slightly pumping up the camera.
- We install the wheel on the car and inflate the tire.
Mounting a tire using a jack and tow rope
On paper, all of these steps look simple. But it is very difficult to carry them out, especially if everything happens in the field, and even in bad weather. The quality of homemade tire fitting always leaves much to be desired, and you need to be prepared for this.
Useful tips
When performing tire fitting work, the following recommendations should be taken into account:
- The extreme part of the lining should not be subject to serious mechanical stress. This is due to the fact that if you make a mistake, you can create serious problems for yourself in the future with the installation of tires. The most difficulties arise when installing tubeless tires.
- The edges are lubricated with grease to eliminate the possibility of damage to the rubber. It is worth considering that the tire should be lubricated every time it is installed. By using a lubricant, the likelihood of a rupture in the rubber is significantly reduced.
- At the time of installation, it is recommended to use a soap composition or another with lubricating properties. Their use greatly simplifies the installation process.
- When installing rubber on the disc, you need to ensure that there is no gap between them. This can lead to the tire starting to flatten or the outer part of the rubber to become damaged.
- On sale you can find quite a few different special kits for installing tires. Their use allows you to significantly simplify your work. Special kits include sealing harnesses and mounts of various sizes.
On the Internet you can find a variety of drawings according to which tire changing machines are made. In most cases, improvised materials are used in construction.
The design of a homemade tire changing machine allows for high-quality removal and installation of tires on almost any rim. At the same time, the machine is assembled practically from scrap materials, that is, it will cost a low cost. Considering that the cost of a service station is constantly growing, a homemade machine in the garage will be useful.
Do-it-yourself trimming
Tires are important when operating a car. They are designed for comfort, while driving they are needed for the safety of the car, and during bad weather they maintain traction with the road surface.
Nowadays, motorists are accustomed to contacting a service center, but some of them still prefer to carry out tire fitting themselves. First of all, it's profitable. Secondly, such a driver is considered to be of a higher level.
The main thing any driver should worry about is monitoring their tire pressure. The pressure level indicates that the wheel is ready for safe use. If the level is reduced, it means that there will be increased fuel consumption, and in unforeseen situations it can degrade the control and stability of the car.
There are two categories of tires with individual characteristics:
- tube - with a camera inside the tire. The tire design contains a cord (each with an original pattern)
- tubeless - air is filled between the tire and rim with seals.
In addition, tires are divided into two types. In summer, it is more rigid, but at high temperatures it becomes elastic. This is beneficial for grip on the road surface.
Installing a new tire
Do-it-yourself tire fitting is carried out after disassembling the wheel as follows:
- One side of the rim is driven overboard.
- A mounting blade is placed between the wheel and the tire, with which part of the bead is inserted over the edge of the wheel.
- At a distance of 10–15 cm, the next section of the tire is inserted behind the edge with the second blade.
- The first blade is installed behind the second and the whole process is done in the same way.
- The second bead of the tire is placed in the rim in a similar way.
- The installed tire must be inflated at the end of the work.
Using raw rubber or a special adhesive patch allows you to repair the tire after you have done the tire fitting yourself. A manual tire changing machine greatly simplifies and speeds up the entire process of changing tires. Tires cannot be repaired if the puncture size exceeds 12 mm.
Structure of the apparatus
The basis of a balancing machine is the supports on which the workpieces and sensors are installed to determine their balance. During testing, the level of imbalance is determined, and based on this information, further actions are taken.
Depending on the type of support, balancing machines are divided into soft and hard. The first measure the parameters of the wheel, taking into account the vibrations of the supports. At the same time, the device is additionally configured for each detail, which allows for fairly accurate testing.
In both the first and second versions of the device, the speed sensor plays a special role. No less important for such a machine is the sensor that measures the rotation angles. Depending on the information input option, balancing devices can be manual or automatic.
Signs of a broken wheel
Damage to a car wheel is always accompanied by the following symptoms:
- A sharp decrease in driving speed.
- The appearance of third-party sounds.
- Car skidding and jerking on flat sections of the highway.
A tire puncture requires the driver to immediately stop the car on the side of the road and check the condition of the tire. If it is damaged, the following actions are taken:
- First gear and parking brake are set. If the car is on a slope, then one wheel is protected by a stop - a stone, a log or a “shoe”.
- Turn on the alarm.
- Put up warning signs.
- Start manual tire fitting with your own hands.
Is the game worth the candle?
Does it make sense to spend time making a homemade device when you can use professional service? It's up to you and only you to decide. Our job is to provide quality information.
A homemade manual tire changing machine does the same thing that is done in a car service center. With this functional equality, the handicraft machine has a number of advantages.
- reliable and durable in operation;
- more optimal and simpler in design;
- compact in size;
- have a manual drive;
- easy to disassemble and store, some even fit in the trunk;
- provide complete independence from workshops;
- provide efficiency in repairs;
- One of the main advantages is serious financial savings.
Types of imbalance
And in order to understand the methods of balancing, you need to know the enemy in person, that is, imbalance. Taking into account the simple laws of physics, one can guess that imbalance can be of two types - dynamic and static.
- Static imbalance occurs when the wheel's center of gravity moves away from the axis of rotation. The simplest type of imbalance and do-it-yourself wheel balancing is most often aimed at eliminating static imbalance. The wheel vibrates up/down.
- Dynamic imbalance is the case when it can only be caught when the wheel rotates, and at fairly high speeds, close to operating conditions. This type of imbalance is characterized by a displacement of the center of gravity of the wheel not only beyond the axis of rotation, but also by an uneven displacement of several centers of gravity relative to each other in a perpendicular plane. The wheel wobbles and vibrates. The diagram will explain this more simply.
It turns out that it is not for nothing that every tire shop has stands for wheel balancing, since any vulcanization is, although minimal, a shift in the center of gravity of the entire wheel, which must be balanced. The cost of balancing wheels on a machine is pennies, but if it is not done, the consequences can be the most depressing.
How parameters are measured
Next, you should pay attention to how the balancing machine evaluates the wheel by measuring its parameters. To do this, the object is conditionally divided into two planes - horizontal and vertical. Thanks to this, the tire is also conditionally divided into 4 equal parts.
The accuracy of mounting the wheel on the shaft of the balancing machine plays a decisive role in determining its parameters. Ideally, all 4 parts should be equal to each other. If you violate the perpendicularity of the installation of the wheel on the shaft, then its division into parts will also be disrupted, which means that the data collection will initially occur with an error.
Precautionary measures
Do-it-yourself home tire fitting is mainly carried out in the garage. You can disassemble and bead a tire using special tools - pry bars. Do-it-yourself tire fitting is often done using chisels. You cannot use heavier tools - they can damage the rubber, tube, rims and tires. In addition to the usual tools, you can use a special machine for tire fitting, which you can do yourself.
It is advisable to carry out the procedure for replacing a wheel at a distance from the car, since damage to the body can be caused if the mount is broken. The driver must also take precautions to avoid injury if the tools spring back.
Wheel disassembly
Do-it-yourself tire fitting begins with disassembling the wheel.
- One tire bead is removed from the wheel rim. The edge of the rubber is carefully pryed up with a pry bar and supported with a screwdriver to prevent it from sliding back, after which it is pulled out over the rim. Before starting work, it is advisable to wet the rim with soapy water - this will make the process of removing the rubber easier.
- At a distance of 15–20 cm, a second pry bar is inserted and moved to the side until the side is completely removed.
- The second side of the tire is removed in the same way.
- Remove the stretched rubber by hand.
What is wheel balancing
If all the other shafts and rotating parts work in a closed volume and they absolutely do not care what happens outside the crankcase, block or housing, then the wheels have a hard time. Even if the tire and disk assembly are perfectly balanced, during operation anything can happen to them, from deformation to the accumulation of dirt. All this affects the balancing of the wheel. What is this, balancing?
Balancing a car wheel is all about eliminating radial mass differences. That is, if the wheel is lighter on one side and heavier on the other, then it will vibrate when rotating. The higher the rotation speed, the greater the vibration.
Balancing machine repair
After prolonged use, individual parts of the device may malfunction. Conventionally, the origin of the breakdown can be divided into mechanical disorders and problems with electrical components. In the latter case, problems with the sensors are detected. Mechanical problems most often occur after falls or strong impacts.
Problems with the machine can be detected by the following signs:
- Normal balancing requires several cycles of operation.
- The parameters of the tested disks are determined incorrectly.