Very easy to make, homemade scoops from empty drink containers that can be used for various household needs.
Greetings to all DIYers!
Today I want to touch on the topic of making homemade scoops from scrap materials (plastic and cardboard drink containers), which can be used for various household needs. Moreover, I will show three of these scoops, very easy to make.
In general, I must say that initially I made all these scoops to sweep away shavings from the work table, which I use at home for minor repairs or making homemade items.
So, in the warm season, I do all my homemade products in my workshop in the barn, where I use this very convenient, large homemade scoop to sweep away shavings (mostly wood).
However, in the cold and frosty winter, I have to go home, where I work at a small folding table. Of course, full-fledged woodworking cannot be carried out on it, but, nevertheless, small operations, for example, drilling holes, sawing small workpieces, etc., are quite possible.
And here, naturally, the problem of chip removal arises. In such conditions, it is best to remove shavings using a small dustpan and a brush, or a wide brush. So a few years ago, I started making small homemade scoops.
To make them, I used approximately the following accessories:
Robot made from cardboard boxes
If you don’t throw away cardboard boxes, but collect them in sufficient quantities, you can give your child the idea of making a wonderful robot with his own hands. For work, prepare the following materials:
- three cardboard boxes of different sizes;
- figured packaging from some spare part;
- two round foil muffin tins;
- chenille wire;
- two cardboard rolls of food foil;
- two bases from a New Year's cracker;
- two reels of tape;
- two CDs.
Let's start assembling the new product. First of all, the boxes should be turned inside out to remove various inscriptions from sight. You don’t have to turn them inside out, but then you’ll have to cover the boxes with colored paper or foil. We connect the smallest box - the head - to the largest - the body using a reel of tape - the neck. You can use glue, or you can work with double-sided tape.
Now we attach pants to the robot - we glue a medium-sized box to the body.
We tie the arms - rolls of food foil - and the legs - the bases of New Year's crackers - with ropes. In the middle, we glue a figured package onto the chest for volume, and decorate the panties with two disks.
We cut two circles on the front side of the head and insert them into the holes of the muffin tin - these are our eyes. We make the mouth and signal antennas on the top of the head from twisted wire.
We cut the remaining tape spool in half and glue it on the sides of the head - these are the ears of our toy.
The design will not be very stable, so you can put the robot in children's boots or boots.
If the baby wants, he can decorate his new friend with an applique and even take it to kindergarten the next day to show off to his peers.
Foam lizard
You will need: a can of polyurethane foam, a plastic pipe for the frame, a rubber cord, a stick or wire, superglue, oil paints, furniture varnish, a stationery knife.
Master Class
- Apply a layer of foam to the head and body, leaving a gap in the cervical region.
- Wait 20 minutes for the foam to set.
- Apply subsequent layers to the head and body area.
- Attach the paw frame using string, then cover with foam.
- Form a long lizard tail from string and stick, then attach it with glue.
- Apply layers of foam and shape the body, head and legs of the lizard.
- Cut out the face and body pattern using a craft knife.
- Wait until the polyurethane foam has completely hardened.
- Paint the lizard and varnish it.
The polyurethane foam lizard is ready!
And for the New Year, you can install a snowman on your garden plot. Watch how to make a snowman from polyurethane foam in this video!
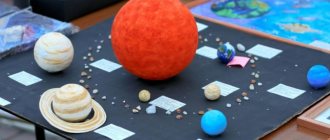
Crafts from the remnants of building materials
I recommend viewing a photo gallery of ideas for creating figures from polyurethane foam!
Absolutely any shape can be made from polyurethane foam. The main thing is to think through the frame and design. Imagine and create masterpieces with your own hands!
New Year costume
If you have large boxes, you can use them to make a fancy dress for your child. In this case, immediately glue the head box to the body box. Cut a square hole on the head so that the baby can look through it.
Make a hole inside for your son's head. And make the robot’s arms and legs from flexible ventilation pipes, choosing the desired diameter.
Master class on how to make a palm tree with your own hands on the site (diagram)
A tropical plant, like the palm tree, won the hearts of the people of Russia a long time ago; it is this plant that often fills the interior of the garden. See this diagram and follow the necessary steps.
And if you have any questions, you can watch the video.
In any case, you’ll figure it out, there’s nothing difficult about it. So save up the material).
Robot made from plastic bottles
You can make a robot from the simplest material – plastic bottles. For the craft, prepare:
- an opaque cola bottle;
- a toy bucket from a set of children's dishes;
- two forks;
- three caps from plastic bottles;
- two wheels from a toy car connected by a chassis.
We make two holes on the bottom sides of the bottle, through which we thread the chassis and screw on the wheels. We bend two forks - these are the arms - and attach them to the body from the back with bolts. We put a bucket on the head, to which we attach two larger lids - these are the eyes, and one smaller one in the middle - this is the mouth. We decorate the robot as your imagination dictates.
Cute pig
In order to make a cute pig, you will need to prepare:
- Five liter plastic bottles;
- Acrylic paint;
- Varnish;
- Scissors;
- Dish sponge;
- Marker.
Related article: How to make a 3D paper snowflake - master class
First, we take the bottle and remove all unnecessary parts from it, such as rims and handles.
Now we mark with a marker and cut out an oblong hole almost from the bottom to the throat, and above it on the back side, we make another wider hole. From scraps we make ears and a tail for a piglet.
Now you need to paint our animal in any color you like. We paint in two or three layers, and when the paint dries, it is necessary to varnish the product. Such a pig can be very useful in the garden and can be used as a flowerbed for growing flowers.
From bottles and tape
If the previous design seemed too complicated to make, you can use a simpler method. Secure three 1.5-liter plastic bottles with tape without removing the caps - this is the body of the robot. To each outermost bottle, attach another bottle of the same type with adhesive tape to the cork - you get legs.
Cut the next bottle in half, and tape the half that is without a cork in the middle bottle - this is the head. Decorate your head with two plugs - eyes.
Hands can be made from half-liter bottles by cutting them into segments and connecting them together.
Cut out palms from two more bottles and attach them to your arms. The craft is ready!
Let's start with preparation
To create animals with your own hands, you first need to prepare all the necessary materials and tools. Below is a selection of the most commonly used materials. However, in accordance with the chosen animal, items on this list may disappear or be added:
- Plastic bottles, possible volumes: 0.5 l, 1.5 l, 2 l, 5 l and 6 l;
- Scissors;
- Knife;
- Paint and varnish;
- Wire;
- Bandages;
- Putty;
- Glue;
- Decorative details: buttons, beads and so on.
It is possible to create any animal you like: a hare, a bear, a frog, a swan, and so on. Whatever animal you choose, the craft will turn out to be unusual and cute, and will also be perfect for the garden.
The methods for creating an animal's body are practically the same among different animals. And the methods for creating wings, ears and tails force you to demonstrate ingenuity; they can be done either from memory or from a textbook with descriptions of animals, depending on the complexity of the animal you have chosen.
We select the volume of bottles based on the desired size of the finished animal. For large products we take five and six liter bottles, and for small ones up to two liters.
Robot made from caps
A robot made from plastic caps would be quite interesting. Thanks to the elastic band that holds all the elements together, his arms and legs will move. We offer a detailed master class on making a transformer from 22 caps:
- For each leg you will need 4 caps. In the first two we make a hole with a hot awl in the middle, in the third - in the bottom, but closer to the edge, and in the fourth we make two holes at once - in the center and on the side.
- We thread a needle into the elastic on one side and tighten a tight knot on the other.
- We thread two covers with a central hole, then there is a cover with a shifted center and a cover with a hole in the side. We tie the elastic band into a knot.
- Using the same scheme, we assemble the second leg.
- To make a hand, we make holes in the center of three lids, and on the side in the fourth.
- First, we pull the needle and elastic into the lid with the side hole, then alternately with the central ones. Tighten the elastic band onto the knot.
- For the head we will need one lid and one cap from a toothpaste tube. For the body - five caps. In two of them we make holes in the center, in the other two - two symmetrical holes on the sides, and in the fifth - three holes in the center and on the sides.
- We tighten the head cap, the toothpaste cap and the cap with three holes with an elastic band. They are followed by a cap with two holes and a cap with one hole. We thread the two remaining caps - the shoulders - with an elastic band into the side holes on the body.
- We make one side hole in the outer lids of the hands. We pass the elastic through it, then through the shoulder and the lid with three holes. Next is the second shoulder cover and the outermost cover of the second arm.
- We pass an elastic band through the side hole in the leg, then it passes through the side holes of the lower lid of the body, through the side hole in the second leg and is pulled together.
In principle, our transforming robot is ready. All that remains is to add his eyes. You can make holes in the head cap, an applique, or attach them from plasticine. The robot will need a grenade launcher. A ballpoint pen cap is perfect for this. It can be attached to your arm, placed behind your back or placed on your shoulder.
Making animals out of plastic bottles
Probably many of you, when you got into this article, were looking for animals, because your dacha will certainly look cool with them if you make them and plant them around the site.
Take this step-by-step instructions with a diagram as a basis. I propose to make a cockerel from waste material. Connect three bottles together with tape.
Make an outfit for the rooster using multi-colored disposable cups.
These are also the feathers for the tail. But, it’s better to take disposable plates and cut off the edge from them, and then cut them. Use a glue gun or stapler to secure.
Now everything is almost ready, all that remains is the head.
It can be made from any ball or ball, in this case a ball for a children's pool is taken.
Draw or glue on eyes and a comb.
Now, as the little animals promised, these are, for example, mischievous turtles.
Caterpillars, and they can be made from bottles and corks.
Cool options with horses and donkeys. Below, a master class will be shown, read on.
Cute pigs, one even winks at you.
Shown here are the chicks and the sister fox from the fairy tale Kolobok. Well, you can’t do without a bear.
Look, a mischievous black cat, kittens and a poodle. And of course the brave peacock.
Frog Princess is a must do if you have a pond. Bunnies and lamb.
And now, as promised, let’s take a closer look at the donkey.
First, prepare the containers for work, you will even need yogurt bottles. Screw the lids from the jars onto the largest one.
Then you need to make the head and neck.
This is the layout that should come out.
You can't do without ears either.
The donkey really came out, it looks like one to one.
This shows how the mane is done.
Don't forget to paint in the desired color, such as gray and white, use acrylic paints.
Then attach the box and it’s not just another country masterpiece.
There is also a recipe for preparing peacock in my piggy bank, maybe it will be useful to someone. Additional foam is also needed.
By the way, have you thought about making a living zoo, for example, it will have giraffes and zebras?
And a boa constrictor or a snake will crawl nearby.
You can make a hedgehog from improvised means, taking some more cones.
Or a scary toy in the shape of a shark, you can have some fun at the same time.
A garden is no fun without birds either, so make a dove.
Or a magpie for example, let your imagination run wild here.
Of course, swans take pride of place.
Not a single site can do without them.
Because they are very beautiful, like queens.
You can use plastic spoons or cut out parts from a bottle to create a ladybug and paint it in the desired color.
But the hero from the cartoon Crocodile Gena, the only thing missing is Cheburashka.
These are the clumsy elephants that escaped from the zoo.
And this bird really amazed me, an owl or an eagle owl, and instead of eyes there are CDs. Great idea.
Also, a bird that symbolizes the birth of a child is a stork. Plant it in cabbage, it will be quite elegant. True, you will also need plywood, wire, polystyrene foam and milk cans.
Robot made from cans
A beautiful robot is made from tin cans. You need to insert one can into another. Make arms and legs from metal caps that cover half-liter glass bottles with drinks. Having drilled a hole in the center of each cap, they need to be pulled together with wire, securing the ends. Bolt two similar caps to the front of the robot body.
Cut a hole on the top can - the mouth, screw two bolts - the eyes. And make the ears from circles of foil, securing them to the sides so that they stick out in different directions.
Don’t forget to take a photo of your work step by step and post it on your social network page. Let your visitors envy your skills, and maybe even learn from your extraordinary experience.
Polyurethane foam frog
You will need: an old saucepan, an iron can, wire, superglue, a can of foam, oil paints, furniture varnish, button eyes, scissors.
Master Class
- Cover the pan with polyurethane foam, then the jar and wait an hour for the foam to set. The base for the frog's body is a saucepan, and the base for the head is a jar.
- Glue the jar to the pan.
- Apply a good layer of foam and shape it into a frog shape with your hands.
- Twist several pieces of wire together and attach them in place of the handles, then cover with foam.
- Make the lower legs and attach the eyes.
- Wait until the foam has completely hardened, then paint the frog.
- Coat the frog with furniture varnish.
- Place the frog in the area or near the pool.
The polyurethane foam frog is ready!
Sprinkler for the garden.
One of the simplest ways to use a bottle in a vegetable garden or garden
— make
a garden sprinkler
, it couldn’t be easier to make. We attach a plastic container to the garden hose and make several small holes, then tightly seal the hose with the neck. This is how we made a garden watering system.
Advice.
For convenience, use a square container or secure a round one with a weighty object.
It is not uncommon for the charger wire to be missing from the socket to the location.
where you can put your mobile phone, everything can be fixed by making a clumsy
phone holder
. It is necessary to cut the bottle diagonally, take the bottom and cut a round hole in the upper part for the socket. Now the phone will lie in the bottom using a socket.
Advice.
It is better to cut the bottle as close to the top as possible, this will allow you to hold the phone more securely.
your stationery every time?
, you have to look for them, you need to make an easy to make
stand
. In addition to the bottle, you will need a bolt and nut. You need to cut off the top and bottom, then drill a hole in the plug and bottom and connect it with a bolt and nut. It will be convenient to use this since it turns out to be 2 sections. The upper compartment will accommodate pens and pencils, and the lower compartment will hold paper clips, buttons, graters, and you won’t have to take out your pens for small things.
Advice.
Tighten the bolt and nut loosely, then the top will be able to rotate.
Empty canister
with a manual one you don’t have to throw it away; it can be useful if you don’t need it or have become unusable; it will turn into
a scoop
. It is necessary to mark the canister with a marker as in the photo and cut it.
Advice.
For convenience, make the nose of the scoop square.
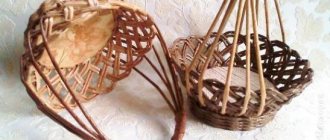
Bucket and scoop
Preparation method:
Both the bucket and the scoop are made from the same bottle.
- First, cut off the bottom of the bottle. Using a knitting needle or scissors heated over a fire, we make holes on both sides for the wire handle. Insert and secure the handle. We paste stickers or transfers. If the edge of the bucket is sharp, you can wrap it with regular electrical tape.
- The scoop or spatula is made from the remaining part of the bottle. The top part of the bottle with the cork will be the handle, and cut out the middle part of the bottle smoothly to fit the scoop. You can also cover it with stickers, just try to stick it closer to the handle, otherwise they will quickly peel off on the working part of the scoop.
It is advisable to choose even bottles for these sand accessories. In our version, the bottle was embossed only at the bottom and near the cork, and the middle, from which the blade was cut, was smooth.
Plastic bottles
In everyone's life, they have firmly taken a place as disposable containers and their use is only in the form of containers, but we can get much more benefits without throwing them away.
For most people, a bottle is a useless thing, but with some ingenuity you can find many ways to make your life easier and save money using bottles. can be made from a plastic bottle
; you just need the bottles themselves and a little imagination.
Laminating a glass jar.
We use glass jars
for different purposes and you have to mark them in all ways, but the inscription on the glass does not stick well, and the glued pieces of paper quickly become unusable, and
to laminate them
. With an industrial hair dryer, this problem will be solved forever, and the strength of the cookware will increase. If you break it, you won't have to pick up the pieces and cut your hands. Using your imagination, you can decorate the jar well. It’s easy to do, you just need one bottle of suitable size and color and a piece of paper with an inscription or design that we want to attach. However, there is a way to do without an industrial hair dryer.
Method one.
Cut off the top of the bottle and place it on the bottom with the cork facing up, then place the jar with the inscription on the cork, put on gloves and start heating the industrial hairdryer. When the hairdryer is hot, you can begin to gently heat the jar in a circle, without stopping in one place. You need to take a reserve, the plastic will settle both in width and height. When the jar is tightly sealed with plastic, cut off the excess and heat the angular parts again, if all parts have become even, the jar is ready.
Advice.
Start heating the plastic from the bottom, gradually rising.
Method two.
Cut off the top of the bottle and place a jar with an inscription glued to the bottom. To heat the plastic in this case, we need a tall pan of water and a stove. The pan should not be full, otherwise water will splash onto the stove. When everything is ready and the water is boiling, we lower the bottle into boiling water and begin to turn it slowly, holding the neck of the glass jar with tongs.
Advice.
By holding the jar at an angle, the effect will be achieved faster.
Are you tired of balls of thread?
, tangled with each other and stuck in knots, the solution is simple - from bottles of any size we make a device for
holding the threads in one place
. At the same time, the balls will rub less, get tangled and get stuck. You can make a holder that can be attached to a chair or armchair. We cut the bottle closer to the neck, leaving a part that needs to be cut in the form of a rectangle to the bottom, after which we make a hole in the resulting tail according to the size of the lid and put it on.
Advice.
The device can be hung by making holes on opposite edges and threading a thread through them.
With the onset of cold weather, all possible types of heaters are turned on in every home and at the same time the air in the rooms becomes dry
, and we begin to experience discomfort. Headaches, skin problems, irritation of the mucous membrane and other inconveniences can be avoided by making a silent, simple, convenient and reliable room humidifier. For this you will need:
- Adhesive tape
- Scissors or knife
- Strip of fabric or lace
- Two liter bottle
- gauze fabric
Advice.
By pouring essential oils into a container, we get an air freshener.
Instructions
- We make a 5×10 centimeter slot in the side of the bottle; errors are acceptable.
- Using strips or string, we hang the resulting bottle on the straight upper pipe entering the battery with the hole facing up and secure it tightly with tape so that the bottle does not jump out and spin.
- We fold the gauze several times to form a rectangle 10 centimeters wide and a meter long.
- We place the middle of the folded fabric in the hole, and wrap the ends around the battery pipe.
- Pour water into the resulting container and moisten the wound gauze, this is the maintenance of the device.
Canister scoop with handle
empty canister with a manual one; it can be useful if you don’t need it or have become unusable; it will turn into a scoop . It is necessary to mark the canister with a marker as in the photo and cut it.
Tip: For convenience, make the nose of the scoop square.
Create an elephant
To make a wonderful baby elephant, you will need the following materials and tools:
- Six liter bottles - two pieces;
- Two liter bottles - six pieces;
- Corrugated tube of small diameter, half a meter long;
- Thick wire 55 centimeters long;
- Sand;
- Glue;
- Scissors.
Related article: DIY book stand made of plywood and wire
First, take four two-liter bottles and cut them in half crosswise. The underside will become the legs of the future baby elephant. Now we take a six-liter bottle and make ears out of it, after which we take a second six-liter bottle and make holes in it to fix the ears. After this, we take the wire and bend it, giving it the shape of an elephant’s trunk, and put a corrugated tube on top of it.
The time has come to paint all the blanks; you can use natural gray, or any other color you wish. When the paint dries, you can assemble the baby elephant.
We take the parts of the legs and fill them with sand, after which we glue them to the body of the animal. The trunk must be fixed to the neck of a six-liter bottle used as a body. Now we insert and fix the elephant ears in specially made holes. All that remains is to take paints and draw the elephant’s eyes and mouth.
Now the cute and funny baby elephant is finished.
Storing vegetables and fruits.
Not all refrigerators have vegetable compartments and you have to store vegetables in a variety of forms, while the food gets beaten, scratched and rolled all over the refrigerator. For convenience, use five-liter eggplants. Cut off the top part and fill with vegetables or fruits. In this form, the food will not wrinkle and there will be significantly more free space in the refrigerator.
Tip: Store vegetables and fruits in separate containers.
Street wire protection
A dacha is a place where various electrical equipment is actively used outside, for example, a water pump for irrigation and a lawn mower. To protect the sockets from which they are powered from moisture and thereby avoid short circuits and fires, use PET containers. We cut a hole and cover the socket with it when we are not using it. If we have a portable extension cord, then we cut off the bottom and neck, cut it on one side and hide the device inside.