How to prepare material for crafts, nuances of the process
The creative process itself is no different from working with any other materials - plasticine, polymer clay, and so on. The advantages of the dough are that it has high plasticity, does not stain your hands and surrounding objects, and allows you to carry out more complex work. If all drying rules are followed, it becomes durable and can be stored for a long time. The most interesting thing is that the material can be used not only for making toys; salted dough is perfect for decorating a loaf, for example.
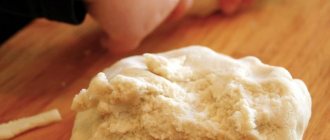
To prevent the mass from sticking to your hands and tools, drying out and cracking, you must follow the manufacturing technology and take into account some nuances:
- Pancake flour is not suitable for such dough; it has increased stickiness, the mass will be sticky and of poor consistency.
- Fine salt must be used. Large particles of the product make the consistency coarser, are less soluble in water, and the dough becomes porous and crumbly.
- When mixing, it is better to use ice water; the material for work is plastic and homogeneous.
Recipe for making dough for making salt dough jewelry:
- Mix bulk ingredients - 1.5 cups flour, 1 cup salt and 2 tbsp. l. any water-soluble wallpaper glue.
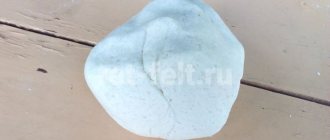
- Pour in 0.5 cups of water and knead the dough thoroughly.
To obtain a more plastic salted dough for decorating a loaf, the recipe will look like this:
- Mix 1 cup each of salt and flour.
- Add 0.5 cups of water and 2 tbsp. l sunflower oil.
Materials for production
First, let's look at some decoration dough recipes. We need salt dough, which means we will need:
- salt - half a glass;
- flour - two glasses;
- water - pour until the dough takes on a plastic consistency;
- paints (it’s better to take acrylic);
- needle or toothpick;
- raised buttons;
- lock for jewelry;
- fishing line
Using these tools you can make the beads that you like. The dough for decorations should be salty, not yeasty. Otherwise nothing will work.
Tools for work
Making jewelry from salt dough involves the use of certain tools and materials.
Each of them can be found among kitchen utensils, stationery, and home handicrafts:
- A rolling pin for dough, if it is not available or is too massive, you can replace it with a glass bottle.
- A regular or shaped knife for cutting dough. To protect the child, you can give him a plastic knife from a plasticine set.
- Modeling board.
- Paints for painting finished products; here you can use watercolor, gouache or acrylic.
- Water-based finishing varnish. Best used in aerosol cans. In addition to standard varnish, it is recommended to use sprays with glitter, mother-of-pearl, and so on as an addition.
- A glass of water and a set of brushes for decorating crafts.
- Cookie molds.
- A variety of accessories for needlework (knitting needles, brushes, hooks, buttons, lace), with the help of which they add texture and volume to products.
It is advisable to prepare an apron and armbands so as not to get dirty while decorating the jewelry. Napkins and rags are used to wipe your hands while working and wet your brushes; they should always be at hand.
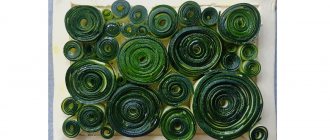
How to make beads
There are no special rules here. Everyone can give their beads the shape they like.
You can make them round. Or flattened. Or even a fantasy form. I decided to make these.
First, I rolled a sausage with a diameter of 1.5 centimeters. Then I cut it into 1 cm pieces. After that I made balls out of them. Then I slightly lengthened the shape. On one edge I pressed the end parallel to the table top with my fingers, and vertically on the other.
Now is a rather difficult moment - you need to make punctures in the beads. The needle, entering the dough, changes the shape of the part, that's the problem! But after the beads are slightly airy (10 minutes should pass after sculpting), the needle can be carefully screwed into the part. In this case, the shape remains virtually unchanged.
The needle for making holes in beads can be either knitting or darning. You can even take a toothpick or a wooden kebabs skewer.
How to dry products correctly?
It is necessary not only to know how to make crafts from salt dough, but also how to process them after that.
Proper drying of the dough is the key to long-term storage of the finished product. You can do this in several ways:
- Drying in a heated oven. Depending on the thickness of the product, the temperature is set from 50°C to 80°C. The fashioned craft is placed on a baking sheet covered with parchment paper and placed in a heated oven for one hour. If the product is large, it may take longer. Then turn off the oven and leave the crafts in it until they cool completely.
- Dry in a cold oven. It follows the same scheme as in the method described above, only the product is placed in a cold oven, and then the heating is turned on.
- The best and longest way to dry is in the open air. Crafts dried in this way become very durable due to uniform and gradual weathering. However, it is suitable mainly for small and flat products.
Do not dry figurines on a radiator or using electrical appliances. Products treated in this way often crack or remain damp inside, which leads to damage to the jewelry.
Eclairs Swans from choux pastry
I have already written more than once about how to prepare choux pastry: in a separate article with a detailed step-by-step guide; in recipes for eclairs and profiteroles. I will repeat it briefly here. Choux pastry is very simple to make; The main thing is to observe the proportions of the ingredients, the baking temperature and, of course, cook in a good mood! It is more convenient to brew the dough in a small, thick-walled container: for example, a cast-iron cauldron or a saucepan. Pour water into it, add salt, cut the butter into pieces and heat over medium heat until the butter melts and the resulting oil water boils.
Pour all the flour into the boiling mixture and quickly stir with a spoon. The mass immediately thickens. After stirring until smooth, remove from heat and set aside to allow the dough piece to cool to room temperature.
Mix the eggs into the cooled mixture one at a time. Beat in an egg and stir until smooth, then a second one, and so on all 4 times.
To bake custard products, you need a hot oven: preheat it to 220-230C. Having covered the baking sheet with high-quality parchment, grease it just a little with vegetable oil, a very thin layer - if there is too much oil, the cakes will not bake, but fry, and will crack on the bottom.
Now the differences with the basic custard cake recipe begin. Let's form “swans”! To make beautifully curved necks you will need a pastry bag or just a thick food bag. Fill it with dough and carefully cut off one corner so that you get a hole of about 7-8 mm, up to 1 cm. Keep in mind that the custard products increase during baking. And, squeezing the dough out of the bag. We “draw” graceful curves on the parchment, similar to twos.
And we make the “torso” by simply laying out round or slightly oblong portions of dough with a spoon dipped in water - like for eclairs.
Place the baking sheet with the preparations in the preheated oven and bake. “Necks” are thinner, so they are ready in 10-15 minutes; they should be removed from the oven earlier; and larger “torsos” - after 25-30 minutes. Signs that custard products are ready are that they rise, become golden, slightly cracked on top, light and dry, empty and ringing; When tapped with a finger, the hard crust does not crush.
Place the preparations on the table and let them cool. In the meantime, we will prepare the cream. I also told you how to make custard cream in a separate publication. Pour half the water into the saucepan (that is, a quarter cup), add all the sugar (half a cup) and heat, stirring, over low heat until the sugar dissolves. Meanwhile, stir a spoonful of flour in the second quarter glass of water so that there are no lumps left. Pour water with flour diluted in it into the boiling sugar syrup, stir vigorously. Boil for 2-3 minutes until the cream mixture thickens and begins to gurgle. Then remove from heat and leave to cool to room temperature.
Add soft butter cut into pieces into the cooled mass and beat with a mixer for 3-4 minutes. At first the cream is thin and yellow; gradually it brightens, becoming almost white, and acquires splendor; The mixer beaters begin to leave increasingly distinct marks. When the cream is white and holds its shape well, it is ready. If it is not as thick as it should be, this can be corrected by putting the cream in the refrigerator for 10-20 minutes. Once frozen, it will become thick. By the way, butter cream tastes much better when chilled.
Now the eclair preparations and the cream are ready - it’s time to assemble the cakes! At first I thought that I just needed to insert the “neck” into the blank for the body. But, having looked at photos of finished swans on the Internet, I noticed that their bodies did not seem to be solid, but consisted of a lower part - the base of the cake, and a pair of wings installed separately on top. This design is beautiful, but a little unstable: the components move apart as soon as the cream melts. Therefore, we keep the eclairs in the refrigerator until serving.
So, cut the eclairs into two parts: top and bottom, and the top - in half again lengthwise, these will be the wings.
Fill the bottom of the cake with cream. You can put it out with a spoon, or even better - with a toothed nozzle, it will be more beautiful.
We install the “wings” and “neck”, securing them in the cream.
What a handsome swan he turned out to be!
Let's make him a couple...
And then a whole brood, for company!
Place the swan eclairs on a beautiful dish; This one would be perfect, blue – like a round lake.
And for beauty, sprinkle the Swans cakes with powdered sugar through a strainer.
Surprise your guests!
Painting and varnishing crafts
At the stage of preparing the dough, you can add colored pigments to it. Coloring a finished craft combines two types of creativity: modeling and drawing.
It is best to use water-soluble paints. Acrylic dyes deserve special attention. They paint in a dense, uniform layer the first time, have a wide range of colors, dry quickly and are easy to use. Conventional watercolor covers with a translucent tone, which makes it possible to layer the palette and create a three-dimensional pattern. The product, smeared with a layer of PVA glue, allows you to obtain a base layer for opaque, permanent coloring.
Jewelry made from salt dough has a good ability to retain pigment without a protective coating. If the finished item is planned to be used in everyday life, for example, a vase, box, dolls, chess pieces, then frequent touches can wear off the paint. In this case, varnishing is mandatory. In addition, the glossy shine often makes the product especially beautiful.
It is better to cover with an aerosol can in the air or in a ventilated area. If necessary, you can apply several layers, drying each one well.
Bead dyeing
Dried products do not look attractive at all. Therefore they will need to be painted.
Acrylic paint is suitable here. If you pour two contrasting colors into a small glass, but do not stir, you can get a wonderful coloring effect.
The bead is hung on a thread and twisted a little in a glass. The paint lays down in random streaks. It looks unusual and interesting.
You can use watercolor or gouache. Beads coated with paint with a mother-of-pearl effect look very creative. I had white mother-of-pearl in my set, I mixed a little blue in my palette and added water.
If you paint on a wet surface with other colors, you get nice spots in the form of streaks, which creates the illusion of real sea stones.
Dough pendant
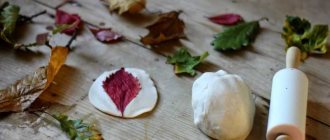
Making such a decoration is quite simple. The dough is rolled out into a layer, and the base is cut out of it using a cookie cutter. Use a pen or knife to cut a hole for threading the lace. The future pendant can be decorated with any items at hand: cut along the edges, stick on geometric figures, attach lace that will leave a beautiful pattern, etc. Then the product is sent to dry.
After drying, begin decorating and painting the product. The effect of antiquity is given by light touches with a sponge with fresh paint. Then the pendant is varnished, dried again and the lace is threaded. A beautiful handmade product is ready.
Beads and bracelets
Beads and bracelets are made using the same technique. First of all, you need to make beads. You can make them in a standard round shape by rolling them into a ball and stringing them on a toothpick. Or get creative and make square, triangular, flat and three-dimensional pieces. Each bead is pierced with a skewer, stuck into a soft base and dried in this form.
To make your jewelry more original, you can sculpt animal figures, symbols or zodiac signs. In addition, the same pendants on the beads and bracelet will combine them into one set. Then each part is carefully painted inside and out, dried and varnished. If this is evening jewelry, you can use glitter and mother of pearl.
The final stage is threading. The beads are strung on a bunch, observing a certain order, and the clasp is attached. The decorations are ready.
Step-by-step process for making salt dough beads
First, preparations for future beads are made: sausages are rolled out from the dough, which are then cut into pieces of approximately the same size with a stationery knife . You can give the workpiece the appearance of a bar - then you will get square beads.
Several blanks of different thicknesses or shapes will allow you to make beads that differ in shape or size - you will get a stylish decoration.
- We pierce each bead, creating holes for stringing to create a bunch, and leave to dry. An oven with a minimum temperature setting will help speed up the process.
- Then comes the stage of painting in the desired colors. For example, you can first make a dark background, and draw zigzags, dots, and stripes on top with lighter tones. It’s time to remember all your existing artistic skills!
- Having applied all the necessary layers of paint, we leave the beads to dry, after which we coat them with varnish: in addition to shine, this will help protect the clothes from contamination with paints.
- All that remains is to collect the beads. If a fastener is intended, we start by fixing one part of it on the fishing line (lace). Then we string the beads (if desired, interspersed with beads or sequins, tying colored ribbons between the beads).
Bracelets can be easily assembled using a similar technique. And the purchased blanks for earrings will allow you to create a whole set of original jewelry.
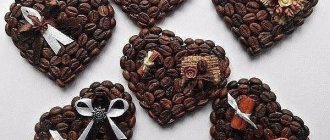
Christmas tree decorations made from dough
Even a child can make New Year's decorations from salt dough. The dough is rolled out and figures are cut out of it (Christmas tree, mitten, heart, etc.), a hole is made for the ribbon and dried. Then they paint it and send it out to air again. New Year's toys look especially festive when they are covered with snow-effect spray, small confetti and sparkles.
Tips for working with the dough
A well-kneaded dough has its secrets. Having mastered them, you won’t have to worry about the quality of products made from it. “Raw materials” turned out to be of high quality if:
- there is no excess moisture - by slightly changing the proportions towards more water, you risk disrupting the whole process;
- Over-drying is also harmful to the dough - it cannot be stored without a bag;
- long-term storage (more than three to four days) can spoil the material;
- Slightly exceeding the oven temperature when trying to dry the products quickly will result in cracks - it is better to be patient and dry at room temperature.
Advice! Has the material become sticky due to long storage? Try air drying it without adding anything. However, it is unlikely to work for small items. If the dough has been stored for a long time and has become sticky, air dry it without any additives. This dough is best used in large quantities.
A sign of a high-quality kneaded dough is considered to be clean hands and the table at the end of kneading: if nothing sticks, it means that the procedure for preparing the “raw materials” was a success!
Celebs who wear boots even in summer
How to tie a belt on a Jiu Jitsu kimono?
Animal figurines or dolls
You can make small animals or dolls with your own hands as home decorations from salt dough. Children will especially enjoy this process.
Making three-dimensional figures is a little more difficult, so you can create a craft together with your parents. If a child wants to make an object on his own, it is better to start with the simplest, for example, a hedgehog or a caterpillar:
- To sculpt a hedgehog, roll up a ball and stretch out one half a little - this is the future muzzle; a small ball is sculpted on the tip - a nose. Needling is done using frequent cuts with scissors or thickly sticking halves of toothpicks.
- To make a caterpillar you will need several balls connected to each other. To make the craft look more realistic, you can attach the parts to the wire and give the insect a bend. The finished product must be painted in different colors.
- You can sculpt a doll in different ways. The simplest one is a bell-type doll. The rolled out square of dough is rolled up into a ball, the excess is cut off so that the form stands on the resulting wide part. A ball is attached to an acute angle - this is the head. Then they sculpt the hair - strips of dough cut out in a chaotic manner - and attach the arms. The doll is ready. You can complement the craft by decorating your head with a wreath or bow, and your dress with flowers or a strap.
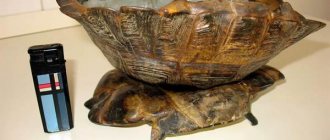
Pictures of panels
The basis for the panel can be a piece of plywood or thick cardboard; this will solve the problem of what to stick the salt dough decoration on.
The mass is rolled out into a thin layer and glued to the base. Then the details of the future picture are cut out or sculpted and attached to the resulting layer. The finished painting is thoroughly dried and painted, then varnished.
If we take plywood covered with foil as a basis, the finished and painted product is easily removed and can be transferred to another material. For example, a frame covered with fabric, a box, glass or plastic would be suitable.
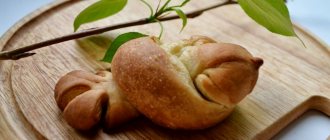
Loaf
Particular pleasure will come from decorating dishes, for example, a loaf. The production of salt dough to decorate this product is carried out according to the recipe described above. The classic way is to twist ropes from the finished material and braid them. You can also make flowers and leaves from the dough. The decor is laid out on the top of the loaf and dried in the oven.
Such handicraft, accessible to everyone, allows you to please your loved ones and friends with an original thing, develops imagination and perseverance. In addition, the activity makes it possible to complement any look with beautiful jewelry.