A diaper cake is the most unusual and original gift that will delight both the baby and the parents. Diapers are always necessary. By adding toys, clothes, and children's cosmetics, you can easily make an interesting and useful gift. Such a gift will definitely surprise and delight.
Handmade gifts for newborns have become popular in the last few years. And since sometimes choosing a gift becomes a difficult task, such a creative and original gift will be an excellent solution.
You always want to come up with an interesting gift that you will surely like and remember. But if you trivially present parents with toys, diapers, children’s cosmetics, and clothes, it will hardly be surprising. However, if you give the same thing, but in a special way, creating a real masterpiece from all these things with your own hands, then such a gift will become an unforgettable magical surprise.
First of all, congratulate the young mother!
A postcard and a bouquet of flowers are ideal for this. You can make a postcard with your own hands and the choice of bouquet depends only on your imagination. The only rule: in order not to harm the baby, you do not need to bring flowers with a strong smell into the house. The bouquet should not be too large, as plant pollen can cause allergies.
In addition, cross-stitched baby metrics are very popular as gifts. A huge selection of beautiful embroidery patterns will allow you to make the most wonderful gift for a newborn! Try to include as much information as possible: height, weight, exact time of birth - now nothing is more important for parents than these numbers, but years will pass and something will be forgotten. Your handicraft will be a wonderful reminder! Frame it with a beautiful frame, decorate it with artificial flowers - you have made the very first gift for a newborn with your own hands.
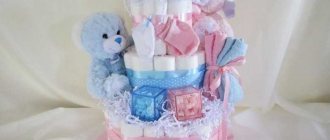
An even more original gift is a beautiful cake made from diapers: snow-white rolls, installed in several tiers, form a touching, delicate structure. Most often, close relatives or friends of the baby’s mother make them with their own hands. Such a structure will immediately lift everyone’s spirits!
But it’s worth thinking about the child’s personal hygiene. Diapers, having been in the wrong hands, lose sterility and are not suitable for use for their intended purpose. Therefore, make the cake small so that it is not so offensive to throw it away later. And it’s best to make such a cake not only from diapers, but also using clothes (socks, rompers, vests), towels, diapers, which the mother can always wash before putting it on the baby. You can also complement such a cake with soft toys, which very soon the baby will be interested in, but for now they will live in the crib.
Decor and design
The choice of color is a delicate moment, depending not only on the gender of the newborn, but also on the color preferences of the parents, as well as the appropriateness of certain combinations. Most often, preference is given to delicate pastel shades. Products whose decor is in the same style, for example, in the spirit of romanticism or shabby chic, as in this photo, look beautiful. In order to harmoniously decorate your creation with beautiful decor, you can use a lot of different baby items, for example: • baby diapers and blankets; • elements of clothing – socks, rompers, bodysuits, suits and caps; • shoes – booties or sandals, • toys – teddy bear, doll, rattles; • children's cosmetics - baby wipes, oil, cream, baby powder, bath products (such items can be hidden inside the gift, or can be placed on top); • tableware – spoons, cups, plates, bottles; • pacifiers. In addition to “useful” decorations, you can also use “useless” but beautiful objects: • multi-colored ribbons, which can be used to connect individual elements and decorate them; • paper or fabric flowers. Paper flowers can be made using napkins or crepe paper in a matter of minutes in any desired color scheme. For fabric ones, you can use felt or organza to emphasize soft and delicate notes. To fasten the individual components of the gift, wide satin ribbons, diapers, and decorative cords are used. No glue, tape or pins are used, as the gift is intended for very young children. Among the cakes, there are wonderful creations with “open” diapers, and there are masterpieces with closed diapers and clothes, which are more reminiscent of a confectionery masterpiece decorated with sugar mastic than a pack of diapers. The second option looks nicer, and there’s room for improvement in the decor, but it also costs significantly more, because children’s clothing, toys and household items are by no means cheap. A gift made from diapers is universal and appropriate not only for the birth, but also for the baptism of a small child. If you doubt whether you will like it, believe me, you can never have too many diapers, and young parents will only be grateful to you! Such a wonderful craft can be given to an employee at work in honor of the addition to the family, to a sister or friend. And everyone who decides to make it with their own hands will receive a lot of pleasant emotions both during the manufacturing process and at the time of delivering it to the recipient!
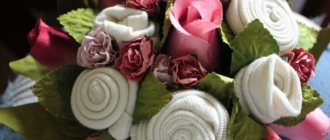
Bouquet of clothes for newborns
When choosing a gift for a newborn, as well as for anyone else, we often strive to ensure that it is pleasant, useful, practical and preferably unusual. The most common gift option is, of course, clothing. You can choose clothes for kids to suit any budget, without fear of making a mistake with the size, since there is always the opportunity to buy a larger item. Currently, there is a wide variety of beautiful and original clothes for children, so choosing this gift option is usually a win-win, however, it will not be easy to surprise them.
A wonderful way to arrange a surprise is to make a bouquet of clothes for newborns from things like this.
It is done very quickly and simply, and looks very impressive. To make a bouquet you will need: - any items of clothing for babies: socks, rompers, blouses, vests, caps, thin hats, slips, overalls; - a basket, vase, bucket, flower pot or other suitable base for a bouquet; - materials for decoration: artificial flowers and leaves, bows, ribbons, pieces of fabric, colored paper, other decorative elements; - skewers and tape or tape if the flowers are on stems; - wrapping paper.
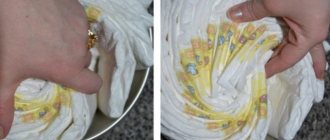
Depending on the type of clothing, the methods for making flowers from them differ slightly. To make a flower out of socks, you first need to twist it into a tube.
It is necessary to twist tightly, but not tightening too much. If the bud is weak, it will quickly fall apart or be shapeless. Next, you need to turn the edge of the sock out on one side.
Then carefully turn the edge over on the other side, imitating rose petals.
This is what a bud should look like from one sock.
If desired, the resulting flower can be secured with tape or tape on a skewer and the leaves can be attached. A flower from a cap or cap is twisted in the same way. It is advisable to bend one edge so that the top of the flower is even.
After this, roll it up and bend the edges in the same way as socks.
Rompers and trousers are rolled up, starting from the legs from the bottom up. If necessary, the trouser legs are pre-folded on each side along the edge.
The legs are rolled up separately, then together to the top edge. Similar items of clothing make two roses.
Vests, sweaters and other similar items of clothing can be rolled up the sleeves separately, getting a small rose from each. To obtain a larger flower, the sleeves are folded inward.
If it is a jumpsuit or slip, it can be folded in half. Then the resulting rectangle is rolled into a roll.
The result is a rose like this.
If the item is not folded in half and rolled, then, depending on the size of the item, you may end up with two flowers on each side, as is the case with sliders. By folding the overalls in the same way, you can get one large or four small buds from the sleeves and legs.
The resulting buds are collected into a bouquet and decorated. If the flowers are on stems, they are first fixed together in a vase, pot or wrapping paper. If the flowers are without stems, the buds are evenly placed on the base.
Artificial flowers and leaves, bows, ribbons, pieces of fabric, colored paper, and soft toys can be used as decorative elements. For example, this bouquet uses artificial leaves, flower branches of two sizes - small and medium, large roses.
Popular articles American bow
To add completeness, the resulting bouquet should be wrapped in transparent wrapping paper and tied with a wide ribbon or bow. Such an original bouquet of clothes for newborns will be a wonderful gift that will pleasantly surprise parents and delight the baby with useful things.
https://www.bolshoyvopros.ru/questions/455506-kak-sdelat-buket-iz-detskih-veschej-odezhdy-svoimi-rukami.htmlhttps://hobbymo.ru/articles/buket-iz-odejdy-dlya- novorojdennyh_1486/https://sdelaysam-svoimirukami.ru/1684-buket-iz-odezhdy-dlya-novorozhdennyh.html
Diaper heaven
Take a diaper and fold it two or three times. We fold the edges of the resulting rectangle towards the middle to form a triangle, and once again bend the sides towards the middle. And so on until we get a bud. Secure at the base with an elastic band or satin ribbon. We take a basket and put a towel in it, and put the resulting flowers in it. We decorate at our discretion.
Flowers from clothes can be placed not only in a classic basket, but also in a flower pot (as a gift for mom), a decorative wicker stroller, or in a gift box.
You can add a toy to the bouquet as decoration and an additional gift.
Or garlands for a crib or stroller, which will be needed by the time of donation.
You can add flowers from diapers to your clothes. But we must remember that this is still a personal hygiene item, so we wash our hands and work with them on a clean surface. And it’s best if the bouquet itself is covered with mica or each flower from the diaper is covered with it. We wrap it in the same way as clothing items.
Related article: Diagram of a lilac bush made of beads: master class with photos and videos
From the same diapers you can make a base for a bouquet. Simply twist them and form a circle using a rubber band and satin ribbon. And you stick flowers from clothes into this base. Decorate with decorations as desired.
You don’t have to always fold your clothes into perfect rolls; make some of them sloppy.
You shouldn’t be afraid of warmer clothes either, you just get more voluminous buds, but this also looks very nice.
But such bouquets will delight parents of opposite-sex twins.
As can be seen from the master classes, the formation of the buds itself is almost the same, but the decor allows you to show all the power of your imagination and create incredible compositions with your own hands. Can be decorated with standard decor in the form of flowers and twigs. It’s better to add to the gift the things necessary for the baby’s first year (pacifiers, bottles, rattles, etc.). If there are older children in the house where you are taking your gift, then include toys for their age or sweets with the gift. Rest assured, the family will be pleased both with the components of the bouquet, which can be unwrapped periodically, and each time it will be a surprise, and with the design itself.
Bath of diapers
You will need: 56 diapers, baby bath, baby shower gel, powder, baby lotion, 2 teethers, 2 washcloths, 2 rubber duckies, cotton wool, satin ribbon, elastic bands, wire.
Master Class
- Hang the diapers on the edges of the baby's bathtub, tightly together.
- Wrap a rubber band around the tub.
- Tie the tub with a satin ribbon and make a cute bow.
- Make a tap this way: take a wire, wrap 4 diapers around it, and secure with rubber bands.
- Roll up a few diapers and attach them to the tub.
- Insert the tap between the folded diapers and give it the desired shape.
- Make vents by placing teethers.
- Fill the tub with the rest of the diapers, filling the top with more cotton wool, creating the appearance of fluffy foam.
- Place a tray of gel, lotion, powder, ducks and give such a useful masterpiece.
The diaper bath is ready!
Beautiful bouquet of corrugated paper and sweets with your own hands - master class with photos
Corrugated paper is the main material for decorating beautiful bouquets of sweets with your own hands. For example, in the next master class, using this material you can create a very delicate and tasty bouquet of snowdrops. Such a beautiful bouquet of sweets and corrugated paper with your own hands will be an excellent gift for any woman.
Necessary materials for a beautiful bouquet of corrugated paper and sweets
- oblong-shaped sweets, such as truffles
- wooden skewers
- scotch
- corrugated paper
- threads
- scissors
- soft wrapping paper
- ribbon for decoration
Step-by-step instructions for a DIY bouquet made from corrugated paper and candies
- The best candies for this lesson are those that are oblong in shape, like truffles. Their packaging allows you to easily attach sweets to skewers.
- We insert the skewer inside the tail of the candy and secure this structure with tape.
- Then take a small piece of white paper and make a bow, as shown in the photo below. This is a blank for the petals.
- We slightly straighten the edges of the workpiece and fix the petals with threads.
- For one snowdrop you will need three such bow blanks.
- We cut out long narrow blanks for leaves from green paper.
- We fix the leaf near the base of the bud. Then we decorate the entire stem with a thin long ribbon of corrugated paper.
- Using a similar pattern, we make the remaining flowers.
- We wrap the finished flowers in bright paper and decorate the bouquet with a beautiful ribbon.
The second gift option for a boy is a train made from diapers
- 36 diapers
- one T-shirt
- three diapers
- small towel
- two satin ribbons – narrow and wide
- 7 small flowers
- needle and thread
- two pairs of socks
For the wheels, we roll three diapers into cylinders (2 wheels) and 5-6 (1 large wheel). We put ribbons inside the wheels, and wrap the wheels themselves with wide tape, gluing its ends together with a glue gun. The wheels must be dense enough so that they do not later flatten under the weight of the locomotive.
The large wheel can be wrapped in a diaper.
For the platform, cut out a rectangle from thick cardboard, wrap it in a diaper and, using a ribbon that was left in the middle of the wheels, attach them to the platform.
In the same way, from 3-5 diapers and a diaper we make a large cylinder that will be in front of the cabin.
We fold the remaining diapers into a pile, put a T-shirt on them and wrap a diaper around this entire structure - this will be the cabin.
We attach the cabin and the large cylinder to the locomotive using thin ribbons passed under the platform and glued from below with a glue gun.
We twist a tube from a pair of socks and sew it to the tape.
We attach another pair of socks to the cabin - these will be the windows.
For beauty, we attach flowers to the wheels and the “face” of the locomotive, and decorate the structure with a small toy. Ready!
Diaper cake, photo
For children in the first month of life, who are just adapting to the world around them, it is not advisable to unpack the factory packaging of diapers so as not to violate their sterility.
Therefore, to make a diaper cake, it is better to use size 2 or 3 diapers. To make an original multi-tiered diaper cake, you can use several different sizes of diapers.
To create a diaper cake, you need to prepare the following components:
- a large pack of diapers (diapers of several sizes can be used),
- thin elastic bands for rolling diapers,
- decorative bright ribbons,
- base for the cake (cardboard, tray),
- children's toys, accessories,
- scissors, glue, tape.
Options for laying diapers in tiers
- First way. Diapers are laid in a spiral; each diaper is not rolled separately. The entire row is fixed with tape. In order to place the diapers in a circle, you can use a vertical base (cardboard tube, paper towel). It is easier to pack diapers tightly around such a rod. After the first tier is laid, the vertical base must be pulled out. You can put some kind of children's accessory (a bottle, a pack of napkins) into the hole that is created.
- Second way. It is necessary to separately roll each diaper into a roll and tie it with a thin elastic band. Take a horizontal base (round tray). Some small children's accessory (bottle) is placed in the center. The bottom tier of the cake is the largest; it fits around the bottle. The entire row is secured with an elastic band, over which a decorative ribbon is tied. The second and third tiers are made smaller in size. Each tier is separately secured with an elastic band and tape.
To give the composition a complete look, the cake can be decorated with additional children's accessories (booties, children's toys). In addition, such cakes are often complemented with baby skin care products. A diaper cake for a girl has its own distinctive characteristics:
- color range - almost all color shades are suitable, preference is given to pink, beige, milky, purple colors,
- the presence of frills, ruffles, which decorate such gifts for girls,
- the presence on the cake of plush toys, baby dolls that decorate the gift,
- decorating the cake with the following accessories: butterflies, satin ribbons, beads, bows, flowers.
Popular articles Happy Easter greetings in verse
Diaper cake for a boy is characterized by:
- colors - blue, blue, light green shades,
- cars, ships, trains, balls, airplanes are used as accessories for decoration,
- the presence of an unusual shape - such cakes can be designed in the form of a motorcycle, car, bicycle.
How to sew a developmental cube for children from 0?
As soon as the baby is born, he begins to explore this world. By three months, his gaze becomes concentrated, he intensively absorbs everything he sees. By this age, you can sew a developmental cube for him, with which the baby will play more actively when he already learns to sit. But even at a very young age, such a thing will be very useful for the baby, especially if you name the objects that are depicted on the cube. The child will learn them, understand what each object and animal looks like.
This cube is soft and pleasant to the touch, so the baby will not get hurt on it.
It is important to take environmentally friendly materials and sew the elements of the cube tightly so that the child cannot tear them off. To make such an educational toy, you need to take:
To make such an educational toy, you need to take:
- cotton fabric (you can use scraps);
- felt;
- interlining;
- soft filler;
- Velcro;
- disappearing marker;
- pins;
- buttons or beads for eyes;
- scissors;
- satin ribbons;
- pieces of green fleece;
- floss;
- rattle elements.
First, cut the cotton fabric into 15 cm squares.
Using the patterns provided, print them out, then transfer them to felt and cut them out.
The bunny has a round head; the template shows the markings of his face. Each ear consists of two parts - a white one and an inner pink one. Make the carrot orange, and the tops for it will need to be cut from green fleece. To do this, you need to cut it out of a rectangle measuring 5.5 by 3 cm. Make the mouse out of gray material, and sew white semicircles to the inside of the ears. The cheese is made from yellow felt.
Now start cutting out the next couple - a bear and a cat. The patterns give the names of the colors that need to be used. Next are the dog and the squirrel.
The dog will have a bone in his hand, and the squirrel will have a hazelnut. When all the parts are cut out of felt of the appropriate color, you can proceed to stitching them.
Draw the features of the face with a water-washable marker. Now embroider them on the bunny's face. To make these parts more dense, put adhesive interlining on the back, iron it, let it stick. Place a triangle of black felt on the hare's nose and sew it on.
Using a disappearing marker, draw a bear's muzzle and ears on one side of the cube. Sew here first the double ears, and then the muzzle, to which the nose and eyes are already attached.
The raspberries are so semi-circular. Embroider scales on it with black thread, and then sew a green tail on top. The raspberry will be double, first sew the Velcro to the back side, and then sew the Velcro to the cube itself.
The child will be able to glue the raspberries into place themselves. In the same way he will attach the carrot for the bunny. But first you will need to put felt greens and ribbon between the two halves of the carrot.
To make the greens, cut one side of a rectangle of fleece into fringe.
All characters and food for them are created in the same way. Cheese, carrots, raspberries, fish, nuts, bones must be attached next to the animal for which this food is intended. The child will learn the names of animals and will know what each animal eats.
Now this baby toy should be assembled as follows. Sew the sides of the cube together, first connecting the four sides. Then sew the bottom and top to them.
At the same time, carefully attach the ribbons to the sides so that they are securely fixed here.
To make it even more interesting for the child later, place food for each animal not only next to this character, but also near another animal.
The child will quickly master this science and will be able to “feed” food exactly to the animal for whom it is intended.
See how to assemble a development cube.
This photo shows how the four sides should be connected to each other, while the top and bottom are left free for now. This is how you stitch these elements.
Such educational toys for children from 0 will allow them to learn the names of the animals on the cube and gain initial knowledge about them. Now fill the cube with synthetic fluff or other soft filler through the hole that is still left. To make it more interesting for the baby, place rattle elements here that will make a funny noise.
Pin this free edge and sew the sides together using a blind stitch.Here are some educational toys for children from 0 that you can sew with your own hands.
If you are invited to visit a baby, then you can easily sew such a developmental cube to give it to the child’s parents.
If you have even some sewing skills, then you can create other entertaining and educational things for your baby.
Gifts for girls
A girl’s gift doesn’t have to be limited in decorations, because this is the first present for a future woman. It can be decorated with bright flowers, bows and beads in any quantity.
Little Princess
This diaper cake turns out very similar to the real thing, you just want to eat it. The diapers are rolled up and placed in a circle.
A baby bottle is inserted into the middle and everything is secured in a circle with ribbons. Pink lace and bows are used for decoration. The very top of the cake is decorated with bright red booties. Rattles in the shape of a heart or butterfly are inserted into the side of the ribbon.
Owl
A very fun and funny gift. Diapers are first unrolled and then folded into a spiral. One large spiral will be the body, and two small ones will be the eyes of the owl. Everything is held together with a diaper, rubber bands and wide tape. We decorate the resulting figurine with a children's bib.
The eyes are made of artificial flowers, with a bead instead of a pupil. And instead of ears - mittens for newborns.
Bike
Girls love riding bicycles just as much as boys. Wonderful transport is made from diapers! We roll the diapers into tubes and fasten them with an elastic band - these will be the wheels. Instead of a seat - a towel, diaper or napkin, and the role of the steering wheel will be played by tights, which need to be passed through the middle of one of the wheels and secured with a pair of round rattles. A soft toy in the same color scheme as the bicycle sits as a cute passenger.
If you don’t have the time or opportunity to create such slightly more complicated options, then you can simply make a cake of several tiers (you already know the technology) and decorate it with ribbons.
- For a boy, ribbons of blue, blue and violet tones are taken.
- For girls - pink, reddish, soft pastel.
If the gift is neutral, we can take green and all shades of beige. And items of children's clothing, rattles, soft toys, and cosmetics for newborns are suitable as decor.
Useful tips
- Before you start making a gift from diapers, thoroughly wash your hands and the surface on which you will work.
- Create your present in a clean room; all work equipment must also be cleaned, because later the diaper will be used for an infant.
- It is better to iron items of children's clothing for decoration, and toys should not have an unpleasant odor.
- You can take different sizes of diapers, up to three or four, because babies grow very quickly.
- For packaging, it is best to use transparent film, tied with a beautiful bow on top.
And don't forget to take a photo of the newborn next to the first gifts. After all, products made from diapers are beautiful, but very short-lived.
I wish you creative success!
Views: 4,289
Magic castle
There are interesting crafts made from diapers for girls, among which the castle stands out. The little princess will be delighted with such a gift and will play with it before using it. You need to prepare for the craft:
- 88 diapers;
- elastic bands;
- cardboard stand with a diameter of 40 cm;
- satin ribbon;
- wooden skewers;
- cocktail straws;
- colored cardboard;
- scissors, tape, glue;
- small children's items for decoration.
Fifteen diapers are folded in half and secured together with an elastic band. Three such blocks are prepared for the lower tier of the castle. From 12 diapers, two middle parts are made, and from 8, one top layer is made. The bottom tier is wrapped with tape, fixing all the elements together. It should completely hide the elastic; the ends are secured with glue or tape. The same is done with the top two layers.
Making towers for the castle. One diaper is wrapped around a wooden skewer. The sharp end should stick out 2-3 cm. 8 such parts are prepared. Each diaper is wrapped with an elastic band and tape to secure it in place. For roofs, semicircles with a diameter of 15 cm are cut out of colored cardboard. They are rolled into a cone, leaving space for a tube, and gluing the joints.
For the central tower, roll three diapers, connect them with an elastic band and insert a skewer between them. They cut out a roof for it with a diameter of 25 cm. Make diamond shapes from paper of a different color and fold them in half. Tubes are inserted along the fold line and the flags are ready. Small towers are placed in the corners of the lower and middle tiers. A roof with a flag is installed on top. This is how the central element and the rest are attached. Decorate the castle with pacifiers, folded baby vests or soft toys.
You can make many different shapes from diapers. All kinds of cakes, bouquets, baskets and cars will look elegant and festive. Handmade gifts are always more valuable than purchased ones.
The birth of a new person is always a holiday, and on holidays we usually give gifts. But what can you give to a person a few days old? After all, you want the gift to be both useful and beautiful.
Diapers are a thing that any baby certainly needs. But simply donating a package of diapers is quite boring. If you wish, you can make funny gifts from diapers. In the photo you can see a variety of options for such cute and practical gifts.
Lesson 2: bouquet of diapers and vests
- Take the vest, fold both sleeves toward the center, and roll it up.
- We do the same with other children's things - we took handkerchiefs and towels. You can add diapers.
- We tie each roll with an elastic band.
- Making flowers: to do this, take several sheets of thin paper, paper handkerchiefs or mesh fabric. Lay each sheet neatly on top of each other and fold it like an accordion, making sure each flap is about 1.5cm wide. Fold the accordion in half.
- We fix it in the place where the fold is.
- Cut the corners of the paper/fabric.
- Fluff the “petals” a little.
- Staple.
- Take a towel (or blanket), wrap it with an elastic band, place “flowers” and baby clothes around it.
- Next, take the box and cover it with paper (so that it “overhangs” a little from the edges), place the bouquet in the center.
- We complete the decoration.
- Add the leaves and tie the box with ribbon.
Popular articles Wishes for May 9
Here are a few more photos for inspiration:
Share this article:
Similar to the diaper cake, you can also make a bouquet of diapers. This will also make a beautiful and original gift for a newborn. Or a one-year-old baby. The baby's parents will thank you heartily for such a necessary and creative gift.
- a pack of diapers (about 50 pieces)
- bottles, pacifiers, a tube of diaper cream, a bottle of baby shampoo that “doesn’t sting the eyes” and other things necessary for a newborn
- small items of clothing (which, similar to diapers, can also be easily rolled up in a small roll): vest, bodysuit, rompers, hats, socks, booties, etc.
- not a very deep vase with a large diameter. The depth of the vase should be such that the diaper rolled into a roll barely peeks out of it. Or so that the vase is slightly higher than the roll
- rubber bands for weaving (if you don’t have them, you can cut a pharmacy rubber glove into many of these rubber bands)
- multi-colored stationery erasers
- lace ribbons, satin ribbons, bows, soft toys, flowers, dolls, rattles
- wooden sticks (skewers) - 25 pieces, maybe a little more
- transparent wrapping paper
- decorative stickers
- scotch
When creating a bouquet of diapers, follow the design principles in accordance with the gender and age of the baby. So, in a bouquet for a boy, blue tones can predominate; there can be any toys, except dolls. In a bouquet for a girl, they usually add more pink tones; butterflies, flowers, dolls, more lace, and flowers are chosen as decorative elements. For a newborn, bouquets are made with pacifiers, bottles, rattles, booties, teethers and baby vests.
Car
A machine made from diapers, diapers and bottles is ideal as a gift for a boy. You can attach various gifts to the cardboard platform on which the machine will stand.
To work you will need:
- diapers, 60 pieces;
- cardboard and beautiful designer paper;
- ribbons;
- socks;
- two baby bottles;
- diapers;
- knife;
- scotch;
- stationery erasers;
- cardboard.
- First you need to make wheels for the car. To do this, you need to lay the diapers on top of each other and roll them into a tight roll, securing them with an elastic band. For one wheel of the car you will need eight diapers. This can be done another way. You can twist each diaper separately and then combine them into one.
- When the car wheels are ready, you need to wrap the cardboard with beautiful paper. You will need two pieces of cardboard of different sizes. One will serve as a platform for the craft, and the other smaller one will serve as the bottom of the car.
- Then you need to put a smaller piece of cardboard in the middle of the larger one. You will need to make holes in the places where the wheels will be in both pieces of cardboard so that they can be fastened together later.
- After this, tapes of different widths need to be inserted into the holes of the large piece to secure the wheels. And then you need to thread them into a small piece of cardboard.
- You need to insert wheels between the tapes and securely fasten them to the top of a small piece of cardboard.
- Place diapers on the resulting chassis. At the front you need to create a radiator grill by placing diapers.
- Next make the headlights. To do this, insert bottles into the structure among the diapers so that the bright caps of the bottles look out from the front of the car on the sides, like headlights.
- The second and third row of diapers can be placed in any order and covered with a diaper.
- You need to make a car hood from a diaper of a different color, placing it in the center in the form of a rectangle.
- Now you need to make the car cabin. To do this, you need to lay out the next layer of diapers so that the cabin takes on its shape. After this, cover everything with a diaper.
- Then you need to make a car bumper. Another diaper needs to be twisted and tied with ribbons.
- In order to make mirrors for a car, you need to insert folded napkins into the socks and then secure them.
The gift is ready. Now you can wrap the car in transparent cellophane and tie it with a beautiful ribbon.
Progress
In order to make such an original “cake”, you need to roll all the diapers into a “roll” and secure them with elastic bands for money so that they do not unfold. After this, the baby blanket is rolled into a narrow strip, after which a “roll” is made from it, into which a bottle is inserted. The container will serve as a reliable support. For stability, the entire structure is tied with a linen elastic band. Pre-folded diapers are distributed around the blanket and fastened again. The first tier is ready. This way you can create amazing gifts from diapers. How to make the second tier and decorate the cake is described below.
The prepared blank is placed on a base, which is cut out of cardboard according to the diameter of the future cake. The base is decorated in different ways: painted, pasted over, decorated or sheathed. It all depends on the flight of fancy. A second tier of folded diapers, tied with an elastic band, is placed on the first one. The “cake” is ready, all that remains is to decorate.
Basket with diapers
You can make more than just cakes from diapers. A diaper basket filled with little things necessary for the first year of a baby’s life looks very impressive. For the craft you need to prepare the following materials:
- 30 diapers;
- two ribbons;
- cardboard;
- rattles;
- two pairs of socks;
- light suit;
- bibs;
- bottles with nipples;
- tubes with cream;
- soap.
A circle is cut out of cardboard with the same diameter as the basket. The diapers are straightened and folded into a circle according to the domino principle, secured with money elastic bands in 4 places. There should be an empty space inside, which is filled with two diapers. The sides are carefully attached to a cardboard stand - it will act as the bottom.
A narrow strip is made of cardboard, wrapped in open diapers, and secured on top with white thread. The finished handle is attached to the basket itself with rubber bands or using wooden skewers. The entire product is wrapped in corrugated paper or light organza, the handle is decorated with ribbon, and a bow is tied at the end. The basket itself is wrapped with the same material.