We make the fan ourselves
If you are a creative person and want to show your imagination, make a wall fan with your own hands. To do this, stock up on the necessary materials:
- paper or fabric;
- wooden skewers;
- materials for decoration;
- threads, needles;
- glue.
If you have decided on the size and color of the fan, it's time to get to work. Cut out a blank from the base material, fold it like an accordion, smoothing the folds, and secure the edges with wooden skewers. Threads and needles are needed to connect the ends of the fan. With the help of decor, you can decorate the fan as you want; for this you need a glue gun and a variety of ribbons, rhinestones, beads, and braid. The handle can be made from cardboard, plywood and glued using super glue on both sides. Once your piece is ready, secure the fan with the fan facing up.
DIY wall fan: master class
The fan can be used to decorate the interior of a room by placing it on the wall. Currently, it has lost its purpose, but can become an original interior detail. It will look harmonious in a room decorated in Japanese or Chinese style.
To make a fan for the wall with your own hands you will need: wooden skewers, fabric or paper, universal thread, sewing supplies.
At the beginning of work, it is necessary to determine the size and shape of the product.
Fold the material into an accordion shape. Folds can be of any width. It depends on your imagination and preferences. When using fabric, each fold must be smoothed out.
Fix the extreme folds with wooden skewers and connect them together with threads.
Next, decorate using ribbons, beads, rhinestones, artificial flowers, which can be secured with a glue gun or universal glue.
According to ancient Chinese teachings , the attribute should not be placed with the fan down or to the side, as this disrupts the movement of energy flows.
You can create an original composition using several objects of the same or different sizes.
A fan on the wall can be placed next to a Japanese or Chinese style painting.
It will be useful: How to install louvered doors in a niche
Paper fan
A fan is the most common paper craft. Making a paper fan is quite simple, but there are some subtleties.
Fold an ordinary sheet of double-sided colored A4 paper in half along the transverse line. Open the sheet, bend each edge to the center line. Open it again and there are three folds.
Fold the edge closest to you to the first marked line - another fold is formed. Unfold and fold the same edge to the far (upper) marked line. This is the next fold. Do all these steps with the opposite edge of the sheet.
Open the workpiece and turn it over with the folds facing up. Fold the edge of the sheet closest to you to the first convex fold.
Grab the first convex fold and fold it to the second. Continue folding the paper like an accordion, grabbing each convex fold and folding it to the next one. Fold the last convex fold to the edge of the sheet.
Now fold the resulting accordion in half, first bending one free edge. Bend the accordion so that the bent edge is inside the bent accordion (does not bend around it from above). Fold the corners of the bent edge - bend the upper corners together downwards, and the lower ones upwards.
Fold the bent edge with the folded corners into the middle of the accordion. Unfold the fan and hide the part with the bent corners inside. Use your fingers to press the folds well. To uncover. Your DIY paper fan is ready!
Kinds
It is difficult to say when fans first appeared. They are known in different countries and cultures. A fan can be any object that is designed to fan oneself or others with wind currents.
In hot countries, slaves stood above their rulers and constantly waved huge structures on a long handle over them. In medieval Europe, every young lady had a whole collection of hand fans of different colors and configurations. Some of them were even decorated with precious stones.
But most of the varieties appeared in Japan, where there was no shortage of paper - the basis for the fan. Here we know both the beam designs that are familiar to us, and products made entirely of paper, on a handle, which when unfolded resemble a leaf of a tree, and when folded they are completely hidden in the handle.
There is also a non-folding fan made of paper and other dense materials. It is also attached to a handle, to which a strap is attached to make it more convenient to carry. Such a fan is decorated with paintings of scenes from everyday life, religion, or landscapes of Japanese nature, which have features characteristic of this culture.
Fans made of paper for decoration. Application options
If you think that a paper fan will not fit into your apartment, then you are mistaken. There are several options for using it, one of which will definitely suit you.
- Wall decor. A paper fan on the wall can often be found in apartments with oriental-style interiors. If any of the walls in your apartment seem empty to you, then a spectacular composition of paper fans can easily correct this situation. Typically, photo frames, paintings, clocks, photo wallpapers, etc. are used for wall decoration. Beautiful colored fans of different diameters will look unusual and will bring a little oriental energy into your home. The advantage of such a decorative element is that it can be made in any color that will perfectly match the color of your walls.
- Children's party decor. On the eve of an important holiday for a child, many parents begin to look for ideas for decorating an apartment. Most often they choose traditional garlands and posters. But believe me, the child will like bright and unusual paper fans for holiday decorations just as much. If you make fans yourself, you can decorate them with images of your favorite characters from cartoons or fairy tales.
- Decor for a window or space above the bed. If you hang paper fans on a thread, they can be used as a garland. You can decorate a window with fans or simply hang them from the ceiling above the bed or in the center of the room.
- Wedding celebration decor. If you don’t want to spend money on ready-made wedding decorations, you can easily make them yourself. Choose paper of delicate colors that match each other and make fans out of them. With their help, you can decorate an area for photographs, an arch for newlyweds, decorate the ceiling at the place of celebration, etc.
- Photo zone decor. A composition of bright and rich fans will be a wonderful backdrop for a photo shoot. You can make such original decor in an oriental style quickly and inexpensively.
From plastic forks
Materials and tools:
- disposable forks - odd number (from 19 pieces);
- wide lace - 1 meter;
- decorative elements (rhinestones, feathers, satin ribbons);
- white cardboard;
- corrugated cardboard;
- CD;
- cup;
- Super glue;
- pencil;
- scissors.
Master Class:
- Trace a disk on a sheet of cardboard, cut it out, and divide it exactly in half.
- On a sheet of corrugated paper, outline the neck of the glass, cut out the resulting circle and divide it in half along the diameter.
- Glue a small one to the large semicircle, aligning them along the cut edges.
- Insert plastic forks into the holes of the corrugated paper until they stop, gluing them to the main semicircle, trying to ensure that the teeth of adjacent forks touch (only an odd number is required).
- Glue the second large semicircle on top of the corrugated cardboard on the workpiece.
- Glue a satin ribbon to one edge of the fan and weave it between the forks. Continue weaving until the teeth are reached, then secure the ribbon at the edge and glue.
- Glue a decorative feather to each fork.
- Cover the attachment point with openwork tape.
- Glue velvet and a ribbon flower onto a cardboard handle.
What materials and tools are needed for the job?
The choice of materials depends on where and how the finished product will be used. If this is an accessory worn by a lady, then a more durable structure that can be folded is needed.
To make this option you will need wooden sticks or long skewers. For simpler models, cocktail straws can be used. The same set of basic materials is necessary if it is to decorate the interior. But in addition to the frame, it is important to think about the foundation. Usually these are good quality textiles.
When choosing fabric, you should pay attention to the color and print. It is advisable to select red fabrics with gold monograms.
To make the simplest options, paper or cardboard is used. Additionally, in each case you need a glue gun, scissors, a pencil with a ruler, and decorative attributes.
How to make a fan vale
A vale is a fan to which a cloth is attached, which flutters spectacularly when performing an oriental dance.
To make a fan with your own hands, you will need a ready-made folding fan with a screen made of thick fabric. Scissors, glue gun or glue, silk fabric.
Before making veil, you should measure the fabric, adding an additional 2-3 centimeters on each side. It is necessary that the canvas protrudes beyond the base. The length of the canvas can be arbitrary from 50 centimeters to two meters.
Then apply glue to all hard parts of the base.
Fasten the fabric to the table and place the fan on the fabric. The ribs of the fan should be applied one at a time, without straining the fabric too much. It is important that the fabric is free when opened. If the tension is tight, it will quickly tear, and the Veil will become unusable.
Leave the finished product for 24 hours to dry completely.
Finally , it is necessary to cut off the part of the base on which glue was not applied. To do this, mark the back side of the product between the plates and cut off the part using a stationery knife. If necessary, glue the fabric.
How to make a Japanese fan with your own hands: step-by-step instructions
There are several options regarding how to make a fan. In this case, different materials and techniques are used. Some schemes are quite complex, while others can be handled even by a small child.
From cardboard
Using just 1 sheet of double-sided cardboard and a stapler, you can make the most primitive version of a fan. At the same time, the design is very functional - the body folds and unfolds at the right time. If necessary, you can think about decoration.
The principle of making a cardboard fan in the Japanese style:
- Fold the cardboard sheet into a small accordion.
- Secure the base of one of the ends with a stapler.
- If desired, decorate with elements made of colored paper using the applique technique.
The material is quite easy to process, so a child in the preparatory group of a kindergarten can also make and use a ready-made model.
From fabric
It is not difficult to make a fabric product, but it looks very attractive. This craft can be used to decorate the interior of a room or as an accessory. For work you will need the following tools and materials:
- interlining;
- textile;
- PVA glue;
- glue gun;
- wooden sticks;
- wire;
- stationery needle;
- compass and scissors;
- pencil and ruler.
Master class on making a textile fan:
1. On one side of each stick, using a ruler and pencil, measure the same distance - approximately 3 cm.
2. Using a stationery needle, make a hole at each marked point.
We recommend reading: How to make a paper ball: photos of the best options for making a paper ball
3. Fold the wooden elements, matching all the resulting holes. Thread a piece of wire through the holes and secure with a loop on both sides. The frame for the fabric base is ready.
4. Cut a rectangle from non-woven fabric. You first need to try on the frame on the base, since the figure should be approximately 2 times larger. Using a compass, draw a semicircle (diameter 5-10 cm) from the middle of the larger side. cut the workpiece.
5. Lay out the non-woven rectangle on a flat surface. Open the frame and attach it to the workpiece. Pre-place each stick in its place. Make notes with a simple pencil on the non-woven fabric. Also mark the edges of the fabric on the sticks.
6. Next, grease each stick to the bottom mark with PVA glue. This must be done evenly and carefully. It's better to use a brush. Glue each stick to the non-woven fabric in its designated place. Trim the excess part of the base at a distance of 5 cm from the edge of the sticks.
7. The fabric base is prepared according to the same principle as non-woven fabric. Cut a semicircle at the base of the textile rectangle.
8. Grease the other side of the wooden sticks with glue. The next step will be fixing the sticks on a fabric base.
9. Trim off excess fabric and interlining at the top. Now you can make a cut close to the sticks.
10. Fold the outer strips from the non-woven side and use a glue gun to bend and glue them to the wooden bases.
Attach a tassel to the wire for decoration and functionality. Thanks to this arrangement, the product is easier to hold in your hand.
This version of the fan can be used in different areas. The design is quite strong and will withstand mechanical stress.
From paper
The easiest way to make a fan is in origami style. To create this option you need the following devices:
- 3 sheets of paper of different colors;
- scissors;
- hole puncher;
- glue;
- ribbon.
Algorithm for how to make a paper fan with your own hands:
- Leave the first sheet unchanged. Reduce the second by cutting a strip 3 cm wide, from the third even more - 6 cm.
- The smallest leaf needs to be processed using a hole punch. Cut the edges of the second into fringe with scissors, and leave the largest one unchanged.
- Place the sheets on top of each other. Fold like an accordion.
- Determine the center of the workpiece. Tie the ribbon into a knot.
- Glue the central strips together.
Spread the fan. Correct all tiers in accordance with the compositional solution.
From scrap materials: forks
To make a Japanese-style accessory, you can use a variety of available materials. Thanks to the thoughtful combination of all the components, you can get a beautiful craft.
To make an item from improvised materials you need the following:
- glue gun;
- satin ribbons of the same thickness;
- wide lace ribbon;
- scissors;
- disposable forks;
- old disk.
Making such a fan is quite simple:
1. divide the disk by diameter and cut in half. Place disposable forks along the workpiece. To do this, you should use a glue gun.
2. Turn the workpiece over so that the disc faces the reflective surface. Thread a lace ribbon through the tines of the forks. Glue the edges of the textile element to the forks.
3. At the base, namely near the disk, satin ribbons are fixed in tiers according to the same principle as lace.
Glue the ribbons to the outer “legs of the forks”. The decorative version of the product is completely ready.
How to make a Chinese fan
Fans have long been used in China. They were made from paper, feathers, palm leaves and silk fabric. The first fans were made from feathers. They were attached to a wooden handle. Embroidery, calligraphy, and various pictures were used for decoration. Craftsmen made them in round and oval shapes.
Making a simple Chinese fan with your own hands is not at all difficult.
- To do this, you need to cut out a rectangular piece from decorative paper. The length of the part should be five times the width.
- Fold the paper blank into an accordion shape and glue wooden sticks to it. You can use disposable medical spatulas, leaving 7 centimeters on each side for the handle.
- Give the accessory shape. To do this, stretch the workpiece and connect it on one side, giving it a semicircular shape or open it until you get a circle.
- Next, decorate the finished product.
Fan made of fabric or feathers
Fans made from feathers look much more impressive than modest paper fans, and fabric accessories look more elegant. To create such fans with your own hands, master classes will be very useful.
From plastic forks
A variety of materials are used to make fans. For example, an original fan can be assembled from ordinary plastic forks. And to do this, you will need the following tools and materials:
- 19 disposable forks (you can take more, but be sure to have an odd number);
- lace 1 meter wide;
- feathers;
- satin ribbons;
- rhinestones;
- openwork ribbon;
- corrugated cardboard;
- old disk;
- heat gun;
- white cardboard;
- cup;
- a simple pencil;
- scissors.
The materials for the product must be selected so that the colors are harmoniously combined. Stages of work:
- On white cardboard, draw a disc with a pencil, draw a line in the center of the resulting circle and cut out two semicircles.
- We trace the neck of the glass on corrugated cardboard and cut out a circle, after which we cut it in half.
- Glue a small semicircle to a semicircle of white cardboard, carefully aligning them along the cut edges.
- We insert the forks into the corrugated paper and attach them to the large semicircle with glue. The forks should be positioned so that their tops touch each other.
- The second piece of white cardboard needs to be glued on top of a semicircle of corrugated paper.
- We take a satin ribbon and attach it to the top of the outer fork. Next, we intertwine the ribbon between the tines of all forks and glue it on the other edge.
- We glue a feather to each of the forks on top, and cover the attachment point with an openwork ribbon.
- We glue a corresponding piece of velvet onto the cardboard semicircle from below, and a flower made from ribbons on top.
Fabric fan
A fabric fan can be used as a prop for performances or as an unusual accessory. To make a fan with your own hands from fabric, you will need the following materials:
- 23 wooden sticks with holes at the bottom;
- scissors;
- glue gun;
- paper;
- compass;
- scissors;
- blue paper or tape;
- blue and pink floss threads;
- blue fabric;
- needle.
Wooden sticks for the craft can be taken from an old fan, and the fabric is not too thick.
If you don’t have old sticks, you can cut them out of plywood.
The size of the part is 40x1 cm. The parts need to be stacked and a hole for the thread should be made at a distance of 1 cm from the edge. Manufacturing procedure:
- We take wooden sticks, stack them and thread a pink thread through the hole. After this, we wrap the thread around them from below several times in a circle so that they hold better.
- We fan out the sticks so that they are at the same distance from each other and apply them to the paper. We outline them with a pencil.
- In the resulting semicircle, draw a small semicircle with a radius of 10 cm and cut it out.
- Using the template, cut out the piece from the fabric.
- We apply the fabric to the unfolded sticks and glue its edge to the lowest strip in the fan. After this, the fabric part needs to be glued to the rest of the sticks from below, and completely to the last strip.
- The top of the sticks should be sewn to the fabric with blue thread. You can sew blue tape onto the edges of the fabric to hide uneven cuts.
- After the glue has dried, the fan can be folded.
Chinese method
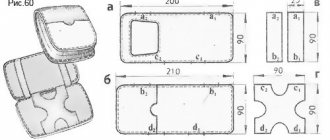
China can be called the birthplace of the fan. It appeared there in ancient times and was made from different materials: lotus, reed, feathers. A little later, thanks to the Japanese, folding fans appeared in China. You can try to make just such a fan yourself. For this you will need:
- From plywood we cut out 13 parts numbered 1 in diagram A and two parts numbered 2. The dimensions of the parts are indicated in the figure.
- We put the parts together, and place the wider ones along the edges.
- At a distance of 2.8 cm from the bottom of the planks, we make a hole in them and insert a bolt.
- Based on the shape and dimensions in diagram B, we cut out the desired part from the fabric.
- We open the planks in a semicircle so that they are at the same distance.
- We completely cover the left bar with fabric. We glue all other parts to the fabric only with the bottom side.
"Fork" fan
A DIY fork fan is a completely unusual solution!
You will need:
- An odd number of disposable plastic forks (23-25 pieces).
- Self-adhesive foam board. Can be replaced with regular one.
- A scrap of satin fabric in your favorite color.
- Decorative lace with scalloped edge 4 cm wide.
- Wide transparent lace to decorate the base.
- A compass (if you don’t have a compass in the house, an ordinary faceted glass and a CD will serve as a replacement), a simple pencil and scissors.
- Transparent strong glue (“Moment Crystal”) or a glue gun.
- Satin roses of different sizes and rhinestones for decoration.
- Two or three satin ribbons of different colors with a width of 1.5 to 3 cm (optional).
Fan base
Using a compass, draw a circle with a radius of 6 cm on the self-adhesive foam board, or outline a CD. Cut out a circle and cut in half.
We recommend reading: How to decorate a room with your own hands - do-it-yourself room decor, ideas for decorating a room: how you can decorate a house, a room
Remove the backing protecting the adhesive side. Place each half with the adhesive side on a piece of satin, press, level, gluing the fabric well. Trim the fabric along the edge of the cardboard. Lightly melt the edges with a lighter.
Lay wide transparent lace, gluing it, on top of the satin with scallops down, releasing them beyond the straight edge of the semicircle. Fold the vertical edges of the lace inside out and glue.
Draw a circle of a smaller diameter on the cardboard - with a radius of 3.5 cm, or outline the top of the glass. Cut and cut in half too.
Turn the large semicircle with the wrong side facing you and stick a small semicircle on it, aligning the centers of the semicircles. The small semicircle will act as a limiter.
Frame
Glue the forks to the base, tines up, one after the other. The fork rods should rest against the border of the small semicircle. The tines of the forks should touch - the sides of the tines can be immediately glued to each other.
Advice! The fork stems can be completely wrapped in satin ribbon, gluing it along the way and fusing the ends.
Glue the second cardboard semicircle face up, covering the structure.
Decor
Carefully thread a colored ribbon 1.1-3 cm wide between the fork rods. It’s better to start from the bottom, melting the end and securing it with glue. At the end, glue the edge of the tape. As the tape moves, also grab it with drops of glue.
Then place a second row of tape between the rods. Let each row go in the opposite direction. There can be two or more rows - right up to the beginning of the teeth.
Pass the wide lace between the tines of the forks, securing it with glue and directing the scallops upward. Melt the ends of the lace and glue them. To make the frame of the fan more romantic, you can glue another, more airy, transparent lace, laying it in folds.
It is good to glue an artificial rose into the base of each fork, for charm and to cover the folds. Rhinestones can be glued onto ribbons and lace, and the base of the fan can be decorated with roses.
As you can see in the photo, this fan is quite beautiful. Such models can even be used in wedding decorations.
Varieties of fans
Who said you can't cool down on hot days without air conditioning or a fan?
An ordinary fan can cope with this task perfectly. At the height of summer, it can be purchased at any accessory store or even at a kiosk. Despite the abundance of this summer accessory, it is a mistake to believe that they have the same structure, because their variety is simply amazing. This is an ordinary paper fan, an element of home decor, and a classic Japanese (Chinese) fan, which we are accustomed to seeing on store shelves, as well as a fan used in fiery dances, and even a fan.
Master class from A to Z
Do you think that making a fan with your own hands is labor-intensive? No matter how it is, thanks to a detailed master class you will be able to make this stylish accessory in a matter of hours. And as a result, you will receive an original product, unlike others.
Stylish paper accessory
A fan made of paper is very easy to make and no less beautiful than its more expensive counterparts. If you don’t know how to make a paper fan with your own hands, then pay attention to this simple master class on how to make it. To make a stylish accessory out of paper, you will need:
- Thick paper (preferably colored).
- Cardboard.
- Ruler.
- Glue.
- Scissors.
- Awl.
- Pencil.
- Scotch.
- Decorative cord - 30 cm.
- Large beads - 2 pcs.
Vale for dancing
A whale is a type of cloth fan used in dance. To make a veil fan with your own hands, you will need the following materials:
- folding fan made of thick fabric;
- heat gun;
- scissors;
- silk fabric.
Before you start creating a veil, you need to measure the required length of fabric. It can range from 50 cm to 2 meters. And the width of the fabric should match the width of the existing fan.
Glue must be applied to the hard parts of the base. Next, you should fix the piece of fabric on the table and start gluing the edges of the base one by one. Do not stretch the fabric too much. It must fold freely, otherwise it will quickly tear.
The finished product must be left for a day for the glue to dry. After this, you need to get rid of that part of the base on which glue was not applied. To do this, carefully cut off unnecessary tissue from the back side of the veil between the ribs.
There are quite a few ways to make a fan at home: from the simplest, which even a child can easily handle, to more complex, which will require certain skills. All you need to do is choose the one that suits you and get to work.
"Heart" decor
For Valentine's Day, you can make your own paper decor for your home using the main symbol - hearts.
Garland of hearts
For a voluminous garland, you need to cut out a lot of hearts from colored paper (you can take bright scrapbook paper with a floral pattern). Fold them 2-3 together, sew them in the center with a strong thread, leaving 30-40 centimeters between the elements. Carefully bend the “petals”, giving the hearts volume. Having prepared several of these threads, attach them to the ceiling or doorway in the form of a curtain.
You can make the garland even more interesting if you take blanks of different sizes and fold them in this way: smallest - medium - large - medium - smallest. Further steps are the same: sew, bend, hang.
DIY paper decor
Decor idea with paper products
Using the quilling technique you can make a bright and unusual garland. You will need scrapbook paper with a floral pattern, bright buttons and glue. To work with scrap paper, it is better to take “Moment” or “Titan”. They will not turn yellow over time. Glue two strips on each side to a small strip of paper (10*2 cm). Bend them one by one and glue the edges. You will get a heart, which can be additionally decorated with bright buttons. All that remains is to attach the hearts to the thread and hang the garland.
"Flower" heart
You will need regular paper napkins and cardboard.
From thick corrugated cardboard (unnecessary boxes), cut out two heart-shaped blanks. Connect them together using a strip of thick cardboard (its width should correspond to the desired thickness of the decorative element). It turns out to be a voluminous heart.
Fold napkins measuring 20*20 cm (without unfolding) in four to form a square with sides 5*5 cm. Staple the layers in the center and cut out a circle. Layer by layer, peel back the petals of the paper flower. The result is a delicate rose. Having made many of these flowers, attach them to a cardboard “heart” blank. A spectacular result will be obtained if you take napkins of a delicate pink color or two colors - white and pink. The result will not leave your “other half” indifferent - a tender heart will decorate the room.
"Love tree"
It’s very simple to make – place several branches in a beautiful transparent vase. Cut out several hearts from red, pink, white paper (you can make them voluminous, like for a garland), hang them on the branches. You can add thin beads
Fire show. Props part 4.
And so we continue. I wrote about poi, staffs, it’s time for beauty. namely fans. Fans for me are the embodiment of grace and beauty.
Before writing this post, fans differed for me in size (the way of working with them), the number of rays, and appearance. However, just posting 3-5 photos of different fans and saying: “I did it” didn’t seem enough to me, I started looking for information and discovered the following thing:
People describing fans divide them not into “spin” and “choreographic”, but into Russian and American. Here's a quote: Traditionally, there are two main types of designs: American and Russian fans. In addition, there are many non-standard designs (folding fans, giant-sized fans and elaborate designs) used mainly for performance purposes rather than for performing tricks. Today, fans of both designs are used everywhere and are no longer localized to any particular country.
Ok, American fans or spiders
American fans, also called “spiders” or “khaos” (after the name of the store), have relatively small sizes (30 – 40 cm), 4 knitting needles topped with wicks, and a small ring (3 – 5 cm in diameter). They often have additional small rings of unknown purpose.
Russian fans, on the contrary, are large in size (more than 35 cm), from five to seven spokes and a ring with a diameter comparable to the width of the palm. Sometimes, just like the American ones, they have an add-on to the ring called a “stopper”, which, however, has more opponents than supporters.
Accordingly, there are two schools:
The American school involves the rotation of fans on one or more fingers, while rotation as such is used relatively rarely, but on the contrary, there is an artistic movement of fans in such a way that various geometric shapes and effects are obtained. Hence the common name for this technique is “geometry”. The tricks themselves are superficially similar to similar elements performed with double staffs and manipulations with a pair of clubs. Such elements are described by the theory of the relative positions of fans. Typical representatives of the American school of fans are such artists as Grimm Zimmer, Corey White, Memory Lena, Ellie Sorokin and others.
The Russian school, on the contrary, involves rotating the fans around the hand in such a way that the fans are in constant motion. At the same time, the tricks performed are often similar to elements with poi. In addition, juggling with two (less often three) fans is widely used. In Russian technique, grips and methods of changing them play a significant role. Typical representatives of the Russian school of fans are such artists as Anna Pevnitskaya (Anika), Alina Pavlova (Alinka-Murka), Rem, Ksenia Falkova and others.
There are spin fans (fans designed for almost constant rotation), they are not large, and the wick is also not large (3-6 cm). Almost all elements are transferred from food.
There are choreographic ones. These animals don't care what size they are. Yes, at least for example
In general, I don’t care about the size (the main thing is that you can hold it in your hands), the number and size of wicks too (the longer the knitting needle, the longer you can cut the wick and not burn the participants), this is where the differences probably end, but as always there are aesthetic background.
People really like the so-called “lotus” fans, look at them
But not everything is so bad in the minds of fire props crafters; there are also such interesting models:
Source
New Year's compositions
Everyone knows how to make openwork snowflakes from a paper napkin. Window decor can be made even more diverse. Elements of the composition are cut out of white paper using stencils - forest, houses, deer and Santa Claus's sleigh. You can come up with many stories.
These elements are placed on the window (you can glue them using paste made from flour or starch). If you want to create a completely magical atmosphere on New Year’s Eve, you can place small light sources nearby. They will shine through paper and glass, creating an unusual effect.
To make the interior beautiful, make the composition three-dimensional by cutting out another one of the same size and placing the lighting between the layers of paper. Add glitter to the interior arrangement.
You can make voluminous Christmas tree cones from paper, decorating them to your liking, or Christmas wreaths. They will create a festive atmosphere in your home.
A wedding, birthday, New Year, and just a desire to do something unusual with your own hands are a good reason to pick up paper. With its help you can do the following things.
- Unusual curtains for the doorway - from long, triangular-shaped multi-colored ribbons, twisting them into a “tube”, starting from the wide side. The finished elements are strung on threads and attached to the opening. Such curtains can be made from colored pages of glossy magazines.
- Panel - laying out its elements from paper strips.
- Volumetric letters – having made a blank like a volumetric heart, you can cover them with scrap paper and decorate them with additional elements.
Show your imagination and come up with your own “paper” room. With such decorative items that keep the warmth of your hands, your home will become even more comfortable and filled with love.